no reproduction in any form of this manual, in whole...
TRANSCRIPT

AF Fisheye-Nikkor
f 2.8 D16mm
Instruction ManualManuel d,utilisationManual de instrucciones
Bedienungsanleitung
使用説明書 JpEnDeFrEsCkCh
No reproduction in any form of this manual, inwhole or in part (except for brief quotation in criticalarticles or reviews), may be made without writtenauthorization from NIKON CORPORATION.
使用説明書の内容が破損などによって判読できなくなったときは、
当社サービス機関にて新しい使用説明書をお求めください。(有償)
FUJI BLDG.,2-3, MARUNOUCHI 3-CHOME,CHIYODA-KU, TOKYO 100-8331, JAPAN
スミ
Printed in Japan ●HB7L10(70)7MAA4770-10▲

各部の名称
①レンズ鏡筒
②最小絞りロックレバー
③フード
④距離目盛
⑤距離目盛基準線/
絞り指標/着脱指標*
⑥赤外指標
⑦距離目盛窓
⑧フォーカスリング
⑨絞り目盛
⑩開放F値連動ガイド
⑪ファインダー内直読用絞り目盛
⑫ CPU信号接点
⑬被写界深度目盛
⑭露出計連動ガイド
⑮絞りリング
はじめに このたびは、ニッコールレンズをお買い上げいただきありがとうございます。ご使用の前に以下の「安全上のご注意」及び製品の使用説明書をよくお読みのうえ、十分に理解してから正しくお使いください。お読みになった後は、お使いになる方がいつでも見られる所に必ず保管してください。なお、カメラ本体の使用説明書に記載されている「安全上のご注意」も併せてお読みください。
「安全上のご注意」 ●分解したり修理・改造をしないでください。 ●使用しないときは、レンズにキャップをつけるか太陽光の当たらない所に保管してください。
このレンズは、ニコンの AF〔オートフォーカス(ニコンF3AFは
除く)〕カメラとの組み合わせではオートフォーカス撮影が可能で、
マニュアル(手動)によるピント合わせも行えます。
さらに被写体までの距離情報をカメラボディ側に伝達する機能
を備え、3D測光機能を持ったカメラとの組み合わせ時により的
確な露出制御を実現する3D‐マルチパターン測光・3D‐マルチ
BL調光を可能とします。他のニッコール魚眼レンズに比べこの
レンズは、ニコン独自の近距離補正方式を採用し、対角線方向
に180°の画角を持ち、魚眼レンズ特有の効果が得られる一般
撮影用レンズとして設計されたもので、通常レンズと同じくフ
ィルム画像一杯に撮影できます。カラーバランスも優れた自然
な色再現を行ない最短撮影距離は0.25mです。
なおフィルターは、常時使用するL37Cと他にO56、A2、B2の3
種類が用意され、バヨネット式で簡単に交換できます。撮影す
るときには必ず1枚装着してご使用ください。
注記 ・下記のアクセサリーは、直接このレンズに取り付けないでく
ださい。
オート接写リングPK-1、PK-11、K1リング、オートリング
BR-4、BR-2、K2
(なお、PK-11の代わりには PK-11A、オートリングBR-4
には BR-6、BR-2 には BR-2Aをご使用ください。)
・DX-1ファインダー(ニコンF3AF 用)と組み合わせてのご使用
はできません。
3 4 5
ピント合わせ
ニコンAF(オートフォーカス)カメラをご使用の場合は、オー
トフォーカスでピント合わせを行なうことができますが、マニ
ュアルでピント合わせを行なう場合は、ファインダー内のスク
リーン上の像が鮮明になるまでフォーカスリングを回します。 ファインダースクリーンとの組み合わせ(24ページ参照)
ニコン F6、 F5、F4、 F3 シリーズカメラボディには多種類の
ファインダースクリーンがあります。レンズのタイプや撮影
条件に合わせてご使用ください。
(なお、ご使用に際しては必ず各カメラの使用説明書を併せて
ご参照ください。) フィルターについて
このレンズにはL37C(紫外線フィルター)と A2、B2、O56の4
枚が付属されてます。撮影条件に合わせてご使用ください。
フィルターの取り付け、取り外し
フィルターの取り付けは、フィルター枠の丸指標を、レンズバ
ヨネット部の着脱ピン溝に併せて静かに押し込んで、そのま
ま時計方向へ止るまで回します。
フィルターの取り外しは、フィルターを反時計方向へ回して
ください。
レンズ後部バヨネット式ですので、簡単に交換できますが、
1枚は必ず常時付けておいてください。
なお、TTL露出計付きカメラでは、レンズを通過した光を測光
しますので、露出補正の必要はありません。TTL露出計付きで
ないカメラの場合は、下表を参照して露出補正をしてください。
最小絞りロックレバー(図A参照)
プログラム撮影時や、シャッター優先による撮影時は、絞りリ
ングを最小絞り目盛で固定しておけます。ロック方法は、絞り
リングを回転させ、最小絞り目盛の(22)を絞り指標(白色)に合
わせます。次に最小絞りロックレバーを絞りリングの方向にス
ライドさせて行ないます。このとき最小絞りロックレバーの白
色の指標と鏡筒上のオレンジ色の線が合う位置まで確実にスラ
イドさせてください。ロックの解除は、ロックしたときと反対
方向にロックレバーをスライドさせてください。
フリルムの区分
白黒・カラー用
フィルターの種類 露出倍数
白黒用
カラー用
*( )内は絞りの段数を示します。
記号
L37C
A2
B2
O56
昼光
1
1.2(1/3)
1.2(1/3)
3.5(15/6)
タングステン光
1
1.2(1/3)
1.2(1/3)
2(1)

6 7
構図を決める際の注意(図B参照)
このレンズを使用して構図を決める際には、一般のレンズを使
用する場合よりもさらに注意が必要です。魚眼レンズは、広角
による歪みを生じるばかりでなく、限られた範囲内に像を写し
込むために、被写体のサイズがかなり誇張されます。中央に近
い被写体は、周辺部の被写体に比べて大きく見え、歪みが小さ
くなっています。全視野が遠方に押しやられた感じで、被写体
の位置関係も変わってきます。また、カメラを少し動かしただ
けでもまったく違った画面が生れます。なお、撮影の際には、
三脚の脚部や、撮影者の手足など不要なものが画面に入らない
ようご注意ください。(図B参照)
レンズ取り扱い上のご注意
●レンズの清掃は、むやみに拭かないで、ホコリを拭う程度に
してください。万一指紋がついたときは、柔らかい清潔な木
綿のふきんに無水アルコール(エタノール)を少量湿らせ、中
心から外側へ渦巻状に、拭きムラ、拭き残りのないよう注意
して拭いてください。
●シンナーやベンジンなどの有機溶剤は絶対に使用しないでく
ださい。
●レンズをご使用にならないときは、レンズの前後に必ずレン
ズキャップをしておいてください。
●長期間レンズをお使いにならないときや保管の際には、カビま
たはサビを防ぐため、高温多湿の所や直射日光のあたる所、
またナフタリンや樟脳のある所は避けて、風通しのよい場所
に保管してください。
●このレンズは、外観の一部に強化プラスチックを使用してい
ますが、極端に温度が高くなると変形する場合があります。
ストーブの前等、高熱となる場所は避けてください。
アクセサリー
専用レンズキャップ 裏ぶた LF-1 バヨネットフィルター L37C、A2、B2、O56 フィルターケース CA-2
ソフトケース CL-0715
付属 別売りアクセサリー 焦 点 距 離
最大口径比
レンズ構成
画 各
距 離 目 盛
撮影距離情報
絞 り 目 盛
絞 り 方 式
測 光 方 式
マ ウ ン ト
フィルター
大 き さ
質量(重さ)
:16mm
:1:2.8
:5 群 8 枚
:180°
:∞~0.25m、1ft(併記)
:カメラボディへの撮影距離情報出力可能
:2.8~22 ファインダー内直読用絞り目盛併記
:自動絞り
:開放測光
:ニコン Fマウント
:L37C、O56、A2、B2 (後部バヨネット交換式)
:約63mm (最大径)x 57mm(長さ:バヨネット基
準面からレンズ先端まで)、全長約 68mm
:約290g
仕様
8 9
Nomenclature
Forward
Important!
Focusing
Recommended Focusing Screens
Using Filters Composing (Illust. B)Lens barrelMinimum aperture lock leverLens hoodDistance scaleLength index line/Aperture index/mounting index*Infrared compensation index(white dot)Distance scale window
Focus(ing)ringAperture scale Aperture indexing postAperture-direct-readout scaleCPUcontactsDepth-of-field sdaleMeter coupling ridgeAperture ring
Thank you for your kind patronage of Nikon.Before using your new lens, read the following carefully so you get the most out of your lens now and for years to come.Unlike other Nikkor fisheye lenses producing a circular image, the AF Fisheye-Nikkor 16mm f/2.8 D lens fills up the frame with an image. But it still possesses a 180° angle of view (as measured across the diagonal) and gives you the same exciting fisheye effects as regular fisheye lenses. Also, distance information used for 3D Matrix Metering or the 3D Multi- Sensor Balanced Fill-Flash will be transmitted instantly from the lens to the camera body.
• Be careful not to soil or damage the CPU contacts.• Do not attach the following accessories to the lens, as they might
damage the lens’ CPU contacts:Auto Extension Ring PK-1, Auto Extension Ring PK-11*, K1 Ring, Auto Ring BR-4**
• This lens cannot be used with AF Finder DX-1 attached to the Nikon F3AF camera.
*Use PK-11A instead.**Use BR-8 instead.
With the Nikon autofocus cameras, both autofocus and manual operations are possible. To focus manualy, rotate the focus ring until the image in the viewfinder appears sharp and crisp.
Various interchangeable focusing screens are available for Nikon cameras to suit any type of lens or picture-taking situation. Those which are recommened for use with your lens are listed on page 24.
As standard equipment, four rear-mounting bayonet-type filters (137C, A2, B2 and 056) are supplied with the AF Fisheye-Nikkor 16mm f/2.8 D lens. Because of the optical construction of this lens, it is necessary to keep a filter attached to the lens at all times.To exchange filter(1) Rotate the already-attached filter counterclockwise to remove.(2) To attach the filter, align the dot on the outside rim of the filter and the
groove beside the mounting pin on the lens bayonet, then rotate the filter clockwise.
With a non-TTL exposure meterExposure compensation is required. Refer to table below:
Using a fisheye lens requires much more e planning and thought about picture composition than does a conventional lens. The lens not only produces wide-angle distortion but it also exaggerates the relative size of objects to conform to its format: objects near the center are bigger than those at the edges, and they show less optical distortion. The entire field is pushed into the distance and spatial relations are transformed. and with a slight shift of the camera, quite new distortions are created. Be careful not to accidentally include in the picture unwanted ovjects, such as the legs of a tripod or the hands or feet of the photographer.
Lens Care• Clean lens surface with a blower brush. To remove dirt and smudges.
use a soft, clean cotton cloth or lens tissue moistened with ethanol (alcohol) or lens cleaner. Wipe in a circular motion from center to outer edge, taking care not to leave traces and not to touch the other lens parts.If you use ether in cleaning the lens, a smudge sometimes appears on the surface of a multi-coated lens. If this happens, wipe it again with a cotton cloth moistened with alcohol.
• Never use thinner or benzine to clean the lens.• Keep the lens cap in place whenever the lens is not in use.• If you will not use the lens for a long time, protect it from rust and mold
by storing it in a cool, dry place. Also, do not store in direct sunlight, and keep it away from naphthalene or camphor.
• Be careful not to get the lens wet or drop it in water. Water on the lens may cause malfunction.
• Reinforced plastic is used on the exterior of the lens unit; to avoid damage, take extra care to never leave the lens in an excessively hot place.
FilmFilter Compensation value (Filter factor)Type Designation Daylight Tungsten light
Ultraviolet L37CA2B2O56
11.2 (1/3)1.2 (1/3)
11.2 (1/3)1.2 (1/3)
3.5 (15/6) 2 (1)
Light AmberLight BlueOrenge
B/W and color film
B/W film only
Color film only
( ) = Exposure compensation in f/stops
Minimum Aperture Lock (Illust. A)For programmed auto or shutter-priority auto shooting, use the minimum aperture lock lever to lock the lens aparture at f/22.1. Set the lens to its minimum aperture (f/22).2. Slide lock lever in the direction of the aperture ring and so the white dot
on the lever aligns with the orenge dot.(See illust.A)
3. To release the lock, slide lever in reverse direction.

10 11
Accessories
Slip-on front lens capRear lens cap LF-1Bayonet-type filters (L37C, A2, B2, O56)Filter case CA-2
Flexible lens pouch CL-0715
Supplied Optional Focal length: 16mmMaximum aperture: f/2.8Lebs construction: 8 elements in 5groupsPicture angle: 180°Distance scale: Graduated in meters and feet from 0.25m (1 ft) to infinity
(∞)Distance information: Output into camera bodyAperture scale: f/2.8 to f/22 on both standard and aperture-direct-
readout scalesDiaphragm: Fully automaticExposure measurement: Via full-aperture methodMount: Nikon bayonet mountFilters: L37C, O56, A2 and B2 (Rear-attachment bayonet type)Dimensions: Approx. 63mm (2.5 inches) dia x 57mm (2.2 inches)
extension from the camera’s lens mounting flange; overall lengthis approx. 68mm (2.7 inches)
Weight: Approx. 290g(10.2oz)
NomenklaturObjektivtubusVerriegelung für kleinsteBlendeGegen lichtblendeEntfernungsskalaBrennweitenskala-indexlinie/Blendenindex/Montage-Index*Infrarot-KompensationsindexEntfernungsskalenfenster
EinstellringBlendenskalaAnschlag für BlendenkupplungSkala für direkteBlendenablesungCPU-KontakteSchärfentiefenskalaSteuerkurveBlendenring
Vorwort
Specifications Wichtig!
Vielen Dank für das Vertrauen, das Sie Nikon entgegenbringen. Bitte lesen Sie die folgende Besechreibung sorgfältig durch, damit Sie viele Jahre Ungetrübte Freude an diesem Objektiv haben.Ungleich anderen Nikkor-Fischaugobjektiven, die ein rundes Bild hervorbringen, füllt das AF Fisheye-Nikkor 16mm f/2,8 D den ganzen Sucherrahmen. Es hat dennoch einen 180°-Bildwinkel (in der Diagonale gemessen) und verschafft Ihnen dieselben anregenden Fischaug-Effekte wie ein normales Fischaugobjekiv.
Scharfeinstellung
• Die CPU - Kontakte unter Keinen Umständen Verschmutzen oder beschädigen.
• Folgendes Zubehör nicht an Objektiv anbringen, weil andernfalls die CPU-Kontakte veschädigt werden können.Automatic-Zwischenring PK-1, Automatik-Zwischenring PK-11*, Ring K1 und Automatik-Zwischenring BR-4**.
• Dieses Objektiv kann nicht verwendet werden, wenn der Autofokussucher DX an der Nikon F3AF angebracht ist.Stattdessen PK-11A verwenden. Stattdessen BR-6 verwenden.
***
In Verbindung mit einer Nikon-Autofokus-Kamera ist sowohi Autofokusbetrieb als auch manuelle Scharfeinstellung möglich. Zur manuellen Scharfeinstellung den Einstellring drehen, bis der Aufnahmegegenstand im Sucher scharf und deutlich erscheint.
Empfohlene EinstellscheibenFür Nikon-Kameras stehen verdchiedene, auswechselbare Einstelischeiben zur Verfügung, um jedem Objektiv und jeder Aufnahmesituation gerecht zu werden. Die zur Verwenduig mit fh lhrem Objektiv empfohlenen auf Seite 24.
12 13
Filter Verriegelung für kleinste Blende (Abb. A) ObjektivpflegeVier Bajonett-Filter (L37C, A2, B2 und O58) gehören zum Lieferumfang des AF Fisheye-Nikkor 16 mm f/2,8 D. Diese Filter werden hinten am Objektiv angebracht. Wegen der besonderen Konstruktion dieses Objektivs muß eines der Filter stets angebracht sein.Filterwechsel(1)Drehen Sie das angebrachte Filter im Gegenuhrzeigersinn, um es
abzunehmen. (2)Richten Sie den Punkt am äußeren Rand des neuen Filters mit der Nut
neben dem Montagestift des Objektivbajonetts aus, und drehen Sie das neue Filter im Uhrzeigersinn, um es sicher anzubringen.
Arbeiten mit einem Nicht-TTL-BelichtungsmesserIn einem solchen Fall ist eine Belichtungskorrektur eroforderlich. Richten Sie sich nach folgender Tabelle:
Verwenden Sie für Programmautomatik oder Blandenautomatik mit Zeitvorwahi den Hebel für Verriegelung der kleinsten Blende, um die Blende bei f/22 zu verriegein.1. Stellen Sie das Objektiv auf die kleinste Blende ein (f/22).2. Schieben Sie den Verriegelungshebel in die Richtung des Blendenrings,
so daß der weiße Punkt auf dem Hebel mit dem orangefarbenen Punktausgerichtet ist. (Siehe Abb. A)
3. Zur Freigabe der Verriegelung schieben Sie den Hebel in die umgekehrte Richtung.
Bildaufbau (Abb. B)Ein Fisheye-Objektiv erfordert viel mehr Überlegung betr. Bildaufbau als ein herkömmliches Objektiv. denn es weist nicht nur eine Weitwinkel- Verzeichnung auf, sondern vergrößert auch die Objekte, um das Bildformat auszufüllen. Objekte in der Bildmitte sind grösßer als jene am Rand und zeigen eine geringere optische Verzeichnung. Das ganze Bild hat eine in die Tiefe wirkende Perspektive und verändert räumliche Verhälthisse. Eine kleine Verschiebung der Kamera hat schon wieder ganz neue Verzeichnungen zur Folge. Achten Sie darauf, nicht unerwünschte Gegenstände, wie z,B. die Beine eines Stativs oder Lhre eigenen Hände oder Füsse auf dem Bild festzuhalten.
Technische DatenBrennweite: 16 mmLichtstärke: 1:2:8Optische Konstruktion: 8 Elemente in 5 GruppenBildwinkel: 180°Entfernungsskala: In Meter und Fuß von 0,25 m (1 ft) bis Unendlich (∞)Entfernungsdaten: Werden an Kametas übertragenBlendenskala: f/2.8 - f/22 auf der normalen und der Skala für direkte BlendenablesungBlendentyp: VollautomatischBelichtungsmessung: OffenblendenmessungObjektivfassung: Nikon-BajonettanschlußFilter: L37C, O56, A2 und B2 (Rückseiten-Bayonettanschluß)Abmessungen: ca. 63 mm Durchnesser x 57 mm Länge bis Montageflansch; Gesantlänge ca. 68 mmGewicht:: ca. 290 g
• Reinigen Sie die Linsenoberfläche zunächst mit einem Blasepinse. Benutzen Sie zur weitergehenden Reiingung ein mit renem Alkkohol befeuchtetes weiches und sauneres Bauberes Baumwolltuch bzw Linsenreinigungspaier. Wischen Sie dabei in einer größer werdenden Kreisbewegung von innen nach außen.
• Zum Reinigen des Objektivs unter Keinen Umsänden Verdünner oder Benzin verwenden.
• Bei Nichtbenuzung sollte der Vordere Objektivdeckel grundsätzlich aufgesetzt bleiben.
• Wenn Sie das Objektiv längere Zeit unbenutzt lassen, bewahren Sie es an einem kühlen, trockenen Ort auf, um Rost und Schimmelbefall zu vermeiden. Schützen Sie das Objektiv vor direkter Sonneneinstrahlung und vermeiden Sie die Nähe von Naphtalin und Kampfer.
• Schützen Sie das Objektiv vor Wasser und Feuchtigkeit. Nässe auf dem Objektiv kann zu Funktionsstörungen führen.
• Bestimmte Bauteile des Objektivs sind aus verstärkten Kunststoffen getertigt. Um Schäden zu vermeiden, darf das Objektiv niemals Pläzen mit extrem hoher Wärme ausgesetzt werden.
( ) = Belichtungskorrekturen in Blendenstufen
FilmFilter
Typ Tageslicht KunstlichtBezeichnung
UV L37C 1
1,2 (1/3)
1,2 (1/3)
3,5 (15/6)
1
1,2 (1/3)
1,2 (1/3)
2 ( )
A2
B2
O56Orange
Hellbernstein
Hellblau
Belichtungsfaktor
Nur Farbfilm
Nur Schwarzweiss-film
Schwarzweiss-und Farbfilm
Zubehör
Aufsteckbarer FrontdeckelHinterer Objektivdeckel LF-1Filter vom Bajonett-Typ (L37C, A2, B2, O56)Filteretui CA-2
Weichlederetui CL-0715
Mitgeliefert Auf Wunsch

14 15
Nomenclature
Avant-propos
Important!
Mise au point
Verres de visée recommandés
Barillet d’objectifVerrou de l’ouverture minimaleParasoreilEchelle des distancesLigne d’index d’echellede/Index d’ouverture/Repère de montage*Repère de mise au point eninfrarougeFenêtre d échelle desdistances
Bague de mise au pointEchelle des ouverturesBorne indicatrice d’ouvertureEchelle de lecture directe desouverturesContacts CPUEchelle de profondeur dechampIndex de couplagephotométriqueBague des ouvertures
Nous vous remercions d’ être fidèle à Nikon.Lisez attentivement les paragraphes suivants avant d’utiliser votre nouvel objectif, les quelques minutes ainsi passées vous permettront de tirer le meilleur de votre objectif tout de suite et pour des années.Contrairement aux autres objectifs “fisheye” Nikkor qui donnent une image circulaire, l’objectif AF Fisheye-Nikkor 16 mm f/2,8 D donne une image couvrant la totalité du format. Caractérisé par un angle de vue de 180° (selon la diagonale), il permet les mêmes effets spéciaux que les objectifs “fisheye”de type courant.
• Veiller à ne pas salir ou endommager les contacts CPU.• Ne pas fixer les accessoires suivants sur un objectif, car ils peuvent
endommager les contacts CPU de l’objectif:Bague d’auto-rallonge PK-1, Bague d’auto-rallonge PK-11*, Bague K1, Auto Bague BR-4**.
• Cet objectif ne peut pas s’employer à l ’intention du viseur AF DX-1 fixé à l’appareil F3AF Nikon.
*Utiliser la PK-11A à la place.**Utiliser la BR -6 à la place.
Avec l’appareil autofocus Nikon cet objectif permet la mise au point automatique, ainsi que la mise au point manuelle. Pour faire le point manuellement, tournez la bague de mise au point jusqu’à ce que vous obteniez dans le viseur une vue nette et claire.
Différents verres de visée interchangeables peuvent être montés sur les appareils photo Nikon. Ils sont utilisables avec tous les types d’objectifs et dans toutes les situations de prise de vue. Les verres de visée recommandés pour votre objedtif sout répertoriés en page 24.
Filtres Verrou de l’ouverture minimale (Illust. A)Comme tout équipement standard, quatre filtres de type baïonnette montés à l’arriére (L37C, A2, B2, et O56), sont fournis avec l’objectif AF Fisheye-Nikkor 16 mm f/2,8 D, De part sa construction optique, il est nécessaire de garder un filtre en permanence attaché à cet objectif.Changement du filtre(1)Pour retirer le filtre déjà attaché, tournez dans le sens contraire des
aiguilles d’une montre. (2)Pour attacher le filtre, alignez le point sur la bague extérieure du filtre
et la rainure à côté de l’axe monté sur la baïonnette, puis tournez le filtre dans le sens des aiguilles d’une montre.
Avec un non TTL index d’expositionUne compensation d’exposition est nécessaire. Se référer au tableau ci- dessous:
Pour une prise de vue automatique programmée ou priorité- obturation, Utilisez le levier du Verrou de l’ouverture minimale pour verrouilierl’ouverture minimale (f/22). 1. Réglez l’objectif sur son ouverture minimale (f/22).2. Glissez le levier de verrou vers la direction de la bague des ouvertures
de sorte que le point blanc sur le levier fasse face au point orange. (Voir illust. A)
3. Pour relâcher le verrou, glissez le levier dans la direction opposée.
Cadrage (Illust. B)Cadrer avec un fisheye nécessite plus de précautions qu’avec un objectif conventionnel. Non seulement les objectifs fisheye provoquent une distorsion propre aux objectifs de courte focale, mais de plus, ils exaèrent la taille relative des sujets contenus dans le cadrage; ceux du centre de l’image de visée sont surdimensionnés par rapport à ceux qui se trouvent sur les bords, et sont moins déformés. L’ensemble du champ cadré est rejeté à distance, et la répartition des sujets dans l’espace semble modifiée. Un léger décalage de l’appareil modifie encore cette répartition. Assurez-vous de ne pas cadre par inadvertance des éléments tels que le pied sur lequel est monté l’appareil, vos mains ou votre jambe.
( ) = Corrections d’exposition en valeurs
FilmFilter
Type Lumièradu pur
LumièreTungstèneDésignation
Ultraviolet L37C 1
1,2 (1/3)
1,2 (1/3)
3,5 (15/6)
1
1,2 (1/3)
1,2 (1/3)
2 ( )
A2
B2
A2Orange
Ambre léger
Bleu léger
Facteur d'exposition
Couleurseulement
Noìr et blancseulement
Noìr et blanc& couleur

16 17
Soins à apporter à votre objectif Caractéristiques• Nettoyez la surface de l’objectif avec un pinceau souflant. Pour enlever
la saleté et les taches, utilisez un chiffon doux en coton ou une étoffe de nettoyage pour objectif, légèrement imprégné d’alcool éthylique ou de liquide de nettoyage pour objectif. Essuyez avec des mouvements circulaires du centre vers l’extérieur, en prenant soin de ne pas laisser de traces et de ne pas toucher les autres parties de l’objectif.
• Ne jamais utiliser de diluants ou de benzine pour nettoyer l’objectif.• Laossez le capuchon d’objectif en place quand l’objectif n’ est pas
utilisé.• Si vous n’utilisez pas l’objectif pendant une longue période de temps,
protégez-le contre la rouille et l’humidité en le rangeant dans un endroit sec et frais. Ne le rangez egalement pas en plein soleil et tanez-le éloigné de la naphtaline ou du camphre.
• Prenez garde de ne pas mouiller les lentilles, a fortiori de les laisser tomber dans l’eau, celle ci provoquerait des défauts.
• Certaines pièces de l’objectif sont en plastique renforcé; pour éviter toute détérioration, ne pas ranger l’objectif dans un endroit excessivement chaud.
AccessoiresFournis
Bouchon avantBouchon arrière LF-1Filtres de type baïonnette (L37C, A2, B2, O56)Etuià filtres CA-2
Pochette souple CL-0715
Options
Distance focale: 16 mmOuverture maximum: f/2,8Construction optique: 8 éléments en 5 groupesChamp anguleire: 180°Echelle des distances: Graduee en métres et en pieds depuis 0,25 m (1 ft)à l’infini (∞)Données relatives à la distance: Figurent pour les appareilsEchelle des ouvertures: f/2,8 - 22 sur les deux normes et les échelles de lecture directe d’ouvertureDiaphragme: Entièrement automatiqueMesure de l’exposition: Par la methode à pleine overtureMonture: Monture à baïonnette NikonFilters: L37C, O56, A2 et B2 (type à baïonnette à montage arrière)Dimensions: Env. 63 mm diam x 57 mm rallonge de la bride de montage d’objectif de l’appareil; destance hort-tout, env, 68 mmPoids: Env. 290 g
Nomenclatura
Prologo
¡Importante!
Entoque
Pantallas de enfoque recomendadas
Tubo portalentesBloqueo de abertura mínimaParasolEscala de distanciasLínea de índice de escala dedistandia/Indice de aberturas/Montaje*Indicador de enfoque infrarrojoVentanilla de escala dedistanciasAnillo de enfoqueEscala de aberturas
Pivote indicador de abertura dediafragmaEscala de lectura directa deaberturaContactos CPUEscala de profundidades decampoProtuberancia de acoplamientoal exposímetroAnillo de aberturas
Gracias por utilizar los productos Nikon.Antes de utilizar su nuevo objetivo, lea cuidadosamente las siguientes instrucciones, con el fin de obtener el mayor rendimiento de su nuevo objetivo ahora y durante muchous años más.A diferencia de otros objetivos Fisheye-Nikkor que producen una imagen circular, el AF Fisheye-Nikkor 16 mm f/2,8 D Ilena el cuadro con una imagen. Sin embargo, sigue ofreciendo un ángulo de visión de 180° (medido diagonalmente) y le brinda los mismos efectos exsitantes que los objetivos fisheye regulares.
• Tenga cuidado de no ensuciar ni dañar los contactos de la CPU.• No monte los sigientes accesorios en el ovjetivo, pues se pueden
dañar los contactos de la CPU del mismo: Anillo Automàtico de Extensión PK-1, Anillo Automático de Extensión PK-11*, Anillo K1, Anillo Automático BR-4**
• Este objetivo no puede ser utilizado con el Visor AF DX-1 anexo a la cámara F3AF de Nikon.
*Utilise el PK-11A, en su lugar.**Utilise el BR-6, en su lugar.
Con la cámara automática Nikon, es posible tanto el enfoque automático como manual. Para enfocar manualmente, haga girar el anillo de enfoque hasta que la imagen aparezca nítida y clara en el visor.
Existen varias pantallas de enfoque intercambiables para las cámaras Nikon aptas para todo tipo de pbjetivo o situación fotográfica. Las pantallas recomendadas para ser utilizadas con este objetivo aparecen listadas en la página 24 de este manual.

18 19
Filtros Bloqueo de abertura mínima (Ilust. A)Como equipo estándar, se suministran cuatro filtros tipo bayoneta de montaje posterior (L37C, A2, B2, y O56) con el objectivo AF Fisheye-Nikorr 16 mm f/2,8 D. Debido a la construcción óptica de este objetivo, es necesario mantener un filtro instalado en el objetivo en todo momento. Para cambiar el filtro(1)Rote el filtro ya instalado en el sentido contrario a los punteros del reloj
para sacarlo. (2)Para instalar el filtro, alinée el punto en el borde exterior del filtro y la
ranura al lado del pasador de montaje en la bayoneta del objetivo, luego rote el filtro en el sentido de los punteros del reloj.
Con un exposímetro no TTL.Se requiere de compensación de la exposidión. Refiérase a la tabla de abajo.
Para operación automática programada o con prioridad al obturador, utilice la palanca de bloqueo de abertura mínima para bloquear la abertura del objetivo en f/22. 1. Coloque el objetivo a su abertura mínima (f/22).2. Deslice la palanca de bloqueo en la direcdión del anillo de abertura de
tal manera que el punto blanco de la pelanca se alinée con el punto anaranjado. (Vea la ilustración A.)
3. Para liberar el bloqueo, deslice la palanca en la dirección inbersa.
Composición (Ilust. B)El uso de un objetivo fisheye requiere más planeación y estudio de la composición fotográfica que cuando se emplea un objetivo conbencional. El objetivo no sólo produce distorción de gran angular sino que tambìén exagera el tamaño relativo de los objetos al centro son más grandes que los de las orillas y muestran una menor distorsión óptica. Todo el campo aparece más distante y se transforman las relaciones espociales. Con un leve movimiento de la cámara, se crean distorsiones completamente nuevas. Tenga cuidado en no incluir accidentalmente en la fotografía objetos no deseados, como por ejemplo, las patas del tripode o las manos o pies del fotógrafo.
( ) = Número f a ser compensado
PelicuraFiltro
Tipo Designación Luz solar Luztungsteno
Ultravioleta
Celeste
Ambar claro
L37C 1
1,2 (1/3)
1,2 (1/3)
3,5 (15/6)
1
1,2 (1/3)
1,2 (1/3)
2 (1)
A2
B2
A2Naranja
Factor de exposición
Prlícula colorsolamente
Pelicula B/Ny color
Pelicula B/Nsolamente
Cuidado del objetivo EspecificacionesDistancia focal: 16 mmAbertura máxima: f/2,8Construccìón del objetivo: 8 elementos en 5 gruposAngulo fotográfico: 180°Escala de distancias: Graduada en metros y en pies, desde 0,25 m (1 ft)Datos de distancia: Salida en las cámarasEscala de aberturas: f/2.8 - f/22 tanto en la escala mormal como en la de lectura directa de aberturasDiafragma: Totalmente automáticoMedición de la exposición: Por medio del método de plana aberturaMontura: Tipo bayoneta de NikonFiltros: L37C, O56, A2 y B2 (mntura trasera tipo bayoneta)Dimensiones:Aprox. 63 mm (2,5 pulgadas) de diám. x 57 mm (2,2 pulgadas) de extensión desde la pestaña de montaje del objetivo existente en la cámara; la longitud total es de aproximada- mente 68 mm (2,7 pulgadas)Paso: Aprox. 290 g (10.2 onzas)
• Limpie la superficie del objetivo con un capillo en pomo. Para eliminar la suciedad y las manchas, utilice un paño de algodón suave y limpio un papel para cristales empapado en etanol (alcohol) o limpiador de cristales. Limpie con un movimiento circular del centro al borde esterior, cuidando de no dejar marcas y de no tocar las otras partes del objetivo. Si se utiliza éter para limpiar el objetivo, en algunas ocasiones aparece una mancha en la superficie de las lentes con recubrimiento de capas múltiples. Si esto sucede, limpie nuevamente con un paño de algodón humedecido en aocohol.
• Para limpiar el objetivo, no utilice nunca ni solvente ni bencina. • Deje colocada la tapa del objetivo cuando no lo utilice. • Si usted no va a usar el objetivo por un período de fiempo prolongado,
protéjalo contra la oxidación y el moho almacenándolo en un lugar fresco y seco. Además, no lo almacene a la liz solar derecta, y manténgalo alejado de la nagtalina o alcanfor.
• Asegúrese de no mojar el objetivo ni dejarlo caer en agua. El agua puede causar mal funcionamiento del objetivo.
• Se utiliza plástico reforzado en algunas partes de la unidad de objetivo; para evitar daños, tenga cuidado adicional para nunca dejar el objetivo en un lugar excesivamente caliente.
Accesorios
Tapa delantera a presión del objetivoTapa trasera del objetivo LF-1 Filtros de tipo de bayoneta (L37C, A2, B2, O56)Estuche de filtro CA-2
Bolsa flexible para objetivo CL-0715
Suministrados Opcionales

20 21
22 23
24 25
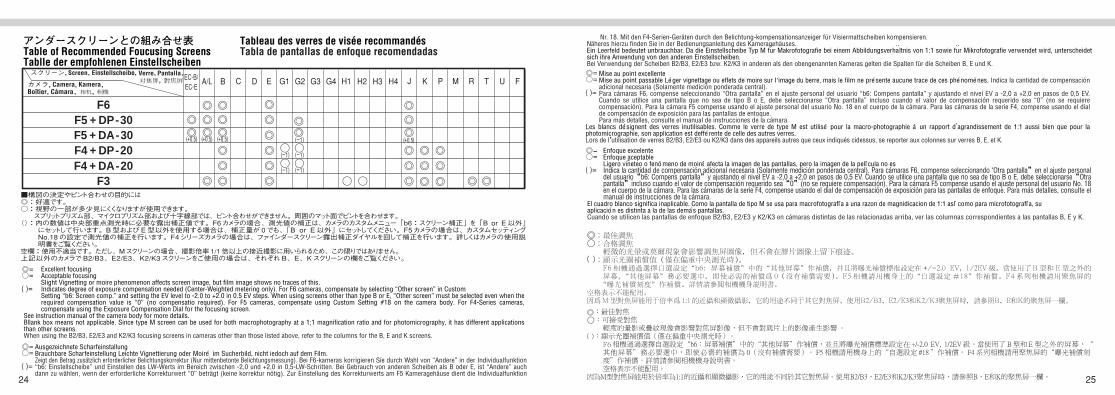
アンダースクリーンとの組み合せ表 Table of Recommended Foucusing Screens Tablle der empfohlenen Einstellscheiben
Tableau des verres de visée recommandésTabla de pantallas de enfoque recomendadas
Excellent focusingAcceptable focusingSlight Vignetting or moire phenomenon affects screen image, but film image shows no traces of this.Indicates degree of exposure compensation needed (Center-Weighted metering only). For F6 cameras, compensate by selecting “Other screen” in CustomSetting “b6: Screen comp.” and setting the EV level to -2.0 to +2.0 in 0.5 EV steps. When using screens other than type B or E, “Other screen” must be selected even when the required compensation value is “0” (no compensatio required). For F5 cameras, compensate using Custom Setting #18 on the camera body. For F4-Series cameras, compensate using the Exposure Compensation Dial for the focusing screen.
See instruction manual of the camera body for more details.Bllank box means not applicable. Since type M screen can be used for both macrophotography at a 1;1 magnification ratio and for photomicrography, it has different applications than other screens. When using the B2/B3, E2/E3 and K2/K3 focusing screens in cameras other than those listed above, refer to the columns for the B, E and K screens.
(+0.5) (+0.5) (+0.5)
(-1)
(-1)
(-1)
(-1)
(-1)
(+0.5)
F3
F6
F4 + DA-20F4 + DP-20F5 + DA-30F5 + DP-30
■構図の決定やピント合わせの目的には ◎:好適です。 ○:視野の一部が多少見にくくなりますが使用できます。 � スプリットプリズム部、マイクロプリズム部および十字線部では、ピント合わせができません。周囲のマット面でピントを合わせます。 ():内の数値は中央部重点測光時に必要な露出補正値です。F6カメラの場合、測光値の補正は、カメラのカスタムメニュー「b6:スクリーン補正」を「B or E以外」
にセットして行います。B型およびE型以外を使用する場合は、補正量が0でも、「B or E以外」にセットしてください。F5カメラの場合は、カスタムセッティングNo.18の設定で測光値の補正を行います。F4シリーズカメラの場合は、ファインダースクリーン露出補正ダイヤルを回して補正を行います。詳しくはカメラの使用説明書をご覧ください。
空欄:使用不適当です。ただし、Mスクリーンの場合、撮影倍率1/1倍以上の接近撮影に用いられるため、この限りではありません。 上記以外のカメラでB2/B3、E2/E3、K2/K3スクリーンをご使用の場合は、それぞれB、E、Kスクリーンの欄をご覧ください。
Mise au point excellenteMise au point passable Le ger vignettage ou effets de moire sur I,image du berre, mais le film ne pre sente aucune trace de ces phe nome nes. Indica la cantidad de compensación adicional necesaria (Solamente medición ponderada central). Para cámaras F6, compense seleccionando “Otra pantalla” en el ajuste personal del usuario “b6: Compens pantalla” y ajustando el nivel EV a -2,0 a +2,0 en pasos de 0,5 EV. Cuando se utilice una pantalla que no sea de tipo B o E, debe seleccionarse “Otra pantalla” incluso cuando el valor de compensación requerido sea “0” (no se requiere compensación). Para la cámara F5 compense usando el ajuste personal del usuario No. 18 en el cuerpo de la cámara. Para las cámaras de la serie F4, compense usando el dial de compensación de exposición para las pantallas de entoque.Para más detalles, consulte el manual de instrucciones de la cámara.
Les blancs de signent des verres inutilisables. Comme le verre de type M est utilise pour la macro-photographie a un rapport d,agrandissement de 1:1 aussi bien que pour la
photomicrographie, son application est deffe rente de celle des autres verres.Lors de l’utilisation de verres B2/B3, E2/E3 ou K2/K3 dans des appareils autres que ceux indiqués cidessus, se reporter aux colonnes sur verres B, E, et K.
Enfoque excelenteEnfoque aceptableLigero vi~neteo o feno meno de moire afecta la imagen de las pantallas, pero la imagen de la pell cula no esIndica la cantidad de compensación adicional necesaria (Solamente medición ponderada central). Para cámaras F6, compense seleccionando "Otra pantalla” en el ajuste personal del usuario “b6: Compens pantalla” y ajustando el nivel EV a -2,0 a +2,0 en pasos de 0,5 EV. Cuando se utilice una pantalla que no sea de tipo B o E, debe seleccionarse “Otra pantalla” incluso cuando el valor de compensación requerido sea “0” (no se requiere compensación). Para la cámara F5 compense usando el ajuste personal del usuario No. 18 en el cuerpo de la cámara. Para las cámaras de la serie F4, compense usando el dial de compensación de exposición para las pantallas de enfoque. Para más detalles, consulte el manual de instrucciones de la cámara.
El cuadro blanco significa inaplicable. Como la pantalla de tipo M se usa para macrofotografl a a una razon de magnidicacion de 1:1 asl como para microfotografl a, suaplicacio n es distinta a la de las dema s pantallas.Cuando se utilicen las pantallas de enfoque B2/B3, E2/E3 y K2/K3 en cámaras distintas de las relacionadas arriba, ver las columnas correspondientes a las pantallas B, E y K.
Ausgezeichnete ScharfeinstallungBrauchbare Scharfeinstellung Leichte Vignettierung oder Moire im Sucherbild, nicht iedoch auf dem Film.Zeigt den Betrag zusätzlich erforderlicher Belichtungskorrektur (Nur mittenbetonte Belichtungsmessung). Bei F6-kameras korrigieren Sie durch Wahl von “Andere” in der Individualfunktion “b6: Einstellscheibe” und Einstellen des LW-Werts im Bereich zwischen -2,0 und +2,0 in 0,5-LW-Schritten. Bei Gebrauch von anderen Scheiben als B oder E, ist “Andere” auch dann zu wählen, wenn der erforderliche Korrekturwert “0” beträgt (keine korrektur nötig). Zur Einstellung des Korrekturwerts am F5 Kameragehäuse dient die Individualfunktion
Nr. 18. Mit den F4-Serien-Geräten durch den Belichtung-kompensationsanzeiger für Visiermattscheiben kompensieren.Näheres hierzu finden Sie in der Bedienungsanleitung des Kameragehäuses. Ein Leerfeld bedeutet unbrauchbar. Da die Einstellscheibe Typ M fu
..r Makrofotografie bei einem Abbildungsverha
..ltnis von 1:1 sowie fu
..r Mikrofotografie verwendet wird, unterscheidet
sich ihre Anwendung von den anderen Einstellscheiben. Bei Verwendung der Scheiben B2/B3, E2/E3 bzw. K2/K3 in anderen als den obengenannten Kameras gelten die Spalten für die Scheiben B, E und K.

26 27
Depth of FieldDepth of field
Focuseddistance 2.8 4 5.6 8 11 16 22
1/11
1/14
1/19
1/24
1/33
1/53
1/92
1/∞
Reproductionratio
(ft)
81/16” –1’ 313/16”
81/2” –1’ 11/2”
815/16” –1’ 1/8”
93/16” –111/2”
91/2” –111/16”
911/16” –103/4”
913/16” –109/16”
815/16” –1’ 103/8”
99/16” –1’ 55/8”
101/8” –1’ 33/16”
109/16” –1’ 21/16”
1015/16” –1’ 13/8”
113/16” –1’ 15/16”
117/16” –1’ 5/8”
915/16” –4’ 79/16”
1013/16” –2’ 6”
113/4” –1’ 105/16”
1’ 7/16” –1’ 71/2”
1’ 11/16” –1’ 513/16”
1’ 19/16” –1’ 47/8”
1’ 115/16” –1’ 41/4”
1011/16” –∞
117/8” –4’ 911/16”
1’ 11/8” –2’ 811/16”
1’ 21/16” –2’ 25/16”
1’ 3” –1’ 1015/16”
1’ 33/4” –1’ 93/16”
1’ 45/16” –1’ 81/8”
1113/16” –∞
1’ 13/8” –∞
1’ 35/16” –6’ 77/8”
1’ 47/8” –3’ 111/4”
1’ 67/16” –3’ 1/8”
1’ 711/16” –2’ 73/8”
1’ 8 3/4” –2’ 411/16”
1’ 11/8” –∞
1’ 33/8” –∞
1’ 65/16” –∞
1’ 815/16” –20’ 17/16”
1’ 113/4” –7’ 15/8”
2’ 2 3/16” –5’ 5/8”
2’ 4 7/16” –4’ 21/16”
1’ 25/16” –∞
1’ 57/16” –∞
1’ 911/16” –∞
2’ 113/16” –∞
2’ 613/16” –∞
2’ 111/2” –20’ 1”
3’ 45/16” –10’ 4”
1’ 45/8” –∞
1’ 99/16” –∞
2’ 513/16” –∞
3’ 311/16” –∞
4’ 71/4” –∞
6’ 315/16” –∞
8’ 11” –∞∞
0.85
1
1.3
1.5
2
3
5
被写界深度表 /Depth-of Field/ SchärfentiefetabelleTable de prondeur de champ/Tabla de profundidad de campo
撮影距離 Focused distanceEingestellte distanzDistance de mise au pointDistancia enfocada
被写界深度 Profondeur de champ/Profundidad de campo
/Depth-of field/Schärfentiefe撮影倍率 Reproduction ratioVergößerungsbereichRapport de reproductionProporción de reproducsión
1/10
1/14
1/20
1/26
1/39
1/58
1/∞
0.25
0.3
0.4
0.5
0.7
1
∞
2.8 4 5.6 8 11 16 22
0.206 –0.35
0.227 –0.543
0.259 –1.988
0.282 –∞
0.313 –∞
0.34 –∞
0.42 –∞
0.215 –0.312
0.241 –0.434
0.283 –0.882
0.314 –2.45
0.359 –∞
0.402 –∞
0.55 –∞
0.224 –0.288
0.256 –0.377
0.308 –0.623
0.351 –1.04
0.416 –4.678
0.482 –∞
0.76 –∞
0.23 –0.276
0.266 –0.351
0.328 –0.536
0.38 –0.789
0.464 –1.742
0.555 –21.01
1.01 –∞
0.236 –0.267
0.275 –0.333
0.346 –0.484
0.408 –0.667
0.513 –1.183
0.635 –2.85
1.4 –∞
0.24 –0.262
0.281 –0.323
0.359 –0.456
0.43 –0.607
0.554 –0.981
0.705 –1.83
1.93 –∞
0.243 –0.258
0.287 –0.315
0.37 –0.437
0.448 –0.569
0.59 –0.873
0.772 –1.46
2.72 –∞
(m)

28 29
A B〈人物〉 A person standing in front of a distant backgroundEine Person vor einem weit entfernten HintergrundUne personne debout sur un fond éloignéUna persona se encuentra delante de un fondo distante
〈花畑〉 A field covered with flowersEine blumenübersäte WieseUn champ couvert de fleursUn campo cubierto de flores
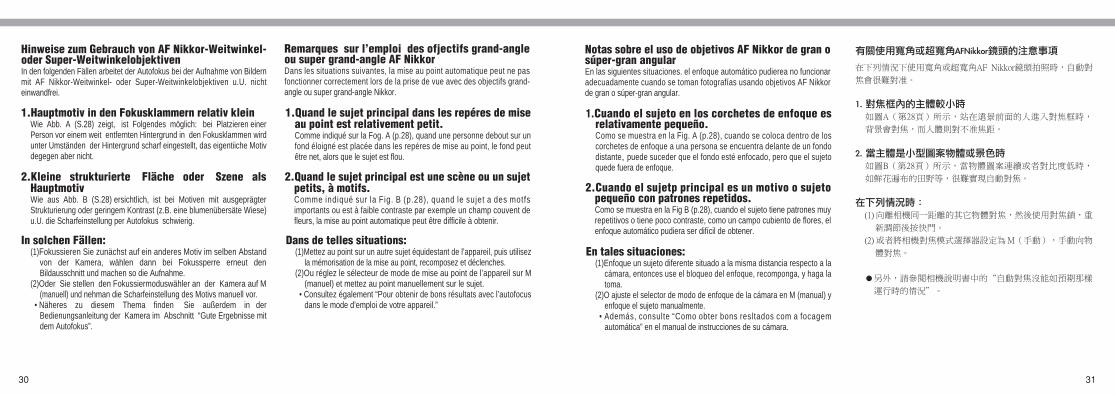
広角・超広角レンズのオートフォーカス撮影について 広角・超広角レンズでは、標準クラスのレンズと比べ、下記のような撮影条件になりやすく、オートフォーカス撮影時には注意が必要です。 以下をお読みになって、オートフォーカス撮影にお役立てください。 1.フォーカスフレームに対して主要な被写体が小さい場合 28頁の図Aのように、フォーカスフレーム内に遠くの建物と近くの人物が混在するような被写体になると、背景にピントが合い、人物のピント精度が低下する場合があります。
2.絵柄がこまかな場合 28頁の図Bのように、被写体が小さいか、明暗差が少ない被写体になると、オートフォーカスにとっては苦手な被写体になります。 ◆ このような時には・・・ 1、2のような被写体条件でオートフォーカスが上手く働かない場合、主要被写体とほぼ同じ距離にある被写体でフォーカスロックし、構図を元に戻して撮影する方法が有効です。 また、マニュアルフォーカスに切り換えて、マニュアルでピントを合わせて撮影する方法もあります。 その他 お手持ちのカメラボディの使用説明書で「オートフォーカスが苦手な被写体について」の説明も参照してください。
Notes on using wide or super-wide angle AF Nikkor lensesIn the following situations, autofocus may not work properly when taking pictures using wide or super-wide angle AF Nikkor lenses. 1. When the main subject in the focus brackets is relatively small.
As shown in Fig. A (p.28), when a person standing in front of a distant background is placed within the focus brackets, the background may be in focus, while the subject is out of focus.
2. When the main subject is a small, patterned subject or scene.
As shown in Fig. B (p.28), when the subject is highly patterned or of low contrast, such as a field covered with flowers, autofocus may be difficult to obtain.
In such situations:(1) Focus on a different subject located at the same distance
from the camera, then use the focus lock, recompose, and shoot.
(2) Or set the camera’s focus mode selector to M (manual) and focus manually on the subject.
• Also, refer to “Getting Good Results with Autofocus” in your camera’s instruction manual.
30 31
Hinweise zum Gebrauch von AF Nikkor-Weitwinkel-oder Super-WeitwinkelobjektivenIn den folgenden Fällen arbeitet der Autofokus bei der Aufnahme von Bildern mit AF Nikkor-Weitwinkel- oder Super-Weitwinkelobjektiven u.U. nicht einwandfrei.
Remarques sur l’emploi des ofjectifs grand-angle ou super grand-angle AF NikkorDans les situations suivantes, la mise au point automatique peut ne pas fonctionner correctement lors de la prise de vue avec des objectifs grand- angle ou super grand-angle Nikkor.
1.Hauptmotiv in den Fokusklammern relativ kleinWie Abb. A (S.28) zeigt, ist Folgendes möglich: bei Platzieren einer Person vor einem weit entfernten Hintergrund in den Fokusklammen wird unter Umständen der Hintergrund scharf eingestellt, das eigentiiche Motiv degegen aber nicht.
1.Quand le sujet principal dans les repéres de mise au point est relativement petit.Comme indiqué sur la Fog. A (p.28), quand une personne debout sur un fond éloigné est placée dans les repéres de mise au point, le fond peut être net, alors que le sujet est flou.
In solchen Fällen:(1)Fokussieren Sie zunächst auf ein anderes Motiv im selben Abstand
von der Kamera, wählen dann bei Fokussperre erneut den Bildausschnitt und machen so die Aufnahme.
(2)Oder Sie stellen den Fokussiermoduswähler an der Kamera auf M (manuell) und nehman die Scharfeinstellung des Motivs manuell vor.
• Näheres zu diesem Thema finden Sie außerdem in der Bedienungsanleitung der Kamera im Abschnitt “Gute Ergebnisse mit dem Autofokus”.
Dans de telles situations:(1)Mettez au point sur un autre sujet équidestant de l’appareil, puis utilisez
la mémorisation de la mise au point, recomposez et déclenches. (2)Ou réglez le sélecteur de mode de mise au point de l’appareil sur M
(manuel) et mettez au point manuellement sur le sujet. • Consultez également “Pour obtenir de bons résultats avec l’autofocus
dans le mode d’emploi de votre appareil.”
2.Kleine strukturierte Fläche oder Szene als HauptmotivWie aus Abb. B (S.28) ersichtlich, ist bei Motiven mit ausgeprägter Strukturierung oder geringem Kontrast (z.B. eine blumenübersäte Wiese) u.U. die Scharfeinstellung per Autofokus schwierig.
2.Quand le sujet principal est une scène ou un sujet petits, à motifs.Comme indiqué sur la Fig. B (p.28), quand le sujet a des motfs importants ou est à faible contraste par exemple un champ couvent de fleurs, la mise au point automatique peut être difficile à obtenir.
Notas sobre el uso de objetivos AF Nikkor de gran o súper-gran angularEn las siguientes situaciones. el enfoque automático pudierea no funcionar adecuadamente cuando se toman fotografías usando objetivos AF Nikkor de gran o súper-gran angular.
1.Cuando el sujeto en los corchetes de enfoque es relativamente pequeño.Como se muestra en la Fig. A (p.28), cuando se coloca dentro de los corchetes de enfoque a una persona se encuentra delante de un fondo distante, puede suceder que el fondo esté enfocado, pero que el sujeto quede fuera de enfoque.
En tales situaciones:(1)Enfoque un sujeto diferente situado a la misma distancia respecto a la
cámara, entonces use el bloqueo del enfoque, recomponga, y haga la toma.
(2)O ajuste el selector de modo de enfoque de la cámara en M (manual) y enfoque el sujeto manualmente.
• Además, consulte “Como obter bons resltados com a focagem automática” en el manual de instrucciones de su cámara.
2.Cuando el sujetp principal es un motivo o sujeto pequeño con patrones repetidos.Como se muestra en la Fig B (p.28), cuando el sujeto tiene patrones muy repetitivos o tiene poco contraste, como un campo cubiento de flores, el enfoque automático pudiera ser difícil de obtener.

32 5