posterdigital: starter guide english
TRANSCRIPT

Starter Guide
Online version at: posterdigital.com/soporte Contact us at: [email protected]
Last update: 28/May/2015
Starter Guide PosterDigital 1
Start Using PosterDigital 3
Upload a file 5
Create a playlist 8
Display content on a screen 11
Starter Guide PosterDigital 2

Start Using PosterDigital Every time you log in to PosterDigital, the first screen you’ll see is the Dashboard. Here you’ll find an overview of the status of your screens, and quick access to all the parts of your project. You can return to this screen anytime by clicking on the PosterDigital logo.
Starter Guide PosterDigital 3

These are the main elements you’ll find on the Dashboard: Fig. 1 Schedule In the center of the screen you’ll see all the events scheduled for today. In Figure 1, you’ll notice that the section is blank because there are no events scheduled yet.
Fig.2 Installed Screens If your player is correctly installed, here you’ll see the number of screens currently installed.
Fig.3 Scheduled events This is the number of events programmed for today.
Fig.4 Alerts If your player is correctly connected to a screen, this number will be “0”. If there are alerts, you’ll need to check the connection between your players and screens because something is not working correctly.
Fig.5 Content and Playlists These sections show the number of uploaded files and the number of playlists you’ve created.
Fig.6 Templates If it’s the first time you're using PosterDigital, you will not have created any templates. You can select from the pre-designed templates we offer by default.
Fig.7 Screens Here you’ll see the number of each type of screen you’ve installed.
Starter Guide PosterDigital 4
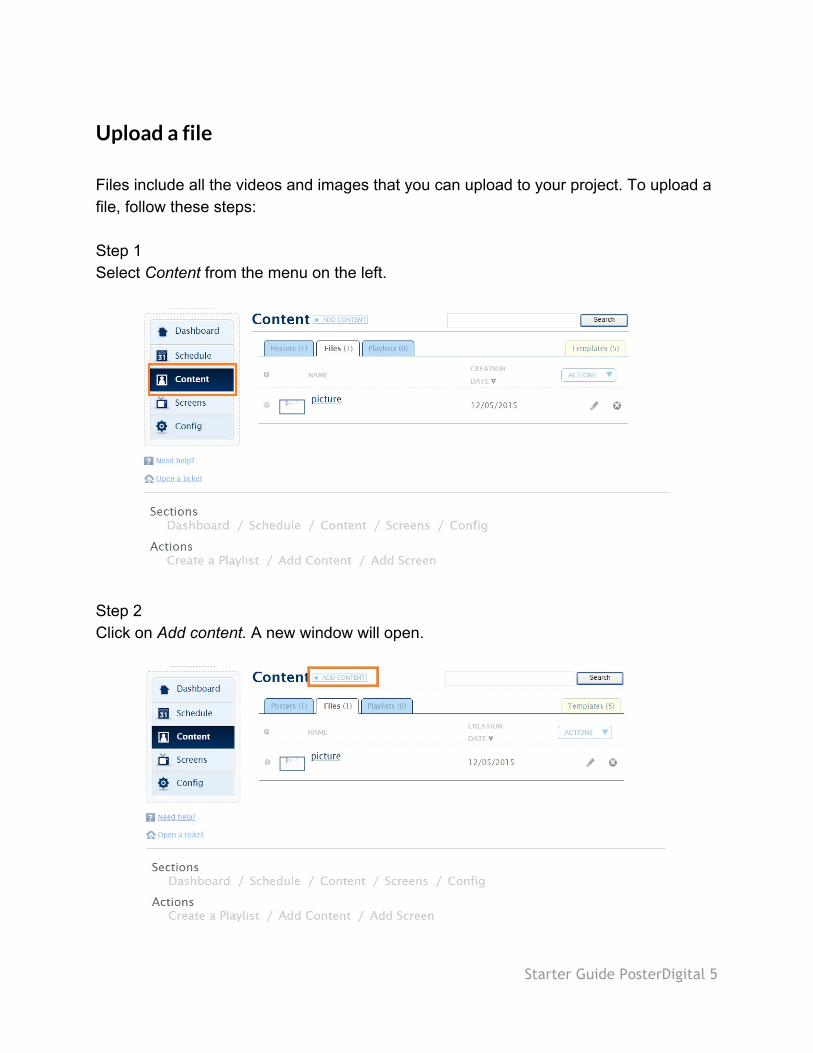
Upload a file Files include all the videos and images that you can upload to your project. To upload a file, follow these steps:
Step 1 Select Content from the menu on the left.
Step 2 Click on Add content. A new window will open.
Starter Guide PosterDigital 5

Step 3 Choose the option Upload new content.
Step 4 There are two ways to add images or videos: 1. Drag and drop the file directly in the area that says Drag files here. 2. Click on Add files, select the files to add, and press Open.
Step 5 Once you’ve selected the files, click on Start upload.
Starter Guide PosterDigital 6

Step 6 When the file has finished uploading, you’ll see it under the Files tab. If it doesn’t appear, try refreshing the page.
Some videos have to be recoded for PosterDigital before they can be played. In this case, you’ll see an icon with a red check beside the video while it is being recorded. When the icon disappears, the file will appear as normal and the video will be ready for playing.
Starter Guide PosterDigital 7

Create a playlist
A playlist is a list of files that can contain videos, images, or both. Follow these steps to create a playlist
Step 1 Select Content from the main menu on the left.
Step 2 Click on Add content. A new window will open.
Starter Guide PosterDigital 8
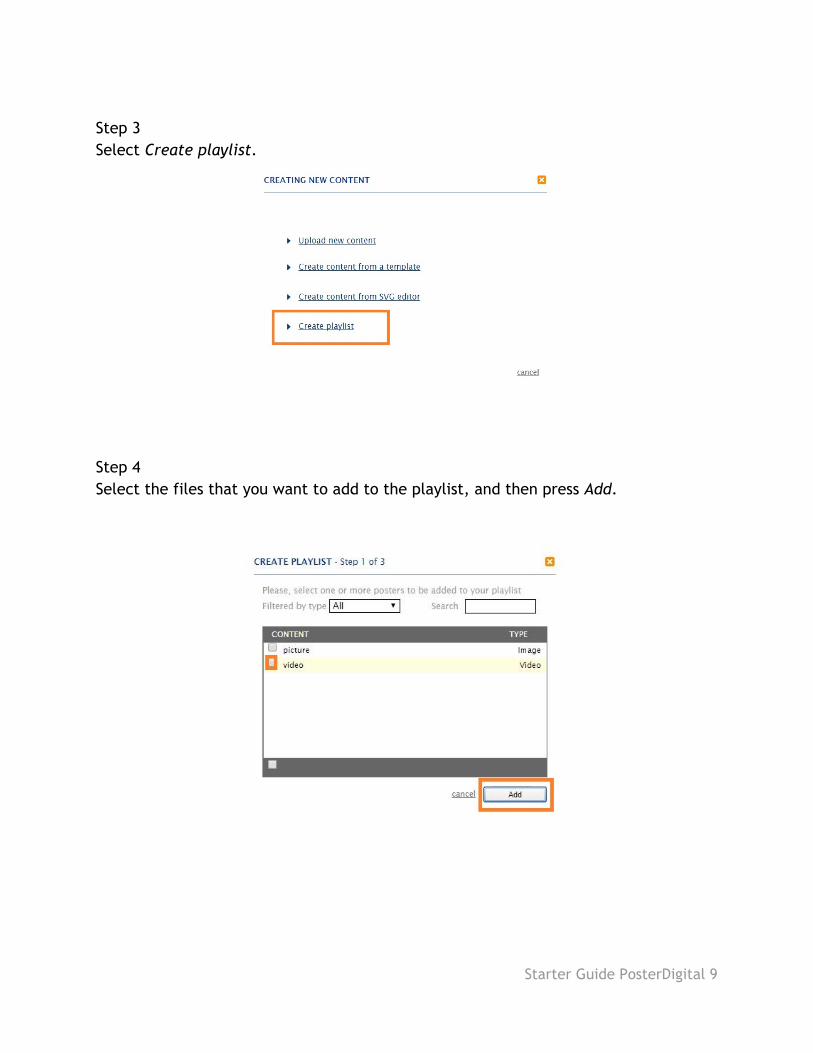
Step 3 Select Create playlist.
Step 4 Select the files that you want to add to the playlist, and then press Add.
Starter Guide PosterDigital 9

Step 5 Enter a name for the playlist. (required) Example: PlaylistJune or PlaylistSpecialOffer.
Step 6 Write a brief description of the playlist. (required) Example: Playlist to show only in June.
Step 7 You also have the option to add a comment about the playlist.
Step 8 Check the box next to RANDOM if you want the files to be played in random order.
Step 9 You can add an effect to the transition between files by selecting an option from the list next to ANIMATION.
Step 10
Press Finish to save the changes and create the playlist.
Starter Guide PosterDigital 10

Display content on a screen
Follow these steps to begin showing your content (files or playlists) on the screen:
Step 1 Select Content from the main menu on the left.
Step 2 Click on the Files tab if you want to show an image or video, or on the Playlists tab to show a playlist. Step 3 There are two ways to program content to be displayed on the screen:
a. From the dropdown next to the name of any file or playlist
Starter Guide PosterDigital 11

b. From the menu on the left of the screen after clicking on a file or playlist.
Step 4 In both places, click on Add this content to a screen’s schedule.
Step 5 Select the screen or group of screens where you want to show the content.
Step 6 Choose the start and end dates for displaying the content.
Starter Guide PosterDigital 12

Step 7 Choose the schedule for showing the content by setting a start time and an end time.
Step 8 If you only want to show the content on certain days of the week, select the days from the list.
Step 9 Click on Save.
Starter Guide PosterDigital 13