refworks manual in english
TRANSCRIPT
RefWorks Guide
이화여자대학교 도서관
Ewha Womans University Library
Updated 2015. 3

RefWorks
Personal bibliographic data management program
Main function
– Direct export or type in bibliographic data from other database
– Save and attach Full-text, images for specific data
– List up reference data automatically for specific format
– Link with Microsoft Word and Hangul Program to create reference list
– Click Find@EWHA to link full text easily
– Share reference list with other collegues
2
▣ What is bibliographic data?
Basic information about data including article title, author, publisher, publication year,
journal title, volume and issue

Access to RefWorks 3
1 1. Library homepage
[Electronic Resources Database] Click RefWorks
2. Log in with RefWorks ID/PW ★ at first, create personal ID/PW Click “Sign Up for a New Account
2 Outside of campus,
1) use Off-campus Access at library homepage 2) log in with Group code + RefWorks ID/PW Find@EWHA cannot be used at this time.
Group code will be sent to your e-mail automatically. Click “forgot your login information?” to find out your ID,
PW and group code through your e-mail.
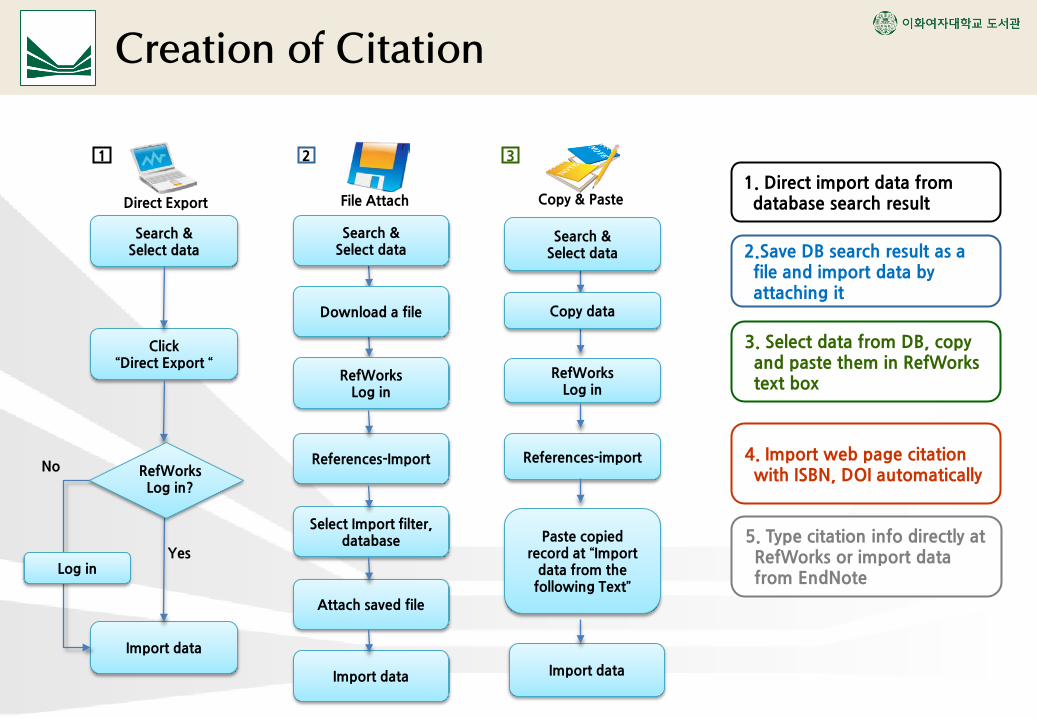
Creation of Citation
Search & Select data
Direct Export
Click “Direct Export “
Import data
Yes Log in
RefWorks Log in?
No
File Attach
Search & Select data
Download a file
RefWorks Log in
References-Import
Select Import filter, database
Attach saved file
Import data
Copy & Paste
Search & Select data
Copy data
RefWorks Log in
References-import
Paste copied record at “Import
data from the following Text”
Import data
2.Save DB search result as a file and import data by attaching it
3. Select data from DB, copy and paste them in RefWorks text box
4. Import web page citation with ISBN, DOI automatically
1. Direct import data from database search result
1 2 3
5. Type citation info directly at RefWorks or import data from EndNote

• Direct export data from DB, e-journals to RefWorks automatically
• How to export – Select records at DB search result – Select Direct Export or RefWorks option at save·export, view
record screen – Log in to RefWorks – Import data automatically and view the data at [Last Imported] – Select data to put in a specific folder
• DBs to use direct export to RefWorks
– [Korean] DBPia, KISS, NDSL, RISS, Kyobomungo scholar
– (ProQuest) ProQuest Dissertations & Theses, ERIC, PsycINFO, …
– (EBSCOhost) ASC, BSC, CINAHL Plus with Full text…
– Literature Online, JSTOR, Wiley Online Library…
– Web of Science, SCOPUS, ScienceDirect, …
– Google Scholar, library homepage
1
Direct Export from DB
Search & Select data
Direct Export
Click “Direct Export “
Import data
Yes Log in
RefWorks Log in?
No

Direct Export EBSCOhost 6
1
2
3
4
4. Select Direct Export to RefWorks to save
1. Add data in a folder by clicking
2. Click Folder View
5. Check imported data at “Last imported” to edit, save in another folder
3. Select export data and click

Direct Export ProQuest
1. Select data at search result
3. Select Output to as “RefWorks” and click Continue
2. 2. Click Refworks
4. Log in to RefWorks. If already logged in, skip this step
5. Check imported data at “Last imported” to edit, save in another folder
7
2
1
3

1
Direct Export Scopus 8
2
1. Select data at search result to click Export
2. Select RefWorks direct Export and click Export
3. Log in to RefWorks. If already logged in, skip this step
4. Check imported data at “Last imported” to edit, save in another folder

1
Direct Export Web of Science 9
2
2. Click arrow next to
and select “Save to RefWorks”
1. Select data at search result
3. Select content and click “Send”
4. Log in to RefWorks. If already logged in, skip this step
5. Check imported data at “Last imported” to edit, save in another folder
3

Direct Export JSTOR 10
1
1. Select data at search result
3. Click RefWorks at Export Citations
2. Click
4. Log in to RefWorks. If already logged in, skip this step
5. Check imported data at “Last imported” to edit, save in another folder
2
3
1
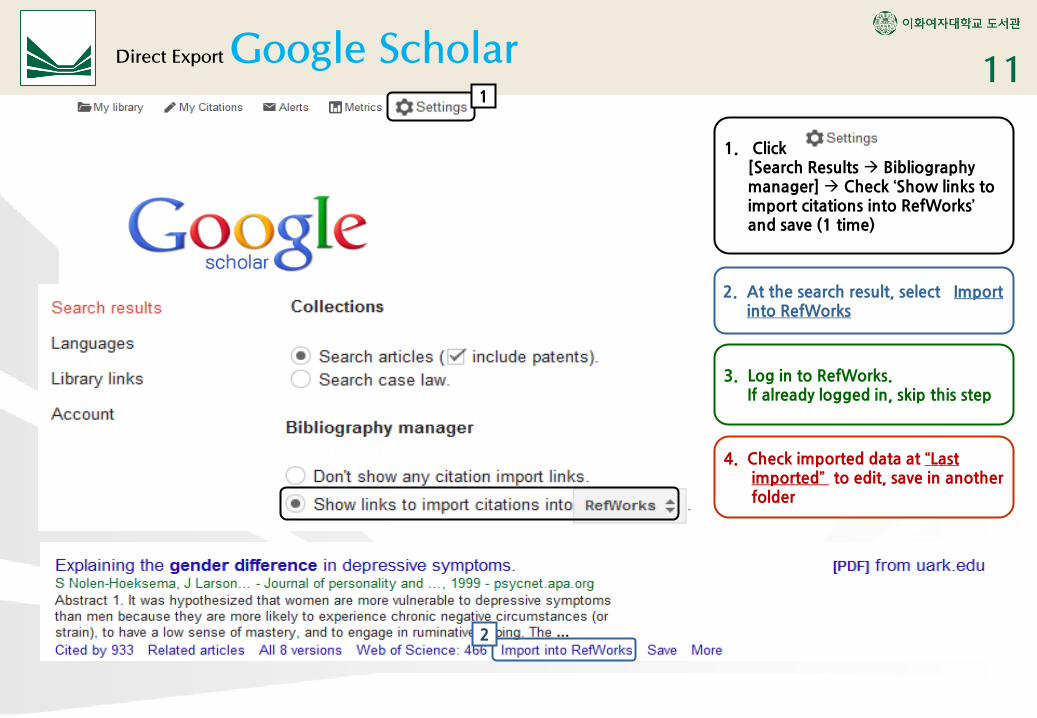
Direct Export Google Scholar 11
1. Click [Search Results Bibliography manager] Check ‘Show links to import citations into RefWorks’ and save (1 time)
2. At the search result, select Import into RefWorks
3. Log in to RefWorks. If already logged in, skip this step
4. Check imported data at “Last imported” to edit, save in another folder
2

Direct Export Library Homepage
2. Click Send
3. Select fields to send again and click
1. Select data at the search result
4. Log in to RefWorks. If already logged in, skip this step
5. Check imported data at “Last imported” to edit, save in another folder
1
2
3
Please check data after import to RefWorks!!
12
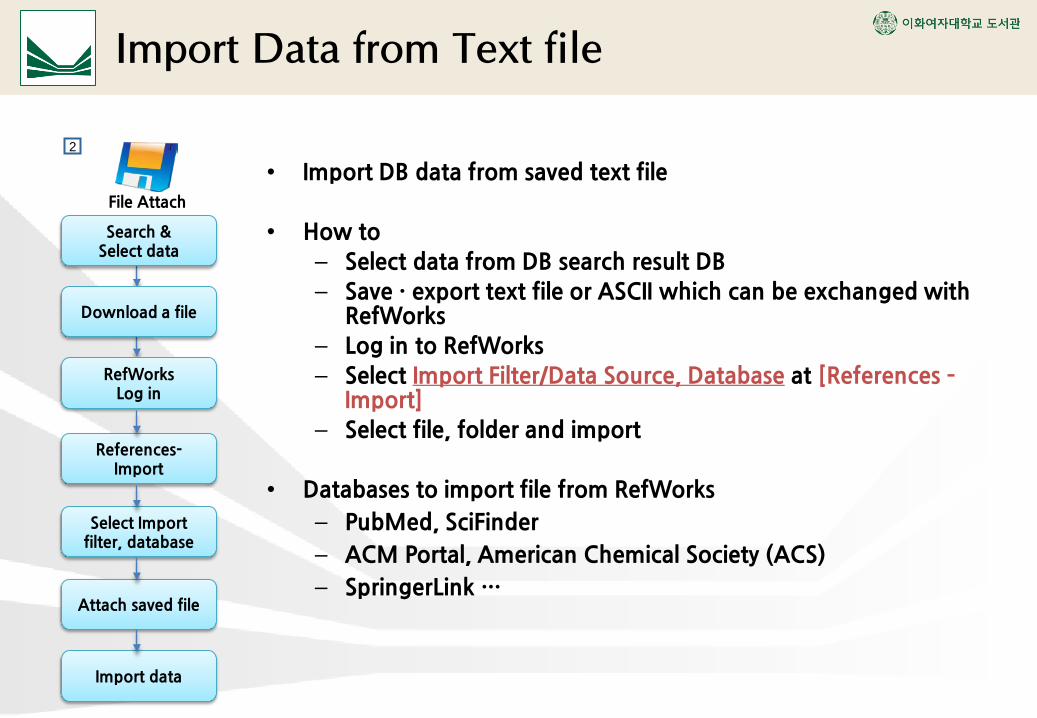
• Import DB data from saved text file
• How to – Select data from DB search result DB – Save · export text file or ASCII which can be exchanged with
RefWorks – Log in to RefWorks – Select Import Filter/Data Source, Database at [References –
Import] – Select file, folder and import
• Databases to import file from RefWorks
– PubMed, SciFinder
– ACM Portal, American Chemical Society (ACS)
– SpringerLink …
Import Data from Text file
2
File Attach
Search & Select data
Download a file
RefWorks Log in
References-Import
Select Import filter, database
Attach saved file
Import data
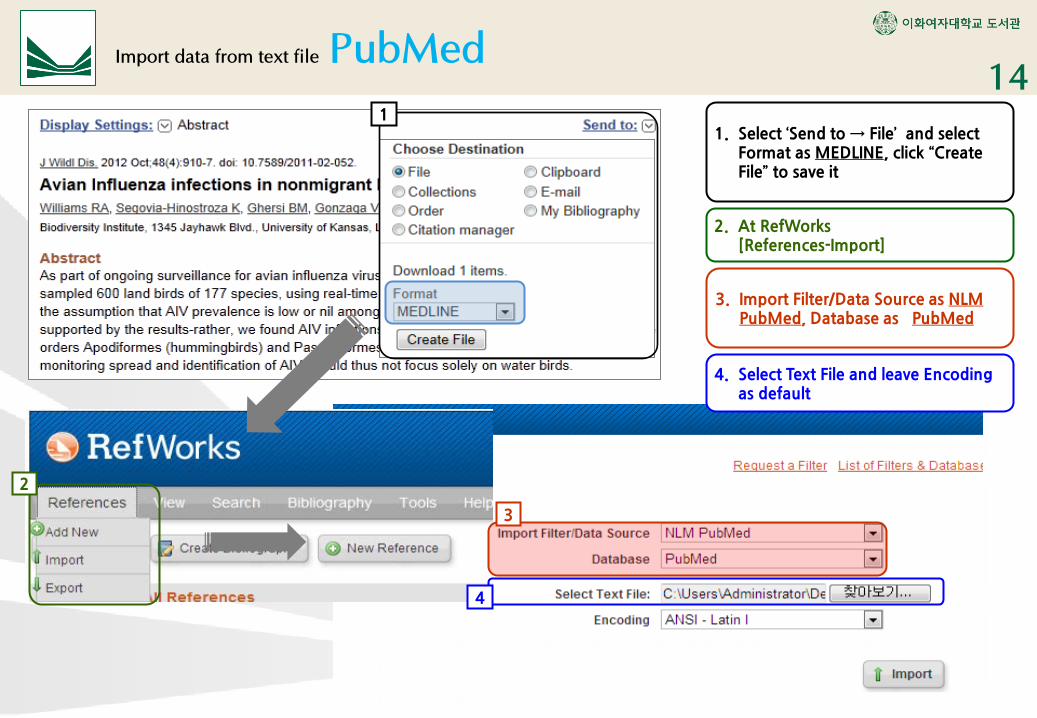
Import data from text file PubMed
2
2. At RefWorks [References-Import]
3. Import Filter/Data Source as NLM PubMed, Database as PubMed
4. Select Text File and leave Encoding as default
1. Select ‘Send to → File’ and select Format as MEDLINE, click “Create File” to save it
3
4
14 1

Import data from text file SpringerLINK 15
1
3
5
4
2. At Export Citation, click RefWorks(RIS) to save a file
3. At Refworks, select [Referenes-Import]
1. Select Export citations
4. Import Filter/Data Source as RIS Format , Database as RIS Format
5. Select text file and import the data
2

Import data from text file SciFinder 16
3
4
5
1
2. Citation Manager as Tagged Format(*.txt) - Click Export to save a file
3. At Refworks, select [References-Import]
1. Select data to export and click Export
4. Import Filter/Data Source as CAS SciFinder, Database as Multiple Databases
5. Select text file and import the data
2
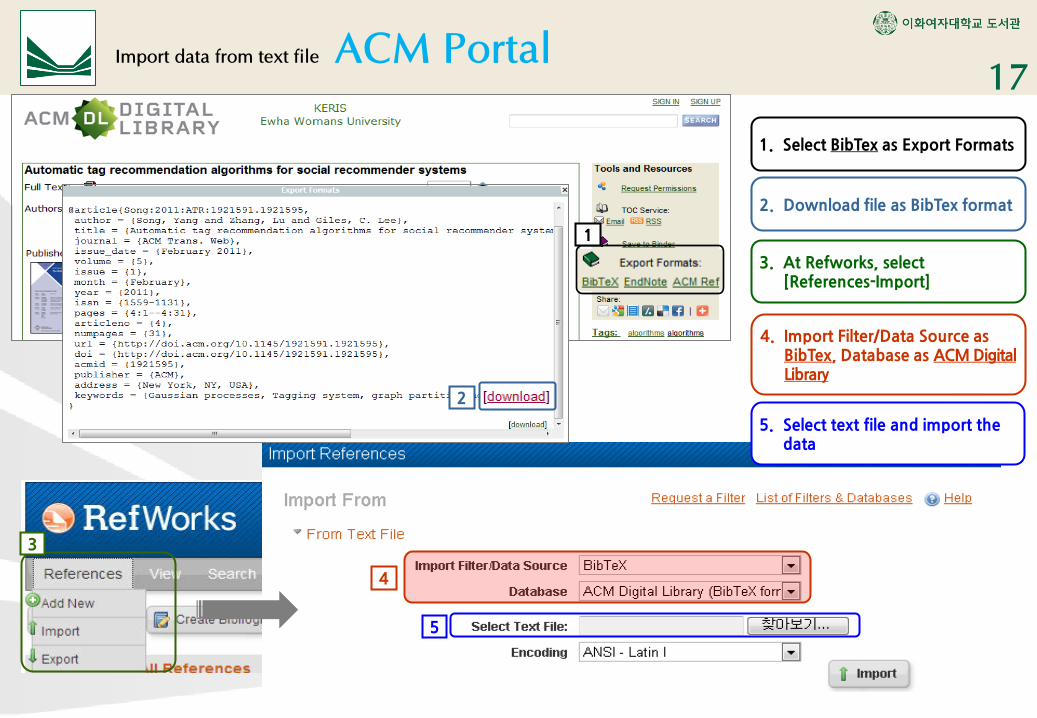
Import data from text file ACM Portal
1
2
3
2. Download file as BibTex format
1. Select BibTex as Export Formats
5
4
3. At Refworks, select [References-Import]
4. Import Filter/Data Source as BibTex, Database as ACM Digital Library
5. Select text file and import the data
17

1
Import data from text file American Chemical Society 18
2
3
4
6
5
2. Click
3. Select Format as RIS Click Download Citation(s)
1. Choose data at search result list
4. At Refworks, select [References-Import]
5. Import Filter/Data Source as ACS Publications , Database as RIS Format
6. Select Text File and click Import

Import data from text file CAJ 19
1
2. Click
1. Choose data at search result list
2
3. Select RefWorks and Click Output to local to download a file
3
4. At RefWorks, Select [References – Import]
5. Import Filter/Data Source as China-中国知网(CNKI), Database as 中国学术文献网络出版总库
6. Select text file and click Import
5

Copy result to make reference data MathSciNet 20
1
3
2. Select Batch DownLoad as Citations (BibTex) and click Retrieve Marked
3. Select data and click right button of a mouse and choose “복사(Copy)”
4. At RefWorks, select [References – Import]
5. Choose “From Text”, Import Filter/Data Source as BibTex, Database as MathSciNet (AMS)
1. Choose data at search result list
6. Paste the copied data from MathSciNet in the box below and click Import
4 6
5
2

Direct Input Bibliographic Data
2. Select Reference Type ★ By types, input data can be different
3. Input bibliographic data at reference Folder selection, upload attached file
can be possible.
1. At RefWorks, select[References- New Reference] or Click “New Reference” 1
2
3
21

Manage Reference
2. Change reference order and format
3. Folder title Possible to save same data in
multiple folders
1. Possible for diverse data : add to a folder : edit reference : delete
5. Click Source title to view other data from same source in RefWorks reference
4. Reference menu : attached file
- show if file exists : add to My List : edit the reference only : delete the reference only : referred data : detail information of the
reference
data from PubMed data from SCOPUS
3
4
5
22 2
1
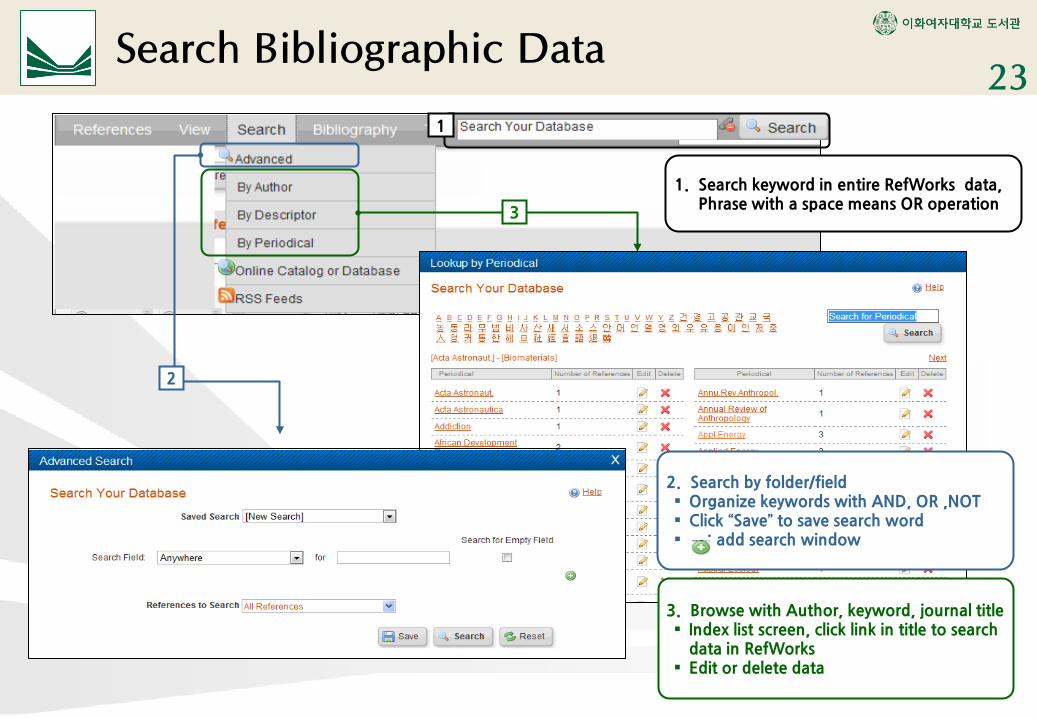
Search Bibliographic Data
2
3
2. Search by folder/field Organize keywords with AND, OR ,NOT Click “Save” to save search word : add search window
1. Search keyword in entire RefWorks data, Phrase with a space means OR operation
3. Browse with Author, keyword, journal title Index list screen, click link in title to search
data in RefWorks Edit or delete data
23 1
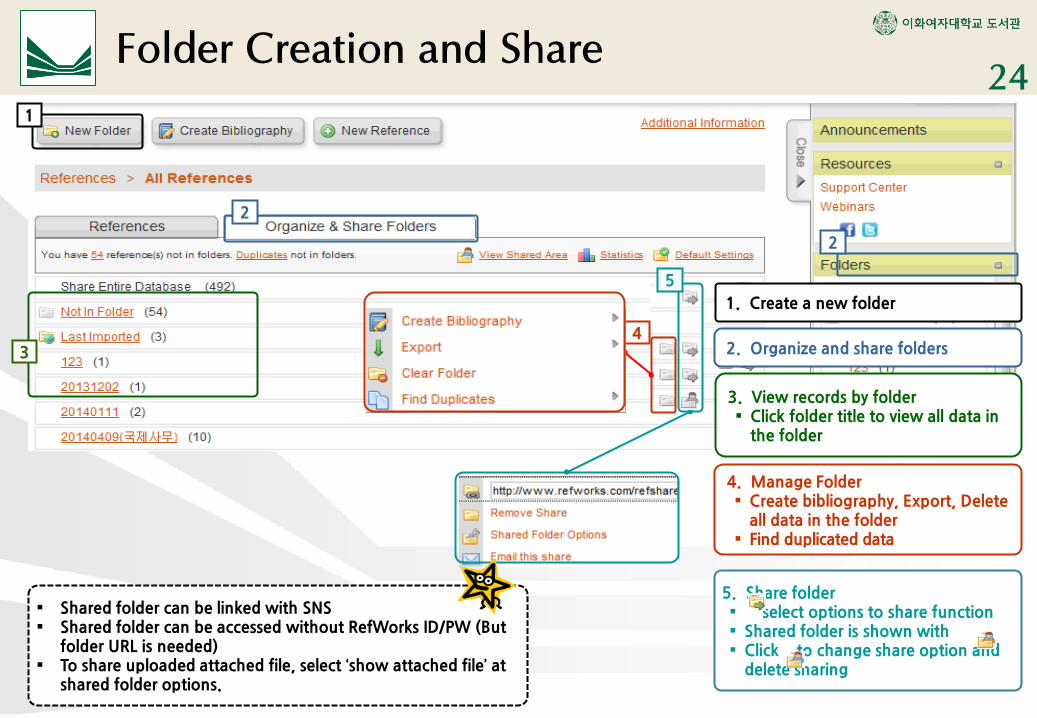
Folder Creation and Share
3. View records by folder Click folder title to view all data in
the folder
2. Organize and share folders
4. Manage Folder Create bibliography, Export, Delete
all data in the folder Find duplicated data
5. Share folder select options to share function Shared folder is shown with Click to change share option and
delete sharing
1
2
1. Create a new folder
Shared folder can be linked with SNS Shared folder can be accessed without RefWorks ID/PW (But
folder URL is needed) To share uploaded attached file, select ‘show attached file’ at
shared folder options.
24
2
3 4
5

Automatic Creation of Reference List
1
2
3
Created Reference list
Korean language may not be shown correctly, please change output language as Korean for Korean publishing data.
25 1
2. Select reference data
3. Select an output style
4. Click “Created Bibliography”
5. Save, print, or copy of reference list
1. Click “Create Bibliography” or click [Bibliography – Create Bibliography”
4

Reference Creation in Hangul File
1
2
4
3
2. Click Write-N-Cite Hangul program
3. Click 인용 in Write-N-Cite to make reference list
4. Click 참고문헌 생성 at Write-N-Cite and select reference style to created reference list
1. [Tools Write-N-Cite], install “Write-N-Cite for Hangul” program (1 time)
Added reference data in Hangul file automatically
Reference list created automatically
26

Edit Reference List at Write-N-Cite
1. Select reference data to edit and click Write-N-Cite
4. Check the edited mark and click Write-N-Cite 참고문헌 생성 , select reference format to create list
1
After change or add data in “인용”, create reference list again in Write-N-Cite “참고문헌 생성”
27
2
2. Click Edit Citation at Write-N-Cite
3. After edit, click 변경사항 적용 Up, Down : change edit order Delete : Delete data Add text in reference data or
show page
3
Change quotation text
4
To change reference order, or data for several references. If you want to change author name, publication year, or other data set, please do it in RefWorks directly.

EndNote to RefWorks 28
2. Select From EndNote Database , EndNote library (*.enl) file and click Import
1. [References Import]
1
2