the blü-test
TRANSCRIPT
The Blü-TestTemperature and Humidity
Measurement ProbeBA/BTP-T-RH
Operations Manual & User Guidefor Probe and App (Version 3.26)
30949_ins_BTP_Full.pdf
Installation & Operations
Blü-Test Temperature and Humidity Measurement ProbeBA/BTP-T-RH
Building Automation Products, Inc., 750 North Royal Avenue, Gays Mills, WI 54631 USATel:+1-608-735-4800 • Fax+1-608-735-4804 • E-mail:[email protected] • Web:www.bapihvac.com
Specifications subject to change without notice.
rev. 02/12/15
2
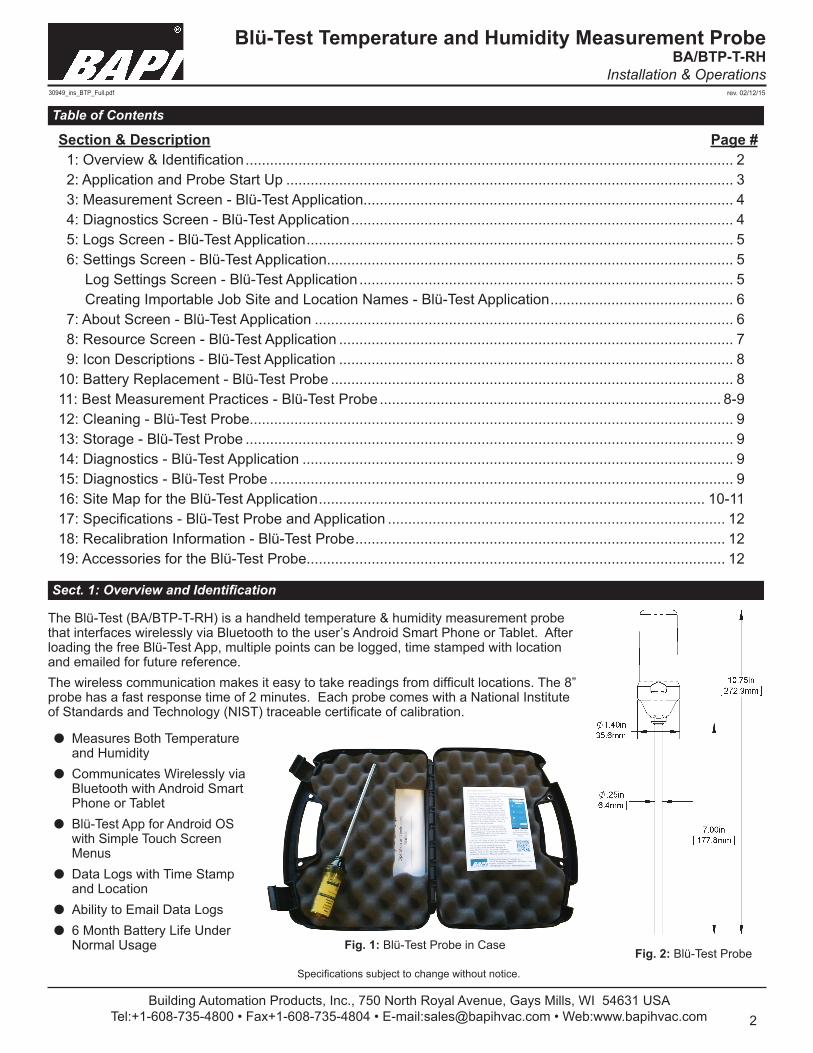
The Blü-Test (BA/BTP-T-RH) is a handheld temperature & humidity measurement probe that interfaces wirelessly via Bluetooth to the user’s Android Smart Phone or Tablet. After loading the free Blü-Test App, multiple points can be logged, time stamped with location and emailed for future reference.The wireless communication makes it easy to take readings from difficult locations. The 8” probe has a fast response time of 2 minutes. Each probe comes with a National Institute of Standards and Technology (NIST) traceable certificate of calibration.
l Measures Both Temperature and Humidity
l Communicates Wirelessly via Bluetooth with Android Smart Phone or Tablet
l Blü-Test App for Android OS with Simple Touch Screen Menus
l Data Logs with Time Stamp and Location
l Ability to Email Data Logsl 6 Month Battery Life Under
Normal Usage Fig. 2: Blü-Test Probe
Sect. 1: Overview and Identification
Table of Contents
Section & Description Page # 1: Overview & Identification ........................................................................................................................ 2 2: Application and Probe Start Up .............................................................................................................. 3 3: Measurement Screen - Blü-Test Application........................................................................................... 4 4: Diagnostics Screen - Blü-Test Application .............................................................................................. 4 5: Logs Screen - Blü-Test Application ......................................................................................................... 5 6: Settings Screen - Blü-Test Application.................................................................................................... 5 Log Settings Screen - Blü-Test Application ............................................................................................ 5 Creating Importable Job Site and Location Names - Blü-Test Application ............................................. 6 7: About Screen - Blü-Test Application ....................................................................................................... 6 8: Resource Screen - Blü-Test Application ................................................................................................. 7 9: Icon Descriptions - Blü-Test Application ................................................................................................. 810: Battery Replacement - Blü-Test Probe ................................................................................................... 811: Best Measurement Practices - Blü-Test Probe .................................................................................... 8-912: Cleaning - Blü-Test Probe....................................................................................................................... 913: Storage - Blü-Test Probe ........................................................................................................................ 914: Diagnostics - Blü-Test Application .......................................................................................................... 915: Diagnostics - Blü-Test Probe .................................................................................................................. 916: Site Map for the Blü-Test Application ............................................................................................... 10-1117: Specifications - Blü-Test Probe and Application ................................................................................... 1218: Recalibration Information - Blü-Test Probe ........................................................................................... 1219: Accessories for the Blü-Test Probe....................................................................................................... 12
Fig. 1: Blü-Test Probe in Case
30949_ins_BTP_Full.pdf
Installation & Operations
Blü-Test Temperature and Humidity Measurement ProbeBA/BTP-T-RH
Building Automation Products, Inc., 750 North Royal Avenue, Gays Mills, WI 54631 USATel:+1-608-735-4800 • Fax+1-608-735-4804 • E-mail:[email protected] • Web:www.bapihvac.com
Specifications subject to change without notice.
rev. 02/12/15
3
Sect. 2: Application and Probe Start Up
Operating the Blü-Test Probe is as simple as turning on the probe, starting up the Blü-Test Application on your smart phone or tablet and syncing the bluetooth communication between the two. The steps below will get you up and running.
Blü-Test Application Software (Phone or Tablet Display):The Blü-Test APK (Android Application Package) software must be loaded on your Android Smart Phone or Tablet to communicate with the probe. The application requires a minimum operating system of Android OS 2.2 or higher and Bluetooth communication version V1.2 or higher. A sample list of compatible Android devices is shown in the Specifications section. However, any Android device meeting the specifications above should work.
Loading the Blü-Test Application:1. Access Play.Google.com on your internet enabled phone or tablet.2. Search Google Play for “Blu-Test” (Do not use the “ü” symbol in your search). 3. Click the Blü-Test Application icon (Fig. 3) and select “Install” to download to your device.
Running the Blü-Test Application:1. Remove the probe cover (CCW) and install the battery (+ toward the button end, see
Fig. 4) then re-install the cover hand tight (CW). See Section 10 for a full description.2. Turn on the Blü-Test Probe by pushing the top On/Off button (Fig. 4A).
The green LED indicates power and the blue LED indicates Bluetooth communication (1 sec. intervals).
3. When the Blü-Test Application has finished loading, select “Run Application”. The Initial Splash Screen will display and the application will start to search for the probe. If Bluetooth is currently turned off, the application will ask if it can turn on Bluetooth on the device. Select “Yes”.
4. The application will then ask for the Product Identification Number (PIN) of the Blü-Test Probe. Enter “1319”.
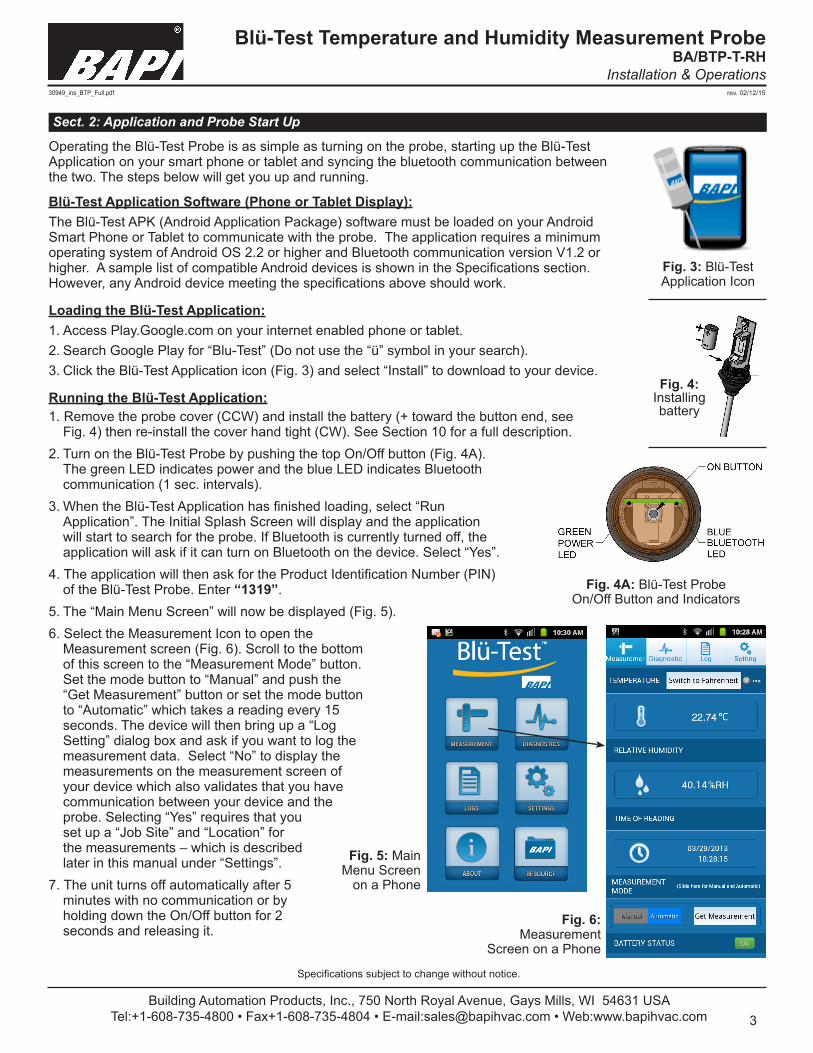
5. The “Main Menu Screen” will now be displayed (Fig. 5). 6. Select the Measurement Icon to open the
Measurement screen (Fig. 6). Scroll to the bottom of this screen to the “Measurement Mode” button. Set the mode button to “Manual” and push the “Get Measurement” button or set the mode button to “Automatic” which takes a reading every 15 seconds. The device will then bring up a “Log Setting” dialog box and ask if you want to log the measurement data. Select “No” to display the measurements on the measurement screen of your device which also validates that you have communication between your device and the probe. Selecting “Yes” requires that you set up a “Job Site” and “Location” for the measurements – which is described later in this manual under “Settings”.
7. The unit turns off automatically after 5 minutes with no communication or by holding down the On/Off button for 2 seconds and releasing it.
Fig. 3: Blü-Test Application Icon
Fig. 4: Installing battery
Fig. 4A: Blü-Test Probe On/Off Button and Indicators
Fig. 6: Measurement
Screen on a Phone
Fig. 5: Main Menu Screen
on a Phone
30949_ins_BTP_Full.pdf
Installation & Operations
Blü-Test Temperature and Humidity Measurement ProbeBA/BTP-T-RH
Building Automation Products, Inc., 750 North Royal Avenue, Gays Mills, WI 54631 USATel:+1-608-735-4800 • Fax+1-608-735-4804 • E-mail:[email protected] • Web:www.bapihvac.com
Specifications subject to change without notice.
rev. 02/12/15
4
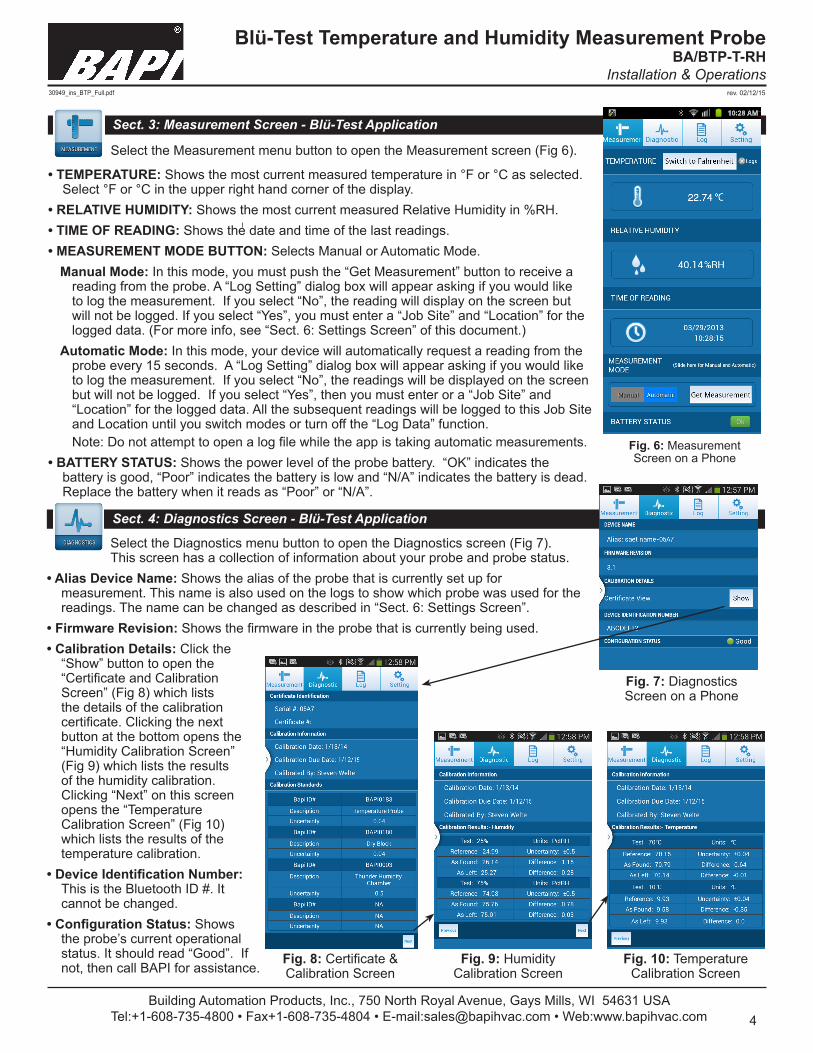
Select the Measurement menu button to open the Measurement screen (Fig 6).
• TEMPERATURE: Shows the most current measured temperature in °F or °C as selected. Select °F or °C in the upper right hand corner of the display.
• RELATIVE HUMIDITY: Shows the most current measured Relative Humidity in %RH.• TIME OF READING: Shows the date and time of the last readings.• MEASUREMENT MODE BUTTON: Selects Manual or Automatic Mode.
Manual Mode: In this mode, you must push the “Get Measurement” button to receive a reading from the probe. A “Log Setting” dialog box will appear asking if you would like to log the measurement. If you select “No”, the reading will display on the screen but will not be logged. If you select “Yes”, you must enter a “Job Site” and “Location” for the logged data. (For more info, see “Sect. 6: Settings Screen” of this document.)
Automatic Mode: In this mode, your device will automatically request a reading from the probe every 15 seconds. A “Log Setting” dialog box will appear asking if you would like to log the measurement. If you select “No”, the readings will be displayed on the screen but will not be logged. If you select “Yes”, then you must enter or a “Job Site” and “Location” for the logged data. All the subsequent readings will be logged to this Job Site and Location until you switch modes or turn off the “Log Data” function. Note: Do not attempt to open a log file while the app is taking automatic measurements.
• BATTERY STATUS: Shows the power level of the probe battery. “OK” indicates the battery is good, “Poor” indicates the battery is low and “N/A” indicates the battery is dead. Replace the battery when it reads as “Poor” or “N/A”.
Sect. 3: Measurement Screen - Blü-Test Application
Select the Diagnostics menu button to open the Diagnostics screen (Fig 7). This screen has a collection of information about your probe and probe status.
• Alias Device Name: Shows the alias of the probe that is currently set up for measurement. This name is also used on the logs to show which probe was used for the readings. The name can be changed as described in “Sect. 6: Settings Screen”.
• Firmware Revision: Shows the firmware in the probe that is currently being used.• Calibration Details: Click the
“Show” button to open the “Certificate and Calibration Screen” (Fig 8) which lists the details of the calibration certificate. Clicking the next button at the bottom opens the “Humidity Calibration Screen” (Fig 9) which lists the results of the humidity calibration. Clicking “Next” on this screen opens the “Temperature Calibration Screen” (Fig 10) which lists the results of the temperature calibration.
• Device Identification Number: This is the Bluetooth ID #. It cannot be changed.
• Configuration Status: Shows the probe’s current operational status. It should read “Good”. If not, then call BAPI for assistance.
Sect. 4: Diagnostics Screen - Blü-Test Application
Fig. 6: Measurement Screen on a Phone
Fig. 7: Diagnostics Screen on a Phone
Fig. 8: Certificate & Calibration Screen
Fig. 9: Humidity Calibration Screen
Fig. 10: Temperature Calibration Screen

30949_ins_BTP_Full.pdf
Installation & Operations
Blü-Test Temperature and Humidity Measurement ProbeBA/BTP-T-RH
Building Automation Products, Inc., 750 North Royal Avenue, Gays Mills, WI 54631 USATel:+1-608-735-4800 • Fax+1-608-735-4804 • E-mail:[email protected] • Web:www.bapihvac.com
rev. 02/12/15
5
Select the Settings Menu button to access the Settings screen (Fig 13).
Bluetooth ScreenTap the word “Bluetooth” to bring up a list of available probes (Fig 14). Available probes are detected and assigned a name during the initial application start-up and can be changed in the Settings menu via the “Set Sensing Device Name” dialogue box (Fig 15). Select the probe you want to communicate or “pair” with by clicking the check box on the right. Note: The probes must be turned on to be detected by the application. Click the ON/OFF button at the right to turn on or off the Bluetooth communication.
Set Alias Device NameClick this link to open the dialog box (Fig 15) to change the name or “alias” of the active probe. This name is useful if you have more than one probe because each probe must have its own name.
Calibration Mode: This area is for factory use only.
Log Settings ScreenTap the words “Log Settings” to enter the “Log Settings” screen (Fig 16). From here you can turn the trend logging feature on or off and also see the current Job Site and Location. Tap the words “Set Job Site” to enter a new Job Site or select an existing Job Site from the dropdown menu (Fig 17). Tap the words “Set Location” (Fig 18) to enter a new Location or select an existing Location from the dropdown menu (Fig 18). Note: You can have multiple “Locations” at each “Job Site”. Tap the words “Set Logging Time” to open the Logging Time selection box (Fig 19). This box sets the amount of time between each reading that is taken by the App.
Fig. 11: Logs Screen on a Phone
Sect. 5: Logs Screen - Blü-Test App
Sect. 6: Settings Screen - Blü-Test App
Select the Logs menu button to access the Logs screen (Fig 11). The measured data is organized
by Job Site and Location. Select the Job Site and the Location to display the log for that Location (Fig 12). The lastest reading is shown on top. Note: The readings Log does not update to the current reading while it is selected and being displayed. You must go back two steps “ ” to the Log Icon and click on the Job Site and Location to update the readings Log with current values.Using the buttons at the top of the screen, you can Email the log data to any email address. The data is sent in a .csv file and can be opened with any spread sheet program. You can also use the Delete button at the top to delete the log data when you are through with it.
Fig. 12: Logs Screen for a specific Site and Job
Log Settings Screen continued on next page...
Fig. 19: Logging Time Selection Box
Fig. 13: Settings Screen
Fig. 14: Bluetooth Screen
FactoryUse Only
Fig. 15: Set Sensing Device
Name Dialog Box
Fig. 16: LogSetting Screen
Fig. 17: Set Job Site Dropdown Menu
Fig. 18: Set Location Dropdown
Menu
30949_ins_BTP_Full.pdf
Installation & Operations
Blü-Test Temperature and Humidity Measurement ProbeBA/BTP-T-RH
Building Automation Products, Inc., 750 North Royal Avenue, Gays Mills, WI 54631 USATel:+1-608-735-4800 • Fax+1-608-735-4804 • E-mail:[email protected] • Web:www.bapihvac.com
Specifications subject to change without notice.
rev. 02/12/15
6
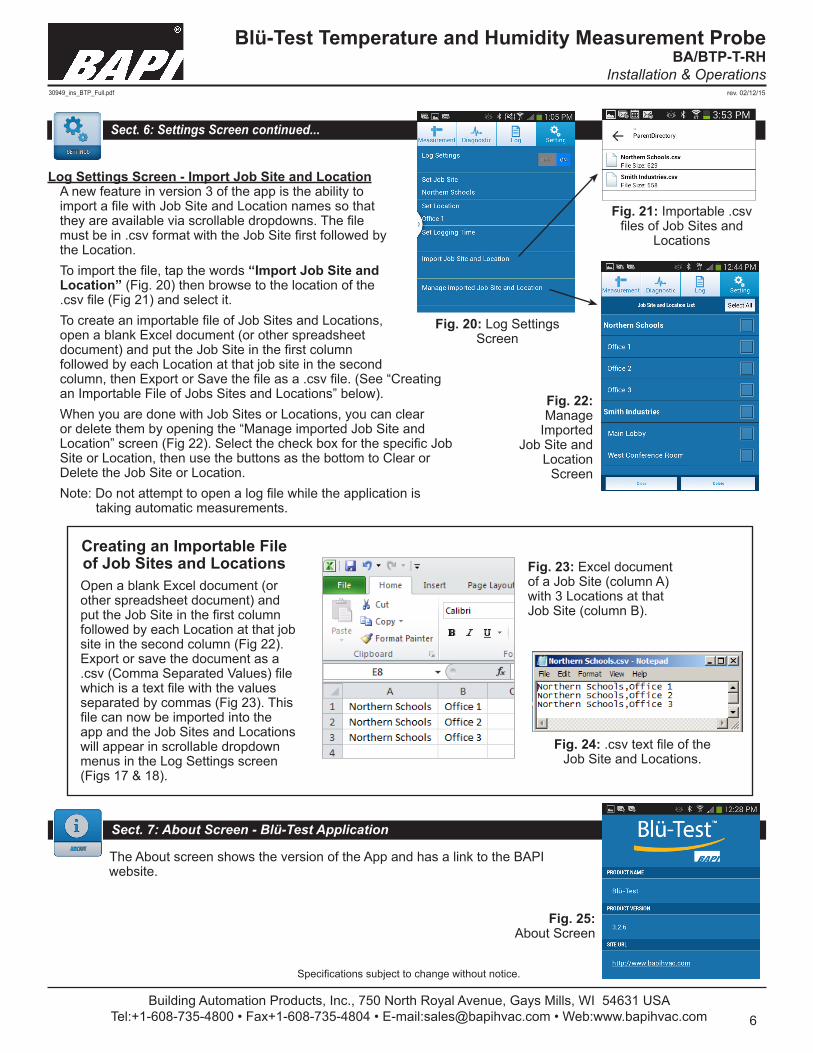
Log Settings Screen - Import Job Site and LocationA new feature in version 3 of the app is the ability to import a file with Job Site and Location names so that they are available via scrollable dropdowns. The file must be in .csv format with the Job Site first followed by the Location.To import the file, tap the words “Import Job Site and Location” (Fig. 20) then browse to the location of the .csv file (Fig 21) and select it. To create an importable file of Job Sites and Locations, open a blank Excel document (or other spreadsheet document) and put the Job Site in the first column followed by each Location at that job site in the second column, then Export or Save the file as a .csv file. (See “Creating an Importable File of Jobs Sites and Locations” below).When you are done with Job Sites or Locations, you can clear or delete them by opening the “Manage imported Job Site and Location” screen (Fig 22). Select the check box for the specific Job Site or Location, then use the buttons as the bottom to Clear or Delete the Job Site or Location.Note: Do not attempt to open a log file while the application is
taking automatic measurements.
Sect. 6: Settings Screen continued...
Sect. 7: About Screen - Blü-Test Application
The About screen shows the version of the App and has a link to the BAPI website.
Fig. 20: Log Settings Screen
Fig. 21: Importable .csv files of Job Sites and
Locations
Fig. 23: Excel document of a Job Site (column A) with 3 Locations at that Job Site (column B).
Fig. 24: .csv text file of the Job Site and Locations.
Creating an Importable File of Job Sites and LocationsOpen a blank Excel document (or other spreadsheet document) and put the Job Site in the first column followed by each Location at that job site in the second column (Fig 22). Export or save the document as a .csv (Comma Separated Values) file which is a text file with the values separated by commas (Fig 23). This file can now be imported into the app and the Job Sites and Locations will appear in scrollable dropdown menus in the Log Settings screen (Figs 17 & 18).
Fig. 22: Manage
Imported Job Site and
Location Screen
Fig. 25: About Screen
30949_ins_BTP_Full.pdf
Installation & Operations
Blü-Test Temperature and Humidity Measurement ProbeBA/BTP-T-RH
Building Automation Products, Inc., 750 North Royal Avenue, Gays Mills, WI 54631 USATel:+1-608-735-4800 • Fax+1-608-735-4804 • E-mail:[email protected] • Web:www.bapihvac.com
rev. 02/12/15
7
Sect. 8: Resource Screen - Blü-Test Application
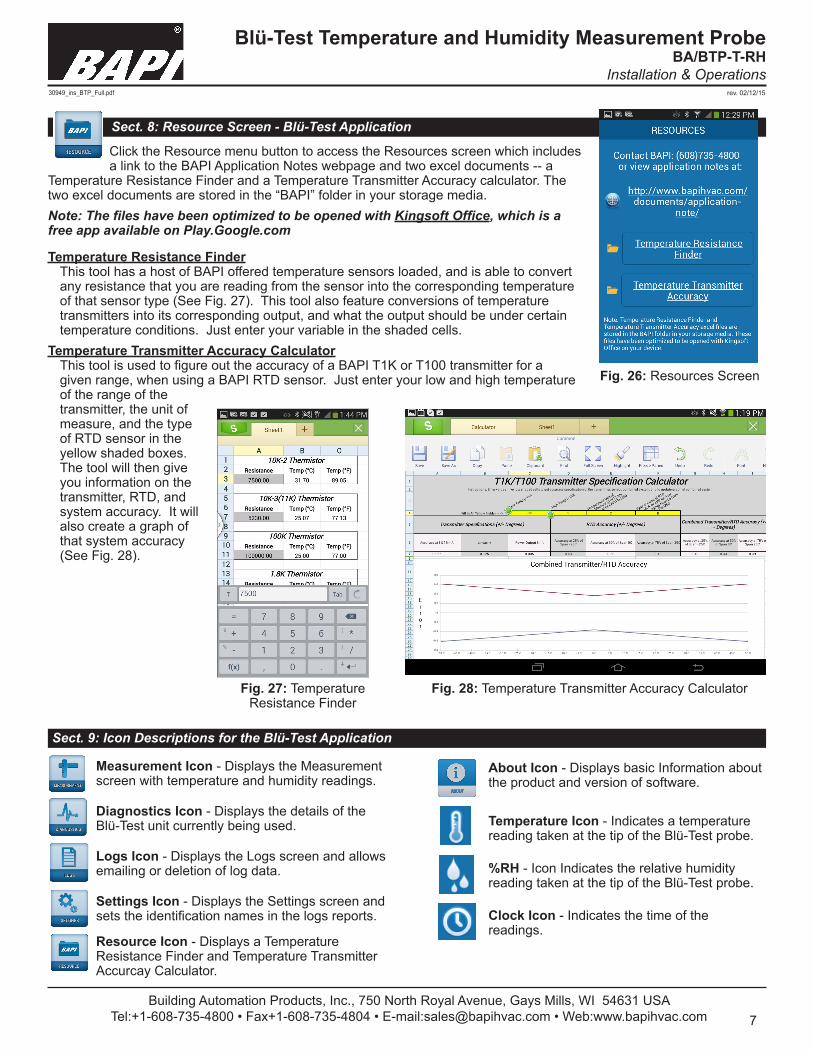
Click the Resource menu button to access the Resources screen which includes a link to the BAPI Application Notes webpage and two excel documents -- a
Temperature Resistance Finder and a Temperature Transmitter Accuracy calculator. The two excel documents are stored in the “BAPI” folder in your storage media. Note: The files have been optimized to be opened with Kingsoft Office, which is a free app available on Play.Google.com
Temperature Resistance FinderThis tool has a host of BAPI offered temperature sensors loaded, and is able to convert any resistance that you are reading from the sensor into the corresponding temperature of that sensor type (See Fig. 27). This tool also feature conversions of temperature transmitters into its corresponding output, and what the output should be under certain temperature conditions. Just enter your variable in the shaded cells.
Temperature Transmitter Accuracy CalculatorThis tool is used to figure out the accuracy of a BAPI T1K or T100 transmitter for a given range, when using a BAPI RTD sensor. Just enter your low and high temperature of the range of the transmitter, the unit of measure, and the type of RTD sensor in the yellow shaded boxes. The tool will then give you information on the transmitter, RTD, and system accuracy. It will also create a graph of that system accuracy (See Fig. 28).
Fig. 26: Resources Screen
Measurement Icon - Displays the Measurement screen with temperature and humidity readings.
Diagnostics Icon - Displays the details of the Blü-Test unit currently being used.
Logs Icon - Displays the Logs screen and allows emailing or deletion of log data.
Settings Icon - Displays the Settings screen and sets the identification names in the logs reports.
Resource Icon - Displays a Temperature Resistance Finder and Temperature Transmitter Accurcay Calculator.
Sect. 9: Icon Descriptions for the Blü-Test Application
About Icon - Displays basic Information about the product and version of software.
Temperature Icon - Indicates a temperature reading taken at the tip of the Blü-Test probe.
%RH - Icon Indicates the relative humidity reading taken at the tip of the Blü-Test probe.
Clock Icon - Indicates the time of the readings.
Fig. 28: Temperature Transmitter Accuracy CalculatorFig. 27: Temperature Resistance Finder
30949_ins_BTP_Full.pdf
Installation & Operations
Blü-Test Temperature and Humidity Measurement ProbeBA/BTP-T-RH
Building Automation Products, Inc., 750 North Royal Avenue, Gays Mills, WI 54631 USATel:+1-608-735-4800 • Fax+1-608-735-4804 • E-mail:[email protected] • Web:www.bapihvac.com
rev. 02/12/15
8
Blü-Test Application• Test your probe with the “Log Settings” turned off to make sure everything is working properly. Bring an extra battery for
the probe and the charger for your display device to the job site.• At the job site, go to the “Settings” menu and set the “Log Settings” to “On” to start logging the readings. The readings
will be logged into the current “Job Site” and “Location” until a new “Job Site” and/or “Location” is entered or until the logging function is turned off. Set the “Log Settings” to “Off” when you’ve taken your last reading at a specific location. That way the last reading in the log is the one to use in the commissioning report.
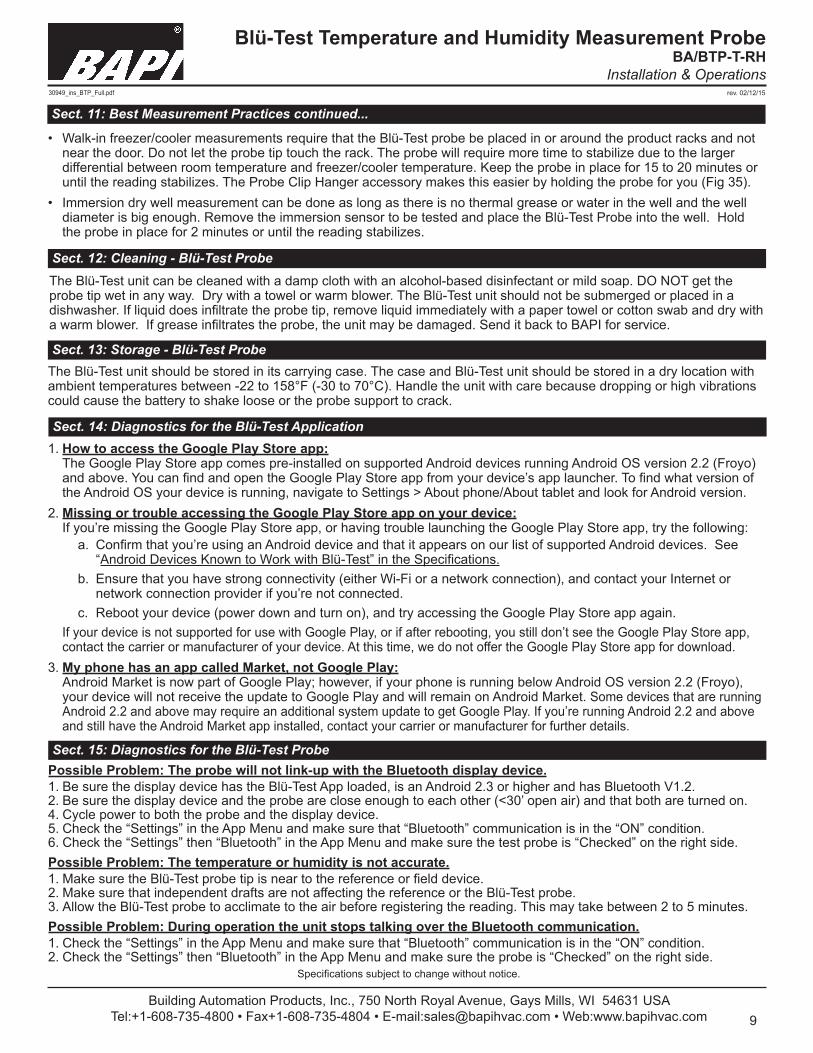
Blü-Test Probe Measurement:• Room Sensor measurement is done by holding the Blü-Test probe directly under the sensor enclosure for 3 minutes or
until the reading stabilizes. Body heat or breathing on the sensor is a major source of faulty readings, so holding the Blü-Test plastic at the button end and standing away from the sensor is the best way to ensure a good measurement. The Probe Clip Hanger accessory (BA/PCH-1) makes this easier by holding the probe for you (Fig 33).
• Duct sensor measurement is done by drilling a 5/8” hole in the duct near the duct sensor to be tested. Insert the Blü-Test probe in the hole so the tip is as close as possible to the duct sensor under test. Hold the Blü-Test probe in place for 2 minutes or until the reading stabilizes. When finished, remove the probe and cover the test hole with duct tape.
• Duct averaging measurement is not very precise and requires that the air stream be placed in a 100% air flow condition from the AHU controls (100% RA or OSA, no mixing) to eliminate stratification. Drill a 5/8” hole in the duct near the duct sensor to be tested. Insert the Blü-Test probe so the tip is as close as possible to the part of the averaging duct sensor under test. Hold the Blü-Test probe in place for 2 minutes or until the reading stabilizes. When finished, remove the probe and cover the test hole with duct tape.
• Outside air sensor measurement requires that the Blü-Test probe be placed next to the outside air sensor. This may require a ladder or extension pole. Hold the Blü-Test probe in place for 3 minutes or until the reading stabilizes. The Probe Clip Hanger accessory (BA/PCH-1) makes this easier by holding the probe for you (Fig 34).
Fig. 33: Probe Clip Hanger used on a
room sensor
Fig. 34: Probe Clip
Hanger used on an outside
air sensor
Fig. 35: Probe Clip
Hanger used on a wire shelf
Sect. 10: Battery Replacement - Blü-Test Probe
Fig. 29: Unscrew
cap
Cap Removal
Tool
Checkfor
corrosion
Fig. 30:Remove battery
Fig. 31: Replace battery Fig. 32:
Replace cap
Sect. 11: Best Measurement Practices
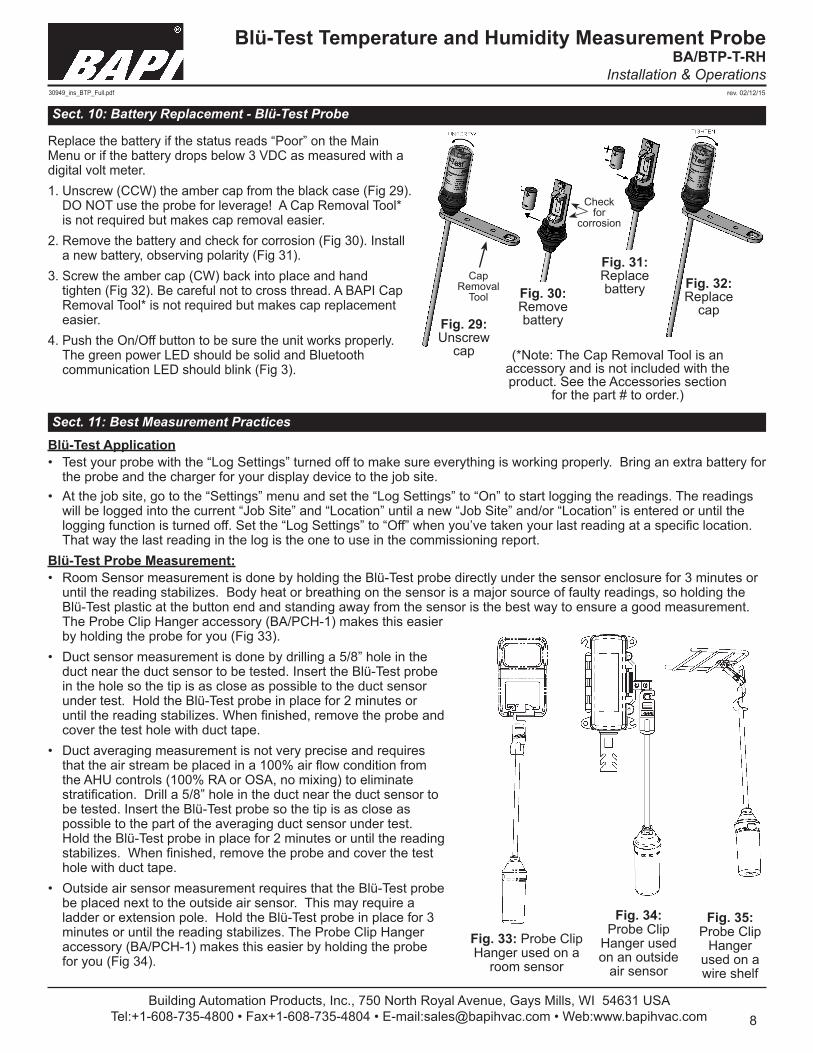
(*Note: The Cap Removal Tool is an accessory and is not included with the product. See the Accessories section
for the part # to order.)
Replace the battery if the status reads “Poor” on the Main Menu or if the battery drops below 3 VDC as measured with a digital volt meter.1. Unscrew (CCW) the amber cap from the black case (Fig 29).
DO NOT use the probe for leverage! A Cap Removal Tool* is not required but makes cap removal easier.
2. Remove the battery and check for corrosion (Fig 30). Install a new battery, observing polarity (Fig 31).
3. Screw the amber cap (CW) back into place and hand tighten (Fig 32). Be careful not to cross thread. A BAPI Cap Removal Tool* is not required but makes cap replacement easier.
4. Push the On/Off button to be sure the unit works properly. The green power LED should be solid and Bluetooth communication LED should blink (Fig 3).
30949_ins_BTP_Full.pdf
Installation & Operations
Blü-Test Temperature and Humidity Measurement ProbeBA/BTP-T-RH
Building Automation Products, Inc., 750 North Royal Avenue, Gays Mills, WI 54631 USATel:+1-608-735-4800 • Fax+1-608-735-4804 • E-mail:[email protected] • Web:www.bapihvac.com
Specifications subject to change without notice.
rev. 02/12/15
9
• Walk-in freezer/cooler measurements require that the Blü-Test probe be placed in or around the product racks and not near the door. Do not let the probe tip touch the rack. The probe will require more time to stabilize due to the larger differential between room temperature and freezer/cooler temperature. Keep the probe in place for 15 to 20 minutes or until the reading stabilizes. The Probe Clip Hanger accessory makes this easier by holding the probe for you (Fig 35).
• Immersion dry well measurement can be done as long as there is no thermal grease or water in the well and the well diameter is big enough. Remove the immersion sensor to be tested and place the Blü-Test Probe into the well. Hold the probe in place for 2 minutes or until the reading stabilizes.
Sect. 11: Best Measurement Practices continued...
Sect. 14: Diagnostics for the Blü-Test Application1. How to access the Google Play Store app:
The Google Play Store app comes pre-installed on supported Android devices running Android OS version 2.2 (Froyo) and above. You can find and open the Google Play Store app from your device’s app launcher. To find what version of the Android OS your device is running, navigate to Settings > About phone/About tablet and look for Android version.
2. Missing or trouble accessing the Google Play Store app on your device:If you’re missing the Google Play Store app, or having trouble launching the Google Play Store app, try the following:
a. Confirm that you’re using an Android device and that it appears on our list of supported Android devices. See “Android Devices Known to Work with Blü-Test” in the Specifications.
b. Ensure that you have strong connectivity (either Wi-Fi or a network connection), and contact your Internet or network connection provider if you’re not connected.
c. Reboot your device (power down and turn on), and try accessing the Google Play Store app again. If your device is not supported for use with Google Play, or if after rebooting, you still don’t see the Google Play Store app, contact the carrier or manufacturer of your device. At this time, we do not offer the Google Play Store app for download.
3. My phone has an app called Market, not Google Play:Android Market is now part of Google Play; however, if your phone is running below Android OS version 2.2 (Froyo), your device will not receive the update to Google Play and will remain on Android Market. Some devices that are running Android 2.2 and above may require an additional system update to get Google Play. If you’re running Android 2.2 and above and still have the Android Market app installed, contact your carrier or manufacturer for further details.
Possible Problem: The probe will not link-up with the Bluetooth display device.1. Be sure the display device has the Blü-Test App loaded, is an Android 2.3 or higher and has Bluetooth V1.2.2. Be sure the display device and the probe are close enough to each other (<30’ open air) and that both are turned on.4. Cycle power to both the probe and the display device.5. Check the “Settings” in the App Menu and make sure that “Bluetooth” communication is in the “ON” condition.6. Check the “Settings” then “Bluetooth” in the App Menu and make sure the test probe is “Checked” on the right side.Possible Problem: The temperature or humidity is not accurate.1. Make sure the Blü-Test probe tip is near to the reference or field device.2. Make sure that independent drafts are not affecting the reference or the Blü-Test probe.3. Allow the Blü-Test probe to acclimate to the air before registering the reading. This may take between 2 to 5 minutes.Possible Problem: During operation the unit stops talking over the Bluetooth communication.1. Check the “Settings” in the App Menu and make sure that “Bluetooth” communication is in the “ON” condition.2. Check the “Settings” then “Bluetooth” in the App Menu and make sure the probe is “Checked” on the right side.
Sect. 15: Diagnostics for the Blü-Test Probe
The Blü-Test unit can be cleaned with a damp cloth with an alcohol-based disinfectant or mild soap. DO NOT get the probe tip wet in any way. Dry with a towel or warm blower. The Blü-Test unit should not be submerged or placed in a dishwasher. If liquid does infiltrate the probe tip, remove liquid immediately with a paper towel or cotton swab and dry with a warm blower. If grease infiltrates the probe, the unit may be damaged. Send it back to BAPI for service.
Sect. 12: Cleaning - Blü-Test Probe
The Blü-Test unit should be stored in its carrying case. The case and Blü-Test unit should be stored in a dry location with ambient temperatures between -22 to 158°F (-30 to 70°C). Handle the unit with care because dropping or high vibrations could cause the battery to shake loose or the probe support to crack.
Sect. 13: Storage - Blü-Test Probe
30949_ins_BTP_Full.pdf
Installation & Operations
Blü-Test Temperature and Humidity Measurement ProbeBA/BTP-T-RH
Building Automation Products, Inc., 750 North Royal Avenue, Gays Mills, WI 54631 USATel:+1-608-735-4800 • Fax+1-608-735-4804 • E-mail:[email protected] • Web:www.bapihvac.com
rev. 02/12/15
10
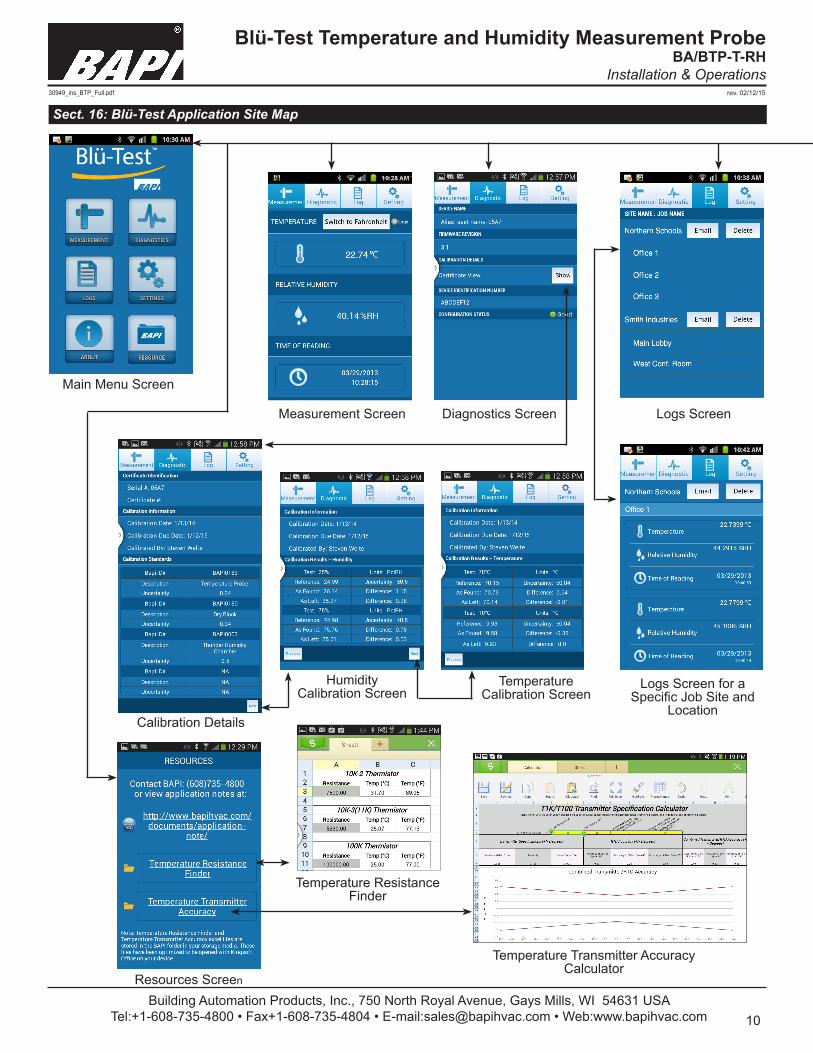
Sect. 16: Blü-Test Application Site Map
Measurement Screen
Main Menu Screen
Diagnostics Screen Logs Screen
Logs Screen for a Specific Job Site and
LocationCalibration Details
Humidity Calibration Screen
Temperature Calibration Screen
Resources Screen
Temperature Resistance Finder
Temperature Transmitter Accuracy Calculator
30949_ins_BTP_Full.pdf
Installation & Operations
Blü-Test Temperature and Humidity Measurement ProbeBA/BTP-T-RH
Building Automation Products, Inc., 750 North Royal Avenue, Gays Mills, WI 54631 USATel:+1-608-735-4800 • Fax+1-608-735-4804 • E-mail:[email protected] • Web:www.bapihvac.com
rev. 02/12/15
11
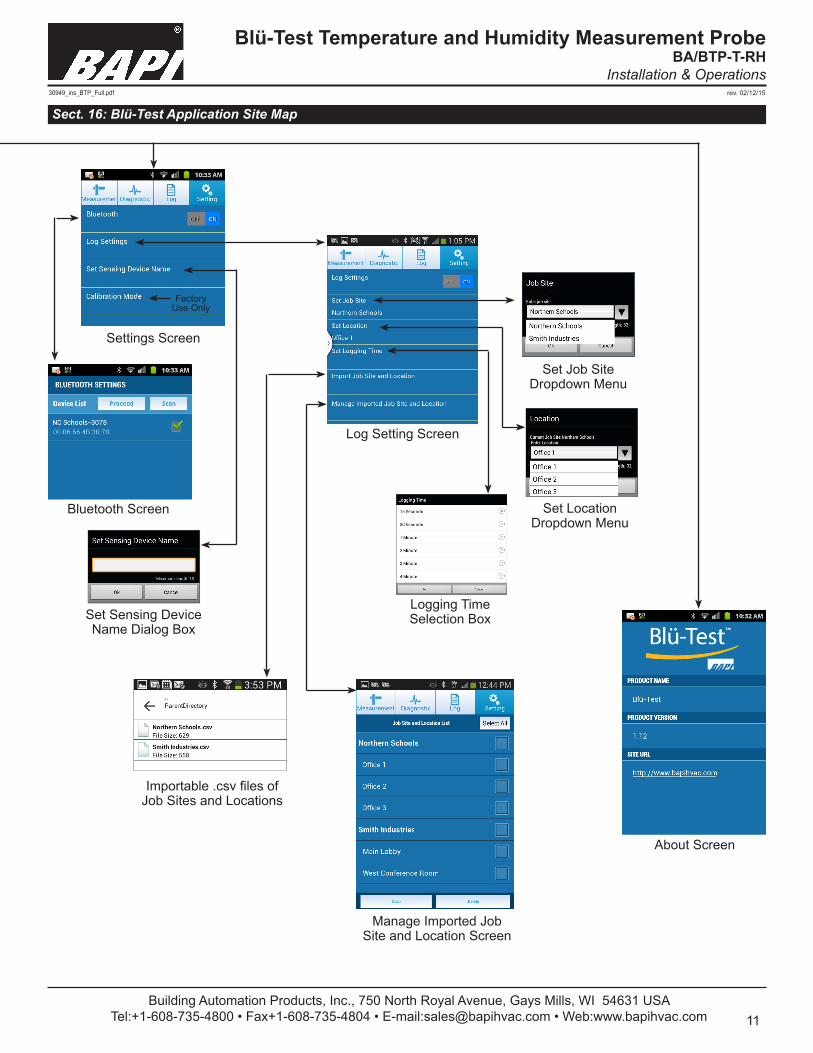
Factory Use Only
Settings Screen
About Screen
Sect. 16: Blü-Test Application Site Map
Logging Time Selection BoxSet Sensing Device
Name Dialog Box
Log Setting Screen
Set Job Site Dropdown Menu
Set Location Dropdown Menu
Bluetooth Screen
Importable .csv files of Job Sites and Locations
Manage Imported Job Site and Location Screen

30949_ins_BTP_Full.pdf
Installation & Operations
Blü-Test Temperature and Humidity Measurement ProbeBA/BTP-T-RH
Building Automation Products, Inc., 750 North Royal Avenue, Gays Mills, WI 54631 USATel:+1-608-735-4800 • Fax+1-608-735-4804 • E-mail:[email protected] • Web:www.bapihvac.com
Specifications subject to change without notice.
rev. 02/12/15
12
Handheld Probe (HHP) Specifications (BA/BTP-T-RH)Power:............................3.0 to 3.6V 1,000 mAh Battery Included (Replaceable)Battery Type: .................Lithium CR2 Battery TypeBattery Disposal: ..........Local recycle centers or per local jurisdictionBattery Life:...................Up to 6 months under normal useHHP Controls: ...............On/Off Button (If not poled, 5 min auto off)HHP LED Indicators: Green LED:...................Unit On (steady) Blue LED: .....................Bluetooth Active Comm. (fast blink) Idle (slow blink) Environmental: Probe ........................... -40 to 185°F (-40 to 85°C), Plastic .......................... -22 to 158°F (-30 to 70°C), Humidity Overall .......... 5 to 95% Non-condensingProbe Measurement Range: Temperature: ............... -40 to 185°F (-40 to 85°C), Humidity: ..................... 10 to 90% Non-condensingTypical Accuracy: Temperature: ......... ±0.54°F@77°F (±0.3°C@25°C) Drift: <0.04°C/Yr • Repeatability: ±0.1°C Humidity:................ ±2%RH @ 77°F (25°C) Hysteresis: ±1% • Drift: <0.5% RH/Yr Repeatability: ±0.1%Specific Accuracy: .. See provided NIST certificate w/ unit Sensor: ..................... Capacitive Polymer, Semicond. Band GapResponse Time: ....... ≈2 Min. @63% of Step Value in still airDimensions: ............. 12” Overall HeightProbe: ....................... Stainless Steel - 7” Length, .25” Dia.Enclosure Material: . Molded PlasticData Transfer: .......... Updates in “Auto” every 15 secondsCarrying Case: ......... Plastic w/ handle, space for multiple probes Agency: .................... RoHS, CE, NIST Traceable CertificateCommunication: Wireless via Bluetooth Power Class: . Class 2 (≈30 feet open air) Version: ......... V1.2 Security:......... Short term 23 hr encryption (resets on power up)Radio Frequency: .... 2.4 to 2.48 GHz, Freq. Hopping (ISM)Antenna: ................... Built inside probeFCC ID: ..................... T9J-RN42End Product Listing: Qualified Design I.D. (QDID): B014867 Enhanced Privacy I.D. (EPID): 35882
Sect. 17: Specifications
BAPI Blü Application Specifications Program: ............... Android OS 2.2 or higherDisplayed Info: ..... On smart phone or tablet Measured Data: ... Temperature (°F/°C) and %RH Time Stamp: ........ Date and 24-hour time Location: .............. Manually entered Job Site & Point Location Log:...................... Current trend data, time stamp & locationDisplay Communication Status: Bluetooth: ............ On-line (Blue LED) Discovered Devices: Shows all Bluetooth probes in range Select:.................. Select one device probe Paired ID Number: PIN is 1319 for all BAPI probes Email:................... Sends trend data log to any email address LOG file: .............. .csv file format for use with spread sheets
Note: A user supplied Bluetooth-enabled Android Smart Phone or Tablet is required as the display device. (Apple iOS is not currently supported.)
Android Devices Known to Work with Blü-Test Typical Devices that work with this program can be found on-line at Android.com under “Browse Devices”. The only Android requirement for this program app is that the device runs on the Android Operating System 2.2 or higher and is Bluetooth enabled with V1.2 or higher. Below are a few specific devices. Type Make & Model Operating Sys. Bluetooth Ver.Phone Samsung Galaxy S III Android 4.1 4.0Tablet Google Nexus 10 Android 4.1 4.0 Phone Motorola RAZR I Android 4.04 2.1Phone HTC ONE V Android 4.0 3.0Tablet Toshiba Excite 13 Android 4.0 3.0Phone Motorola Droid 4 Android 4.04 4.0Tablet Toshiba AT200 Android 4.03 2.1Phone Samsung Galaxy S II Android 4.1 3.0
CAUTIONRisk of explosion if battery is replaced by an incorrect type. Dispose of used batteries according to the instructions
BA/FP-CRT-1: Plastic Cap Removal ToolBA/FP-CLP-2: Stainless Steel Universal Probe holderBA/FP-CLP-7: Stainless Steel Probe holder w/flat hookBA/BAT-CR2: Replacement battery, 3.6VDC, CR2BA/PCH-1: Probe Clip Hanger
Sect. 19: Accessories
The Blü-Test unit is factory calibrated and comes with an NIST traceable certificate. The Blü-test should be re-calibrated once every year as a standard practice. The unit cannot be field calibrated and must be calibrated at the factory, which includes a thorough inspection, cleaning, new battery, calibration and an NIST traceable re-certification.
Sect. 18: Recalibration - Blü-Test Probe
Cap Removal
Tool