trace voice tools installation guide€¦ · installation instructions for trace voice recording...
TRANSCRIPT

Trace Voice Tools Installation Guide
On-Demand Face-to-Face
©2013 The White Stone Group, Inc. TraceCommunication.com
Intended for Trace Customers Only Proprietary Materials
2
Table of Contents
Voice On-Demand Installation ……………………………………………… ……….. 3
Minimum System Requirements ……………………………………………… 3
Hardware Requirements …………………………………………………………. 3
Connection Instructions for Trace Hardware …………………..……. 4
Voice Face-to-Face Installation ……………………………………………… ……….. 6
Installation Instructions for Trace Voice Recording Software ……….……. 7
Using Trace Voice Recording Software…………………………………………………. 10
Testing Trace Voice Recording Software ………………………………………………. 13
Troubleshooting Audio & Volume Issues (Software)..…………………………. 14
Troubleshooting Audio & volume Issues (Hardware).……………………….. 16
Trace Voice On-Demand Connection with Optional Items Shown ………… 20
This icon denotes important information concerning the installation of Voice On-Demand. Please read information carefully before proceeding.
©2013 The White Stone Group, Inc. TraceCommunication.com
Intended for Trace Customers Only Proprietary Materials
3
Voice On-Demand Installation
Please read these instructions completely before installing Voice On-Demand.
Software installation will require Administrator permissions on user’s computer. Users MUST also have Write and Modify NTFS permissions to C:\Documents and Settings\All Users\Application Data (C:\Program Data for Windows 7) and C:\Program Files\Trace Voice
Minimum System Requirements Microsoft Windows XP , Vista, or Windows 7 (32- and 64-bit)
An available USB Port (1.1 or higher)
2 GHz Processor
1GB RAM (2 GB recommended if using non-Trace apps in conjunction with Trace)
1 GB free hard disk space (Temporary cache space for audio files)
Microsoft .NET Framework 3.5 SP 1 Audio-capable (sound card), speakers/headphones (if playback is desired)
Real-time scans from anti-virus applications scanning the files as they are written can cause slowness in the application and or operating system. Please exclude C:\Documents and Settings\All Users\Application Data\VCTemp (C:\Program Data\VCTemp for Windows 7) from any real-time scans.
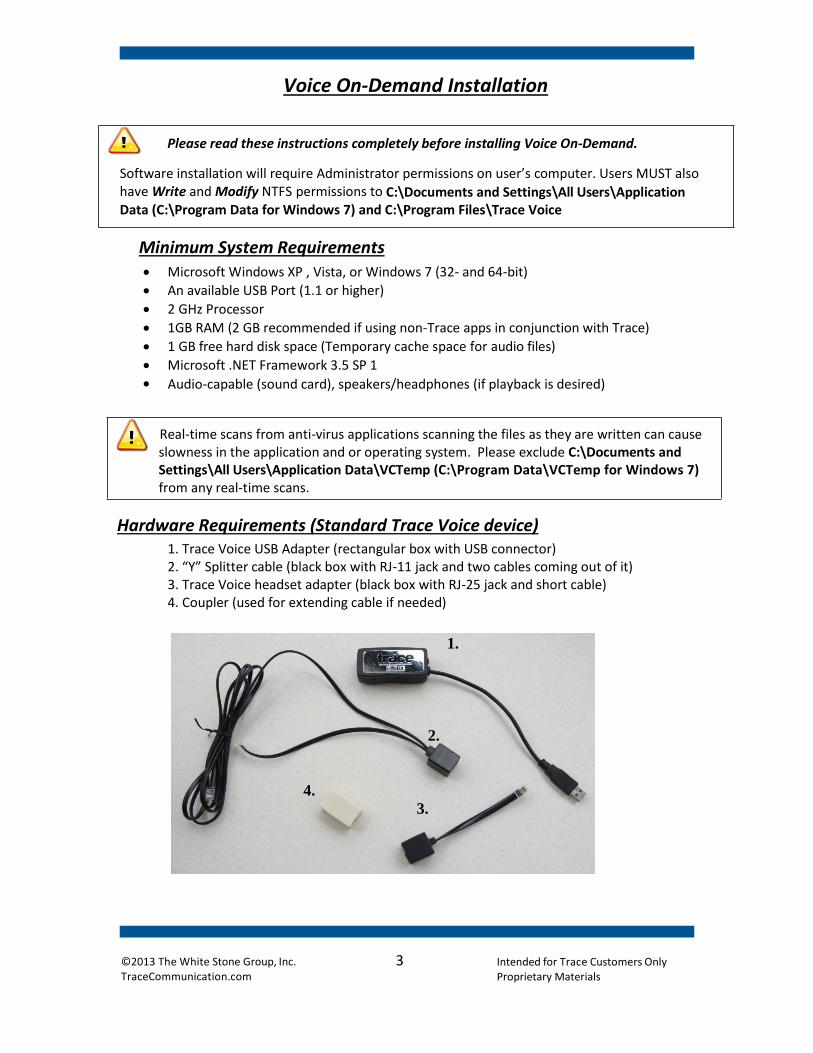
Hardware Requirements (Standard Trace Voice device) 1. Trace Voice USB Adapter (rectangular box with USB connector) 2. “Y” Splitter cable (black box with RJ-11 jack and two cables coming out of it) 3. Trace Voice headset adapter (black box with RJ-25 jack and short cable) 4. Coupler (used for extending cable if needed)
1.
2.
4.
3.
©2013 The White Stone Group, Inc. TraceCommunication.com
Intended for Trace Customers Only Proprietary Materials
4
Connection Instructions for Voice On-Demand Hardware
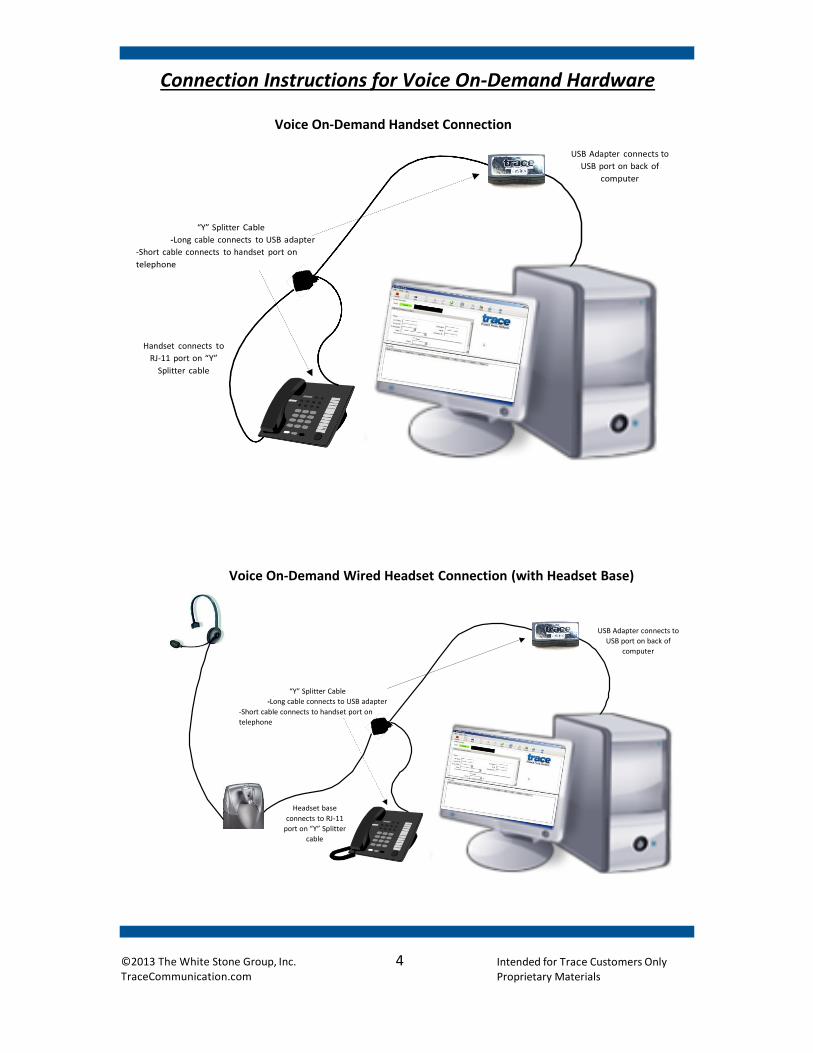
Voice On-Demand Handset Connection
USB Adapter connects to
USB port on back of
computer
“Y” Splitter Cable
-Long cable connects to USB adapter
-Short cable connects to handset port on
telephone
Handset connects to
RJ-11 port on “Y”
Splitter cable
Voice On-Demand Wired Headset Connection (with Headset Base)
USB Adapter connects to
USB port on back of
computer
“Y” Splitter Cable
-Long cable connects to USB adapter
-Short cable connects to handset port on
telephone
Headset base
connects to RJ-11
port on “Y” Splitter
cable

©2013 The White Stone Group, Inc. TraceCommunication.com
Intended for Trace Customers Only Proprietary Materials
5
Voice On-Demand Wired Headset Connection to Telephone (No Headset Base)
USB Adapter connects to
USB port on back of
computer
“Y” Splitter Cable
-Long cable connects to USB adapter
-Short cable connects to handset port on
telephone
Handset connects to
RJ-11 port on “Y”
Splitter cable
Voice On-Demand Wireless Headset Connection
USB Adapter connects
to USB port on back
of computer
“Y” Splitter Cable
-Long cable connects to USB adapter
-Short cable connects to handset port
on telephone
Headset base
connects to RJ-11
port on “Y”
Splitter cable
Handset Connects to
Headset base
©2013 The White Stone Group, Inc. TraceCommunication.com
Intended for Trace Customers Only Proprietary Materials
6
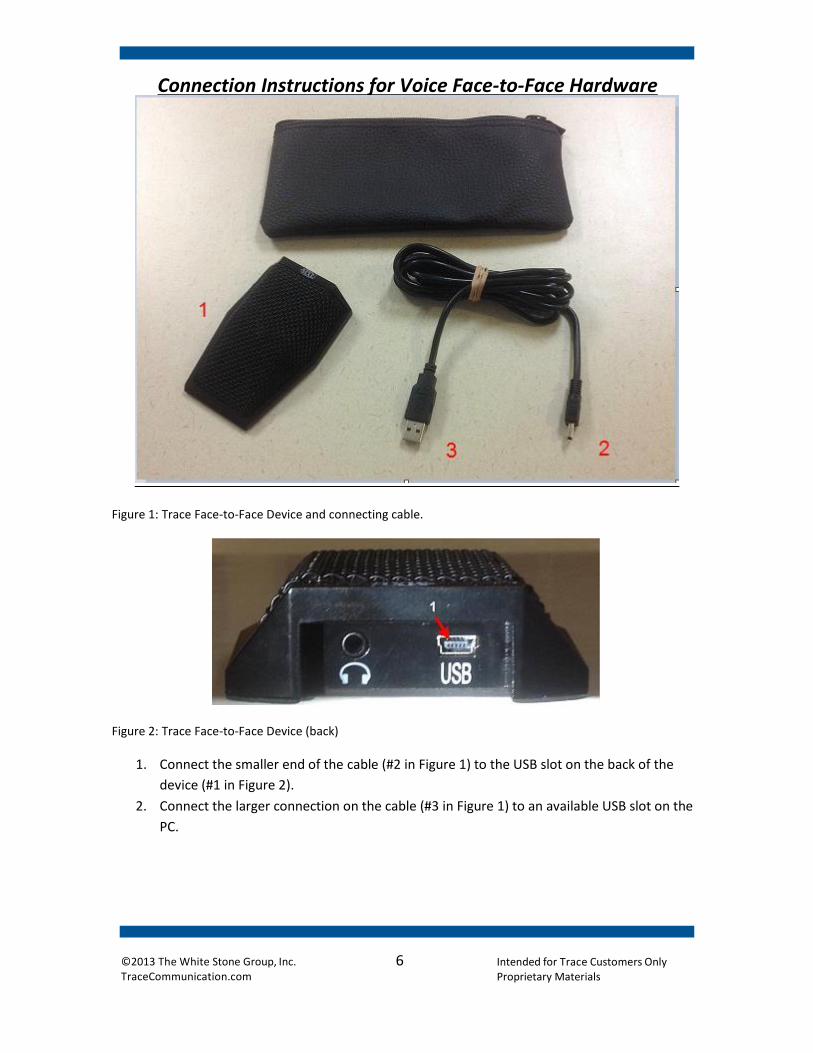
Connection Instructions for Voice Face-to-Face Hardware
Figure 1: Trace Face-to-Face Device and connecting cable.
Figure 2: Trace Face-to-Face Device (back)
1. Connect the smaller end of the cable (#2 in Figure 1) to the USB slot on the back of the
device (#1 in Figure 2).
2. Connect the larger connection on the cable (#3 in Figure 1) to an available USB slot on the
PC.
©2013 The White Stone Group, Inc. TraceCommunication.com
Intended for Trace Customers Only Proprietary Materials
7
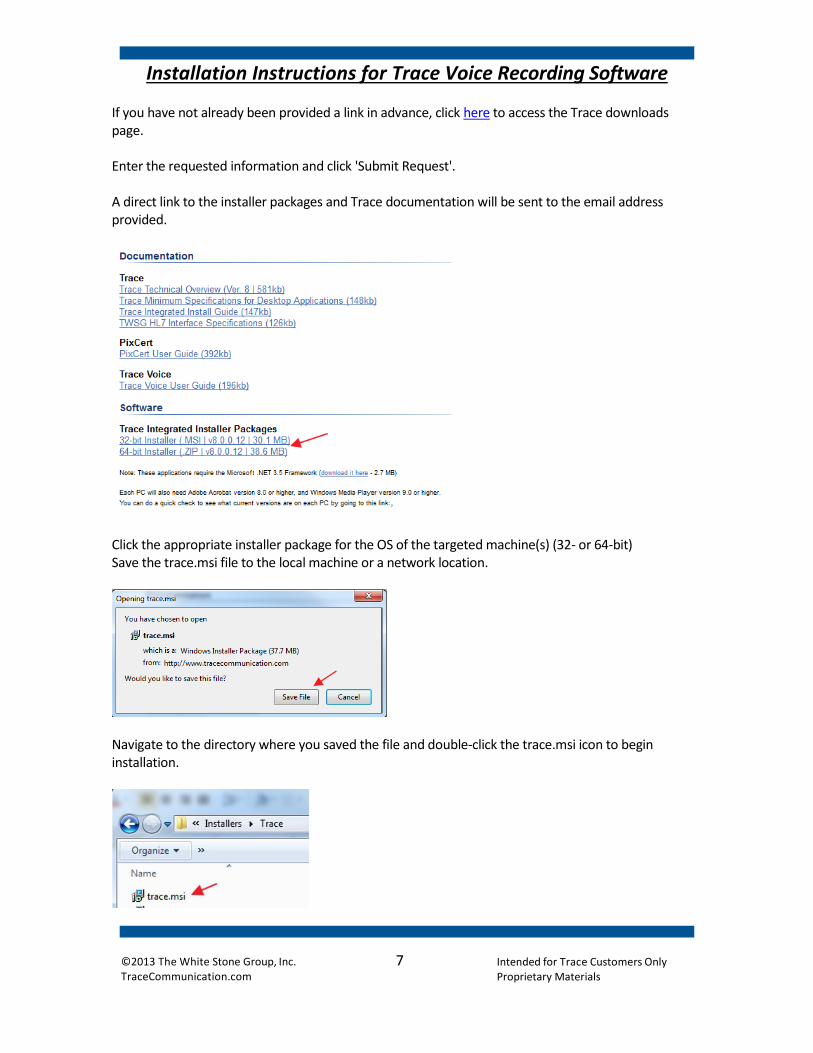
Installation Instructions for Trace Voice Recording Software If you have not already been provided a link in advance, click here to access the Trace downloads page. Enter the requested information and click 'Submit Request'. A direct link to the installer packages and Trace documentation will be sent to the email address provided.
Click the appropriate installer package for the OS of the targeted machine(s) (32- or 64-bit) Save the trace.msi file to the local machine or a network location.
Navigate to the directory where you saved the file and double-click the trace.msi icon to begin installation.
©2013 The White Stone Group, Inc. TraceCommunication.com
Intended for Trace Customers Only Proprietary Materials
8
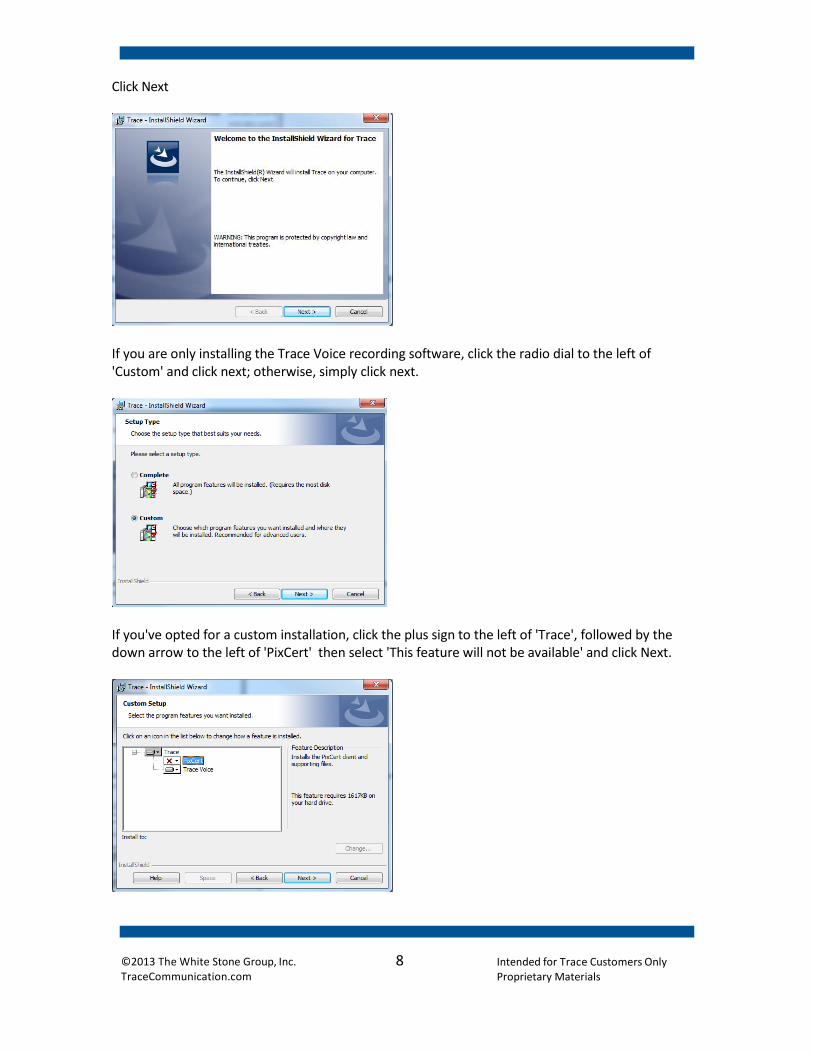
Click Next
If you are only installing the Trace Voice recording software, click the radio dial to the left of 'Custom' and click next; otherwise, simply click next.
If you've opted for a custom installation, click the plus sign to the left of 'Trace', followed by the down arrow to the left of 'PixCert' then select 'This feature will not be available' and click Next.

©2013 The White Stone Group, Inc. TraceCommunication.com
Intended for Trace Customers Only Proprietary Materials
9
Click Install.
Click Finish.
If installing Trace software via Windows command prompt, please see the Trace Integrated Install Guide for available command line parameters NOTE: The 64-bit installer is an executable and cannot be installed via Windows command prompt.
©2013 The White Stone Group, Inc. TraceCommunication.com
Intended for Trace Customers Only Proprietary Materials
10
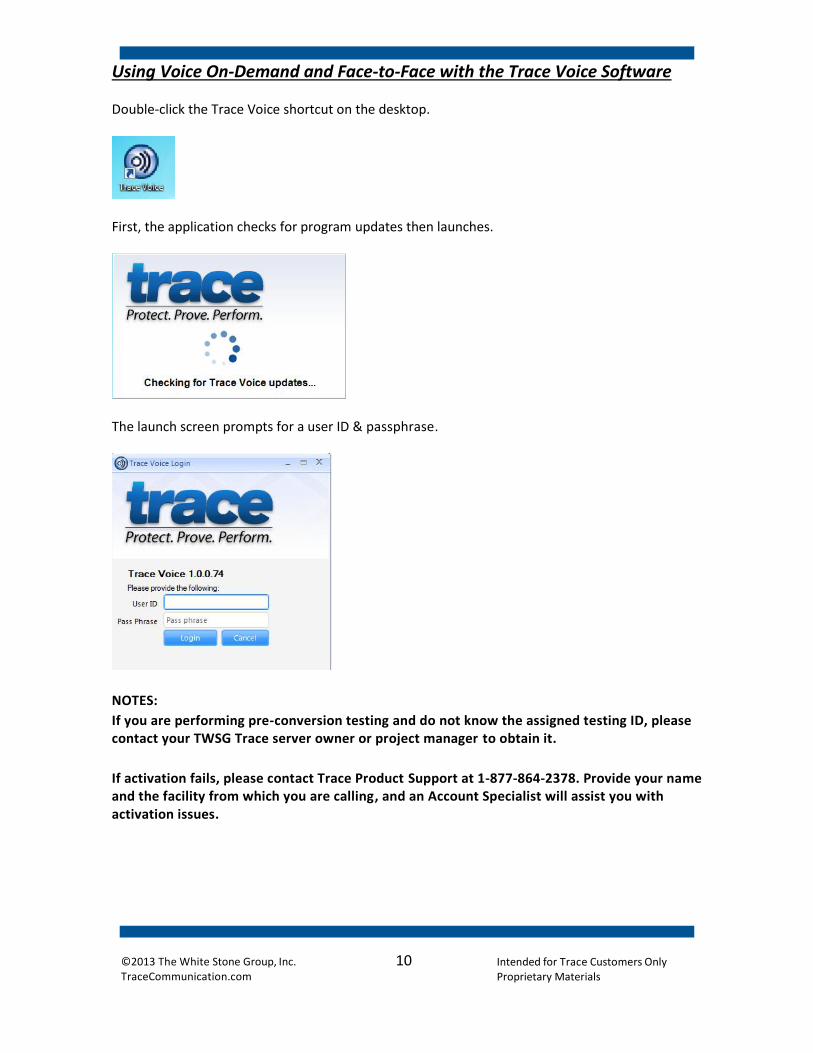
Using Voice On-Demand and Face-to-Face with the Trace Voice Software Double-click the Trace Voice shortcut on the desktop.
First, the application checks for program updates then launches.
The launch screen prompts for a user ID & passphrase.
NOTES:
If you are performing pre-conversion testing and do not know the assigned testing ID, please contact your TWSG Trace server owner or project manager to obtain it.
If activation fails, please contact Trace Product Support at 1-877-864-2378. Provide your name and the facility from which you are calling, and an Account Specialist will assist you with activation issues.
©2013 The White Stone Group, Inc. TraceCommunication.com
Intended for Trace Customers Only Proprietary Materials
11
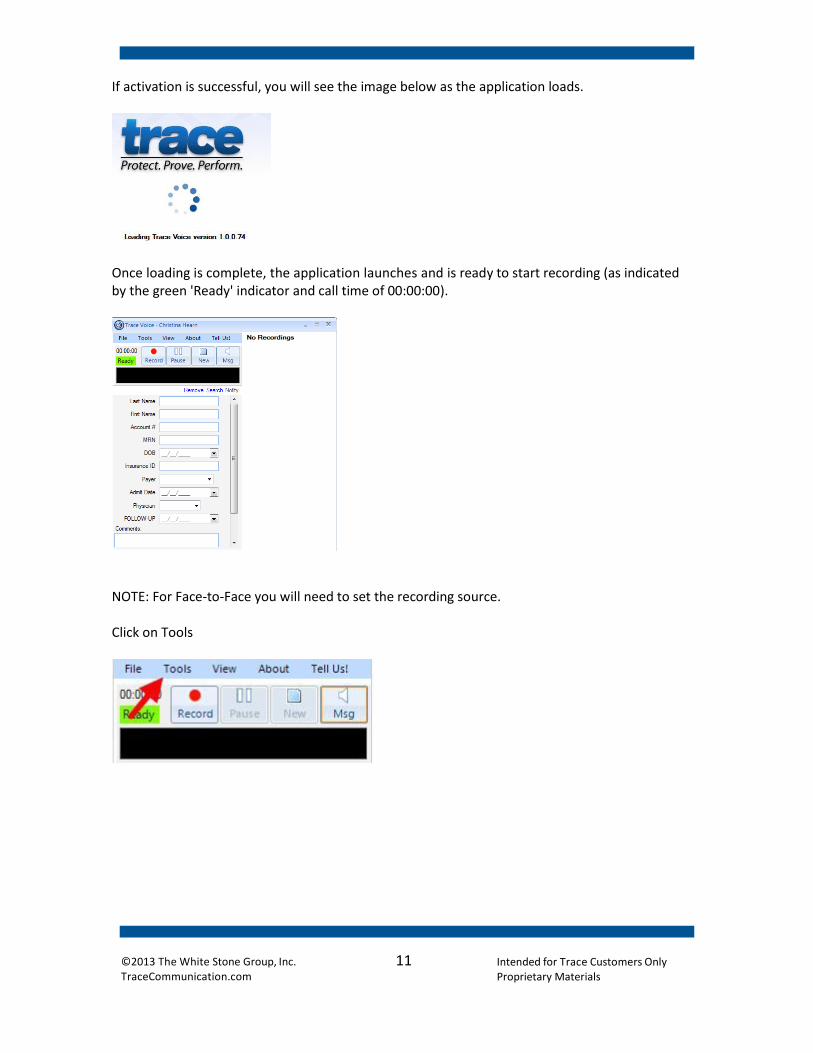
If activation is successful, you will see the image below as the application loads.
Once loading is complete, the application launches and is ready to start recording (as indicated by the green 'Ready' indicator and call time of 00:00:00).
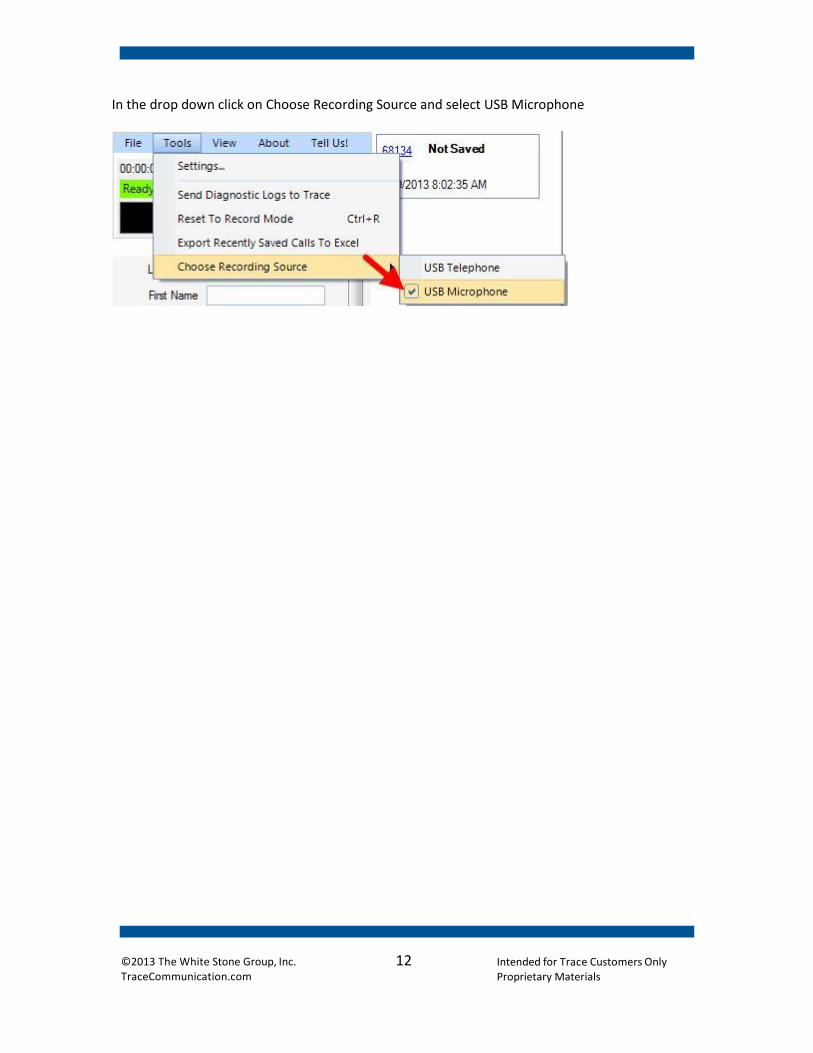
NOTE: For Face-to-Face you will need to set the recording source. Click on Tools
©2013 The White Stone Group, Inc. TraceCommunication.com
Intended for Trace Customers Only Proprietary Materials
12
In the drop down click on Choose Recording Source and select USB Microphone
©2013 The White Stone Group, Inc. TraceCommunication.com
Intended for Trace Customers Only Proprietary Materials
13
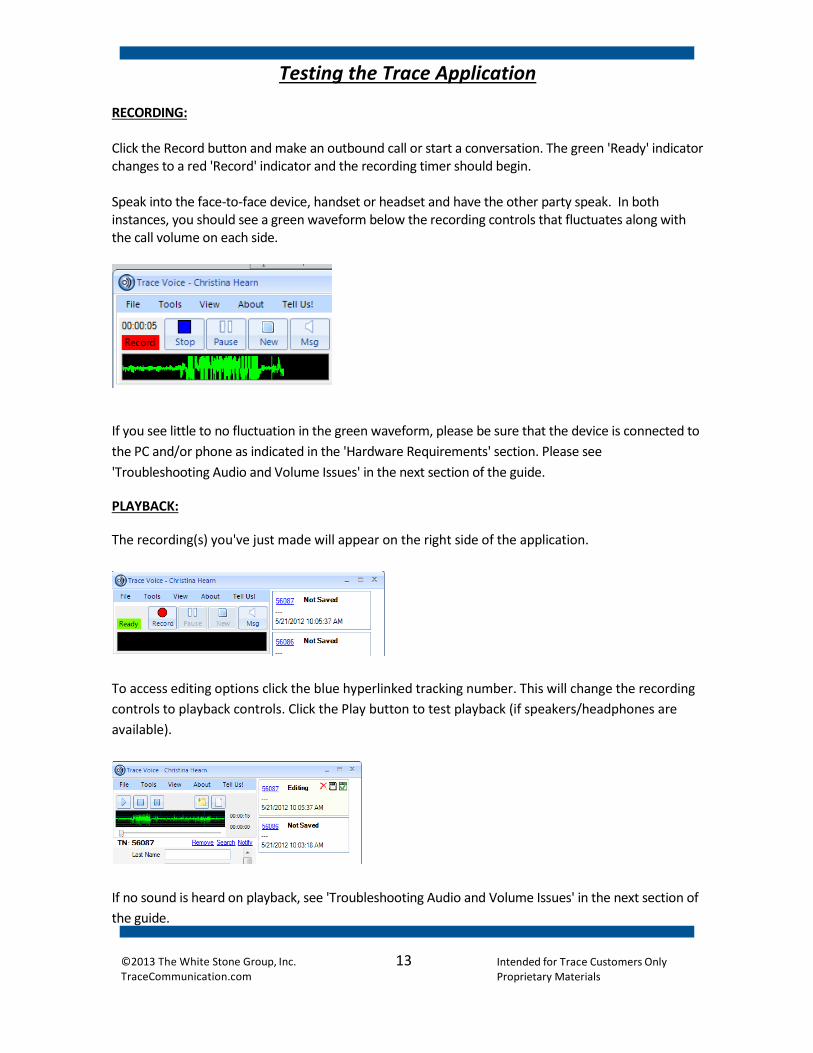
Testing the Trace Application RECORDING: Click the Record button and make an outbound call or start a conversation. The green 'Ready' indicator changes to a red 'Record' indicator and the recording timer should begin. Speak into the face-to-face device, handset or headset and have the other party speak. In both instances, you should see a green waveform below the recording controls that fluctuates along with the call volume on each side.
If you see little to no fluctuation in the green waveform, please be sure that the device is connected to
the PC and/or phone as indicated in the 'Hardware Requirements' section. Please see
'Troubleshooting Audio and Volume Issues' in the next section of the guide.
PLAYBACK:
The recording(s) you've just made will appear on the right side of the application.
To access editing options click the blue hyperlinked tracking number. This will change the recording
controls to playback controls. Click the Play button to test playback (if speakers/headphones are
available).
If no sound is heard on playback, see 'Troubleshooting Audio and Volume Issues' in the next section of
the guide.
©2013 The White Stone Group, Inc. TraceCommunication.com
Intended for Trace Customers Only Proprietary Materials
14
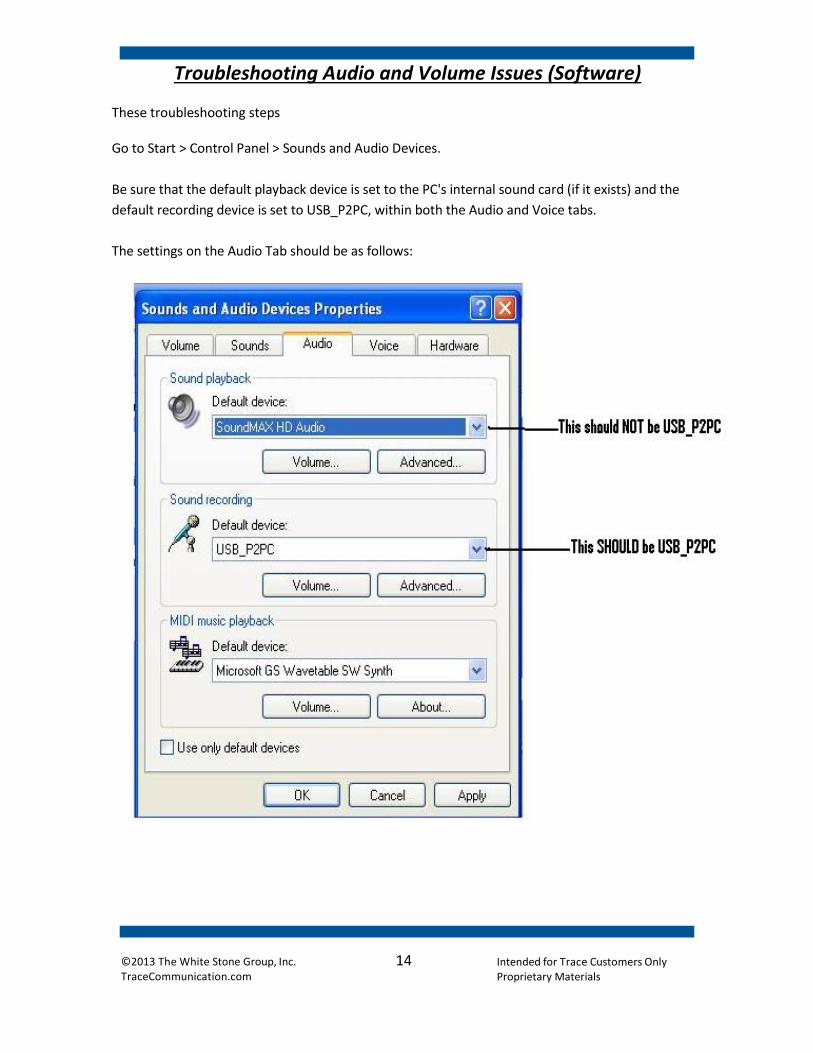
Troubleshooting Audio and Volume Issues (Software) These troubleshooting steps Go to Start > Control Panel > Sounds and Audio Devices.
Be sure that the default playback device is set to the PC's internal sound card (if it exists) and the
default recording device is set to USB_P2PC, within both the Audio and Voice tabs.
The settings on the Audio Tab should be as follows:
©2013 The White Stone Group, Inc. TraceCommunication.com
Intended for Trace Customers Only Proprietary Materials
15
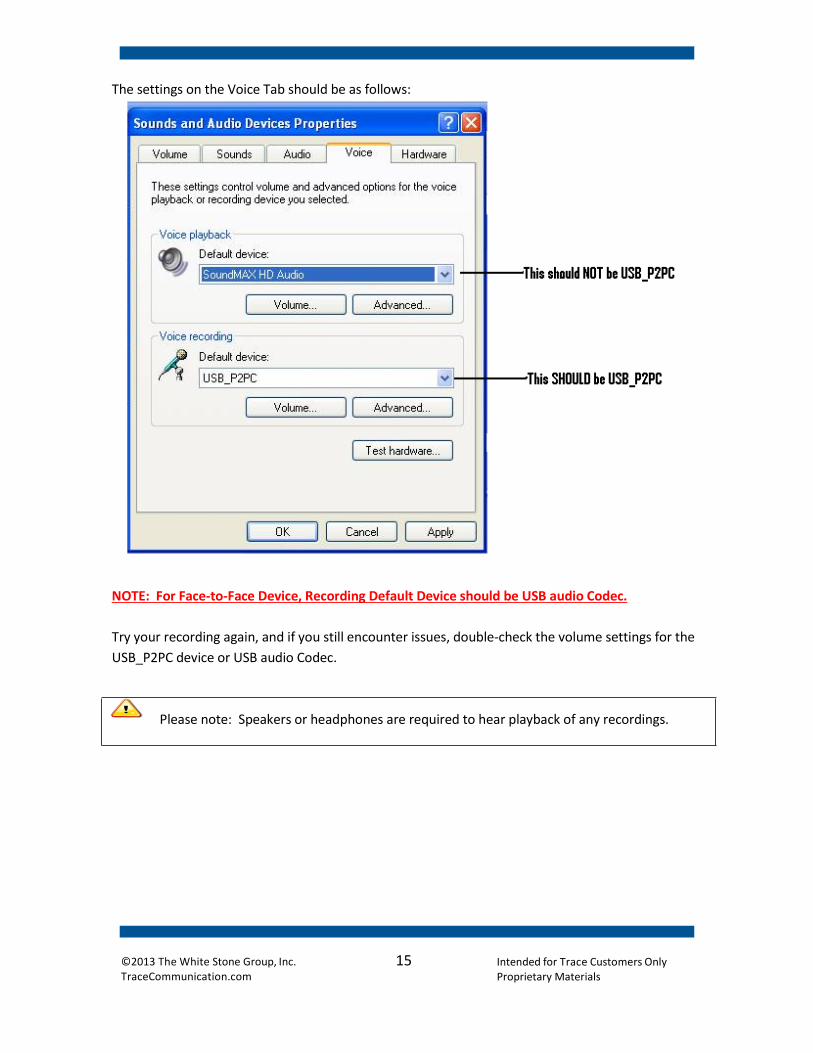
The settings on the Voice Tab should be as follows:
NOTE: For Face-to-Face Device, Recording Default Device should be USB audio Codec.
Try your recording again, and if you still encounter issues, double-check the volume settings for the
USB_P2PC device or USB audio Codec.
Please note: Speakers or headphones are required to hear playback of any recordings.
©2013 The White Stone Group, Inc. TraceCommunication.com
Intended for Trace Customers Only Proprietary Materials
16
Troubleshooting Audio and Volume Issues (Hardware)
Most of the audio and volume issues revolve around the connection to the telephone. Depending on the phone, amplifier, or headset the connection to the telephone could vary or require additional adapters. This section will cover the main connectivity issues and how they should be resolved.
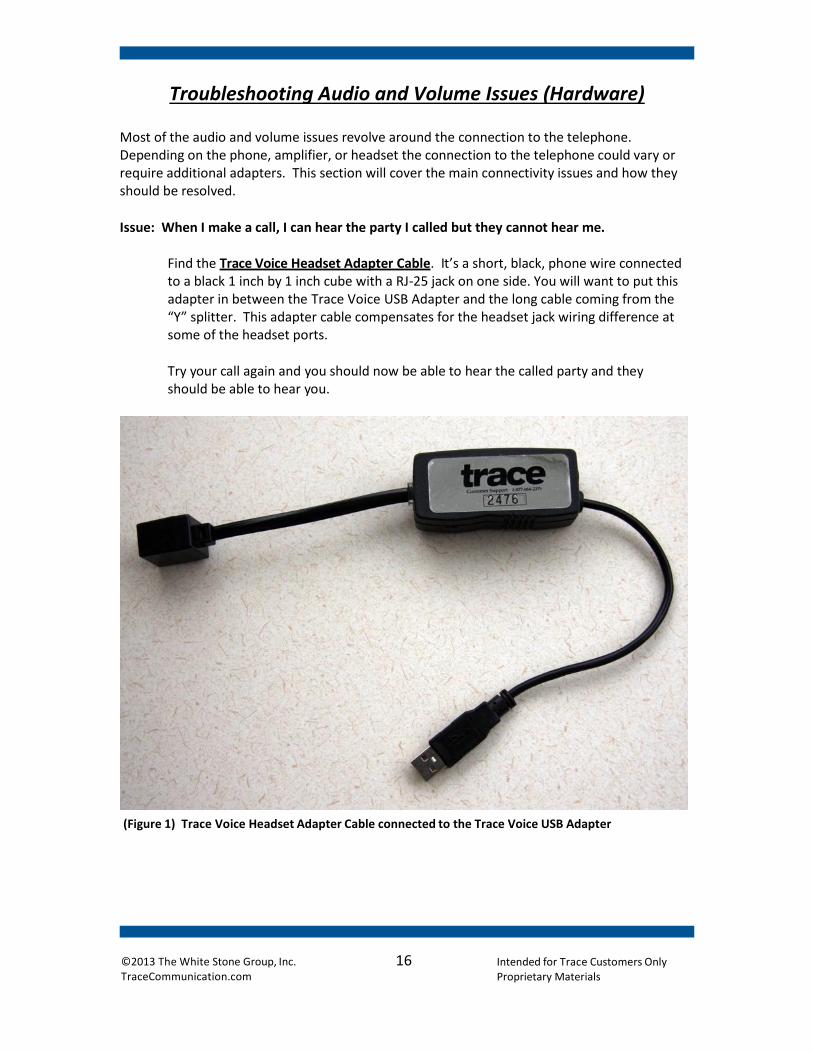
Issue: When I make a call, I can hear the party I called but they cannot hear me.
Find the Trace Voice Headset Adapter Cable. It’s a short, black, phone wire connected to a black 1 inch by 1 inch cube with a RJ-25 jack on one side. You will want to put this adapter in between the Trace Voice USB Adapter and the long cable coming from the “Y” splitter. This adapter cable compensates for the headset jack wiring difference at some of the headset ports.
Try your call again and you should now be able to hear the called party and they should be able to hear you.
(Figure 1) Trace Voice Headset Adapter Cable connected to the Trace Voice USB Adapter
©2013 The White Stone Group, Inc. TraceCommunication.com
Intended for Trace Customers Only Proprietary Materials
17
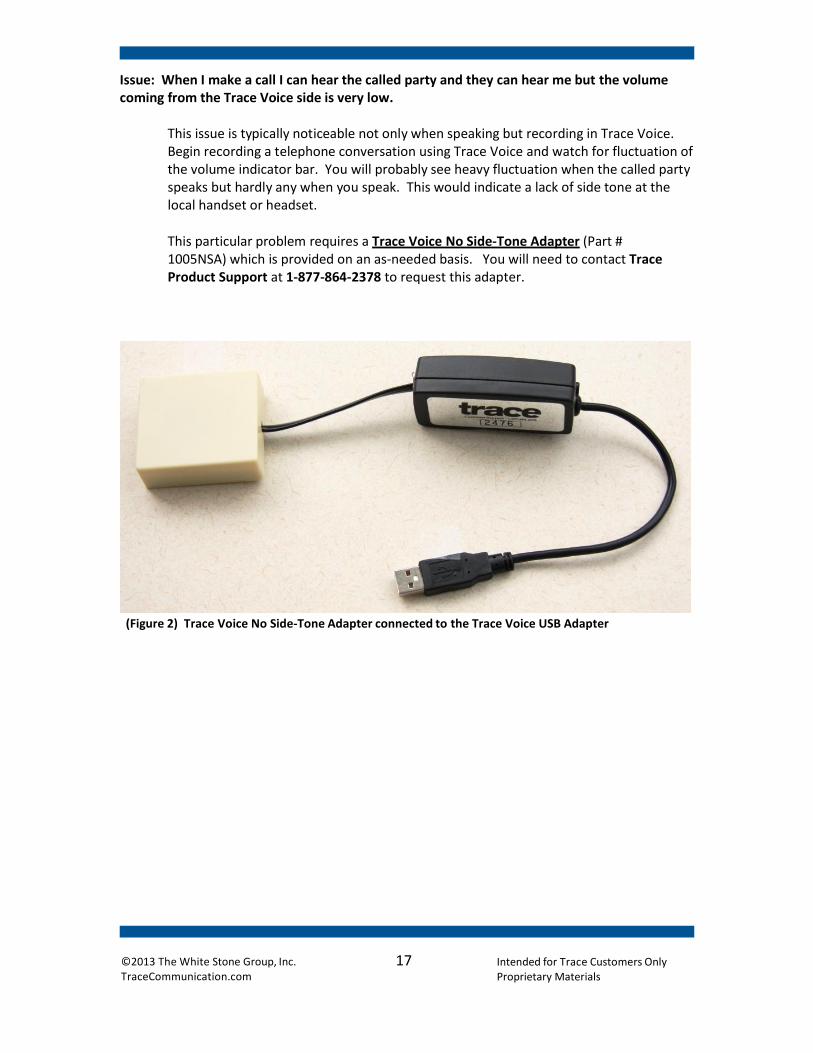
Issue: When I make a call I can hear the called party and they can hear me but the volume coming from the Trace Voice side is very low.
This issue is typically noticeable not only when speaking but recording in Trace Voice. Begin recording a telephone conversation using Trace Voice and watch for fluctuation of the volume indicator bar. You will probably see heavy fluctuation when the called party speaks but hardly any when you speak. This would indicate a lack of side tone at the local handset or headset.
This particular problem requires a Trace Voice No Side-Tone Adapter (Part # 1005NSA) which is provided on an as-needed basis. You will need to contact Trace Product Support at 1-877-864-2378 to request this adapter.
(Figure 2) Trace Voice No Side-Tone Adapter connected to the Trace Voice USB Adapter
©2013 The White Stone Group, Inc. TraceCommunication.com
Intended for Trace Customers Only Proprietary Materials
18
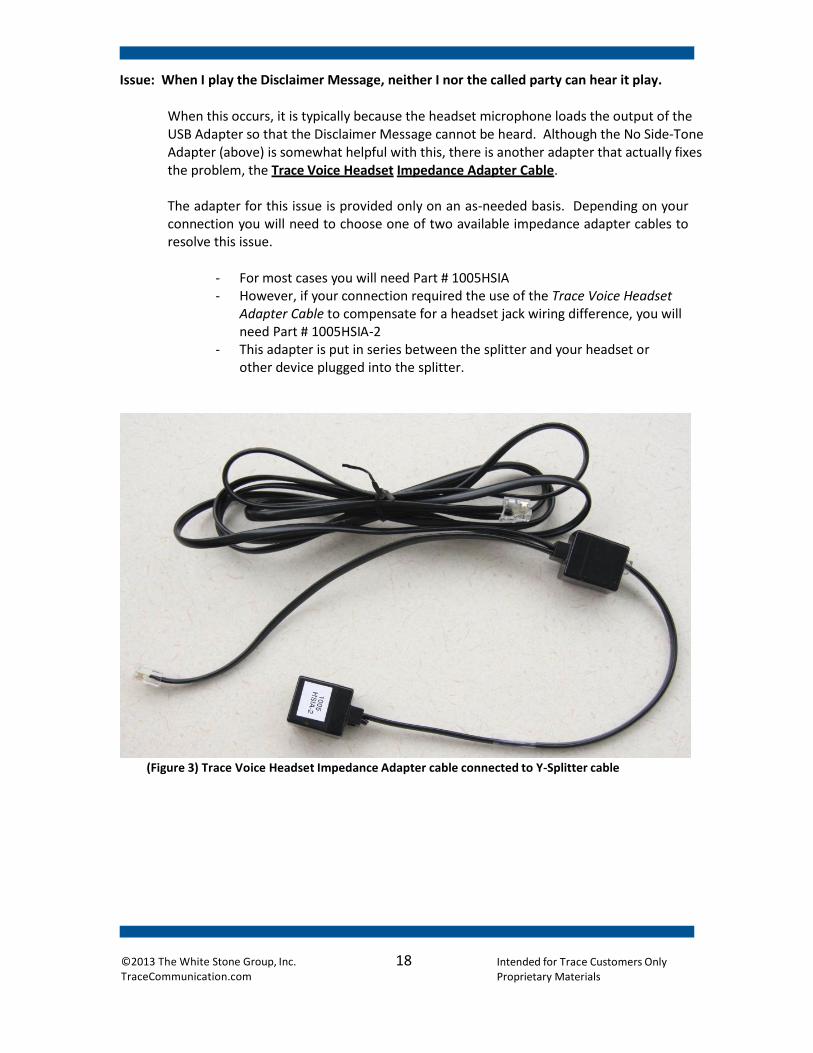
Issue: When I play the Disclaimer Message, neither I nor the called party can hear it play.
When this occurs, it is typically because the headset microphone loads the output of the USB Adapter so that the Disclaimer Message cannot be heard. Although the No Side-Tone Adapter (above) is somewhat helpful with this, there is another adapter that actually fixes the problem, the Trace Voice Headset Impedance Adapter Cable.
The adapter for this issue is provided only on an as-needed basis. Depending on your connection you will need to choose one of two available impedance adapter cables to resolve this issue.
- For most cases you will need Part # 1005HSIA - However, if your connection required the use of the Trace Voice Headset
Adapter Cable to compensate for a headset jack wiring difference, you will need Part # 1005HSIA-2
- This adapter is put in series between the splitter and your headset or other device plugged into the splitter.
(Figure 3) Trace Voice Headset Impedance Adapter cable connected to Y-Splitter cable
©2013 The White Stone Group, Inc. TraceCommunication.com
Intended for Trace Customers Only Proprietary Materials
19
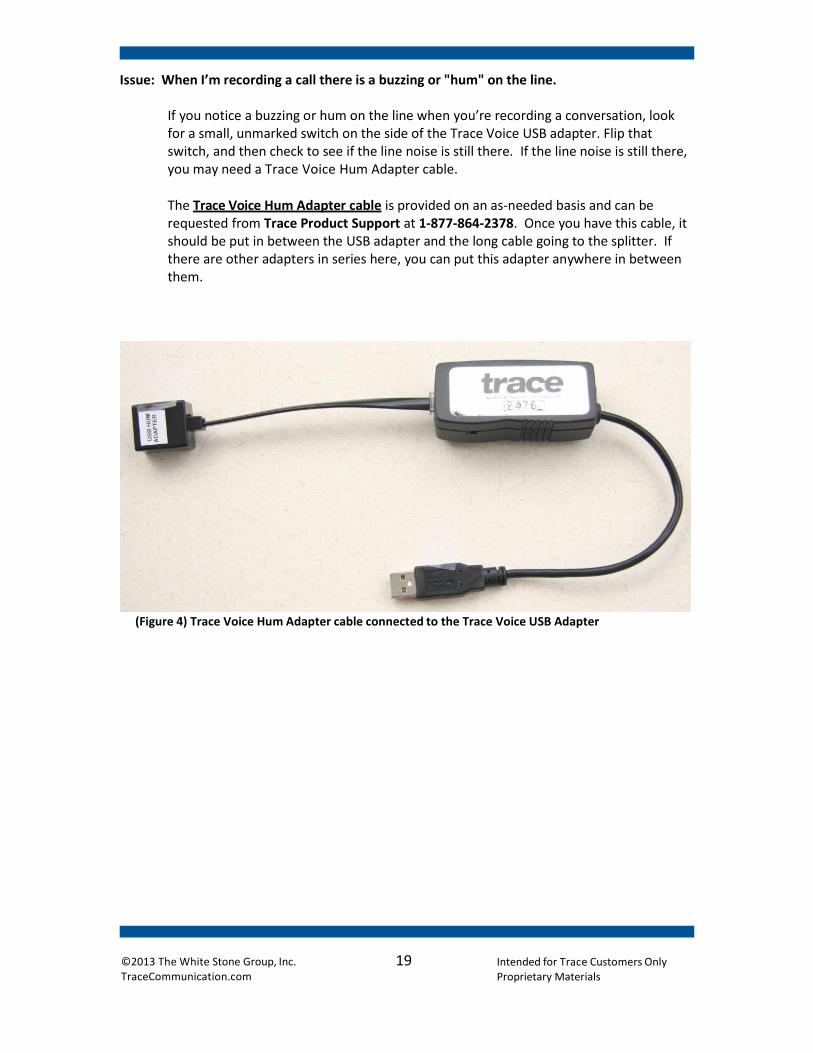
Issue: When I’m recording a call there is a buzzing or "hum" on the line. If you notice a buzzing or hum on the line when you’re recording a conversation, look for a small, unmarked switch on the side of the Trace Voice USB adapter. Flip that switch, and then check to see if the line noise is still there. If the line noise is still there, you may need a Trace Voice Hum Adapter cable.
The Trace Voice Hum Adapter cable is provided on an as-needed basis and can be requested from Trace Product Support at 1-877-864-2378. Once you have this cable, it should be put in between the USB adapter and the long cable going to the splitter. If there are other adapters in series here, you can put this adapter anywhere in between them.
(Figure 4) Trace Voice Hum Adapter cable connected to the Trace Voice USB Adapter
©2013 The White Stone Group, Inc. TraceCommunication.com
Intended for Trace Customers Only Proprietary Materials
20
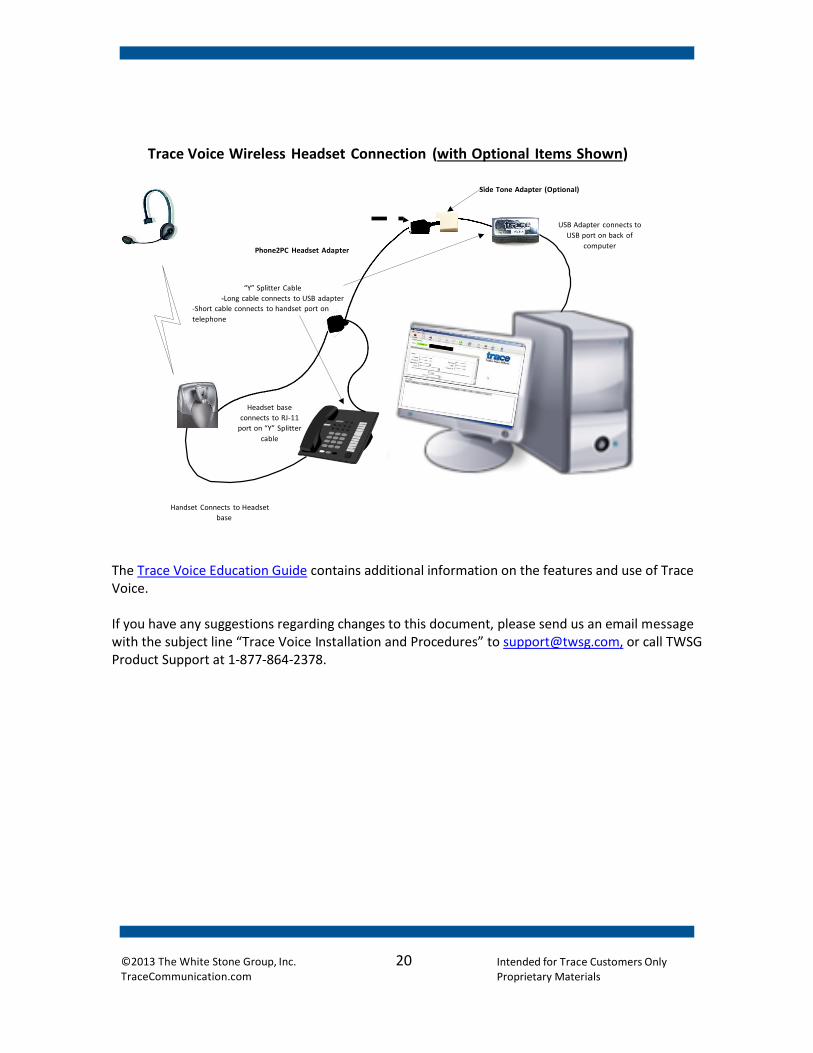
Trace Voice Wireless Headset Connection (with Optional Items Shown)
Phone2PC Headset Adapter
“Y” Splitter Cable
-Long cable connects to USB adapter
-Short cable connects to handset port on
telephone
Side Tone Adapter (Optional)
USB Adapter connects to
USB port on back of
computer
Headset base
connects to RJ-11
port on “Y” Splitter
cable
Handset Connects to Headset
base
The Trace Voice Education Guide contains additional information on the features and use of Trace Voice. If you have any suggestions regarding changes to this document, please send us an email message with the subject line “Trace Voice Installation and Procedures” to [email protected], or call TWSG Product Support at 1-877-864-2378.