tw38td1, tw12td2, tw12td1 - mytoolservice.commytoolservice.com/man/tw12td1.pdftw38td1, tw12td2,...
TRANSCRIPT
TW38TD1, TW12TD2, TW12TD1 1 Rev. 02/27/15
TW38TD1, TW12TD2, TW12TD1
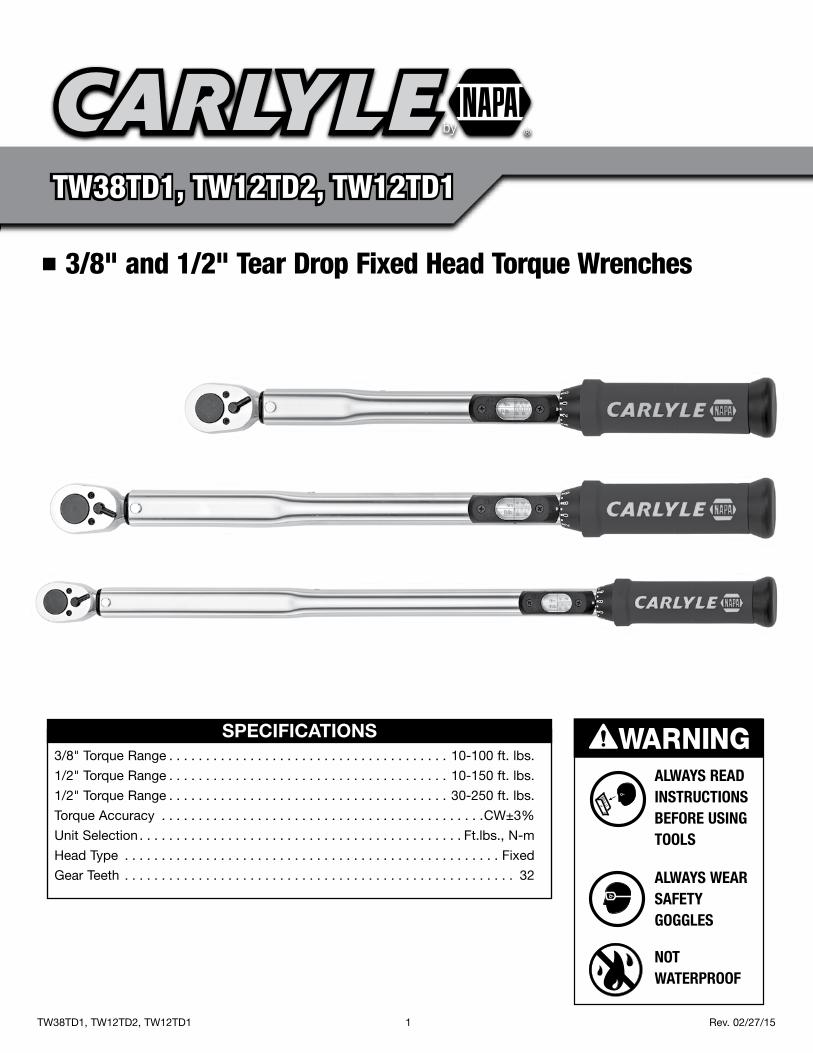
3/8" Torque Range . . . . . . . . . . . . . . . . . . . . . . . . . . . . . . . . . . . . . . 10-100 ft. lbs.
1/2" Torque Range . . . . . . . . . . . . . . . . . . . . . . . . . . . . . . . . . . . . . . 10-150 ft. lbs.
1/2" Torque Range . . . . . . . . . . . . . . . . . . . . . . . . . . . . . . . . . . . . . . 30-250 ft. lbs.
Torque Accuracy . . . . . . . . . . . . . . . . . . . . . . . . . . . . . . . . . . . . . . . . . . . .CW±3%
Unit Selection . . . . . . . . . . . . . . . . . . . . . . . . . . . . . . . . . . . . . . . . . . . . Ft.lbs., N-m
Head Type . . . . . . . . . . . . . . . . . . . . . . . . . . . . . . . . . . . . . . . . . . . . . . . . . . . Fixed
Gear Teeth . . . . . . . . . . . . . . . . . . . . . . . . . . . . . . . . . . . . . . . . . . . . . . . . . . . . . 32
AlwAys reAd instructions before using tools
AlwAys weAr sAfety goggles
not wAterproof
TW38TD1, TW12TD2, TW12TD1
3/8" and 1/2" Tear Drop Fixed Head Torque Wrenches
WARNINGSPECIFICATIONS

TW38TD1, TW12TD2, TW12TD1 2 Rev. 02/27/15
WARRANTY
MANUAL CLICK TORQUE WRENCH - LIMITED 1 YEAR WARRANTY Carlyle Professional Hand Tools warrants to the original purchaser that the company’s manual click torque wrenches are free from defects in material or workmanship during the 1 year warranty period. We will repair or replace any manual torque wrench which fails to give satisfactory service due to defective workmanship or materials (excluding calibration) for 1 year from the date of original purchase. (Calibration is only covered by this warranty for each new unused torque wrench out of the box.) Repairs or replacements are warranted as described above for the duration of the original warranty period. Products must be returned with proof of purchase, freight prepaid, to the warranty service center listed below.
This warranty excludes torque wrenches which have been subjected to abnormal use, accident, neglect, or lack of maintenance. Any modification, disassembly of this wrench or repair by an unauthorized service center will void the warranty.
This warranty gives you specific rights. You may also have other rights which vary from state to state.
The foregoing obligation is Carlyle Professional Hand Tools sole liability under this or any implied warranty and under no circumstances shall Carlyle Professional Hand Tools be liable for any incidental or consequential damages.
Note: Some states do not allow the exclusion or limitation of incidental or consequential damages so the above limitation or exclusion may not apply to you.
For Warranty Service and Recalibration/Certification Services, contact:
Torque Wrench Repair Facility 315 Hawkins Rd. Travelers Rest, SC 29690 Phone:866.496.8423•Fax:864.834.6651
IMPORTANT SHIPPING NOTE: To avoid shipping damage when you return your torque wrench for repair, please enclose your Carlyle Torque Wrench in its original molded case if included with your model and package securely so that it is resistant to impact shock while in transit.
WARNING - FOLLOW THESE RULES FOR SAFE OPERATION!
This insTrucTion Manual conTains iMporTanT safeTy inforMaTion. read This insTrucTion Manual carefully and undersTand all inforMaTion Before operaTing This Tool.
• Tosafeguardtorqueaccuracyavoidkeeping tool set at high loads for long periods of time. When finished reset back to zero.
•Donotoperatewithouteyeandhand protection (users and bystander).
•Keepbodyworkingstancebalancedandfirm. Do not overreach when operating the tool.
•Keepfingersandhandsawayfrompinch point region of this tool at all times.
• Donotforcetoolbeyonditsratedcapacity. Overtorqueing can cause breakage.
• Use of a "cheater bar" or leverage multipliers will result in an inaccurate reading and can possibly damage the wrench. Use of unapproved accessories could push the unit beyond its rated capacity and will void your warranty.
FAILURE TO OBSERVE THESE WARNINGS COULD RESULT IN INJURY• Do not use torque wrench to loosen fasteners.
• The wrench should be sent in for calibration once every year or every 5,000 cycles for re-calibration.
• The wrench should be cleaned and stored properly after every use. Do not submerge this unit in any fluid.
• Wrenches should be re-calibrated if dropped or accidentally mishandled.
• The torque wrench should be "exercised" a minimum of three times at 100% of full scale before use.
• Donotremoveanylabels.Replacedamaged labels.
• Thisproductcontainschemicalsknowntothe State of California to cause cancer and birth defects or other reproductive harm. Wash hands thoroughly after handling.
•Failuretoheedthesewarningsmayresultin serious or fatal personal injury and/or property damage.
TW38TD1, TW12TD2, TW12TD1 3 Rev. 02/27/15
FEATURES AND FUNCTIONS
t.lb30 90 150
40 100 160 200NmF
80
28
42
1 2 3 4
5 6 7
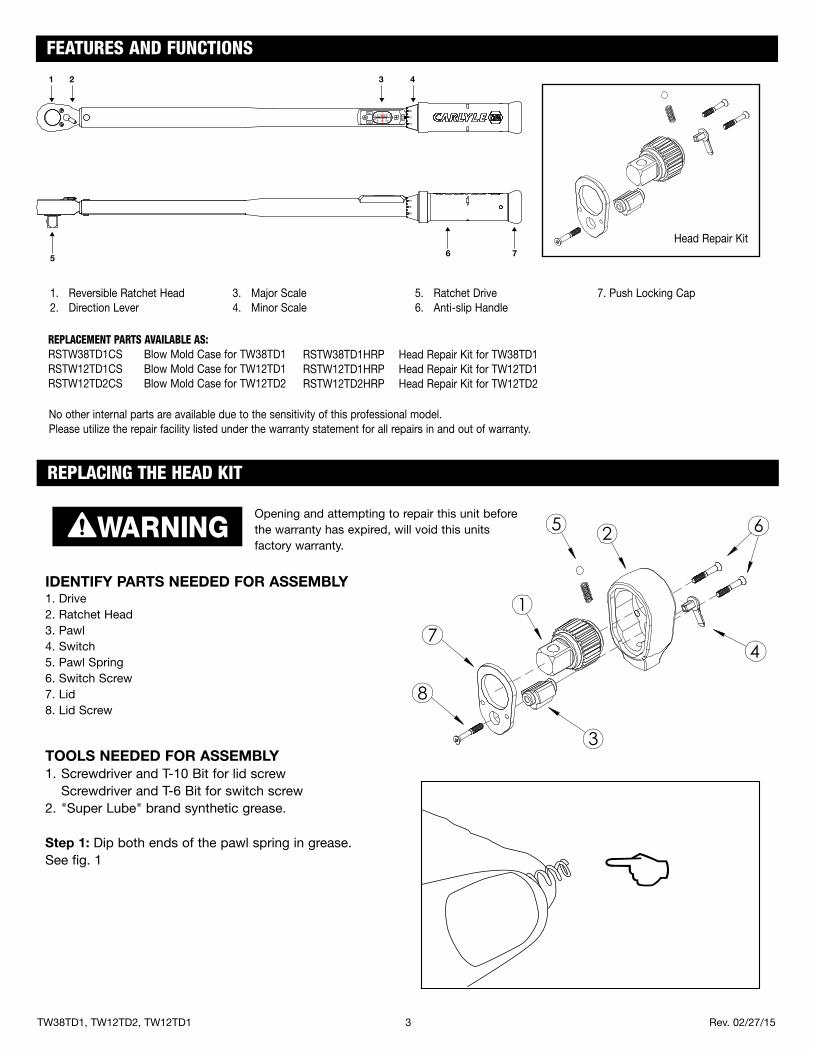
1. Reversible Ratchet Head 2. Direction Lever
3. Major Scale4. Minor Scale
5. Ratchet Drive6. Anti-slip Handle
7. Push Locking Cap
REPLACEMENT PARTS AVAILABLE AS:RSTW38TD1CS Blow Mold Case for TW38TD1 RSTW12TD1CS Blow Mold Case for TW12TD1RSTW12TD2CS Blow Mold Case for TW12TD2
RSTW38TD1HRP HeadRepairKitforTW38TD1RSTW12TD1HRP HeadRepairKitforTW12TD1RSTW12TD2HRP HeadRepairKitforTW12TD2
No other internal parts are available due to the sensitivity of this professional model. Please utilize the repair facility listed under the warranty statement for all repairs in and out of warranty.
HeadRepairKit
REPLACING THE HEAD KIT
3
1
5 2
4
6
7
8
IDENTIFY PARTS NEEDED FOR ASSEMBLY1. Drive 2. Ratchet Head3. Pawl4. Switch5. Pawl Spring6. Switch Screw7. Lid8. Lid Screw
TOOLS NEEDED FOR ASSEMBLY1. Screwdriver and T-10 Bit for lid screw Screwdriver and T-6 Bit for switch screw2. "Super Lube" brand synthetic grease.
Step 1: Dip both ends of the pawl spring in grease.See fig. 1
WARNINGOpening and attempting to repair this unit before the warranty has expired, will void this units factory warranty.

TW38TD1, TW12TD2, TW12TD1 4 Rev. 02/27/15
REPLACING THE HEAD KIT (CONT.)
Step 2: Insert the pawl spring into the handle spring hole. See fig. 2
Step 3: Place the steel ball on top of the pawl spring.See fig. 3
Step 4: Insert the pawl with the square hole facing inward and the circle hole facing you. See fig. 4
Fig. 2
Fig. 3
Fig. 4
TW38TD1, TW12TD2, TW12TD1 5 Rev. 02/27/15
REPLACING THE HEAD KIT (CONT.)
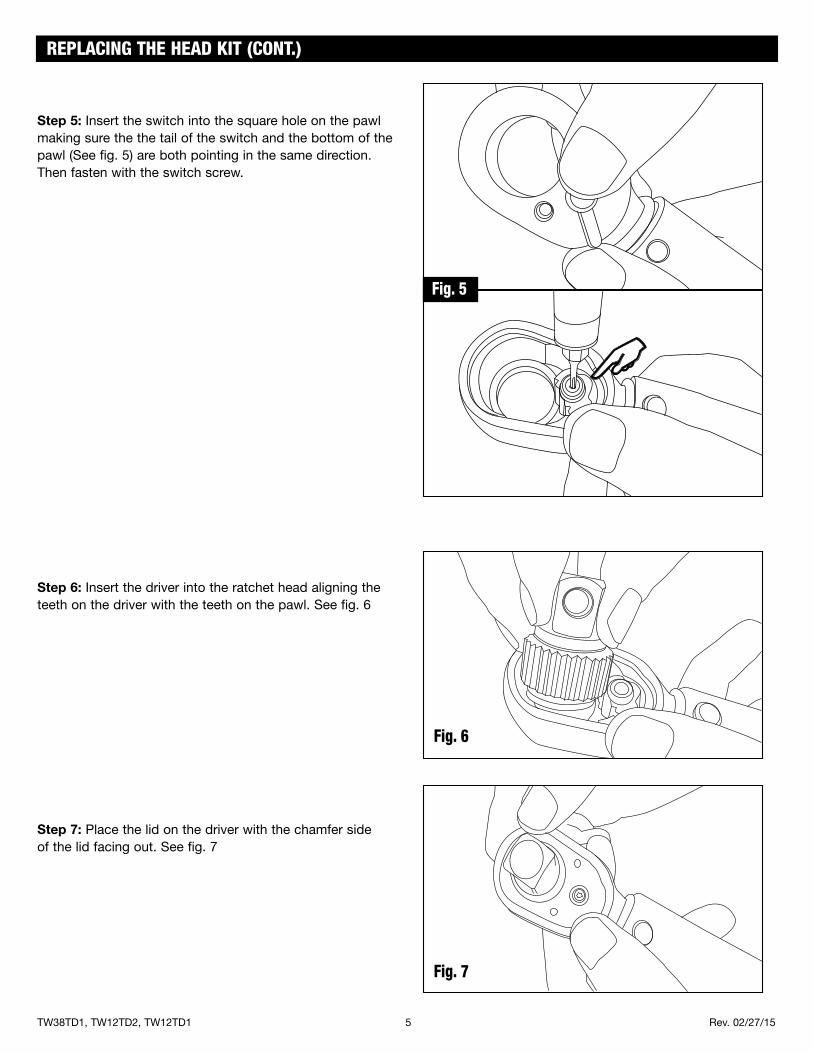
Step 5: Insert the switch into the square hole on the pawl making sure the the tail of the switch and the bottom of the pawl (See fig. 5) are both pointing in the same direction. Then fasten with the switch screw.
Step 6: Insert the driver into the ratchet head aligning the teeth on the driver with the teeth on the pawl. See fig. 6
Step 7: Place the lid on the driver with the chamfer side of the lid facing out. See fig. 7
Fig. 6
Fig. 7
Fig. 5
TW38TD1, TW12TD2, TW12TD1 6 Rev. 02/27/15
REPLACING THE HEAD KIT (CONT.)
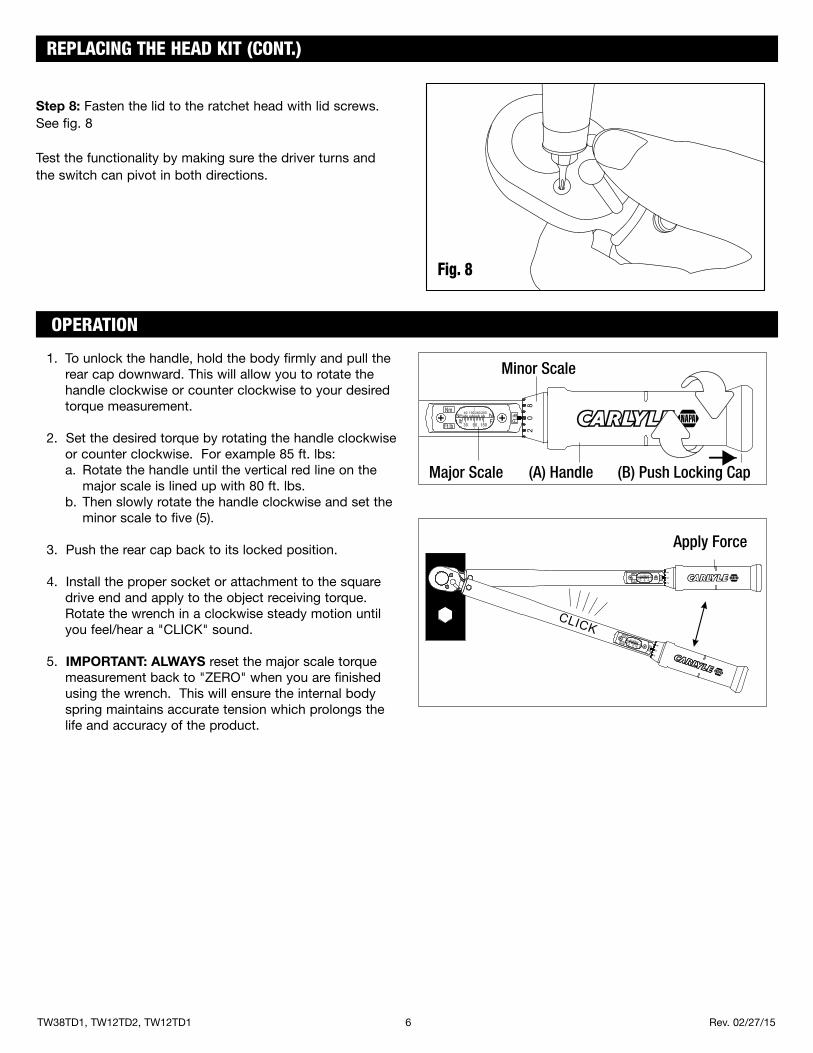
Fig. 8
1. To unlock the handle, hold the body firmly and pull the rear cap downward. This will allow you to rotate the handle clockwise or counter clockwise to your desired torque measurement.
2. Set the desired torque by rotating the handle clockwise or counter clockwise. For example 85 ft. lbs: a. Rotate the handle until the vertical red line on the major scale is lined up with 80 ft. lbs. b. Then slowly rotate the handle clockwise and set the minor scale to five (5). 3. Push the rear cap back to its locked position.
4. Install the proper socket or attachment to the square drive end and apply to the object receiving torque. Rotate the wrench in a clockwise steady motion until youfeel/heara"CLICK"sound.
5. IMPORTANT: ALWAYS reset the major scale torque measurement back to "ZERO" when you are finished using the wrench. This will ensure the internal body spring maintains accurate tension which prolongs the life and accuracy of the product.
OPERATION
Major Scale
Minor Scale
Apply Force
(A) Handle (B) Push Locking Cap
t.lb30 90 150
40 100 160 200NmF
80
2
t.lb30 90 150
40 100 160 200NmF
80
2
t.lb30 90 150
40 100 160 200Nm
F 80
2
CLICK
Step 8: Fasten the lid to the ratchet head with lid screws. See fig. 8
Test the functionality by making sure the driver turns and the switch can pivot in both directions.

TW38TD1, TW12TD2, TW12TD1 7 Rev. 02/27/15
1. The internal mechanism of the torque wrench has been calibrated and lubricated before final assembly. DO NOT attempt to open the wrench's internal mechanism for any reason. Doing so will void the warranty.
2. Do not submerge the torque wrench in water or any other liquids.
3. When not in use always store the torque wrench in its protective case. Be sure before storage that you have reset the torque setting back to zero.
4. Re-calibration is necessary to maintain accuracy once a year or every 5000 cycles. Using a torque wrench that is not regularly calibrated may cause damage to the tool and personal property.
MAINTANENCE
TW38TD1, TW12TD2, TW12TD1 8 Rev. 02/27/15
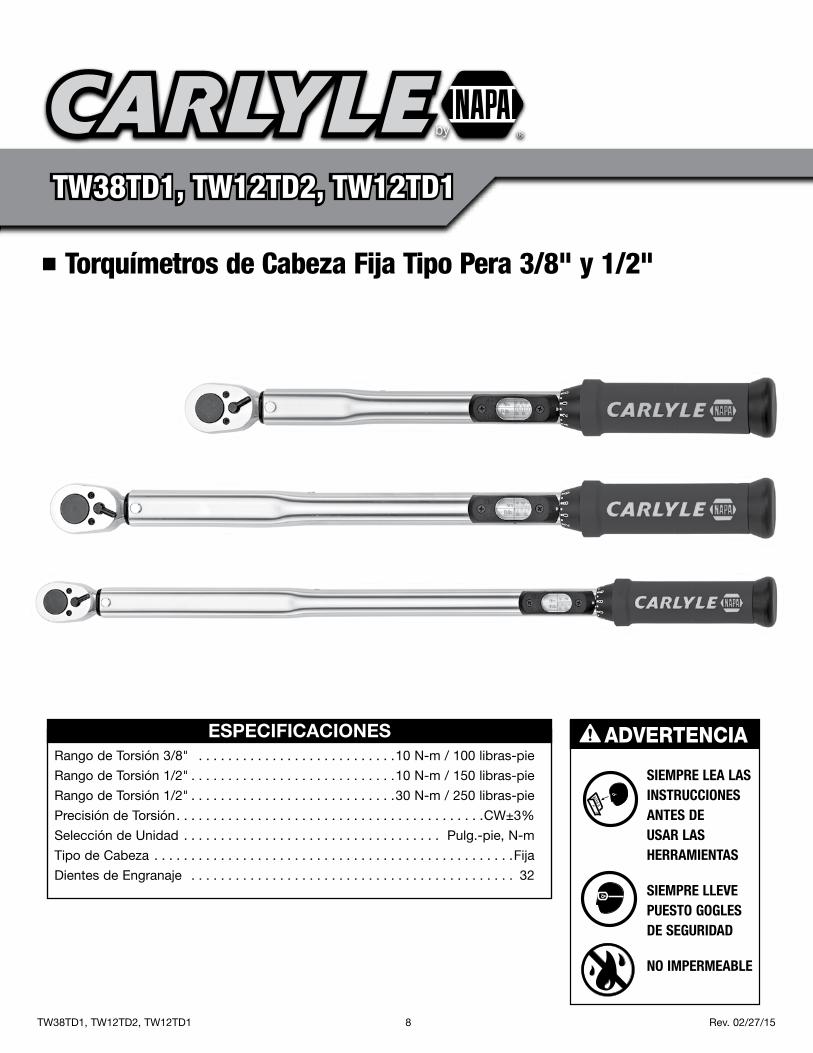
TW38TD1, TW12TD2, TW12TD1
Rango de Torsión 3/8" . . . . . . . . . . . . . . . . . . . . . . . . . . .10 N-m / 100 libras-pie
Rango de Torsión 1/2" . . . . . . . . . . . . . . . . . . . . . . . . . . . .10 N-m / 150 libras-pie
Rango de Torsión 1/2" . . . . . . . . . . . . . . . . . . . . . . . . . . . .30 N-m / 250 libras-pie
Precisión de Torsión. . . . . . . . . . . . . . . . . . . . . . . . . . . . . . . . . . . . . . . . . .CW±3%
Selección de Unidad . . . . . . . . . . . . . . . . . . . . . . . . . . . . . . . . . . . Pulg.-pie, N-m
Tipo de Cabeza . . . . . . . . . . . . . . . . . . . . . . . . . . . . . . . . . . . . . . . . . . . . . . . . .Fija
Dientes de Engranaje . . . . . . . . . . . . . . . . . . . . . . . . . . . . . . . . . . . . . . . . . . . . 32
TW38TD1, TW12TD2, TW12TD1
Torquímetros de Cabeza Fija Tipo Pera 3/8" y 1/2"
ESPECIFICACIONES
sieMpre leA lAs instrucciones Antes de usAr lAs HerrAMientAs
sieMpre lleVe puesto gogles de seguridAd
no iMperMeAble
ADVERTENCIA
TW38TD1, TW12TD2, TW12TD1 9 Rev. 02/27/15
GARANTíA
TORQUÍMETRO MANUAL TIPO "CLICKER" - GARANTÍA LIMITADA DE UN AÑO Carlyle Professional Hand Tools le garantiza al comprador original que los torquímetros manuales tipo "clic" de la compañía son libres de defectos en cuanto a material y mano de obra durante el periodo de garantía de un año. Repararemos o repondremos cualquier torquímetro manual el cual deja de brindar un servicio satisfactorio debido a una mano de obra o materiales defectuosos (excluyendo el calibrado) por un año a parte de la fecha original de compra. (El calibrado sólo está cubierto bajo esta garantía para cada torquímetro nuevo no usado fuera de caja). Las reparaciones o repuestos son garantizados según sean descritos anteriormente por la duración del periodo original de garantía. Los productos deben ser devueltos con la comprobación de compra, flete prepagado, al centro de servicio de garantía alistado a continuación.
Esta garantía excluye los torquímetros los cuales hayan sido sujetados al uso anormal, accidentes, la negligencia, o la falta de mantenimiento. Se anulará la garantía por cualquier modificación, el desensamble de este torquímetro o reparaciones por parte de un centro de servicio no autorizado.
Esta garantía le brinda derechos específicos. Usted puede contar con derechos adicionales los cuales varían de estado a estado.
La obligación anterior es la única responsabilidad por parte de Carlyle Professional Hand Tools bajo ésta o cualquier otra garantía implicada y bajo ninguna circunstancia será responsable Carlyle Professional Hand Tools por ningún daño incidental ni consecuencial.
Nota: Algunos estados no permiten la exclusión ni limitación de daños incidentales ni consecuenciales por lo que la limitación o exclusión anterior puede no ser aplicable para usted.
Para servicio de garantía y servicios de recalibrado/certificación, comuníquese con:
Torque Wrench Repair Facility 315 Hawkins Rd. Travelers Rest, SC 29690 Phone:866.496.8423•Fax:864.834.6651
NOTA IMPORTANTE SOBRE EL ENVÍO: Para evitar daños durante el envío al momento de devolver su torquímetro para reparaciones, por favor envuelva su torquímetro Carlyle en su estuche moldeado original (si viene incluido con su modelo) y empáquelo seguramente con el fin de que esté resistente a los choques de impacto durante el transporte.
ADVERTENCIA - ¡SIGA LAS REGLAS PARA UNA OPERACIÓN SEGURA!
HACER CASO OMISO A ESTAS ADVERTENCIAS PODRÍA OCASIONAR LESIONES
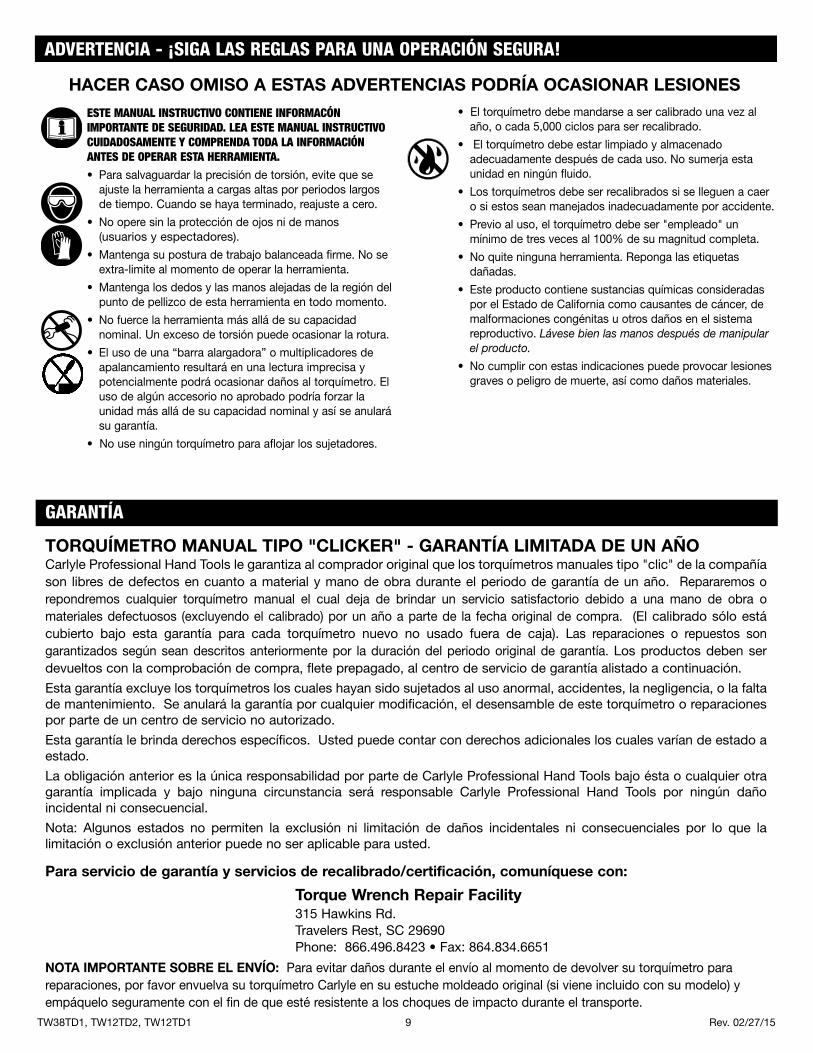
esTe Manual insTrucTiVo conTiene inforMacÓn iMporTanTe de seguridad. lea esTe Manual insTrucTiVo cuidadosaMenTe y coMprenda Toda la inforMaciÓn anTes de operar esTa herraMienTa.
• Parasalvaguardarlaprecisióndetorsión,evitequese ajuste la herramienta a cargas altas por periodos largos de tiempo. Cuando se haya terminado, reajuste a cero.
•Nooperesinlaproteccióndeojosnidemanos (usuarios y espectadores).
•Mantengasuposturadetrabajobalanceadafirme.Nose extra-limite al momento de operar la herramienta.
•Mantengalosdedosylasmanosalejadasdelaregióndel punto de pellizco de esta herramienta en todo momento.
• No fuerce la herramienta más allá de su capacidad nominal. Un exceso de torsión puede ocasionar la rotura.
• El uso de una “barra alargadora” o multiplicadores de apalancamiento resultará en una lectura imprecisa y potencialmente podrá ocasionar daños al torquímetro. El uso de algún accesorio no aprobado podría forzar la unidad más allá de su capacidad nominal y así se anulará su garantía.
•Nouseningúntorquímetroparaaflojarlossujetadores.
•Eltorquímetrodebemandarseasercalibradounavezal año, o cada 5,000 ciclos para ser recalibrado.
• Eltorquímetrodebeestarlimpiadoyalmacenado adecuadamente después de cada uso. No sumerja esta unidad en ningún fluido.
• Lostorquímetrosdebeserrecalibradossiselleguenacaer o si estos sean manejados inadecuadamente por accidente.
• Previoaluso,eltorquímetrodebeser"empleado"un mínimo de tres veces al 100% de su magnitud completa.
• Noquiteningunaherramienta.Repongalasetiquetas dañadas.
• Esteproductocontienesustanciasquímicasconsideradas por el Estado de California como causantes de cáncer, de malformaciones congénitas u otros daños en el sistema reproductivo. Lávese bien las manos después de manipular el producto.
•Nocumplirconestasindicacionespuedeprovocarlesiones graves o peligro de muerte, así como daños materiales.

TW38TD1, TW12TD2, TW12TD1 10 Rev. 02/27/15
CARACTERíSTICAS Y FUNCIONES
1. Cabeza de trinquete reversible 2. Manivela de sentido
3. Escala mayor4. Escala menor
5. Encaje de trinquete 6. Mango anti-deslizante
7. Tapa de seguridad de empuje
t.lb30 90 150
40 100 160 200NmF
80
28
42
1 2 3 4
5 6 7
LAS PARTES DE REPUESTO DISPONIBLES COMO:RSTW38TD1CS Estuche moldead por soplado para TW38TD1 RSTW12TD1CS Estuche moldead por soplado para TW12TD1RSTW12TD2CS Estuche moldea por soplado para TW12TD2
RSTW38TD1HRP Equipo de reparación de cabeza para TW38TD1RSTW12TD1HRP Equipo de reparación de cabeza para TW12TD1RSTW12TD2HRP Equipo de reparación de cabeza para TW12TD2
Ninguna otra parte está disponible debido a la sensibilidad de este modelo profesional. Utilice por favor el centro de reparación alistado bajo la declaración de garantía para todas las reparaciones dentro y fuera de garantía.
Equipo de reparación de cabeza
REPOSICIÓN DEL EqUIPO DE CABEzA
3
1
5 2
4
6
7
8
IDENTIFICACION DE PARTES REQUERIDAS PARA EN EL ENSAMBLE1. Encaje 2. Cabeza de trinquete 3. Trinquete4. Interruptor5. Resorte de trinquete 6. Tornillo de interruptor7. Tapa8. Tornillo de tapa
HERRAMIENTAS REQUERIDAS PARA EL ENSAMBLE 1. Destornillador y broca T-10 para el tornillo de tapa Destornillador y broca T-6 para el tornillo del interruptor 2. "Super Lube" brand synthetic grease.
Paso 1: Sumerja ambos extremos del resorte del trinquete en el aceite engrasador. Ver la fig. 1
Fig. 1
ADVERTENCIAOpening and attempting to repair this unit before the warranty has expired, will void this units factory warranty.

TW38TD1, TW12TD2, TW12TD1 11 Rev. 02/27/15
REPOSICIÓN DEL EqUIPO DE CABEzA
Step 2: Inserte el resorte del trinquete en el agujero del resorte del mango. Ver la fig. 2
Paso 3: Coloque la bola de acero en la parte superior del resorte del trinquete. Ver la fig. 3
Paso 4: Inserte el trinquete con el agujero cuadrado orientado hacia adentro y el agujero circular orientado hacia usted. Ver la fig. 4
Fig. 2
Fig. 3
Fig. 4
TW38TD1, TW12TD2, TW12TD1 12 Rev. 02/27/15
REPOSICIÓN DEL EqUIPO DE CABEzA
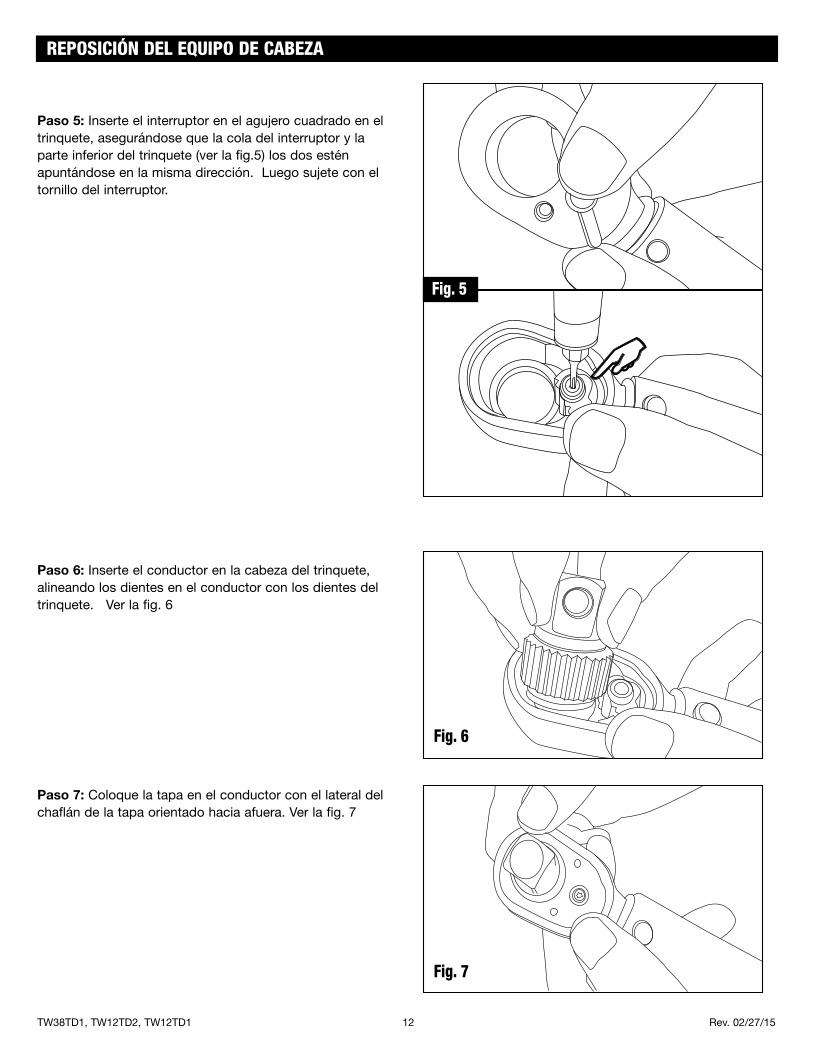
Paso 5: Inserte el interruptor en el agujero cuadrado en el trinquete, asegurándose que la cola del interruptor y la parte inferior del trinquete (ver la fig.5) los dos estén apuntándose en la misma dirección. Luego sujete con el tornillo del interruptor.
Paso 6: Inserte el conductor en la cabeza del trinquete, alineando los dientes en el conductor con los dientes del trinquete. Ver la fig. 6
Paso 7: Coloque la tapa en el conductor con el lateral del chaflán de la tapa orientado hacia afuera. Ver la fig. 7
Fig. 6
Fig. 7
Fig. 5
TW38TD1, TW12TD2, TW12TD1 13 Rev. 02/27/15
REPOSICIÓN DEL EqUIPO DE CABEzA
Fig. 8
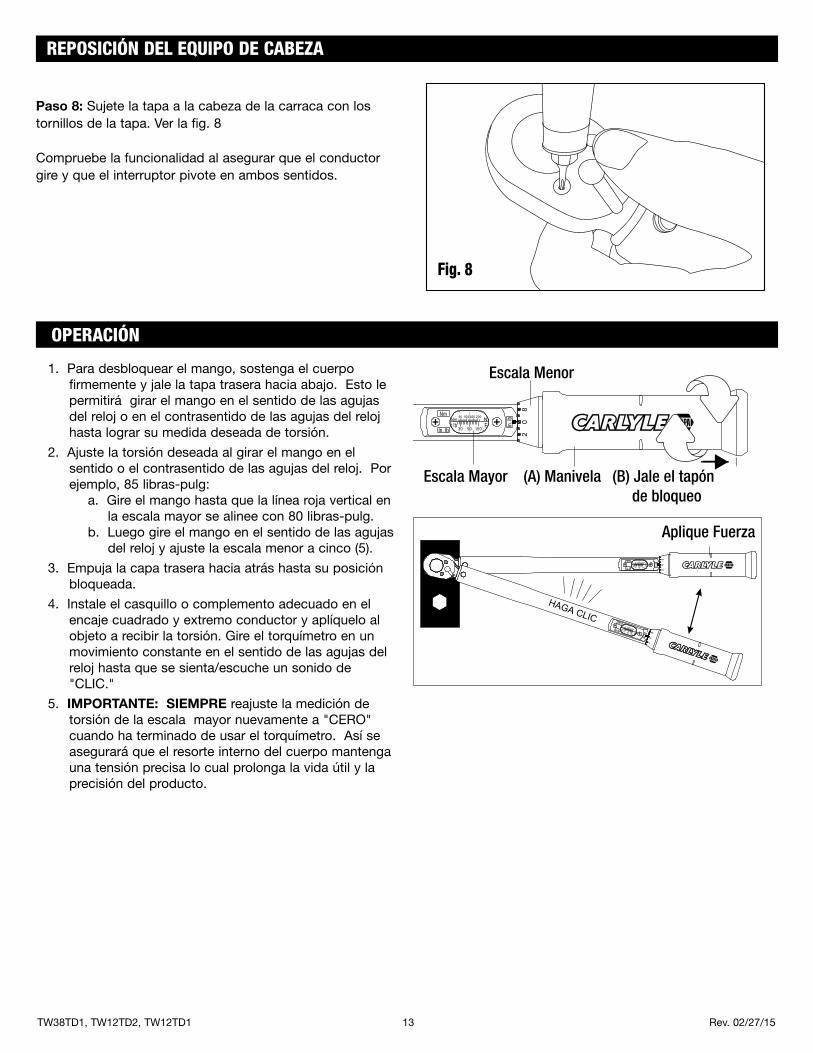
Paso 8: Sujete la tapa a la cabeza de la carraca con los tornillos de la tapa. Ver la fig. 8
Compruebe la funcionalidad al asegurar que el conductor gire y que el interruptor pivote en ambos sentidos.
1. Para desbloquear el mango, sostenga el cuerpo firmemente y jale la tapa trasera hacia abajo. Esto le permitirá girar el mango en el sentido de las agujas del reloj o en el contrasentido de las agujas del reloj hasta lograr su medida deseada de torsión.
2. Ajuste la torsión deseada al girar el mango en el sentido o el contrasentido de las agujas del reloj. Por ejemplo, 85 libras-pulg: a. Gire el mango hasta que la línea roja vertical en la escala mayor se alinee con 80 libras-pulg. b. Luego gire el mango en el sentido de las agujas del reloj y ajuste la escala menor a cinco (5).
3. Empuja la capa trasera hacia atrás hasta su posición bloqueada.
4. Instale el casquillo o complemento adecuado en el encaje cuadrado y extremo conductor y aplíquelo al objeto a recibir la torsión. Gire el torquímetro en un movimiento constante en el sentido de las agujas del reloj hasta que se sienta/escuche un sonido de "CLIC."
5. IMPORTANTE: SIEMPRE reajuste la medición de torsión de la escala mayor nuevamente a "CERO" cuando ha terminado de usar el torquímetro. Así se asegurará que el resorte interno del cuerpo mantenga una tensión precisa lo cual prolonga la vida útil y la precisión del producto.
OPERACIÓN
Escala Mayor
Aplique Fuerza
(A) Manivela (B) Jale el tapón de bloqueo
t.lb30 90 150
40 100 160 200NmF
80
2
t.lb30 90 150
40 100 160 200NmF
80
2
t.lb30 90 150
40 100 160 200Nm
F 80
2
In. lb
In. l
b
In. lb
In. l
b
In. lb
In. l
b
Escala Menor
HAGA CLIC
TW38TD1, TW12TD2, TW12TD1 14 Rev. 02/27/15
1. El mecanismo interno del torquímetro ha sido calibrado y lubricado antes del ensamble final. NO intente abrir el mecanismo interno del torquímetro por ningún motivo. Si esto se llegara a pasar, se anularía la garantía.
2. No sumerja el torquímetro en agua ni en ningún otro líquido.
3. Cuando no está en uso, siempre almacene el torquímetro en su estuche protector. Antes de almacenarlo, asegúrese que se haya reajustado el ajuste de torsión nuevamente a cero.
4. Es necesario el recalibrado una vez al año o cada 5000 ciclos para mantener la precisión. El uso de un torquímetro que no sea calibrado regularmente podría ocasionar daños a la herramienta o a la propiedad personal.
MANTENIMIENTO