benji - the rules of good portraiture - pdf - kel.cc · pdf filerules to good portraiture: ......
TRANSCRIPT

Rules to good portraiture: by Benji 12052006
1. "No sleeveless clothing in the head and shoulders image."
2. "No shorts in group portraits."
3. Avoid Bright Colors and Bold Patterns in Clothing. The idea of a portrait is to see the face of the subject. Brightly colored clothing and bold patterns draw the eye away from the subject's face. (This is especially true in the head and shoulders portrait.)
4. Avoid Football ShouldersThe body should not be turned straight to the camera. 5. Solid Pyramidal Base The body should not be turned 90 degrees away from the
camera. 45 degrees is usually the ideal angle for the head and shoulders portrait. Posing someone at a 90 degree angle to the camera does not allow the head to appear to have proper support. After posing the subject at a 45 degree angle, bring the arms
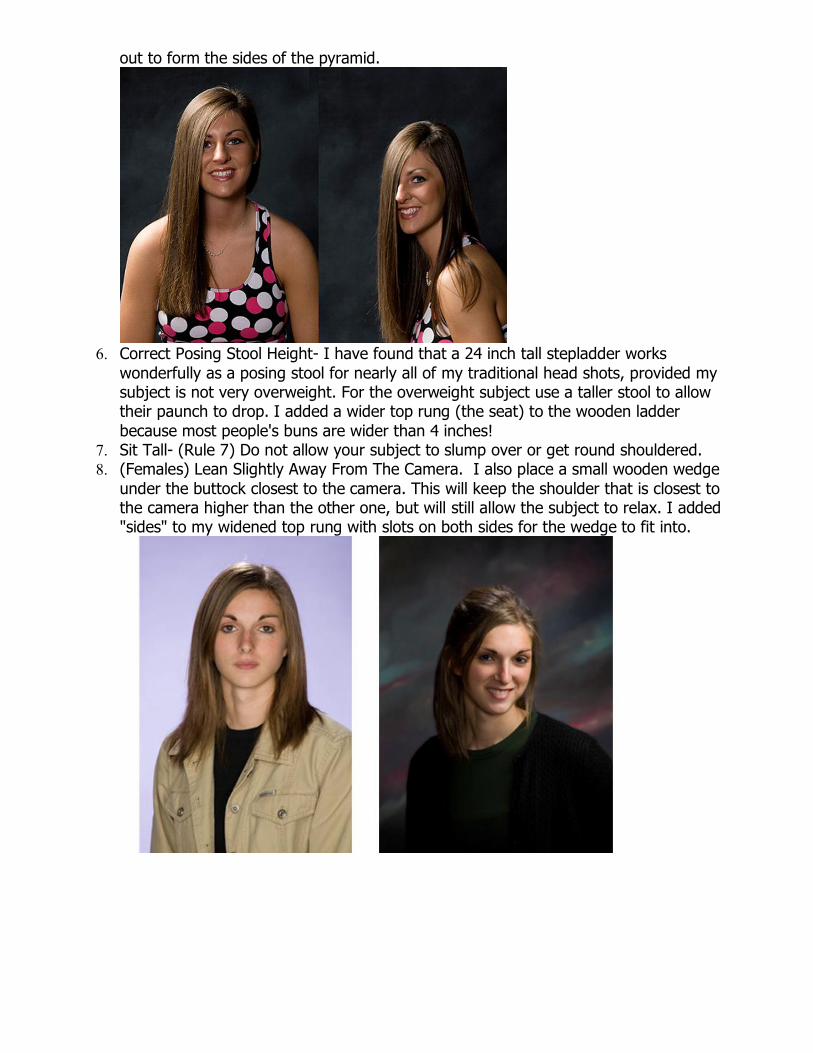
out to form the sides of the pyramid.
6. Correct Posing Stool Height I have found that a 24 inch tall stepladder works wonderfully as a posing stool for nearly all of my traditional head shots, provided my subject is not very overweight. For the overweight subject use a taller stool to allow their paunch to drop. I added a wider top rung (the seat) to the wooden ladder because most people's buns are wider than 4 inches!
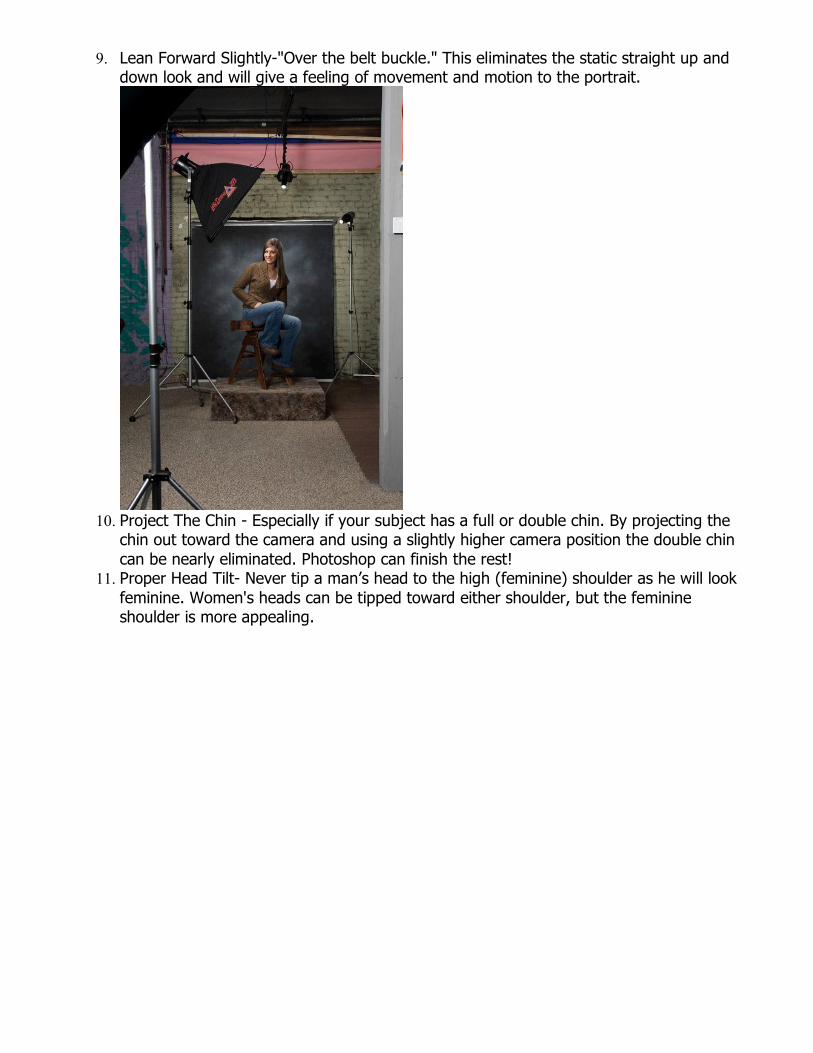
7. Sit Tall (Rule 7) Do not allow your subject to slump over or get round shouldered. 8. (Females) Lean Slightly Away From The Camera. I also place a small wooden wedge
under the buttock closest to the camera. This will keep the shoulder that is closest to the camera higher than the other one, but will still allow the subject to relax. I added "sides" to my widened top rung with slots on both sides for the wedge to fit into.
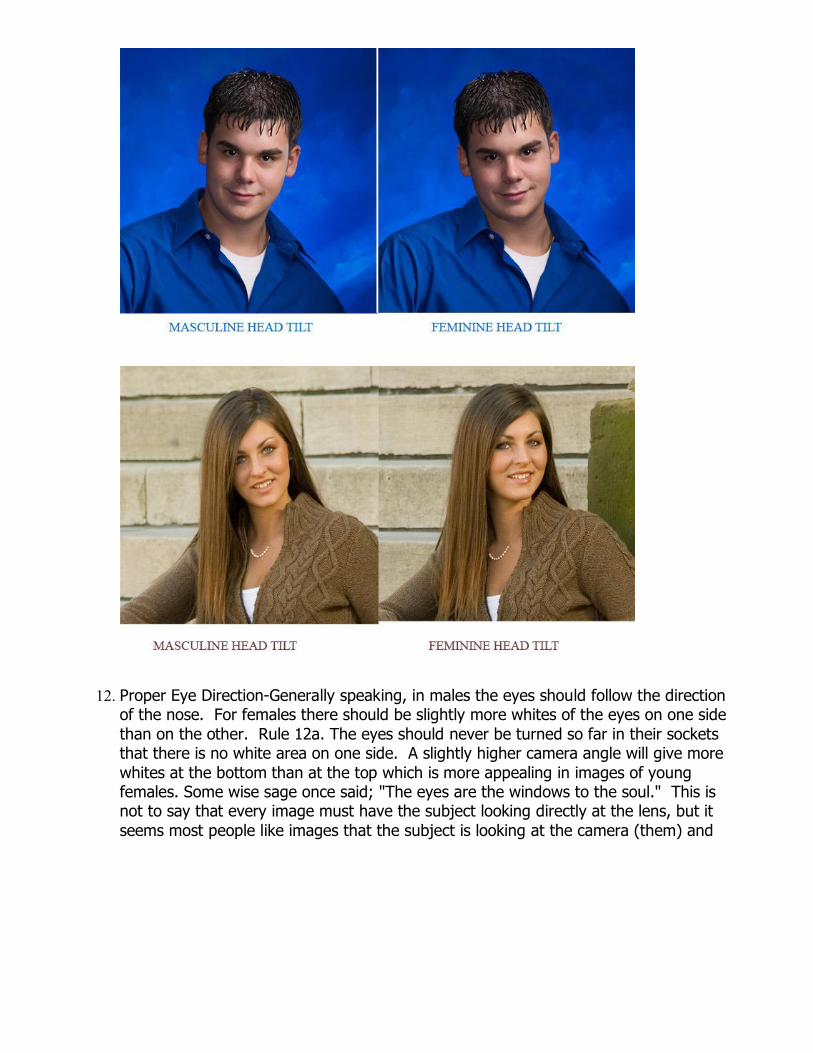
9. Lean Forward Slightly"Over the belt buckle." This eliminates the static straight up and down look and will give a feeling of movement and motion to the portrait.
10. Project The Chin Especially if your subject has a full or double chin. By projecting the chin out toward the camera and using a slightly higher camera position the double chin can be nearly eliminated. Photoshop can finish the rest!
11. Proper Head Tilt Never tip a man’s head to the high (feminine) shoulder as he will look feminine. Women's heads can be tipped toward either shoulder, but the feminine shoulder is more appealing.
12. Proper Eye DirectionGenerally speaking, in males the eyes should follow the direction of the nose. For females there should be slightly more whites of the eyes on one side than on the other. Rule 12a. The eyes should never be turned so far in their sockets that there is no white area on one side. A slightly higher camera angle will give more whites at the bottom than at the top which is more appealing in images of young females. Some wise sage once said; "The eyes are the windows to the soul." This is not to say that every image must have the subject looking directly at the lens, but it seems most people like images that the subject is looking at the camera (them) and
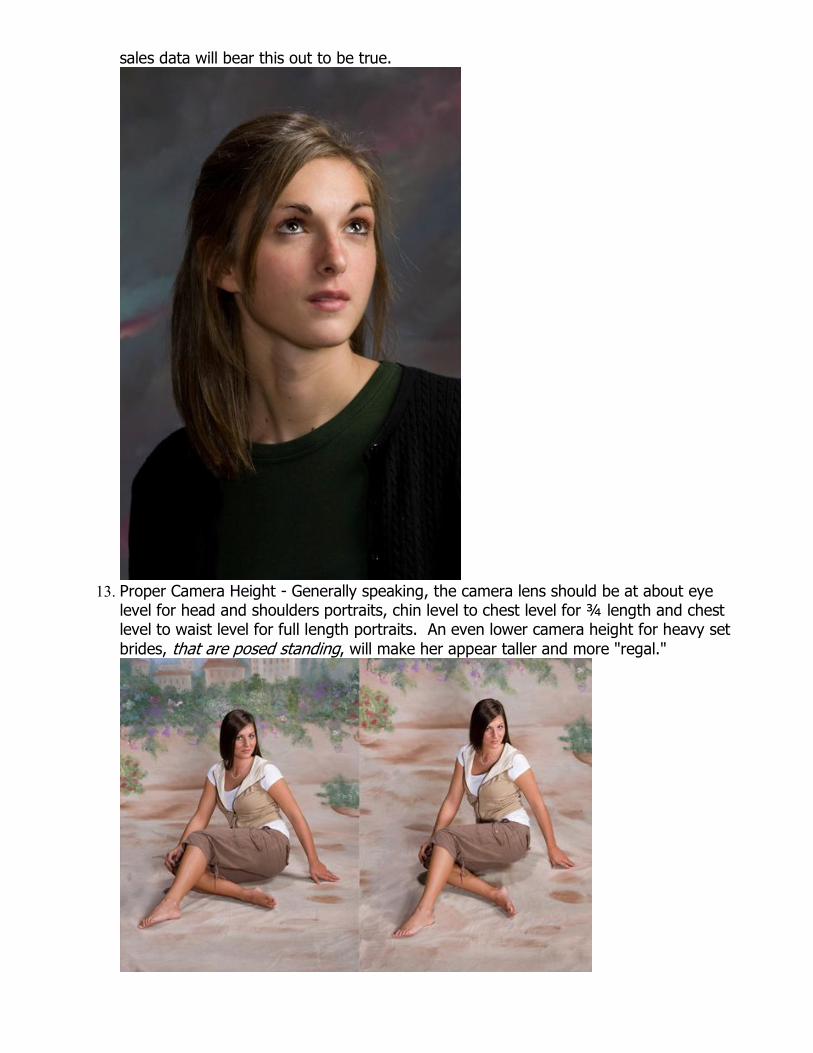
sales data will bear this out to be true.
13. Proper Camera Height Generally speaking, the camera lens should be at about eye level for head and shoulders portraits, chin level to chest level for ¾ length and chest level to waist level for full length portraits. An even lower camera height for heavy set brides, that are posed standing, will make her appear taller and more "regal."
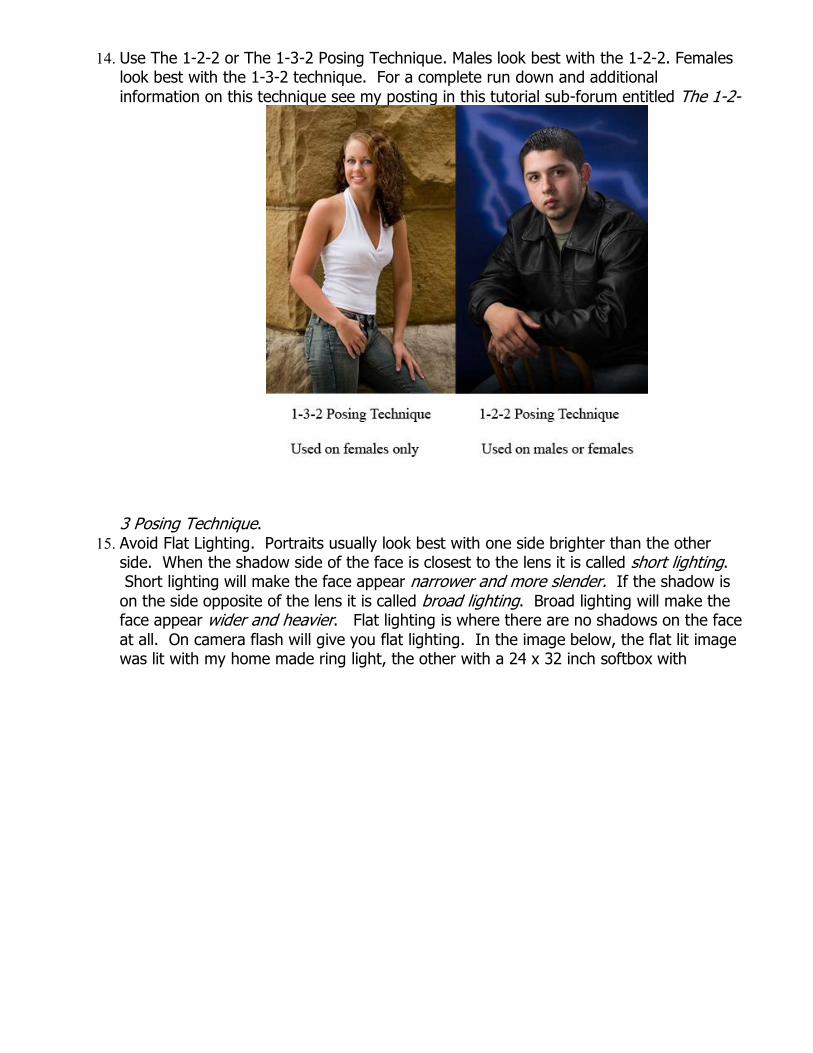
14. Use The 122 or The 132 Posing Technique. Males look best with the 122. Females look best with the 132 technique. For a complete run down and additional information on this technique see my posting in this tutorial subforum entitled The 12
3 Posing Technique. 15. Avoid Flat Lighting. Portraits usually look best with one side brighter than the other
side. When the shadow side of the face is closest to the lens it is called short lighting. Short lighting will make the face appear narrower and more slender. If the shadow is on the side opposite of the lens it is called broad lighting. Broad lighting will make the face appear wider and heavier. Flat lighting is where there are no shadows on the face at all. On camera flash will give you flat lighting. In the image below, the flat lit image was lit with my home made ring light, the other with a 24 x 32 inch softbox with

louvers at camera right.
16.Watch the Nose and Cheek LineThe face should not be turned so far away from the camera that the nose will break or nearly break the far cheek line. This will make the nose look large. 16 a. The far eye should either been seen completely or not be seen at all, but one should never photograph the face so that only 1/2 of the far eye shows. Note that this pose will also cause the subject's eyes to have too much white on one side of the eye as opposed to the other side of the eye (a violation of rule 12.)
17. Avoid Clutter Simplicity is usually best! Too many props in an image or a busy, sharply focused or brightly lit background will create confusion for the eye.
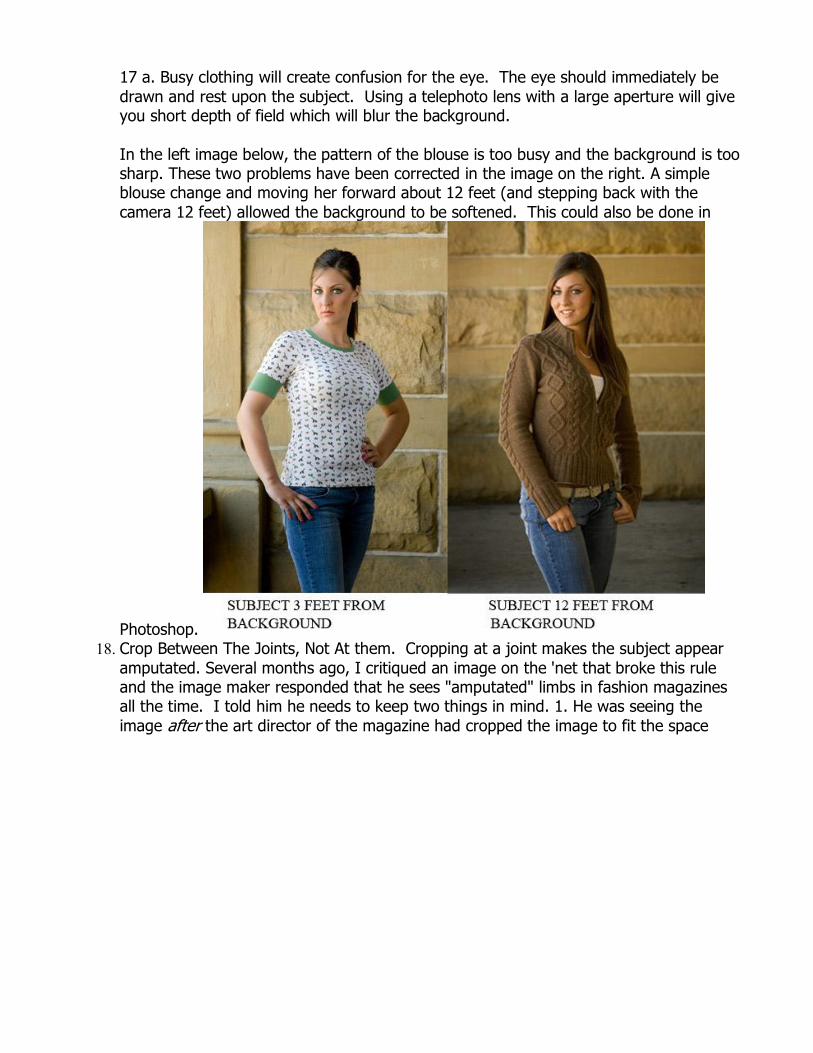
17 a. Busy clothing will create confusion for the eye. The eye should immediately be drawn and rest upon the subject. Using a telephoto lens with a large aperture will give you short depth of field which will blur the background.
In the left image below, the pattern of the blouse is too busy and the background is too sharp. These two problems have been corrected in the image on the right. A simple blouse change and moving her forward about 12 feet (and stepping back with the camera 12 feet) allowed the background to be softened. This could also be done in
Photoshop. 18. Crop Between The Joints, Not At them. Cropping at a joint makes the subject appear
amputated. Several months ago, I critiqued an image on the 'net that broke this rule and the image maker responded that he sees "amputated" limbs in fashion magazines all the time. I told him he needs to keep two things in mind. 1. He was seeing the image after the art director of the magazine had cropped the image to fit the space
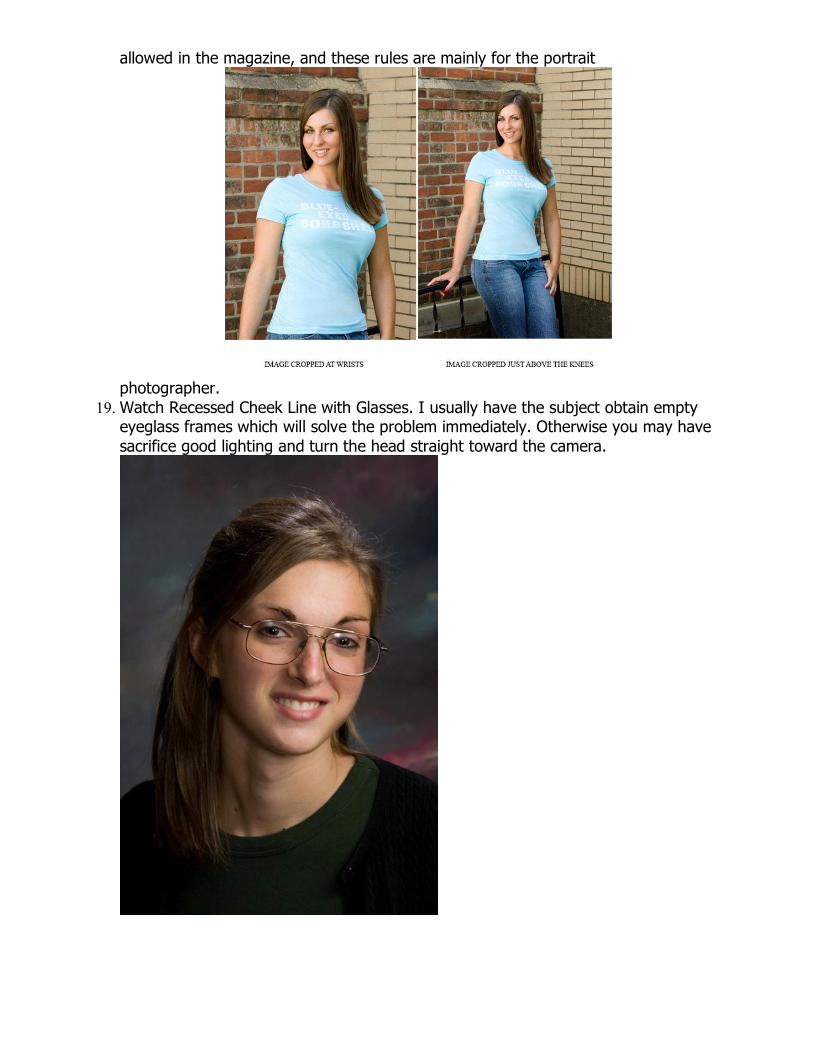
allowed in the magazine, and these rules are mainly for the portrait
photographer. 19.Watch Recessed Cheek Line with Glasses. I usually have the subject obtain empty
eyeglass frames which will solve the problem immediately. Otherwise you may have sacrifice good lighting and turn the head straight toward the camera.
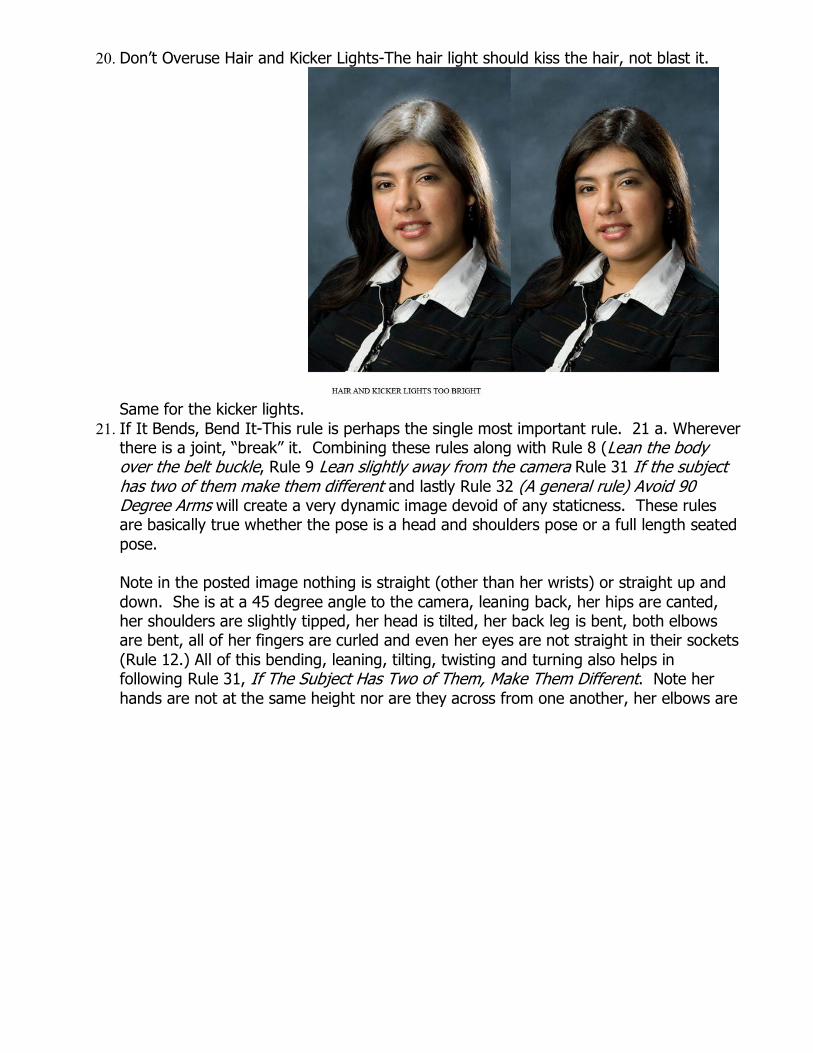
20. Don’t Overuse Hair and Kicker LightsThe hair light should kiss the hair, not blast it.
Same for the kicker lights. 21. If It Bends, Bend ItThis rule is perhaps the single most important rule. 21 a. Wherever
there is a joint, “break” it. Combining these rules along with Rule 8 (Lean the body over the belt buckle, Rule 9 Lean slightly away from the camera Rule 31 If the subject has two of them make them different and lastly Rule 32 (A general rule) Avoid 90 Degree Arms will create a very dynamic image devoid of any staticness. These rules are basically true whether the pose is a head and shoulders pose or a full length seated pose.
Note in the posted image nothing is straight (other than her wrists) or straight up and down. She is at a 45 degree angle to the camera, leaning back, her hips are canted, her shoulders are slightly tipped, her head is tilted, her back leg is bent, both elbows are bent, all of her fingers are curled and even her eyes are not straight in their sockets (Rule 12.) All of this bending, leaning, tilting, twisting and turning also helps in following Rule 31, If The Subject Has Two of Them, Make Them Different. Note her hands are not at the same height nor are they across from one another, her elbows are
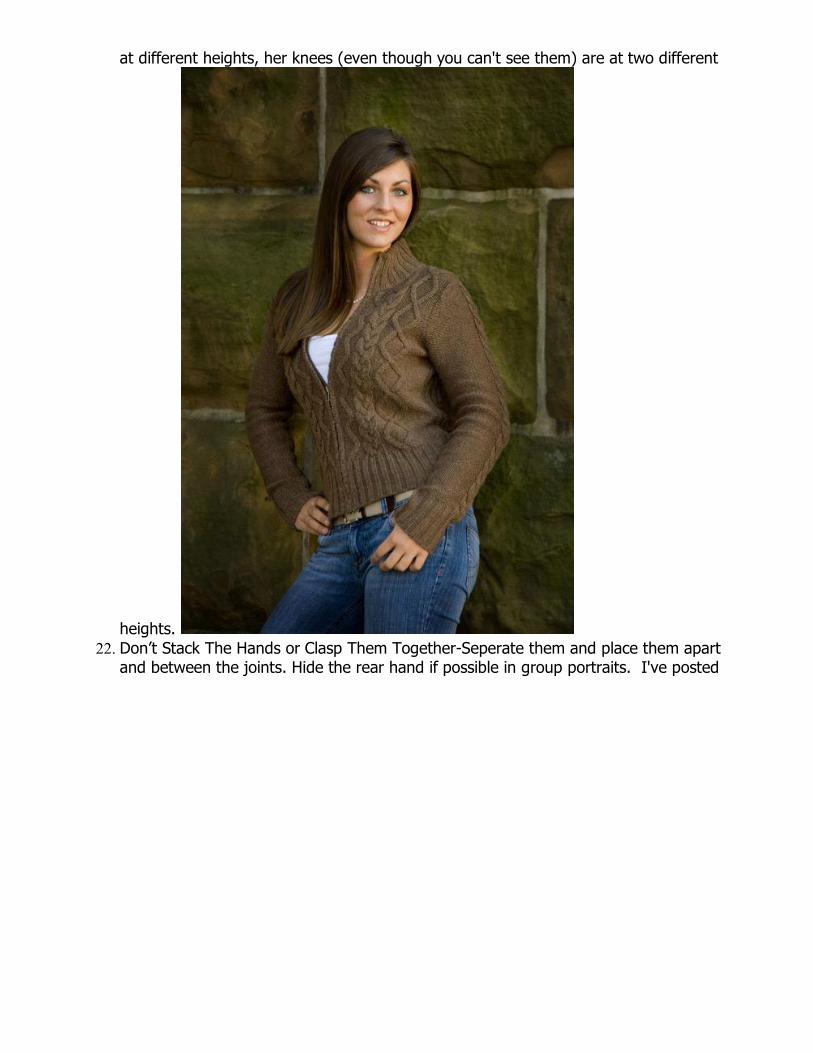
at different heights, her knees (even though you can't see them) are at two different
heights. 22. Don’t Stack The Hands or Clasp Them TogetherSeperate them and place them apart
and between the joints. Hide the rear hand if possible in group portraits. I've posted

three images showing how this rule was broken three different ways.
23. Subdue the Near handThe hand that is nearest to the lens will appear larger than what it actually is. 23 a. Don't project the hands toward the lens and keep them within the range of focus. 23 b. Generally speaking, if the hand is above the subject's waist, the fingers should be directed upwards. If below the waist, the fingers should be directed down. The little finger side of the hand photograph's best. I will post an image that does NOT break this rule.
24. Don’t Photograph The Back of Women's Hands. The sides are much more graceful than the flat of the hand. Fists are masculine, open hands are feminine. Note how much
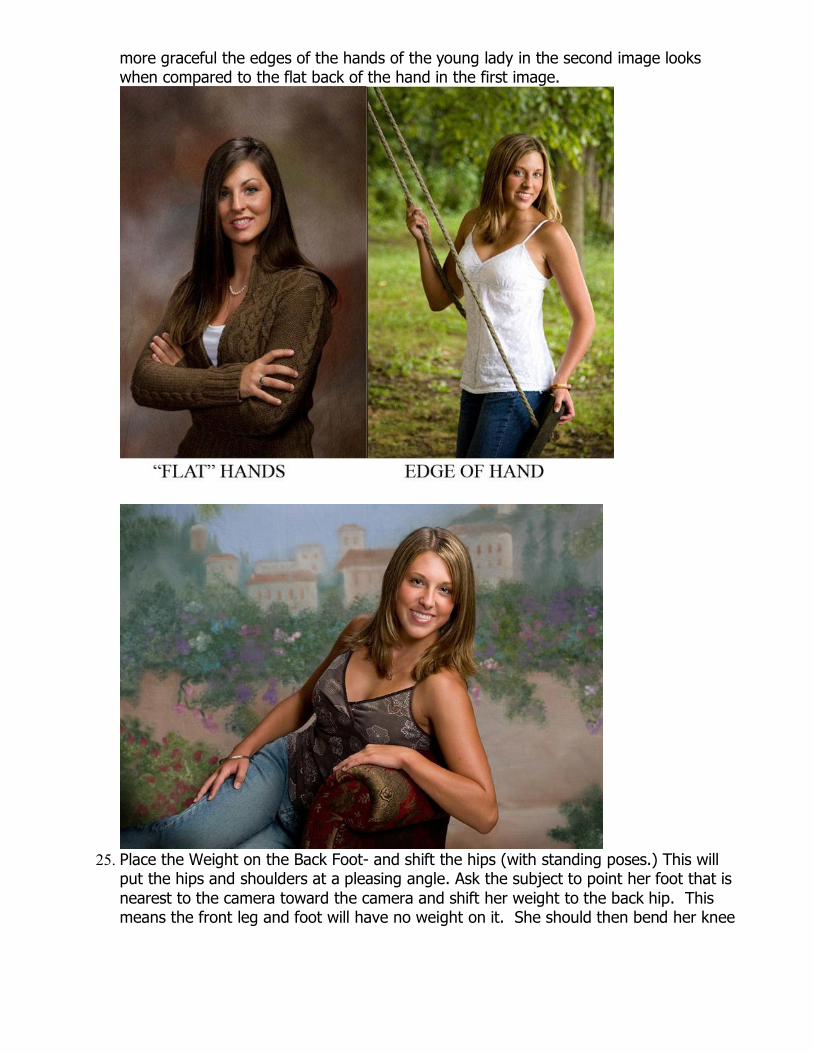
more graceful the edges of the hands of the young lady in the second image looks when compared to the flat back of the hand in the first image.
25. Place the Weight on the Back Foot and shift the hips (with standing poses.) This will put the hips and shoulders at a pleasing angle. Ask the subject to point her foot that is nearest to the camera toward the camera and shift her weight to the back hip. This means the front leg and foot will have no weight on it. She should then bend her knee

slightly toward the other leg. This will give a pleasing “S” curve to her body.
26. (Couples Portraiture) Do Not Photograph Two Heads at the Same Height Ideally the eyes of the shorter subject (usually the female) should be at the same height as the mouth of the taller subject.

27. (Couples or Group Portraiture) Have No Head Directly Above AnotherAll heads should not only be at different heights but also not directly above another subject.
28. Avoid Crotch ShotsRaising the leg that is closest to the camera in a standing pose will prevent shooting into the subject’s crotch. In groups, turning the subject's body to a 45 degree angle and keeping the legs together should prevent shooting into the crotch. This rule has been "relaxed" in the last decade or so for high school senior images, especially for boys and to a somewhat lesser extent for gals.
29. Use The Right Key and Good TasteGenerally speaking a subject dressed in all white looks best in a medium or high key background. Conversely, a subject dressed in dark clothing looks best on a medium or dark (low key) background. Note in the above

image (the gal in rule # 28) I broke this rule because she is dressed in black with a black prop but on a white background. Again this rule is frequently broken especially in high school senior portraiture.
30. If The Subject Has Two of Them, Make Them Different. Feet, knees, arms, hands and elbows at different levels are more interesting than when placed side by side. Note in the posted image that everything that can be made different has been made different. His hips are not level, his shoulders are not level, his head is tipped to the masculine shoulder, he is leaning slightly, his knees, feet, arms, hands and elbows are not side by side but are placed at different and multiple levels. Sameness leads to boringness in a photographic image.
31. Avoid "90 Degree" Arms (a general rule for females.) Don Blair called these arms "Carpenter's T square arms." Gently flowing lines usually look best in portraits of women. I broke this rule in my

example image of rule 25 above. In my bridal example below I followed it.
32. Don't Shoot Into a Bare Armpit. Either cover it with something or raise the opposite arm and bring the near arm down. I've seen bare armpits covered with the young lady's long hair, flowers, toul, strips of cloth, and small props. With long sleeved clothing shooting into an armpit is usually not a problem. In the example image I covered one with her long hair, and I heavily retouched the other. She didn't buy this image.
33. (Group Portraiture) Have the subjects at either end of the image face in toward the center. This will keep the viewers attention on the subjects. I also use this technique in my high school senior foilios. The images on the left side of the folio all face to the right and those on the right face left. The master painters of the Rennaissance used
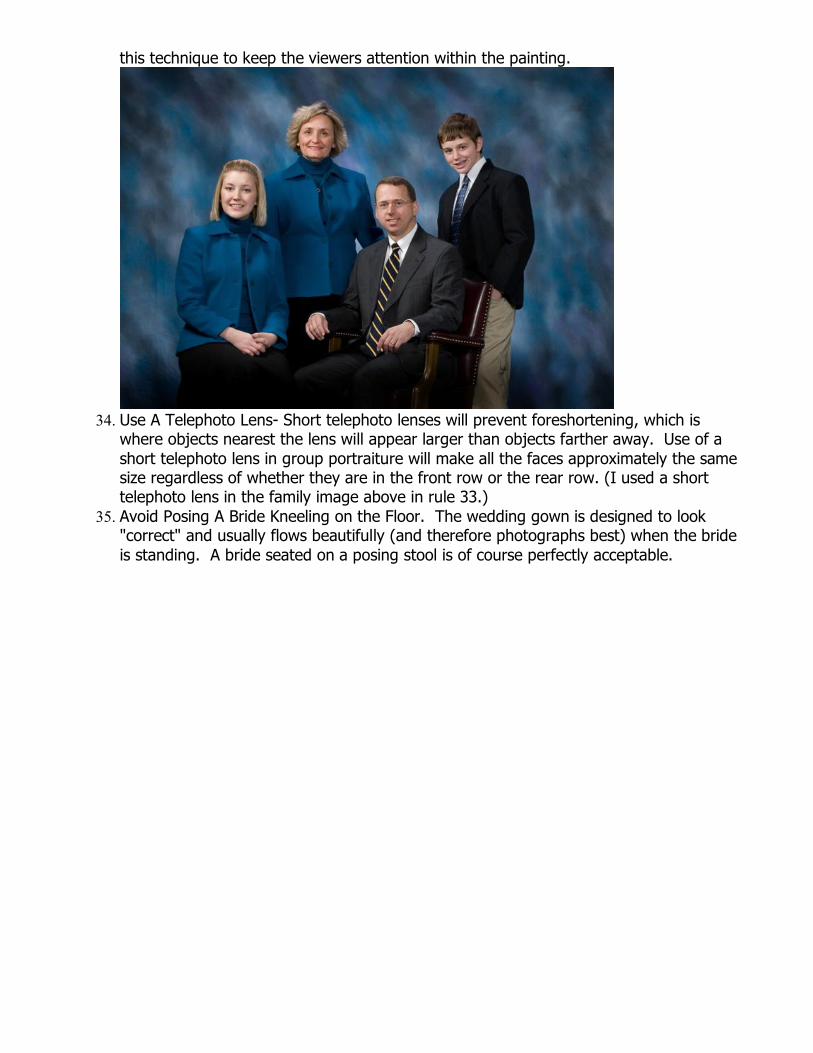
this technique to keep the viewers attention within the painting.
34. Use A Telephoto Lens Short telephoto lenses will prevent foreshortening, which is where objects nearest the lens will appear larger than objects farther away. Use of a short telephoto lens in group portraiture will make all the faces approximately the same size regardless of whether they are in the front row or the rear row. (I used a short telephoto lens in the family image above in rule 33.)
35. Avoid Posing A Bride Kneeling on the Floor. The wedding gown is designed to look "correct" and usually flows beautifully (and therefore photographs best) when the bride is standing. A bride seated on a posing stool is of course perfectly acceptable.