installationsanvisning - ergotechnik
TRANSCRIPT

Dok. Nr: M510V: 2
2018-03-19
MontageanleitungInDiago 510
Installation Instructions InDiago 510
Installationsanvisning InDiago 510
Notice de montage InDiago 510

2
InDiago
Förberedelser / Preparation / Vorbereitung / Préparation
Tack för att ni har valt att installera en produkt från Granberg!
För att produkten skal fungera säkert är det ytterst viktigt att installationsanvisningen följs.Installatör skall läsa och förstå hela installationsanvisningen innan installation påbörjas. Installatören ansvarar för att väggkonstruktioner uppfyller de krav som ställs och att fästelement klarar de krafter som kan uppstå.Installatör ansvarar även för att rätt behörighet och kompetens finns för el- och vattenarbete.
Efter utförd installation ska produkten funktionstestas enligt avsnitt på s. 23-24.
Innan produkten tas i drift måste användarmanualen läsas i sin helhet. Användarmnualen lämnas över till användare i samnband med en demonstation av produktens funktioner och säkerhetssystem.
Samtliga som skall använda produkten ska ha läst hela användarmanualen och vara införstådd i avsedd användning och vilka risker som finns.
Användamanualen skall finnas tillgänglig i produktens närhet.
Thank you for choosing to install a Granberg product!
In order for the product to function safely, it is very important that the installation instructions are followed.The installer must read and understand the entire installation instructions before installation starts.The installer is responsible for ensuring that wall constructions meet the demands and that fasteners can handle the forcesthat can arise.The installer is also responsible for the right of competence and competence for electricity and water work.
After performing installation, the product must be tested for function according to section on pages 23-24.
Before using the product, the user manual must be read in its entirety.The user manual is handed over to users in conjunction with a demo of the product features and security systems.
Everyone who uses the product should have read the entire user manual and be aware of the intended use and the risks involved.
The user manual should be available in the vicinity of the product.
Danke, dass Sie sich für die Installation eines Granberg Produkts entschieden haben!
Damit das Produkt sicher funktioniert, ist es sehr wichtig, dass die Installationsanweisungen befolgt werden.Der Monteur muss die komplette Montageanleitung vor Beginn der Montage lesen und verstehen.Der Monteur ist dafür verantwortlich, dass die Wandbeschaffenheit den Anforderungen entspricht und dass die Befestigung-smittel den auftretenden Kräften entsprechend gewählt werden.Der Monteur muss dazu berechtigt sein, die Wasser- u. Stromanschlüsse ausführen zu dürfen.
Nach der Montage muss eine Funktionsprüfung gemäß der Beschreibung auf den Seiten 23-24 durchgeführt werden.
Vor der Verwendung des Produkts muss das Benutzerhandbuch vollständig gelesen werden.Das Benutzerhandbuch muss den Nutzern in Verbindung mit einer Demo der Produktfunktionen und der Sicherheitssysteme übergeben werden.
Jeder, Nutzer, sollte das gesamte Benutzerhandbuch gelesen haben und den richtigen Gebrauch und dessen Risiken kennen.
Das Benutzerhandbuch sollte stets in der Nähe des Produkts verfügbar sein.
SE
EN
DE

3
InDiago
InDIago 510230/50Hz/2.0A
20 mm / s
470 mm
40 kg
6 / 1h
kg
(mm)Teknisk data / Technical data / Technische Daten / Données techniques
Min 460Max 968
318 / 418 / 518 / 618 / 718 / 818
614
248 / 298
650 /
800
254 / 304
Installation
07174
WEIGHT:
A3
SHEET 1 OF 1SCALE:1:10
DWG NO.
TITLE:
REVISION
DO NOT SCALE DRAWING
MATERIAL:
DEBUR AND BREAK SHARP EDGES
FINISH:
UNLESS OTHERWISE SPECIFIED:DIMENSIONS ARE IN MILLIMETERS TOLERANCES: LINEAR: SS-ISO 2768-m ANGULAR: SS-ISO 2768-m
DRAWN
CHECKED
Granberg Interior AB Tel. +46(0)[email protected] www.granberg.se

4
InDiago
Planering / Planning / Planung / Planification
(mm)
500 / 600 / 700 / 800 / 900 / 1000
min
700 /
min
850
min 260 / min 310
min
660 /
min
810
16 -
20
Väggskåp SMST
07183-skåp
WEIGHT:
A3
SHEET 1 OF 1SCALE:1:10
DWG NO.
TITLE:
REVISION
DO NOT SCALE DRAWING
MATERIAL:
DEBUR AND BREAK SHARP EDGES
FINISH:
UNLESS OTHERWISE SPECIFIED:DIMENSIONS ARE IN MILLIMETERS TOLERANCES: LINEAR: SS-ISO 2768-m ANGULAR: SS-ISO 2768-m
DRAWN
CHECKED
Granberg Interior AB Tel. +46(0)[email protected] www.granberg.se
16 - 20
Min 460Max 968
318 / 418 / 518 / 618 / 718 / 818
Installation
07174-hållfasthet
WEIGHT:
A3
SHEET 1 OF 1SCALE:1:10
DWG NO.
TITLE:
REVISION
DO NOT SCALE DRAWING
MATERIAL:
DEBUR AND BREAK SHARP EDGES
FINISH:
UNLESS OTHERWISE SPECIFIED:DIMENSIONS ARE IN MILLIMETERS TOLERANCES: LINEAR: SS-ISO 2768-m ANGULAR: SS-ISO 2768-m
DRAWN
CHECKED
Granberg Interior AB Tel. +46(0)[email protected] www.granberg.se
750N
600N
900N

5
InDiago
Very important!Check the cabinet fixing on the wall before installation!
At maximum load and fully driven, the tensile force in the wall can reach 600N.
Make sure that the screw connection and condition of the cabinet meet these requirements.
Check the condition of the wall joining with cupboard sides.Reinforce with an angle bracket fixed in the sides of the cabinet and into the wall through the cabinet to get a strongerwall fixing.
Also connect the cabinet with cabinets at the sides to further distribute of the forces.
HingesAll cabinet manufacturers have different types of hinges and placement.
We have developed the product to work with as many types and hinges and its location as possible.There may even be cases where the hinges are in conflict with the product.The hinges must then be moved so as not to collide with the product or its moving parts.
Dampings mounted outside of the hinges must be removed.Hinges with integrated damping are compatible.
Planering / Planning / Planung / Planification
Min 460Max 968
318 / 418 / 518 / 618 / 718 / 818
Installation
07174-hållfasthet
WEIGHT:
A3
SHEET 1 OF 1SCALE:1:10
DWG NO.
TITLE:
REVISION
DO NOT SCALE DRAWING
MATERIAL:
DEBUR AND BREAK SHARP EDGES
FINISH:
UNLESS OTHERWISE SPECIFIED:DIMENSIONS ARE IN MILLIMETERS TOLERANCES: LINEAR: SS-ISO 2768-m ANGULAR: SS-ISO 2768-m
DRAWN
CHECKED
Granberg Interior AB Tel. +46(0)[email protected] www.granberg.se
750N
600N
900N
EN
Mycket Viktigt!Kontrollera skåpets fastsättning i vägg före installation!
Vid max belastning och fullt utkörd kan dragkraften i vägg uppgå till 600N
Säkerställ att skruvförband och skick på skåp uppfyller dessa krav.
Kontrollera skicket på spikregelns sammanfogning med skåpsidor. Förstärk med en byggvinklar fastsatta i skåpets sidor och in i vägg genom spikregel för att få en starkare fastsättning i vägg.
Sammanfoga även skåpet med skåp vid sidorna för att fördela ut kraften ytterligare.
GångjärnAlla skåpstillverkare har olika typer av gångjärn och placering.
Vi har utfromat produkten för att fungera med så många typer och gångjärn och dess placering som är möjligt.Det kan ändock förekomma fall där gångjärnen är i konflikt med produkten.Gångjärnen flyttas då för att inte kollidera med produkten eller dess rörliga delar.
Dämpning som är monterade utanpå gångjärn avlägsnas. Gångjärn med integrerad dämpning är kompatibla.
SE

6
InDiago
Sehr wichtig! Überprüfen Sie vor der Montage die Wandbeschaffenheit! Bei max. Belastung können während des Betriebs Zugkräfte von bis zu 600N an der Wand auftreten. Stellen Sie sicher, das die Schrankaufhängung dieser Belastung standhält. Gegebenenfalls müssen weiter Befestigungspunkte gesetzt werden. Um eine möglichst große Stabilität zu erhalten, verschrauben Sie den Schrankkorpus mit den seitlich anschließenden Schränken (falls vorhanden). Scharniere Je nach Möbelhersteller variieren die Montagemaße und die Art der Scharniere.
Wir haben unser Produkt so konstruiert, das es mit den gängigsten Fabrikaten kompatibel ist.Sollte es dennoch zu Problemen kommen, so müssen die Scharniere versetzt werden, damit eine einwandfreie Funktion gewährleistet wird.
Aufgesetzte Scharnierdämpfungen müssen entfernt werden.Scharnieren mit integrierter Dämpfung sind kompatibel.
Très important!Vérifiez la fixation du caisson sur le mur avant l’installation!
Une fois le caisson chargé et en fonctionnement, la force de traction sur le mur peut atteindre jusqu’à 600N
Assurez-vous que le support murale et la suspension du caisson peuvent supporter cette charge.
Si nécessaire, d’autres points de fixation doivent être définis.
Afin d’obtenir la plus grande stabilité possible, renforcer avec une equerre fixée dans les coins du caisson et dans le mur pour obtenir pour obtenir une plus forte fixation murale (si possible).Connectez également l’armoire avec des armoires sur les côtés pour répartir davantage la puissance.
CharnièreSelon le fabricant de meubles, les dimensions de montage et le type de charnières varient.
Nous avons conçu notre produit pour être compatible avec les marques les plus courantes. Si toutefois il y a des problèmes, les charnières doivent être déplacées, de sorte qu’une fonction parfaite est garanti.
Les ”amortisseurs” de charnière attachés doivent être enlevés.Tracer des repères de perçage sur les côtés du caisson.
Min 460Max 968
318 / 418 / 518 / 618 / 718 / 818
Installation
07174-hållfasthet
WEIGHT:
A3
SHEET 1 OF 1SCALE:1:10
DWG NO.
TITLE:
REVISION
DO NOT SCALE DRAWING
MATERIAL:
DEBUR AND BREAK SHARP EDGES
FINISH:
UNLESS OTHERWISE SPECIFIED:DIMENSIONS ARE IN MILLIMETERS TOLERANCES: LINEAR: SS-ISO 2768-m ANGULAR: SS-ISO 2768-m
DRAWN
CHECKED
Granberg Interior AB Tel. +46(0)[email protected] www.granberg.se
750N
600N
900N
Planering / Planning / Planung / Planification
DE
FR
7
InDiago
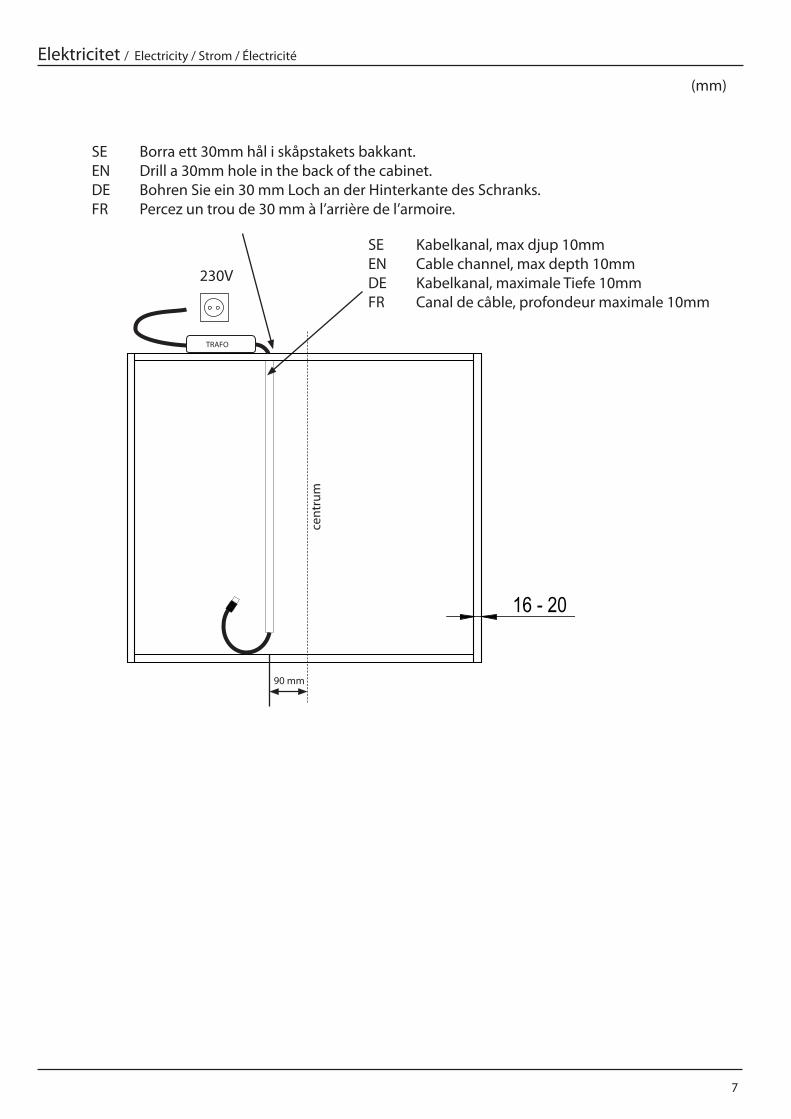
Elektricitet / Electricity / Strom / Électricité
SE Kabelkanal, max djup 10mmEN Cable channel, max depth 10mmDE Kabelkanal, maximale Tiefe 10mmFR Canal de câble, profondeur maximale 10mm
(mm)
500 / 600 / 700 / 800 / 900 / 1000
min
700 /
min
850
min 260 / min 310
min
660 /
min
810
16 -
20
Väggskåp SMST
07183-skåp
WEIGHT:
A3
SHEET 1 OF 1SCALE:1:10
DWG NO.
TITLE:
REVISION
DO NOT SCALE DRAWING
MATERIAL:
DEBUR AND BREAK SHARP EDGES
FINISH:
UNLESS OTHERWISE SPECIFIED:DIMENSIONS ARE IN MILLIMETERS TOLERANCES: LINEAR: SS-ISO 2768-m ANGULAR: SS-ISO 2768-m
DRAWN
CHECKED
Granberg Interior AB Tel. +46(0)[email protected] www.granberg.se
16 - 20
TRAFO
cent
rum
90 mm
230V
SE Borra ett 30mm hål i skåpstakets bakkant.EN Drill a 30mm hole in the back of the cabinet.DE Bohren Sie ein 30 mm Loch an der Hinterkante des Schranks.FR Percez un trou de 30 mm à l’arrière de l’armoire.

8
InDiago
Leveransinnehåll / Delivery content / Lieferinhalt / Contenu de livraison
1x
1x
1x
2x
1x 1x
Okin nätkabel
WEIGHT:
A3
SHEET 1 OF 1 SCALE:1:5
DWG NO.
TITLE:
REVISION
DO NOT SCALE DRAWING
MATERIAL:
DEBUR AND BREAK SHARP EDGES
FINISH:
UNLESS OTHERWISE SPECIFIED:DIMENSIONS ARE IN MILLIMETERS TOLERANCES: LINEAR: SS-ISO 2768-m ANGULAR: SS-ISO 2768-m
DRAWN
Granberg Interior AB Tel. +46(0)11197750Fax. +46(0)11127676 [email protected] www.granberg.se
Joel2013-12-19
CHECKED
1x
12 mm
14x 4x12mm16 mm
6x 3,5x25mm
Systemskruv 5x16
WEIGHT:
A4
SHEET 1 OF 1
REVISION
DO NOT SCALE DRAWING
MATERIAL:
DEBUR AND BREAK SHARP EDGESUNLESS OTHERWISE SPECIFIED:DIMENSIONS ARE IN MILLIMETERS TOLERANCES: LINEAR: SS-ISO 2768-m ANGULAR: SS-ISO 2768-m
Granberg Interior AB Tel. +46(0)11197750Fax. +46(0)11127676 [email protected] www.granberg.se
Drawn
Checked
2014-11-26Joel
5x16
SCALE:5:1
DWG NO.
TITLE:
FINISH:
16 mm
4x 3x12mm 6x M5 x 8 mm
WEIGHT:
A4
SHEET 1 OF 1
REVISION
DO NOT SCALE DRAWING
MATERIAL:
DEBUR AND BREAK SHARP EDGESUNLESS OTHERWISE SPECIFIED:DIMENSIONS ARE IN MILLIMETERS TOLERANCES: LINEAR: SS-ISO 2768-m ANGULAR: SS-ISO 2768-m
Granberg Interior AB Tel. +46(0)11197750Fax. +46(0)11127676 [email protected] www.granberg.se
Drawn
Checked
socket head cap screw 4762_din
SCALE:2:1
DWG NO.
TITLE:
FINISH:
8x - M5 x 5 mm
2x
4x
12x 6,3x13mm2x 2x
or
* not available in Usa / Canada / Australia
1x
2x

9
InDiago
1x
1PZ2TX3
185
mm
SE Placera lucköppnarenheten på botten av skåpet och skruva fast. EN Place the door opener on the bottom of the cabinet and screw it tight.DE Platzieren Sie den Türöffner wie unten gezeigt auf dem Unterboden des Schranks.FR Placez l’ouvre-porte sur le fond de l’armoire et vissez-le fermement.
16 mm6x - 3,5 x 25 mm
12 mm2x - 4x12mm
12 mm 16 mm
2x 4x12mm 6x 3,5x25mm
2x

10
InDiago
2
SE Placera vänster och höger motorenhet i skåpet. Skjut ner och fram i urtaget på lucköppnarna.
EN Place the left and right motor unit in the cabinet. Slide down into the recess on the door openers.
DE Stellen Sie die linke und rechte Motoreinheit in den Schrank. Unten in die Aussparung des Türöffners schieben.
FR Placez les unités moteur gauche et droite dans l’armoire. Glissez vers le bas dans l’évidement sur l’ouvre-porte.

11
InDiago
3
A
A
95
125
180
240
240
95
25
60
168
326 35
2
SECTION A-A
Väggskåp SMST
07183
WEIGHT:
A3
SHEET 1 OF 1SCALE:1:5
DWG NO.
TITLE:
REVISION
DO NOT SCALE DRAWING
MATERIAL:
DEBUR AND BREAK SHARP EDGES
FINISH:
UNLESS OTHERWISE SPECIFIED:DIMENSIONS ARE IN MILLIMETERS TOLERANCES: LINEAR: SS-ISO 2768-m ANGULAR: SS-ISO 2768-m
DRAWN
CHECKED
Granberg Interior AB Tel. +46(0)[email protected] www.granberg.se
6x 6x
5,0 mm
13 mm
SE Markera infästningshålen på skåpssidorna.EN Draw the fixing holes on the cabinet sides.DE Markieren sie die seitlichen Befestigungspunkte.FR Zeichnen Sie die Befestigungslöcher an den Schrankseiten.
12
InDiago
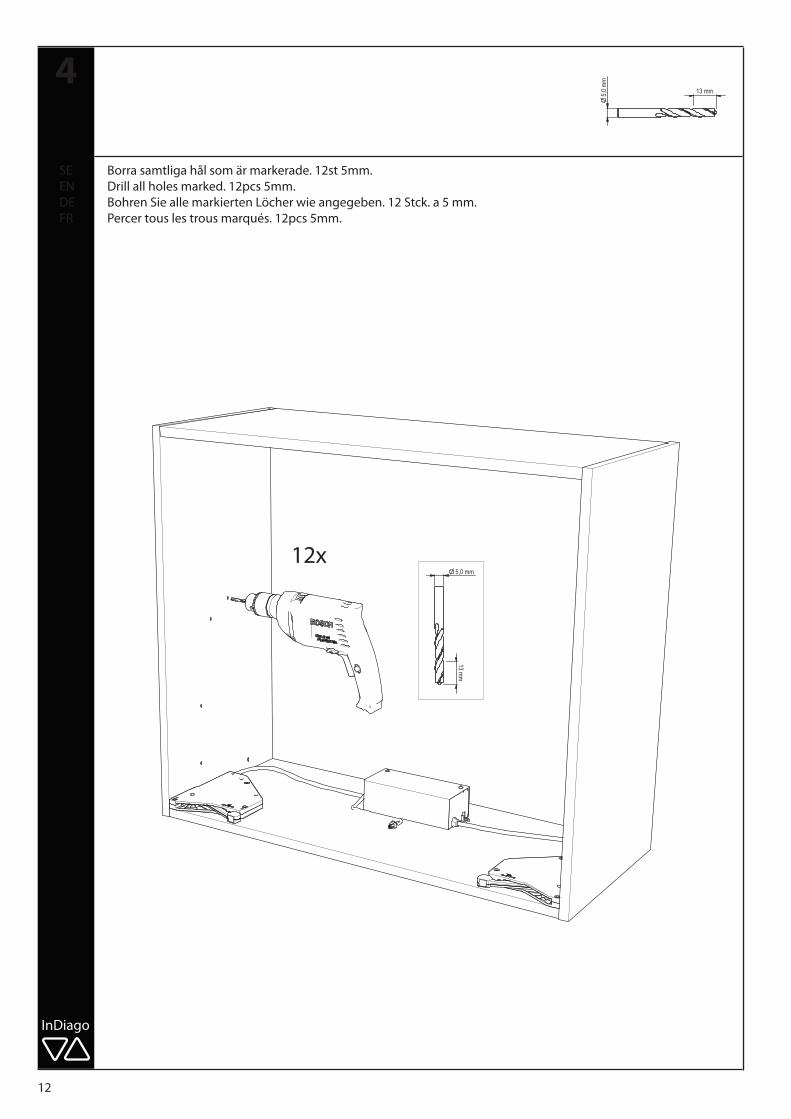
4
SE Borra samtliga hål som är markerade. 12st 5mm.EN Drill all holes marked. 12pcs 5mm.DE Bohren Sie alle markierten Löcher wie angegeben. 12 Stck. a 5 mm.FR Percer tous les trous marqués. 12pcs 5mm.
5,0 mm
13 mm
12x
5,0
mm
13 mm

13
InDiago
5
Systemskruv 5x16
WEIGHT:
A4
SHEET 1 OF 1
REVISION
DO NOT SCALE DRAWING
MATERIAL:
DEBUR AND BREAK SHARP EDGESUNLESS OTHERWISE SPECIFIED:DIMENSIONS ARE IN MILLIMETERS TOLERANCES: LINEAR: SS-ISO 2768-m ANGULAR: SS-ISO 2768-m
Granberg Interior AB Tel. +46(0)11197750Fax. +46(0)11127676 [email protected] www.granberg.se
Drawn
Checked
2014-11-26Joel
5x16
SCALE:5:1
DWG NO.
TITLE:
FINISH:
12 x
SE Skruva fast motorenheterna i sidorna på skåpet. EN Screw the motor units into the sides of the cabinet.DE Verschrauben Sie die Motoreinheiten mit den Schrankseiten.FR Vissez les unités de moteur dans les côtés de l’armoire.
PZ2

14
InDiago
6
(T)
T + 7 mm
40 mm
16 mm
4x 3x12mm 2x PZ2

15
InDiago
7
SE Anslut kablarna enligt nedan
EN Connect the cables as shown below
DE Schließen Sie Kabel wie gezeigt an
FR Connectez les câbles comme indiqué ci-dessous
Väns
ter m
otor
Le
ft m
otor
Hög
er m
otor
Le
ft m
otor
Kläm
skyd
d Sa
fety
sto
p
Mot
or fö
r luc
kor
Doo
r mot
or24V
in
Slad
dans
lute
nm
anöv
erkn
app

16
InDiago
8
40 mm
SE Skruva fast styrenheten.EN Fix the control unit.DE Verschrauben Sie das Steuergerät wie unten gezeigt.FR Visser l’unité de contrôle.
12 mm
4x 4x12mm 1x PZ2
17
InDiago
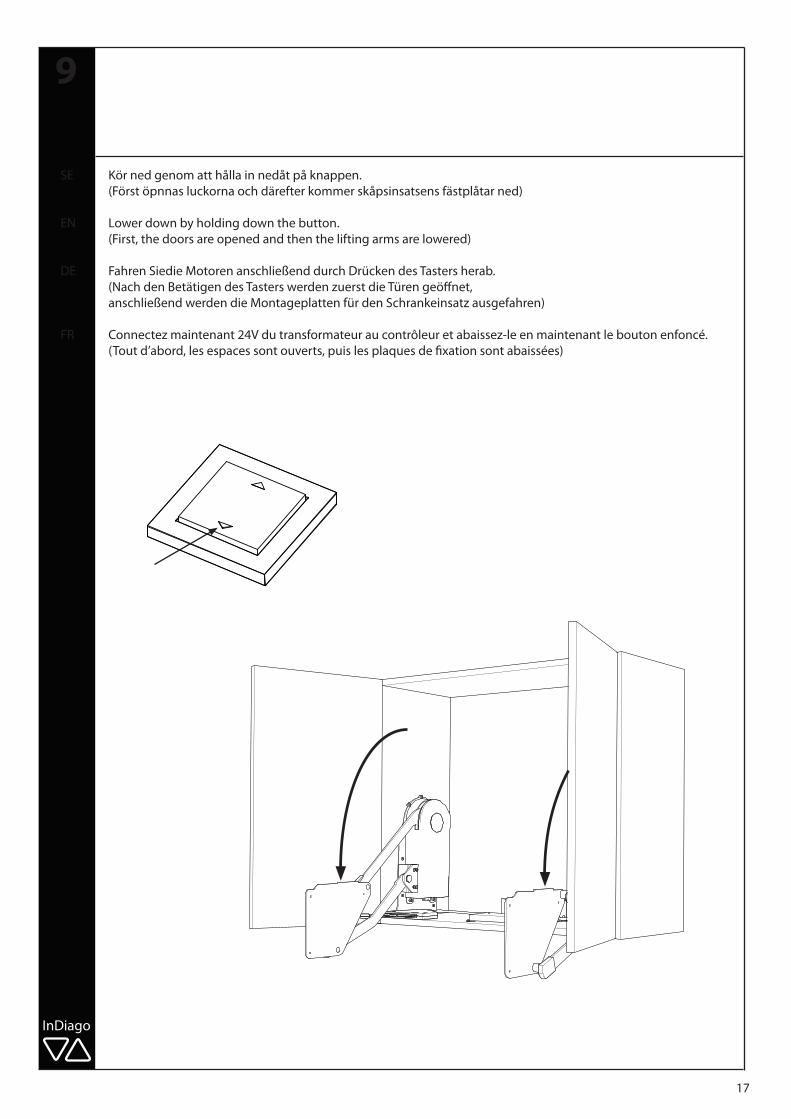
9
SE Kör ned genom att hålla in nedåt på knappen. (Först öpnnas luckorna och därefter kommer skåpsinsatsens fästplåtar ned)
EN Lower down by holding down the button. (First, the doors are opened and then the lifting arms are lowered)
DE Fahren Siedie Motoren anschließend durch Drücken des Tasters herab. (Nach den Betätigen des Tasters werden zuerst die Türen geöffnet, anschließend werden die Montageplatten für den Schrankeinsatz ausgefahren)
FR Connectez maintenant 24V du transformateur au contrôleur et abaissez-le en maintenant le bouton enfoncé. (Tout d’abord, les espaces sont ouverts, puis les plaques de fixation sont abaissées)
18
InDiago
10
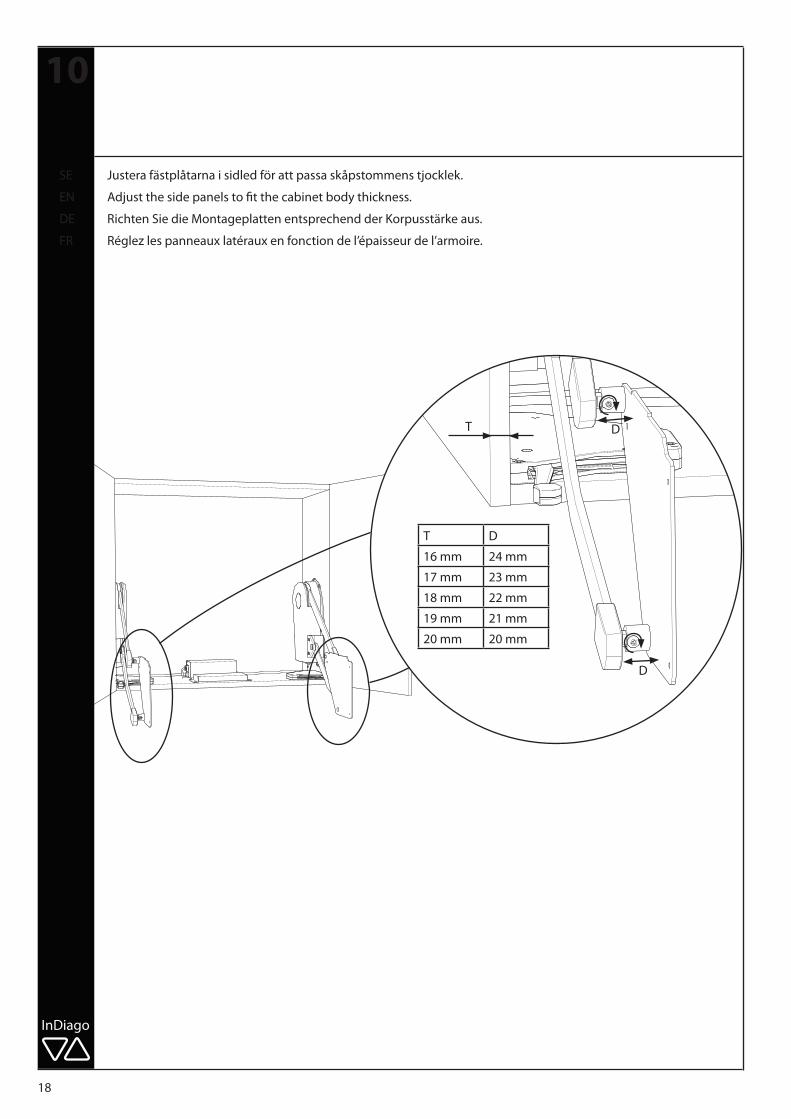
D
DT
T D
16 mm 24 mm
17 mm 23 mm
18 mm 22 mm
19 mm 21 mm
20 mm 20 mm
SE Justera fästplåtarna i sidled för att passa skåpstommens tjocklek.
EN Adjust the side panels to fit the cabinet body thickness.
DE Richten Sie die Montageplatten entsprechend der Korpusstärke aus.
FR Réglez les panneaux latéraux en fonction de l’épaisseur de l’armoire.
19
InDiago
11
SE Häng på skåpsinsatsen på plåtarna och fixera sedan med 6st M5 x 8 mm insex. EN Hang on the cabinet insert on the plates and then fix with 6x M5 x 8 mm hexagon. DE Hängen Sie die Schrankeinsatz an die Montageplatten und befestigen Sie diesen mittels der 6 Stck. M5 x 8 mm Innensechskantschrauben. FR Accrocher l’insert du coffret sur les plaques et fixer avec 6x M5 x 8 mm insex.
6x M5 x 8 mm
WEIGHT:
A4
SHEET 1 OF 1
REVISION
DO NOT SCALE DRAWING
MATERIAL:
DEBUR AND BREAK SHARP EDGESUNLESS OTHERWISE SPECIFIED:DIMENSIONS ARE IN MILLIMETERS TOLERANCES: LINEAR: SS-ISO 2768-m ANGULAR: SS-ISO 2768-m
Granberg Interior AB Tel. +46(0)11197750Fax. +46(0)11127676 [email protected] www.granberg.se
Drawn
Checked
socket head cap screw 4762_din
SCALE:2:1
DWG NO.
TITLE:
FINISH:
HEX 3,5 mm

20
InDiago
12
SE Koppla ihop klämskyddskabeln från vänster motorenhet med skåpsinsatsens kabel. Fixera med medföljande bundband och fäste.
EN Connect the safety guard cable from the left motor unit to the cabinet insert cable. Fix with the supplied strap and bracket.
DE Verbinden Sie das Kabel der Klemmschutzplatte mit dem Kabel der linken Motorein heit. Fixieren Sie das ganze anschließend mit der Kabelhalterung.
FR Raccordez le câble de protection de la pince de l’ensemble moteur gauche au câble d’insertion de l’armoire. Fixez avec la sangle inférieure et le support fournis.

21
InDiago
4x
8x 12 mm
8x - 4x12mm
8x - M5 x 5 mm
13.1 13.2
13.3
13.4
13.5
13.6
1312 mm
8x - 4x12mm8x - M5 x 5 mm 4x

22
InDiago
23
InDiago
SE - Funktionsprov
Efter installation ska komplett funktionsprov: * Provkör lyftenheten upp och ner hela vägen till respektive ändläge. Kontrollera att skåpet löper fritt utan hinder, klämrisker och missljud. Kontrollera att den står kvar i nedre respektive övre läge.
* Kontrollera att inga kablar kommer i kläm och att de är fixerade.
* Kör skåpsinsatsen nedåt och kontrollera att klämskyddet under skåpinsatsen fungerar genom att trycka lätt på den. Skåpinsatsen ska stanna omedelbart och vända uppåt för att frige utrymme, en ljudsignal indikerar att klämskyddet är aktiverat. * Kontrollera att luckorna öppnas och stängs korrekt.
Inbyggda säkerhetssystem * Om luckorna ej kan öppnas hela vägen hindras skåpinsatsen från att köras utåt. * Om luckorna försöker stängas under drift stoppas rörelsen omedelbart och ljudsignal varnar.
* Om kabel till motorenhet skadas eller kopplas ur stannar enheten och ljudsignal indikerar fel.
EN - Functional test
After installation, complete functional test:
* Test the lift unit up and down all the way to the respective end positions. Make sure the cabinet is running free without obstacles, crushing and noise. Make sure it remains in the lower and upper positions respectively.
* Make sure that no cables are clamped and fixed.
* Move the cabinet insert downwards and make sure that the clamp cover under the cabinet insert works by pushing it lightly. The cabinet insert should stop immediately and turn upwards to release space, an acoustic signal indicates that the clamp guard is activated.
* Check that the doors are opened and closed properly.
Built-in security system
* If the doors can not be opened all the way, the cabinet insert is prevented from running outwards.
* If the gates try to shut down during operation, the motion stops immediately and the beep sounds.
* If the cable to the motor unit is damaged or disconnected, the device stops and the audio signal indicates errors.

24
InDiago
DE - Funktionstest Führen Sie nach der Montage einen Funktionstest durch.
* Fahren Sie die Lifteinheit bis zu beiden Endpositionen rauf und runter. Stellen Sie sicher, das sich der Lift frei von Hindernissen ohne Quetschungen und frei von Störgeräuschen läuft. Der Lift muss in der oberen und der unteren Position stehen bleiben.
* Stellen Sie sicher, das keine Kabel oder Schläuche geklemmt werden und alle Kabel gut fixiert sind.
* Fahren Sie den Schrankeinsatz heraus und prüfen sie die Funktion der Klemmschutzplatte unter dem Lift. Durch leichtes Drücken der Klemmschutzplatte muss die Abwärtsbewegung sofort stoppen und der Lift sich etwas nach oben bewegen. Ein akustisches Signal zeigt an, das der Klemmschutz aktiv ist. * Überprüfen Sie, das sich die Türen ordnungsgemäß öffnen und schließen lassen.
Integriertes Sicherheitssystem
* Wenn die Schranktüren nicht vollständig geöffnet sind, wird das Ausfahren des Schrankeinsatzes verhindert. * Wenn die Türen während der Bewegung geschlossen werden, so wird die Bewegung gestoppt und es ertönt ein Signalton. * Wenn ein Kabel zu den Motoreinheiten beschädigt oder getrennt wird, stoppt der Lift und ein Signalton ertönt.
FR - Test fonctionnel
Après l’installation, effectuez un test fonctionnel complet.
* Testez l’unité de levage de haut en bas jusqu’aux positions extrêmes respectives. Assurez-vous que le mécanisme fonctionne libre ment, sans rencontrer d’obstacles, sans écrasement et ni bruit. Assurez-vous qu’il reste bien dans les positions inférieure et supérieure.
* Assurez-vous qu’aucun câble n’est serré ni fixé.
* Déplacez le système vers le bas et assurez-vous que la sécurité fonctionne en la pressant légèrement. Le système doit s’arrêter immédiatement et remonter légèrement, un signal sonore indique que le dispositif de protection est activé.
* Vérifiez que les portes s’ouvrent et se ferment correctement.
Système de sécurité intégré
* Si les portes ne peuvent pas être ouvertes complètement, le mécanisme ne pourra sortir du caisson.
* Si les portes se referment pendant le fonctionnement, le mouvement s’arrête immédiatement et le bip retentit.
* Si le câble de l’unité moteur est endommagé ou déconnecté, l’appareil s’arrête et le signal audio indique un dysfonctionnement

Granberg Interior ABBox 6112 600 06, Norrköping Tel: 011-19 77 50 E-mail: [email protected] Internet: www.granberg.se
Granberg Deutschland GmbHEggeweg 91, 33617 Bielefeld Tel: +49 521 1439983E-mail: [email protected] Internet: www.granberg.de