midwifery marking criteria
TRANSCRIPT

Page 1 of 14 Midwifery - Marking Criteria - V1
Midwifery
Marking Criteria

Page 2 of 14 Midwifery - Marking Criteria - V1
Contents Midwifery Marking Criteria ....................................................................................................... 3
Important Information ........................................................................................................... 3
Examination Process ............................................................................................................ 3
Assessment Marking Criteria: All scenarios ............................................................................. 4
Planning Marking Criteria: All scenarios .................................................................................. 5
Implementation Marking Criteria: All scenarios ........................................................................ 6
Evaluation Marking Criteria: All scenarios ................................................................................ 7
Abdominal Examination Marking Criteria ................................................................................. 8
Aseptic Non-Touch Technique (ANTT) Marking Criteria .......................................................... 9
Catheter Specimen of Urine (CSU) Marking Criteria .............................................................. 10
In-Hospital Resuscitation (without defibrillation) Marking Criteria .......................................... 11
Intramuscular Injection (IM) Marking Criteria ......................................................................... 12
Removal of Urinary Catheter (RUC) Marking Criteria ............................................................ 13
Subcutaneous Injection Marking Criteria ............................................................................... 14

Page 3 of 14 Midwifery - Marking Criteria - V1
Midwifery Marking Criteria
Important Information
This ‘Midwifery Marking Criteria’ document is intended to provide candidates with additional
preparation information to help prepare for the test of competence (part 2). This document
should be read in conjunction with the Candidate Information Booklet, recommended/core
reading, the Mock OSCE and ‘OSCE Top Tips Midwifery’ document.
Examination Process
Each station is marked against unique criteria matched to the skill being assessed. Within
each stations marking grid, there are essential criteria that a candidate must meet in order to
pass; these reflect the minimum acceptable standards of a pre-registration midwife entering
the NMC register.
The following marking grid relates to this particular scenario but is not generic across all
scenarios as this will change depending on what part of the child bearing continuum the
scenario relates to.

Page 4 of 14 Midwifery - Marking Criteria - V1
Assessment Marking Criteria: All scenarios
Assessment Criteria
1 Completes hand hygiene appropriately.
2 May verbalise or make environment safe.
3 Introduce self to the woman.
4 Check ID verbally against the wristband and paperwork.
5 Establish history, recap antenatal care to date and reason for admission to the Antenatal Day Assessment Unit.
6 Identify known allergies.
7 Gain consent.
8 Completes maternal observations (temperature, pulse, blood pressure, respirations and oxygen saturations) accurately.
9 Accurately documents observations using a Modified Early Obstetric Warning Score (MEOWS) chart.
10 Asks about fetal movement, contractions, vaginal loss and pain.
11 Explains urinalysis and checks reagent strips expiry date.
12 Completes hand hygiene and puts on gloves.
13 Inserts the reagent strip into the urine to cover the reagent areas.
14 Reads the reagent strip following manufacture’s recommendations.
15 Removes gloves and completes hand hygiene.
16 Disposes of equipment correctly.
17 Accurately documents clinical results on MEOWS chart.
18 Addresses health education sensitively.
19 Verbal communication is clear and appropriate.
20 Close assessment appropriately and may check findings with the woman.
Page 5 of 14 Midwifery - Marking Criteria - V1
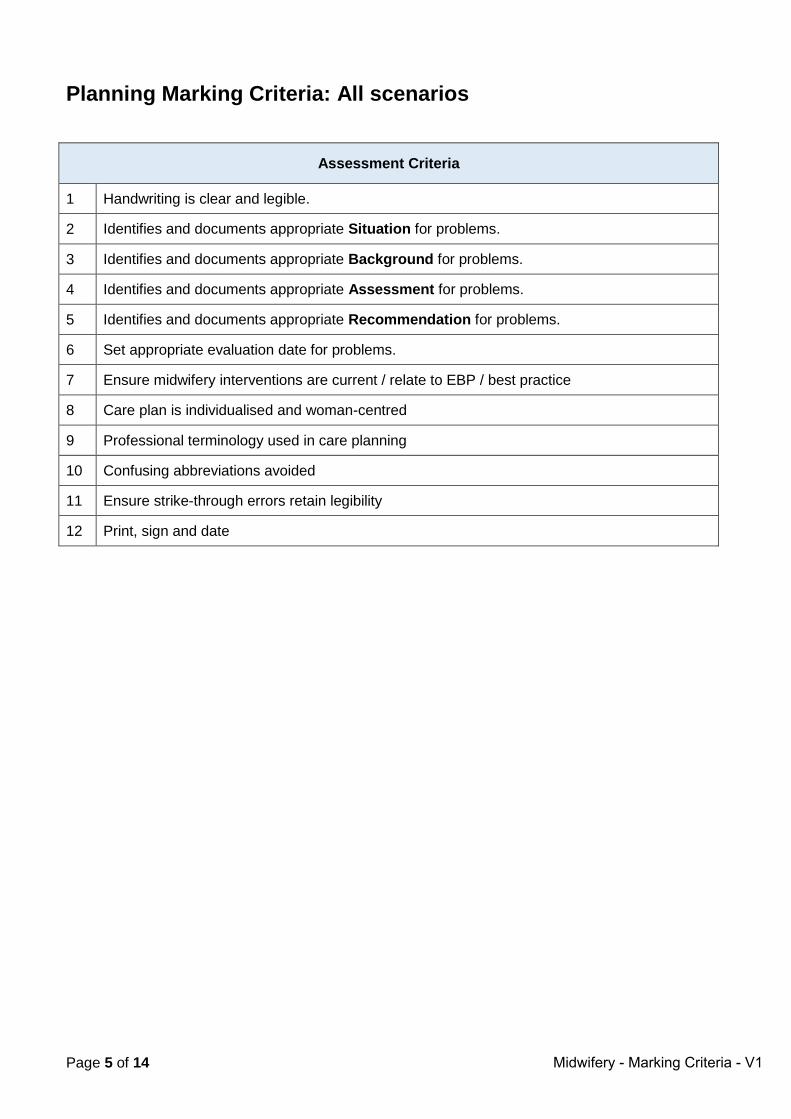
Planning Marking Criteria: All scenarios
Assessment Criteria
1 Handwriting is clear and legible.
2 Identifies and documents appropriate Situation for problems.
3 Identifies and documents appropriate Background for problems.
4 Identifies and documents appropriate Assessment for problems.
5 Identifies and documents appropriate Recommendation for problems.
6 Set appropriate evaluation date for problems.
7 Ensure midwifery interventions are current / relate to EBP / best practice
8 Care plan is individualised and woman-centred
9 Professional terminology used in care planning
10 Confusing abbreviations avoided
11 Ensure strike-through errors retain legibility
12 Print, sign and date
Page 6 of 14 Midwifery - Marking Criteria - V1
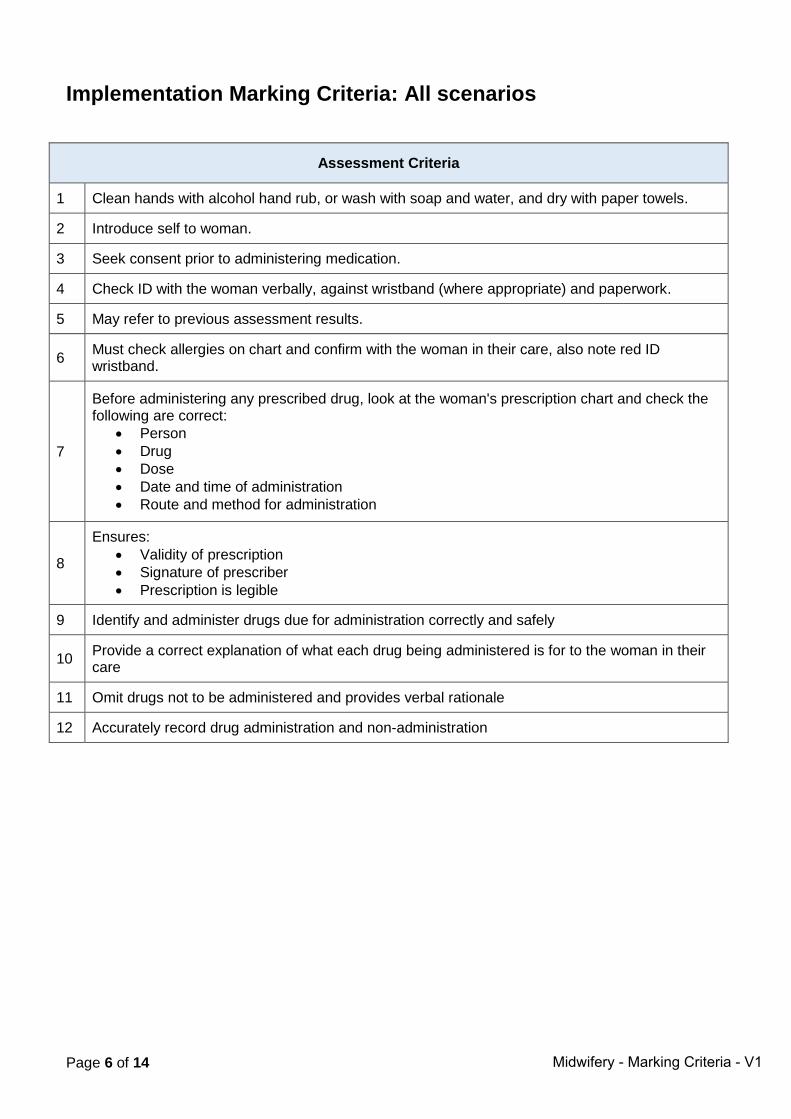
Implementation Marking Criteria: All scenarios
Assessment Criteria
1 Clean hands with alcohol hand rub, or wash with soap and water, and dry with paper towels.
2 Introduce self to woman.
3 Seek consent prior to administering medication.
4 Check ID with the woman verbally, against wristband (where appropriate) and paperwork.
5 May refer to previous assessment results.
6 Must check allergies on chart and confirm with the woman in their care, also note red ID wristband.
7
Before administering any prescribed drug, look at the woman's prescription chart and check the following are correct:
Person
Drug
Dose
Date and time of administration
Route and method for administration
8
Ensures:
Validity of prescription
Signature of prescriber
Prescription is legible
9 Identify and administer drugs due for administration correctly and safely
10 Provide a correct explanation of what each drug being administered is for to the woman in their care
11 Omit drugs not to be administered and provides verbal rationale
12 Accurately record drug administration and non-administration

Page 7 of 14 Midwifery - Marking Criteria - V1
Evaluation Marking Criteria: All scenarios
Assessment Criteria
1 Clearly describe reason for initial admission and diagnosis.
2 Record date of admission.
3 Identify Situation – including observations.
4 Identify Background – including brief history.
5 Identify Assessment – including examination and investigations.
6 Identify Recommendations – including ongoing investigations and referral to MDT.
7 Documents allergies and associated reactions.
8 Documents plan of care and future appointments.
9 Identifies potential areas for parent education.
10 Identifies members of the MDT who need to be aware of discharge.
11 Ensure strike-through errors retain legibility.
12 Print, sign and date.

Page 8 of 14 Midwifery - Marking Criteria - V1
Abdominal Examination Marking Criteria
Assessment Criteria
1 Confirms ID verbally - with wristband/paperwork.
2 Discuss the procedure with the woman and gains consent.
3 Asks if she has emptied her bladder.
4 Discuss the woman’s health and well-being regarding - fetal movements, growth, pain, position.
5 Position the woman correctly - ensures privacy and dignity is maintained.
6 Completes hand hygiene appropriately.
7 Completes and verbalises visual observation of size and shape of gravid uterus.
8 Undertakes fundal height palpation and uses tape measure to assess symphysis-fundal height.
9 Undertakes lateral palpation.
10 Undertakes pelvic palpation.
11 Accurately auscultates the fetal heart with Pinards whilst simultaneously palpating the maternal pulse.
12 Verbalises fetal heart rate to the assessor.
13 Discusses findings with woman and reassures anxieties if required.
14 Assists woman to replace clothing and move into a comfortable position.
15 Completes hand hygiene following examination.
16 Accurately documents findings.
Page 9 of 14 Midwifery - Marking Criteria - V1
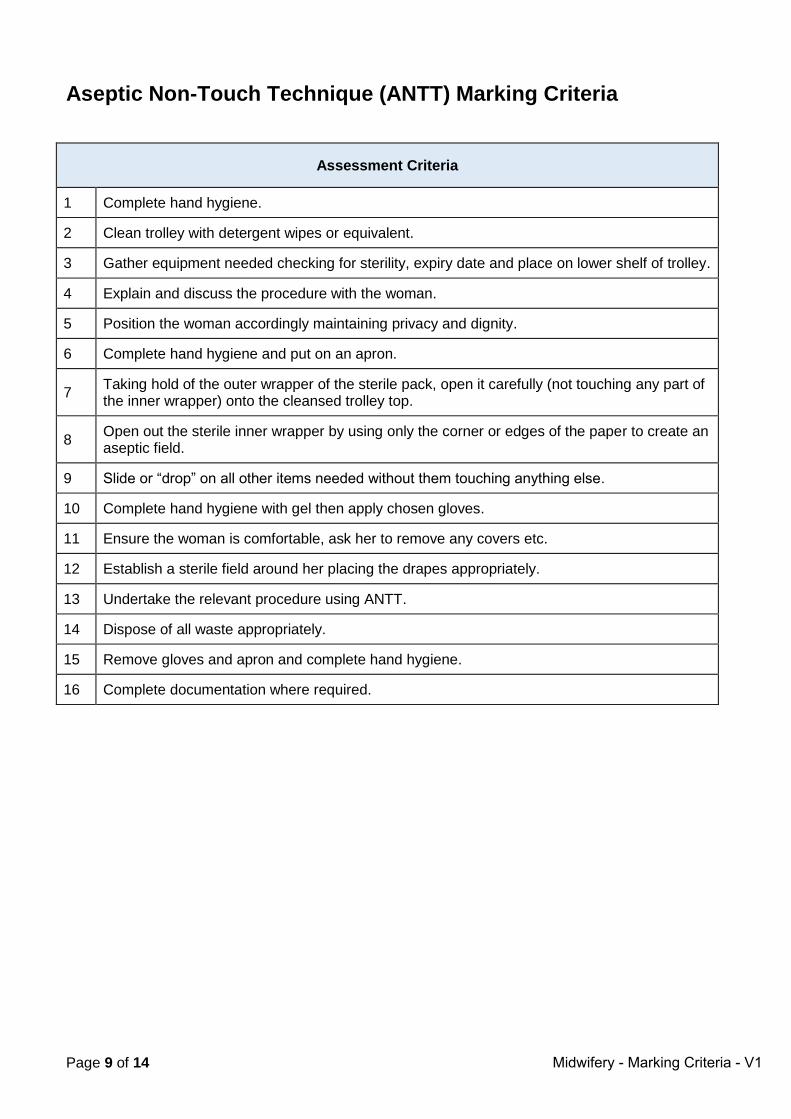
Aseptic Non-Touch Technique (ANTT) Marking Criteria
Assessment Criteria
1 Complete hand hygiene.
2 Clean trolley with detergent wipes or equivalent.
3 Gather equipment needed checking for sterility, expiry date and place on lower shelf of trolley.
4 Explain and discuss the procedure with the woman.
5 Position the woman accordingly maintaining privacy and dignity.
6 Complete hand hygiene and put on an apron.
7 Taking hold of the outer wrapper of the sterile pack, open it carefully (not touching any part of the inner wrapper) onto the cleansed trolley top.
8 Open out the sterile inner wrapper by using only the corner or edges of the paper to create an aseptic field.
9 Slide or “drop” on all other items needed without them touching anything else.
10 Complete hand hygiene with gel then apply chosen gloves.
11 Ensure the woman is comfortable, ask her to remove any covers etc.
12 Establish a sterile field around her placing the drapes appropriately.
13 Undertake the relevant procedure using ANTT.
14 Dispose of all waste appropriately.
15 Remove gloves and apron and complete hand hygiene.
16 Complete documentation where required.

Page 10 of 14 Midwifery - Marking Criteria - V1
Catheter Specimen of Urine (CSU) Marking Criteria
Assessment Criteria
1 Explain and discuss the procedure with the person.
2 Check that any equipment required for the procedure is available and, where applicable, is sterile (i.e. that packaging is undamaged, intact and dry; that sterility indicators are present on any sterilized items and have changed colour where applicable).
3 Ensure privacy.
4 If no urine visible in catheter tubing: wash / Clean hands with alcohol hand rub, or wash with soap and water, and dry with paper towels, don apron and apply non-sterile gloves prior to manipulating the catheter tubing.
5 Apply non-traumatic clamp a few centimetres distal to the sampling port.
6 Clean hands with alcohol hand rub, or wash with soap and water, and dry with paper towels, don gloves.
7 Wipe sampling port with 2% chlorhexidine in 70% isopropyl alcohol and allow drying for 30 seconds.
8
If using needle and syringe: connect sterile syringe and needle, insert needle into port using a non-touch technique, and aspirate the required amount of urine (usually 10 to 20ml), then withdraw needle. If using needless system: insert sterile syringe firmly into centre of sampling port (according to manufacturer’s guidelines), using a non-touch technique, aspirate the required amount of urine and remove syringe.
9 Transfer an adequate volume of the urine specimen (approx. 10ml) into a sterile container immediately.
10 Discard needle and syringe into sharps container (if relevant).
11 Wipe the sampling port with an alcohol wipe and allow to dry.
12 Unclamp catheter tubing (if relevant).
13 Dispose of waste, remove apron and gloves and clean hands with alcohol hand rub, or wash with soap and water, and dry with paper towels.

Page 11 of 14 Midwifery - Marking Criteria - V1
In-Hospital Resuscitation (without defibrillation) Marking Criteria
Assessment Criteria
1 Ensure personal safety (safe environment).
2 Check the person for a response.
3 Shouts for help when the person does not respond (if not already done).
4 Turn the person on to their back.
5 Open the airway using head tilt and chin lift (jaw-thrust if risk of cervical spine injury).
6 Keeping the airway open, look, listen, and feel - to determine if the person is breathing normally (less than 10 seconds).
7 May check for carotid pulse at the same time.
8 Ensure resuscitation team are called and resuscitation equipment requested (if alone leaves the person to get help and equipment).
9 Commence CPR with ratio of compressions to ventilations of 30:2.
10 Uses correct hand position - middle of the lower half of sternum.
11 Compression depth of 5-6cm.
12 Compression rate of 100-120 compressions per minute.
13 Allow the chest to recoil completely after each compression.
14 Minimise any interruptions to chest compressions (hands-off time).
15 Use bag-valve mask (ambu-bag / self-inflating bag-mask) to produce a visible rise of the chest wall.
16 Avoid rapid or forceful breaths.

Page 12 of 14 Midwifery - Marking Criteria - V1
Intramuscular Injection (IM) Marking Criteria
Assessment Criteria
1 Explain and discuss the procedure with the woman.
2
Before administering any prescribed drug, look at the woman’s prescription chart and check the following: Correct: • Person• Drug• Dose• Date and time of administration• Route and method of administration• Diluent (as appropriate).
3
Ensures: • Validity of prescription• Signature of prescriber• Prescription is legibleIf any of these pieces of information are missing, are unclear or illegible then the midwifeshould not proceed with administration and should consult the prescriber.
4 Prepare medication and connect needle with syringe using non-touch technique. Invert syringe and examine for air; if necessary, push plunger to exclude air ensuring none of solution is lost and dosage in syringe correct.
5 Don apron and close the curtains / door and assist the woman into the required position and wash hands.
6 Ask the woman to confirm her name and date of birth and confirm details on her identity band against the medicine administration chart.
7 Remove the appropriate garment to expose injection site.
8 Clean hands with alcohol hand rub, or wash with soap and water, and dry with paper towels; don gloves and assess the injection site for signs of inflammation, oedema, infection and skin lesions.
9 Clean the injection site with a swab saturated with isopropyl alcohol 70% for 30 seconds and allow to dry for 30 seconds.
10 Gently stretch the skin with non-dominant hand and Insert the needle at an angle of 90° into the skin with dominant hand until about 1cm of the needle is left showing.
11 Depress the plunger at approximately 1ml every 10 seconds and inject the drug slowly.
12 Wait 10 seconds before withdrawing the needle.
13 Withdraw the needle rapidly. Apply gentle pressure to any bleeding point but do not massage the site.
14 Ensure that all sharps and non-sharp waste are disposed of safely (including scooping method of re-sheathing is used) and in accordance with locally approved procedures.
15 Date and sign drug administration record.
Page 13 of 14 Midwifery - Marking Criteria - V1
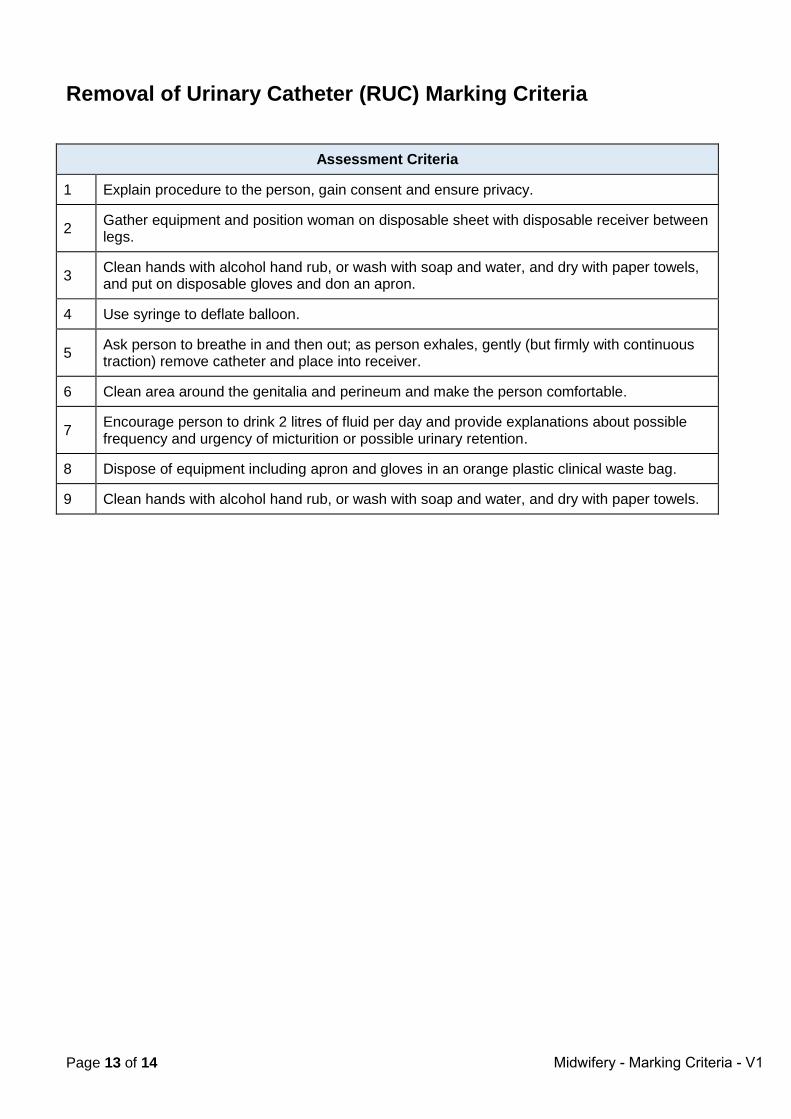
Removal of Urinary Catheter (RUC) Marking Criteria
Assessment Criteria
1 Explain procedure to the person, gain consent and ensure privacy.
2 Gather equipment and position woman on disposable sheet with disposable receiver between legs.
3 Clean hands with alcohol hand rub, or wash with soap and water, and dry with paper towels, and put on disposable gloves and don an apron.
4 Use syringe to deflate balloon.
5 Ask person to breathe in and then out; as person exhales, gently (but firmly with continuous traction) remove catheter and place into receiver.
6 Clean area around the genitalia and perineum and make the person comfortable.
7 Encourage person to drink 2 litres of fluid per day and provide explanations about possible frequency and urgency of micturition or possible urinary retention.
8 Dispose of equipment including apron and gloves in an orange plastic clinical waste bag.
9 Clean hands with alcohol hand rub, or wash with soap and water, and dry with paper towels.

Page 14 of 14 Midwifery - Marking Criteria - V1
Subcutaneous Injection Marking Criteria
Assessment Criteria
1 Explain and discuss the procedure with the woman.
2
Before administering any prescribed drug, look at the woman's prescription chart and check the following: Correct: • Person• Drug• Dose• Date and time of administration• Route and method of administration• Diluent (as appropriate).
3
Ensures: • Validity of prescription• Signature of prescriber• Prescription is legibleIf any of these pieces of information are missing, are unclear or illegible then the midwifeshould not proceed with administration and should consult the prescriber.
4 Prepare medication and connect needle with syringe using non- touch technique. Invert syringe and examine for air; if necessary push plunger to exclude air ensuring none of solution is lost and dosage in syringe correct.
5 Don apron and close the curtains / door and assist the woman into the required position and wash hands.
6 Ask the woman to confirm her name and date of birth and confirm details on her identity band against the medicine administration chart.
7 Remove the appropriate garment to expose injection site.
8 Clean hands with alcohol hand rub, or wash with soap and water, and dry with paper towels; don gloves and assess the injection site for signs of inflammation, oedema, infection and skin lesion.
9 Clean the injection site with a swab saturated with isopropyl alcohol 70% for 30 seconds and allow to dry for 30 seconds.
10 Lift the skin folds away from the muscle with non-injecting hand, decisively inject at a 90-degree angle, continuing to hold the folds.
11 Inject slowly until the injection is complete.
12 Wait 10 seconds before withdrawing the needle then release skin folds.
13 Withdraw the needle rapidly. Apply gentle pressure to any bleeding point but do not massage the site.
14 Ensure that all sharps and non-sharp waste are disposed of safely (including scooping method of re-sheathing is used) and in accordance with locally approved procedures.
15 Date and sign drug administration record.