midwifery lab manual
DESCRIPTION
nursingTRANSCRIPT
Christian University of Thailand, College of Nursing Midwifery 1, Academic Year 2011
Christian University of ThailandCollege of Nursing
Course Manual
Midwifery I
1st Semester, ,A.Y.2012

Table of Contents
Title Page
Table of contents ………………………………………………………………………………2
I. Midwifery Related Concepts
1. Critical Factors in Labor …………………………………………………………………….4
2. Exercise During Pregnancy ………………………………………………………………….5
3. Components of the Birth Process……………………………………………………………10
4. Stages of Labor and Nursing Care…………………………………………………………..19
5. Steps in Bathing the Newborn……………………………………………………………….35
6. Laboratory Exercise………………………………………………………………………….37
II. Laboratory Procedures for Graded Return Demonstration
1. Mechanism of Labor…………………………………………………………………………41
2. Leopold’s Maneuver…………………………………………………………………………43
3. Assisting in Birth and Delivery………………………………………………………………45
III. Evaluation Checklists
IV. Resources
Midwifery 1 Course Manual Page 2

Midwifery Related Concepts
Midwifery 1 Course Manual Page 3

CRITICAL FACTORS IN LABOR
1. Birth Passage
a. Size of the maternal pelvis ( diameters of the pelvic inlet, midpelvis and outlet).b. Type of maternal pelvis (gynecoid, android, anthropoid, platypelloid, or a combination).c. Ability of the cervix to dilate and efface and ability of the vaginal canal and the external opening of the vagina (the inroitus) to distend.
2. Fetus
a. Fetal head ( size and pressure of molding).b. Fetal attitude ( flexion or extension of the fetal body and extremities).c. Fetal Lied.Fetal presentation ( the body part of the fetus entering the pelvis in a single or multiple pregnancy).
3. The relationship between the passage and the fetus
a. Engagement of the fetal presenting part.b. Station ( location of fetal presenting part to in the maternal pelvis).c. Fetal position ( relationship of the presenting part to one of the four quadrants of the maternal pelvis).
4. Physiologic forces of labor
a. Frequency, duration, and intensity of uterine contractions as the fetus moves through the passage.b. Effectiveness of the maternal pushing effort.
5. Psychosocial considerations
a. Mental and physical preparations for childbirth.b. Sociocultural values and beliefs.c. Previous childbirth experience.d. Support from significant others.e. Emotional status.
Midwifery 1 Course Manual Page 4
EXERCISE DURING PREGNANCY
General Exercise Guidelines
Exercise regularly. Stop if you feel pain. Finish eating at least 1 to 11/2 hours before working out. Drink water before, during, and after your work -- out -- even if you aren't thirsty. Don't go on a calorie-restriction diet during pregnancy. This is very dangerous for your baby. Eat a nutritious, balanced diet.
Prenatal Exercise Safety
It is particularly important that you not begin exercising on your own if:
you have any type of cardiac (heart) or respiratory condition you have diabetes that developed before or during pregnancy you have high blood pressure, whether the onset was before pregnancy or occurred as a symptom
of toxemia you have a history of premature labor your placenta is implanted completely over or near your cervix (placenta previa) you have physical impairments or musculoskeletal disease that would prevent exercise even in
the nonpregnant state.
Appropriate Clothing
Wear loose-fitting, comfortable clothes. Wear a good support bra while exercising. Wear good shoes.
Aerobic Exercises During Pregnancy
Three parts: A warm-up period, the aerobic workout, and a cool-down period
The Warm-Up Spend a minimum of five minutes (ten minutes is much better) stretching and limbering up.
Stretch just to the point of mild tension (not pain), and then hold the stretch for a slow count of ten. Release and repeat, three times in all. Whichever warm-up stretch you choose, do not bounce! It only makes your muscles tighter.
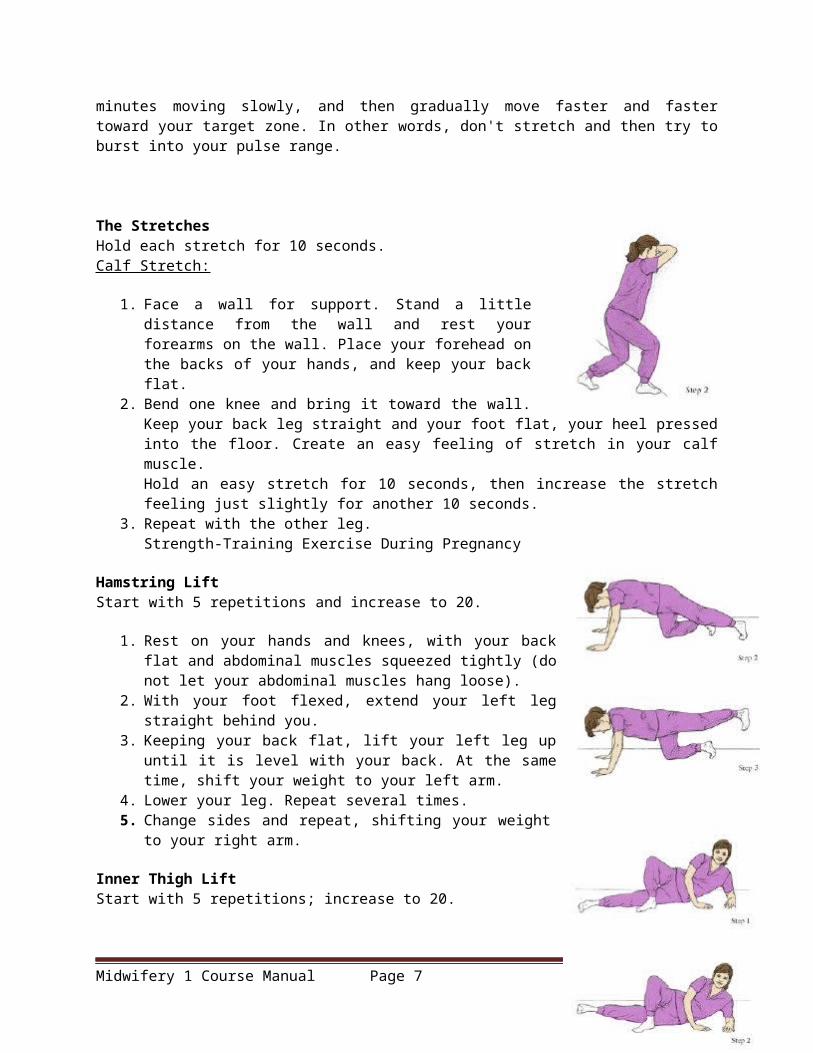
Concentrate stretches mainly on the lower body (legs, ankles, hips, knees), but don't completely neglect the upper body (arms, shoulders, neck). If you are lap swimming, walking, biking, or engaging in some other independent activity, spend another five minutes moving slowly, and then gradually move faster and faster toward your target zone. In other words, don't stretch and then try to burst into your pulse range.
Midwifery 1 Course Manual Page 5

The Stretches Hold each stretch for 10 seconds. Calf Stretch:
1. Face a wall for support. Stand a little distance from the wall and rest your forearms on the wall. Place your forehead on the backs of your hands, and keep your back flat.
2. Bend one knee and bring it toward the wall. Keep your back leg straight and your foot flat, your heel pressed into the floor. Create an easy feeling of stretch in your calf muscle. Hold an easy stretch for 10 seconds, then increase the stretch feeling just slightly for another 10 seconds.
3. Repeat with the other leg.Strength-Training Exercise During Pregnancy
Hamstring Lift Start with 5 repetitions and increase to 20.
1. Rest on your hands and knees, with your back flat and abdominal muscles squeezed tightly (do not let your abdominal muscles hang loose).
2. With your foot flexed, extend your left leg straight behind you. 3. Keeping your back flat, lift your left leg up until it is level with your
back. At the same time, shift your weight to your left arm. 4. Lower your leg. Repeat several times. 5. Change sides and repeat, shifting your weight to your right arm.
Inner Thigh Lift Start with 5 repetitions; increase to 20.
1. Lie on your left side, propping yourself on your left elbow and forearm. Cross the right leg over the left, placing the right foot on the floor next to your left knee. (Alternatively, rest your bent leg behind the bottom leg.)
2. With your foot flexed, lift your left leg slowly two to three inches (as far as is comfortable).
3. Slowly lower your leg to the floor-do not just drop it! 4. As you repeat the lifts, be sure to keep your body aligned. Do not roll
back onto your buttock. 5. Change sides and repeat.
Outer Thigh Lift Start with 5 repetitions; increase to 20.
1. Lie on your left side, your head resting on your hand, your body aligned. For balance, bend your bottom leg.
2. Slowly lift your top leg straight up and slightly back. Hold for a slow count of 5, then lower slowly.
3. After you've completed your repetitions, change sides.
Midwifery 1 Course Manual Page 6
Chest Muscle Exercise Start with 5 to 10 repetitions; increase to 20.
1. Clasp your hands in front of you at chest level. 2. Press palms together for a slow count of 5. 3. Lock your fingers and pull against your fingers for a slow count of 5.
Do not hold your breath. (This stage of the exercise strengthens muscles in the upper back.)
Pelvic Rock on All Fours Start with 5 repetitions; increase to 20.
1. Rest on your hands and knees, your back straight and your knees comfortably apart.
2. Slowly arch your lower back, lift your abdomen, and tuck your pelvis under (as if a string attached to your spine is pulling you upward). Hold for a slow count of 4.
3. Slowly return to the starting position-do not allow your back to sag. Repeat the tuck, holding the tucked position for a full count of 10. Squeeze your pelvic floor at the same time for an added benefit.
Diagonal Knee and Arm Reach
Do 5 to 10 repetitions. Caution: Do not perform this exercise after the first trimester of pregnancy.
Midwifery 1 Course Manual Page 7

.
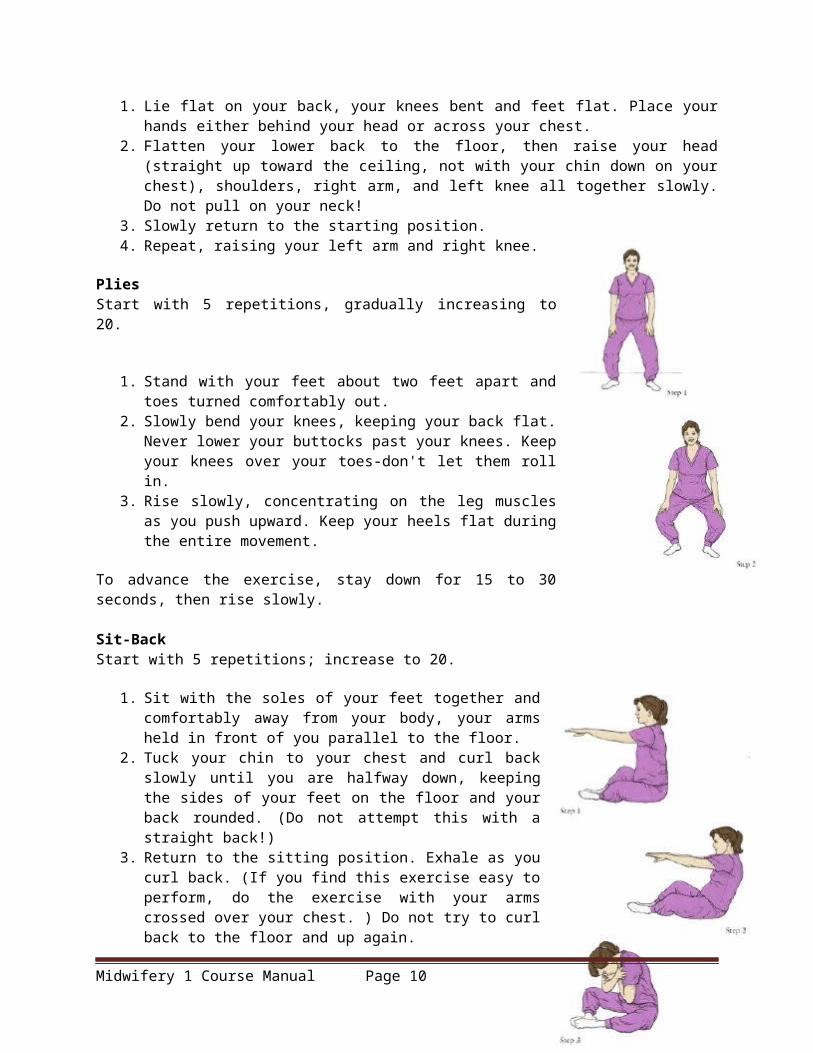
1. Lie flat on your back, your knees bent and feet flat. Place your hands either behind your head or across your chest.
2. Flatten your lower back to the floor, then raise your head (straight up toward the ceiling, not with your chin down on your chest), shoulders, right arm, and left knee all together slowly. Do not pull on your neck!
3. Slowly return to the starting position. 4. Repeat, raising your left arm and right knee.
Plies Start with 5 repetitions, gradually increasing to 20.
1. Stand with your feet about two feet apart and toes turned comfortably out.
Midwifery 1 Course Manual Page 8

2. Slowly bend your knees, keeping your back flat. Never lower your buttocks past your knees. Keep your knees over your toes-don't let them roll in.
3. Rise slowly, concentrating on the leg muscles as you push upward. Keep your heels flat during the entire movement.
To advance the exercise, stay down for 15 to 30 seconds, then rise slowly.
Sit-Back Start with 5 repetitions; increase to 20.
1. Sit with the soles of your feet together and comfortably away from your body, your arms held in front of you parallel to the floor.
2. Tuck your chin to your chest and curl back slowly until you are halfway down, keeping the sides of your feet on the floor and your back rounded. (Do not attempt this with a straight back!)
3. Return to the sitting position. Exhale as you curl back. (If you find this exercise easy to perform, do the exercise with your arms crossed over your chest. ) Do not try to curl back to the floor and up again.
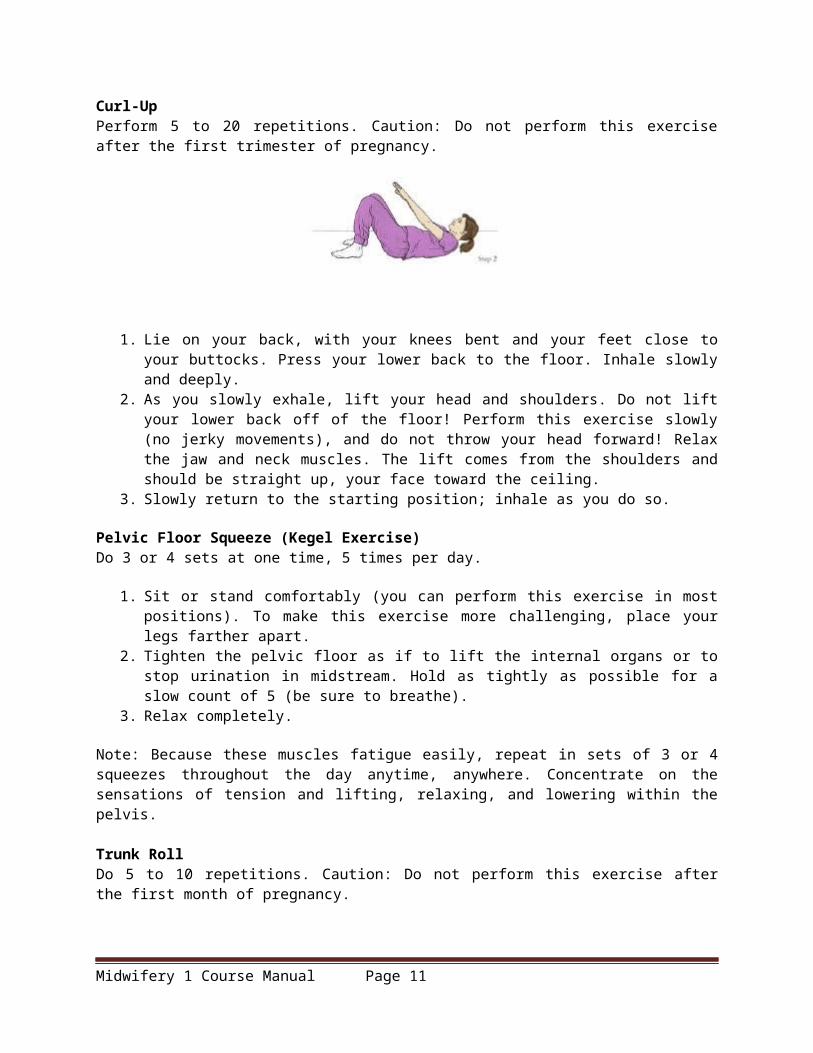
Curl-Up Perform 5 to 20 repetitions. Caution: Do not perform this exercise after the first trimester of pregnancy.
1. Lie on your back, with your knees bent and your feet close to your buttocks. Press your lower back to the floor. Inhale slowly and deeply.
2. As you slowly exhale, lift your head and shoulders. Do not lift your lower back off of the floor! Perform this exercise slowly (no jerky movements), and do not throw your head forward! Relax the jaw and neck muscles. The lift comes from the shoulders and should be straight up, your face toward the ceiling.
3. Slowly return to the starting position; inhale as you do so.
Pelvic Floor Squeeze (Kegel Exercise) Do 3 or 4 sets at one time, 5 times per day.
1. Sit or stand comfortably (you can perform this exercise in most positions). To make this exercise more challenging, place your legs farther apart.
2. Tighten the pelvic floor as if to lift the internal organs or to stop urination in midstream. Hold as tightly as possible for a slow count of 5 (be sure to breathe).
3. Relax completely.
Midwifery 1 Course Manual Page 9
Note: Because these muscles fatigue easily, repeat in sets of 3 or 4 squeezes throughout the day anytime, anywhere. Concentrate on the sensations of tension and lifting, relaxing, and lowering within the pelvis.
Trunk Roll Do 5 to 10 repetitions. Caution: Do not perform this exercise after the first month of pregnancy.
1. Lie on your back, your knees bent and arms on the floor straight out at your side. Lift your feet off the floor, or keep them flat on the floor.
2. Keeping your shoulders down and your knees together, roll your legs to the left, touching your left leg on the floor.
3. Roll your legs back to the starting point, then to the right. Make sure your knees are not bent too close to the chest. Keep the movement smooth and don't rush.
Push-Away Start with 5 repetitions; increase to 20.
1. Stand facing a wall, with your palms on the wall slightly farther apart than shoulder width. Place your feet about two to three feet from the wall. Hold your arms and body straight.
2. Lean toward the wall, allowing your arms to bend. Touch one cheek to the wall.
3. Straighten your arms, pushing your body (still aligned) away from the wall. Do not arch your back. Keep your palms on the wall at all times.
COMPONENTS OF THE BIRTH PROCESS
The four major factors during childbirth.
1. POWERS - is the uterine contraction which is the primary force moving the fetus through the pelvis and the maternal pushing efforts during the second stage which add to the forces of the uterine contraction to propel the fetus.
Midwifery 1 Course Manual Page 10
Uterine Contractions- During the first stage of labor (onset through full cervical dilation), uterine contractions are the primary force moving the fetus through the maternal pelvis.
Maternal Pushing Efforts- During the second stage of labor (full cervical dilation through the birth of the baby), the woman adds her voluntary pushing efforts to the force of uterine contractions to propel the fetus through the pelvis.
2. PASSAGEWAY - consists of the soft tissues of the pelvic floor, cervix, vagina, introitus and maternal pelvis. The bony pelvis is divided by the Linea Terminalis (pelvic brim) into the false pelvis above and the true pelvis below. Softening of the cartilage linking the pelvic bones occurs at term because of the hormone Relaxin.
Subdivisions of the Pelvis Inlet or upper pelvic opening Midpelvic or pelvic cavity Outlet or lower pelvic opening
Four Basic Pelvic Shapes Gynecoid- this is the most common shape in females and is the most favorable for childbirth. Android- this is the most common shape in males and is not favorable for child birth. Anthropoid- has an ape-like shape Platypelloid- is broad and flat shaped.
The four major types of maternal pelves and their characteristics are outlined as follows:
I. Gynecoid
Gynecoid pelvis. A. Inlet view. B. Lateral view. C. Subpubic arch view.
A. A spacious and well-rounded posterior segmentB. A An inlet with a slightly ovoid or round shapeC. A wide, well-rounded forepelvis (anterior segment)D. A sacrosciatic notch of medium sizeE. An average sacral inclination and curvatureF. A wide subpubic archG. Wide interspinous and intertuberous diametersH. Bones ranging from medium to delicate in structure
Engagement in this type of pelvis occurs most frequently with the fetus in a transverse position, followed in frequency by the anterior and posterior positions.
II. Android
Android pelvis. A. Inlet view. B. Lateral view. C. Subpubic arch view.
A. A wedge-shaped inletB. A narrow retropubic angle (anterior segment)C. A flat, wide posterior segmentD. A narrow sacrosciatic notch
Midwifery 1 Course Manual Page 11

E. A forward sacral inclinationF. A narrow wedge-shaped “Gothic” subpubic archG. Converging side walls, narrow interspinous and intertuberous diametersH. Bones ranging from medium to heavy in structure
Engagement in this type of pelvis occurs most frequently with the fetus in a transverse position, followed in frequency by the posterior and anterior positions. The clinician should be alerted by this type of pelvis that the possibility of posterior positions exists.
III. Anthropoid
Anthropoid pelvis. A. Inlet view. B. Lateral view. C. Subpubic arch view.
A. A long, narrow, oval-shaped inletB. A long, narrow, well-rounded anterior segmentC. A long, narrow posterior segmentD. A very wide, shallow sacrosciatic notchE. A long, narrow sacrum with average inclination and curvatureF. A slightly narrow subpubic archG. Straight side walls with below-average interspinous and intertuberous diametersH. Medium to delicate bones
Engagement in this type of pelvis occurs with the fetus in either an anterior or transverse position, but the anterior position appears to be more characteristic.
IV. Platypelloid
Platypelloid pelvis. A. Inlet view. B. Lateral view. C. Subpubic arch view.
A. A transverse, oval-shaped inletB. A very wide, round retropubic angleC. A very wide, flat posterior segmentD. A narrow sacrosciatic notchE. Average sacral inclinationF. A very wide subpubic archG. Straight side walls with very wide interspinous and intertuberous diametersH. Bones ranging from medium to delicate in structure
3. PASSENGER - the fetus plus the membranes and placenta.
A. Fetal Head- The fetus enters in the birth canal in the cephalic presentation 96% of the time. The fetal shoulders are important because of their width, but they are usually movable and adapt to the pelvis.
Bones, Sutures and FontanelsThe bones of the fetal head involved in the birth process are the two frontal bones on the
forehead, the two parietal bones at the crown of the head and, and the occipital bone at the back of the head.
Midwifery 1 Course Manual Page 12

The anterior fontanel-is diamond shaped and formed by the intersection of four sutures: the two coronal, the frontal, and the sagittal, which connect the two frontal, and the two parietal bones.
The posterior fontanel has a triangular shape formed by the intersection of three sutures, one sagittal and two lambdoid, which connect the two parietal bones and the occipital bone.
B. Variations in the passenger
I. FETAL LIEThe orientation of the long axis of the fetus to the long axis of the woman is the fetal lie. In more
than 99% of pregnancies, the lie is longitudinal lie, or parallel to the long axis of the woman. In the longitudinal lie, either the head or buttocks of the fetus enter the pelvis first. The transverse lie exists when the long axis of the fetus is at right angles to the woman’s long axis; it occurs in less than 1% of pregnancies. An oblique lie is one at some angle between the longitudinal lie and transverse lie.
II. FETAL ATTITUDE
The relationship of fetal body parts to each other is the attitude of the fetus. The normal fetal attitude is one of flexion, with the head flexed toward the chest and the arms and legs flexed over the thorax. The back is curved in a convex C shape.
1. Types of attitudes.A-Complete flexion B-Moderate flexion C-Poor flexion D-Hyperextension
(a) Complete flexion. This is normal attitude in cephalic presentation. With cephalic, there is complete flexion at the head when the fetus "chin is on his chest." This allows the smallest cephalic diameter to enter the pelvis, which gives the fewest mechanical problems with descent and delivery.
(b) Moderate flexion or military attitude. In cephalic presentation, the fetus head is only partially flexed or
Midwifery 1 Course Manual Page 13

not flexed. It gives the appearance of a military person at attention. A larger diameter of the head would be coming through the passageway.
(c) Poor flexion or marked extension. In reference to the fetus head, it is extended or bent backwards. This would be called a brow presentation. It is difficult to deliver because the widest diameter of the head enters the pelvis first. This type of cephalic presentation may require a C/Section if the attitude cannot be changed.
(d) Hyperextended. In reference to the cephalic position, the fetus head is extended all the way back. This allows a face or chin to present first in the pelvis. If there is adequate room in the pelvis, the fetus may be delivered vaginally.
(2) Areas to look at for flexion. (a) Head (b) Thighs-flexed on the abdomen. (c) Knees-flexed at the knee joints. (d) Arches of the feet-rested on the anterior surface of the legs. (e) Arms-crossed over the thorax.
(3) Attitude of general flexion. This is when all of the above areas are flexed appropriately as described.
III. FETAL PRESENTATION
Fetal presentation refers to the part of the fetus which enters the pelvis first; part of the fetus lying over the pelvic inlet.
Three Categories of Fetal Presentation
1. Cephalic Presentation- is the most favorable among the three. The fetal head is the largest angle of the fetal part. It can gradually change shape to adapt to the size and shape of the maternal pelvis. The fetal head is smooth, round, and hard. There are three variations of cephalic presentation. These are:
Vertex- the brow is partly extended. Military- the face is fully extended. Brow-fetal head is partly extended Face-the head is fully extended, and the fetal occiput is near the fetal spine. Suboccipito- most favorable, is the neutral
position.
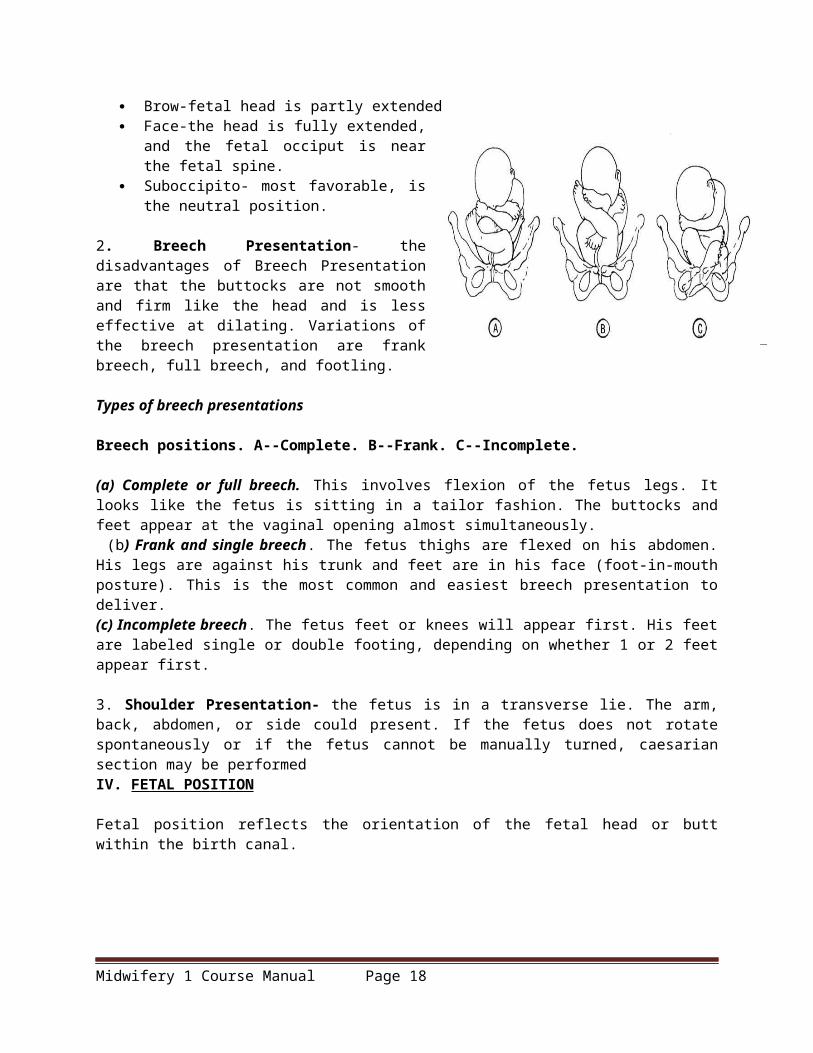
2. Breech Presentation- the disadvantages of Breech Presentation are that the buttocks are not smooth and firm like the head and is less effective at dilating. Variations of the breech presentation are frank breech, full breech, and footling.
Types of breech presentations
Breech positions. A--Complete. B--Frank. C--Incomplete.
(a) Complete or full breech. This involves flexion of the fetus legs. It looks like the fetus is sitting in a tailor fashion. The buttocks and feet appear at the vaginal opening almost simultaneously.
Midwifery 1 Course Manual Page 14

(b) Frank and single breech. The fetus thighs are flexed on his abdomen. His legs are against his trunk and feet are in his face (foot-in-mouth posture). This is the most common and easiest breech presentation to deliver. (c) Incomplete breech. The fetus feet or knees will appear first. His feet are labeled single or double footing, depending on whether 1 or 2 feet appear first.
3. Shoulder Presentation- the fetus is in a transverse lie. The arm, back, abdomen, or side could present. If the fetus does not rotate spontaneously or if the fetus cannot be manually turned, caesarian section may be performedIV. FETAL POSITION
Fetal position reflects the orientation of the fetal head or butt within the birth canal.
Anterior FontanelThe bones of the fetal scalp are soft and meet at "suture lines." Over the forehead, where the bones meet, is a gap, called the "anterior fontanel," or "soft spot." This will close as the baby grows during the 1st year of life, but at birth, it is open.The anterior fontanel is an obstetrical landmark because of its' distinctive diamond shape. Feeling this fontanel on pelvic exam tells you that the forehead is just beneath your fingers.Early in labor, it is usually difficult (if not impossible) to feel the anterior fontanel. After the patient is nearly completely dilated, it becomes easier to feel the fontanel.When attaching a fetal scalp electrode, it is better to not attach it to the area of the fontanel.
Posterior Fontanel
Posterior FontanelThe occiput of the baby has a similar obstetric landmark, the "posterior fontanel."This junction of suture lines in a Y shape that is very different from the anterior fontanel.In cases of fetal scalp swelling or significant molding, these landmarks may become obscured, but in most cases, they can identify the fetal head position as it is engaged in the birth canal.
Midwifery 1 Course Manual Page 15

Direct OA
Occiput Anterior (OA)Occiput anterior is usually the easiest position for the fetal head to traverse the maternal pelvis. Shown here is the "direct OA" position. While some fetuses deliver in this position, others deliver slightly rotated clockwise (LOA) or counterclockwise (ROA). Either way, the fetus is still considered to be an an "anterior" position.
LOA
Left Occiput Anterior (LOA)The fetal position is often described using three letters.This is an example of LOA, meaning:
Left Occiput Anterior
In other words, the fetal occiput is directed towards the mother's left, anterior side.
ROA
Right Occiput Anterior (ROA)This is an example of ROA, meaning:
Right Occiput Anterior
These anterior presentations (ROA and LOA) are normal and usually are the easiest way for the fetus to traverse the birth canal.
LOT
Transverse PositionThis LOT (Left, Occiput, Transverse) position and its' mirror image, ROT, are common in early labor.As labor progresses and the fetal head descends, the occiput usually rotates anteriorly, converting this LOT to an LOA or OA as the head delivers.If the head fails to rotate despite steady descent, this is called a "deep transverse arrest," and is common among:
Babies who are too big to come through, and Mothers with flat pelvises that favor a transverse
delivery Women with this condition who fail to deliver
Midwifery 1 Course Manual Page 16

ROT
spontaneously are treated with cesarean section, forceps, or vacuum extraction, depending on the clinical circumstances, available resources, and experience of the operator.
OP
LOP
ROP
Occiput PosteriorOcciput posterior positions, including direct OP, LOP (Left Occiput Posterior) and ROP (Right Occiput Posterior) are positions favored by certain internal pelvic shapes. This position has some obstetrical significance.
Normally, if the head is at 0 Station, the biparietal diameter is at the pelvic inlet and the head is fully engaged. In posterior positions, at 0 Station, the biparietal diameter is still a couple centimeters above the pelvic inlet, meaning that the head is not fully engaged.
Babies can deliver in the posterior position, but the pelvis needs to be large enough and it usually takes longer.
Forceps are often used to deliver babies in this position, but there is controversy whether the fetus should be delivered in the posterior position, or rotated with the forceps to the anterior position. Much depends on the clinical circumstances and the experience of the operator.
Midwifery 1 Course Manual Page 17
RSP
Breech PositionsThe terms used for breech positions are the same as for cephalic positions, except the sacrum of the fetus is used as the identifying landmark, instead of the occiput.
Sacrum Anterior (SA) means the fetal sacrum is closest to the mother's symphysis.
Left Sacrum Anterior (LSA) means the fetal sacrum is closest to the mother's symphysis and rotated slightly to the mother's left (clockwise from direct SA).
Right Sacrum Anterior (RSA) means the fetal sacrum is closest to the mother's symphysis and rotated slightly to the mother's right (counterclockwise from direct SA).
Right Sacrum Transverse (RST) Left Sacrum Transverse (LST) Right Sacrum Posterior (RSP) Left Sacrum Posterior (LSP) Sacrum Posterior (SP)
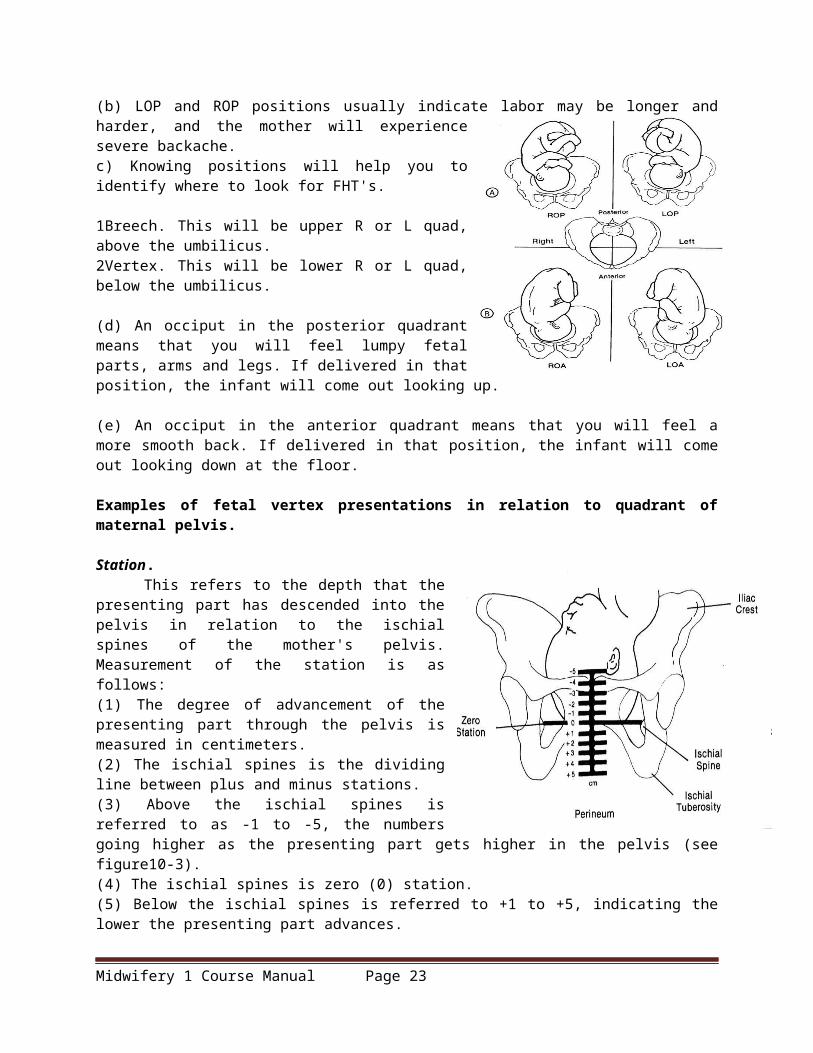
Observations about positions (a) LOA and ROA positions are the most common and permit relatively easy delivery. (b) LOP and ROP positions usually indicate labor may be longer and harder, and the mother will experience severe backache.c) Knowing positions will help you to identify where to look for FHT's.
1Breech. This will be upper R or L quad, above the umbilicus. 2Vertex. This will be lower R or L quad, below the umbilicus.
(d) An occiput in the posterior quadrant means that you will feel lumpy fetal parts, arms and legs. If delivered in that position, the infant will come out looking up.
(e) An occiput in the anterior quadrant means that you will feel a more smooth back. If delivered in that position, the infant will come out looking down at the floor.
Examples of fetal vertex presentations in relation to quadrant of maternal pelvis.
Station. This refers to the depth that the presenting part has
descended into the pelvis in relation to the ischial spines of the mother's pelvis. Measurement of the station is as follows: (1) The degree of advancement of the presenting part through the pelvis is measured in centimeters.
Midwifery 1 Course Manual Page 18

(2) The ischial spines is the dividing line between plus and minus stations. (3) Above the ischial spines is referred to as -1 to -5, the numbers going higher as the presenting part gets higher in the pelvis (see figure10-3). (4) The ischial spines is zero (0) station. (5) Below the ischial spines is referred to +1 to +5, indicating the lower the presenting part advances.
Measurement of station.
Engagement- This refers to the entrance of the presenting part of the fetus into the true pelvis or the largest diameter of the presenting part into the true pelvis. In relation to the head, the fetus is said to be engaged when it reaches the midpelvis or at a zero (0) station. Once the fetus is engaged, it (fetus) does not go back up. Prior to engagement occurring, the fetus is said to be "floating" or ballottable.4. PSYCHE - is the most crucial part of childbirth. The mother may experience anxiety and fear.
SUMMARY
There are five essential factors that affect the process of labor and delivery. They are easily remembered as the five Ps (passenger, passage, powers, placenta, and psychology).
a. Passenger (Fetus). (1) Presentation of the fetus (breech, transverse). (2) Position of the fetus (ROP, LOP). (3) Size of the fetus.
b. Passage (Birth Canal). (1) Parity of the woman, if she has ever delivered before. (2) Resistance of the soft tissues as the fetus passes through the birth canal. (3) Fetopelvic diameters.
c. Powers (Contractions). (1) Force of the uterine contractions. (2) Frequency of the uterine contractions.
d. Placenta. (1) Site of implantation. (2) Whether it covers part of the cervical os.
e. Psychology (Psychological State of the Woman). (a) Patient extremely anxious. (b) Emotional factors related to the patient. (c) Amount of sedation required for the patient.
Midwifery 1 Course Manual Page 19

STAGES OF LABOR AND NURSING CARE
I. OVERVIEW
Labor is defined as the onset of rhythmic contractions and the relaxation of the uterine smooth muscles which results in effacement or progressive thinning of the cervix and dilation or widening of the cervix. This process culminates with the expulsion of the fetus and expulsion of the other products of conception (placenta and membranes) from the uterus.
Stages of effacement and dilatation.
TRUE LABOR VS FALSE LABOR
Many women often experience "false labor" before "true labor" actually begins. False contractions may begin as early as three or four weeks before the termination pregnancy. Contractions, show, the cervix, and fetal movement all are vital in distinguishing between true and false labor.
FACTOR TRUE LABOR FALSE LABOR
Contractions Produce progressive dilation and effacement of the
Do not produce progressive dilatation and effacement. Are irregular and do not
Midwifery 1 Course Manual Page 20

cervix. Occur regularly and increase in frequency, duration, and intensity.
increase in frequency, duration, and intensity.
Show Is present. Not present. May have brownish discharge that may be from vaginal exam if within the last 48 hours.
Cervix Becomes effaced and dilates progressively.
Usually uneffaced and closed.
Fetal Movement No significant change, even though fetus continues to move.
May intensify for a short period or it may remain the same.
OVERVIEW OF THE LABOR PROCESS-FOUR STAGES
a. First Stage of Labor. The first stage of labor is referred to as the "dilating" stage. It is the period from the first true labor contractions to complete dilatation of the cervix (10cm) The forces involved are uterine contractions. The first stage of labor is divided into three phases:
(1) Latent (early) or prodromal. (2) Active or accelerated. (3) Transient or transitional.
b. Second Stage of Labor. The second stage of labor is referred to as the "delivery or expulsive" stage. This is the period from complete dilatation of the cervix to birth of the baby. The forces involved are uterine contractions plus intra-abdominal pressure.
c. Third Stage of Labor. The third stage of labor is referred to as the "placental" stage. This is the period from birth of the baby until delivery of the placenta. The forces involved are uterine contractions and intra-abdominal pressure.
d. Fourth Stage of Labor. The fourth stage of labor is referred to as the "recovery or stabilization" stage. This period begins with the delivery of the placenta and ends when the uterus no longer tends to relax. The forces involved are uterine contractions
Midwifery 1 Course Manual Page 21

NURSING CARE DURING THE FIRST STAGE OF LABOR
a. Hospital Admission. After a physician or nurse has evaluated the patient, an admission order is written. At this point, your duties as a practical nurse are as follows: (1) Establish a rapport with the patient and significant others. (2) Explain all procedures or routines, which will be carried out prior to performing them. These include:
(a) NPO except ice chips while in labor. (b) Activities allowed and disallowed according to ward policies (i.e. bathroom privileges). (c) Use of fetal monitors. (d) Progress reports. (e) Visitation policies. (f) Where patient's personal belongings will be maintained.
(3) Orient the patient to the surroundings (that is, room, call bell). (4) Initiate the patient's labor chart. (5) Review the information obtained originally in the exam room, verify and transfer the OB health record to the labor chart per ward policies. You will review the following information:
(a) Obstetric history. 1 Gravida/para. 2 Estimated date of confinement (EDC) or due date. 3 Duration of previous labors. 4 Problems with previous pregnancies/deliveries.
(b) General condition. 1 Rh status. 2 Allergies. 3 History of medical problems.
(c) Current pregnancy. 1 Onset of labor (contractions regular, 5 minutes or less). 2 Frequency, duration, and intensity of contractions. 3 Membranes-ruptured or intact. 4 Amount and character of show or vaginal bleeding. 5 Vital signs. 6 Rate, location of fetal heart tones. 7 Plans to bottle or breast feed. 8 Any problems with this pregnancy.
(6) Evaluate the patient's current emotional status.
Midwifery 1 Course Manual Page 22
(7) Evaluate the patient's preparation for labor through classes. (8) Evaluate for possible danger signs.
(a) Increased pulse or temperature. (b) Excessive vaginal bleeding. (c) Presence of meconium (fetal feces) in the amniotic fluid of a mother with a vertex position. (d) Alteration in fetal heart tones (FHT's) above 160 or below 120. (e) Obvious change in the character of uterine contractions.
(9) Perform the admission physician's orders to include but not limited to the following: (a) Administer and maintain intravenous fluids--per physician's order and SOP. This is usually done on all patients. (b) Draw lab work--CBC, serologic testing, type and screen, or per SOP. (c) Send uterine activity (UA) which was obtained prior to admission to the lab.
b. Perineal Preparation. Shaving of pubic hair to prevent infection of perineal episiotomy/lacerations is rarely done anymore. There must be a physician's order to perform this task.
c. Cleansing Enema.
(1) A cleansing enema may range from "mini-" or "Fleets" to a full, soap-suds enema. Giving an enema is no longer considered routine. There must be a physician's order to perform this task.
(2) The patient must be evaluated to determine if she has had a recent bowel movement.
(3) If a cleansing enema is given, it is usually a small fleet.
(4) Some physicians consider giving fleets to: (a) Prevent fecal contamination of the perineum during delivery. (b) Cleanse the bowel. This provides more room for fetal passage. (c) Stimulate uterine contractions.
(5) Some physicians consider not giving fleets because the following factors may be present or begin:
(a) Vaginal bleeding. (b) Premature labor. (c) Presenting part not engaged. (d) Abnormal presentation--breech or transverse. (e) Already rapid moving labor. (f) Advanced labor. (g) Membranes are ruptured or danger of prolapsed cord. (h) Results of enema may produce unmanageable amounts of loose stool at delivery.
d. Evaluation of Uterine Contractions Continued.
(1) The purpose of this evaluation is to assess the ability of the uterus to dilate the cervix, help in determining the progress of labor, help to detect abnormalities of uterine contractions (such as lack of uterine relaxation), and help to evaluate any signs of fetal distress.
(2) This evaluation will help you in identifying the frequency (how often in minutes contractions occur), intensity (strength of contractions when palpitations are identified as mild, moderate, or strong [severe]), and duration (how long the contractions lasts in seconds).
Midwifery 1 Course Manual Page 23

(3) When palpating for contractions, place your hand over the fundal area of the patient's uterus. Contractions can be felt by your fingers before the patient actually becomes aware of them.
Uterus between and during contractions.
e. Monitoring and Recording Color and Amount of Show. As labor progresses, the show becomes more blood-tinged. A sharp increase in the amount of bloody show coupled with frequent severe contractions may indicate labor is progressing too rapidly. Report this immediately to the Charge Nurse or physician and be prepared for possible delivery.
f. Fetal Monitoring. (1) Fetal monitoring is done to detect presence of fetal life at time of admission and to detect
development of fetal distress during labor. A fetoscope or fetal monitor may be used to obtain FHTs. Normal fetal heart rate ranges from 120 to 160 beats per minute (BPM). The rate may increase or decrease by 30 BPM during a contraction. It should return to the baseline immediately after the contraction. A continued fetal heart rate of greater than or less than 30 BPM from the normal baseline after contractions may be indicative of fetal distress as defined by:
(a) Fetal tachycardia--FHTs sustained at greater than 160 BPM. (b) Fetal bradycardia--FHTs sustained at less than 120 BPM.
(2) Fetal distress may be indicated by FHT's, between contractions that are consistently abnormal. Any variations should be reported immediately.
(3) The FHTs should be checked and recorded on admission, every 15 minutes during the first stage of labor, every 5 minutes during the second stage of labor, and immediately after rupture of membranes. This helps to identify the location of the prolapsed cord.
NOTE: The prolapsed cord is referred to as the umbilical cord that protrudes beside or ahead of the presenting part of the fetus. Pressure of the presenting part on the umbilical cord can endanger fetal circulation.
(4) Fetal monitoring continued. According to the National Institute of Health (NIH), electronic fetal monitoring of the fetus is not necessary during normal labor. However, if either the mother or fetus is considered at risk, a more precise measurement of fetal response is indicated.
Midwifery 1 Course Manual Page 24

(5) Candidates for continuous fetal monitoring includes a patient with a multiple pregnancy, a patient with obstetric complications, a patient receiving oxytocin infusions, any high risk patient, a patient with meconium stained amniotic fluid, or any patient whose pregnancy is not progressing normally.
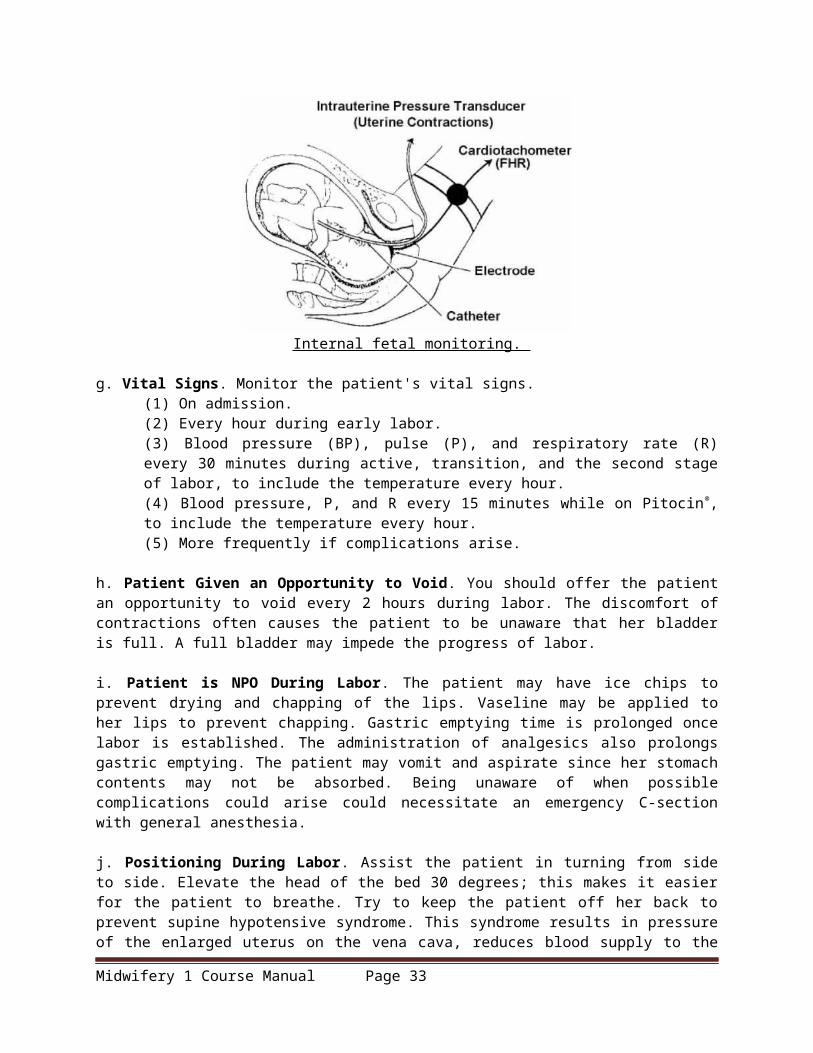
(6) Most medical facilities are using continuous fetal monitoring during labor. Alternative birth centers often use intermittent monitoring. (7) Methods of fetal monitoring. A transducer is placed on the abdomen over the uterus for external monitoring. An electrode is attached to the presenting part of the fetus, but NOT placed on the sutures, fontanels, face, or scrotum for internal monitoring.
External fetal monitoring,
Internal fetal monitoring.
g. Vital Signs. Monitor the patient's vital signs. (1) On admission. (2) Every hour during early labor. (3) Blood pressure (BP), pulse (P), and respiratory rate (R) every 30 minutes during active, transition, and the second stage of labor, to include the temperature every hour. (4) Blood pressure, P, and R every 15 minutes while on Pitocin®, to include the temperature every hour. (5) More frequently if complications arise.
Midwifery 1 Course Manual Page 25

h. Patient Given an Opportunity to Void. You should offer the patient an opportunity to void every 2 hours during labor. The discomfort of contractions often causes the patient to be unaware that her bladder is full. A full bladder may impede the progress of labor.
i. Patient is NPO During Labor. The patient may have ice chips to prevent drying and chapping of the lips. Vaseline may be applied to her lips to prevent chapping. Gastric emptying time is prolonged once labor is established. The administration of analgesics also prolongs gastric emptying. The patient may vomit and aspirate since her stomach contents may not be absorbed. Being unaware of when possible complications could arise could necessitate an emergency C-section with general anesthesia.
j. Positioning During Labor. Assist the patient in turning from side to side. Elevate the head of the bed 30 degrees; this makes it easier for the patient to breathe. Try to keep the patient off her back to prevent supine hypotensive syndrome. This syndrome results in pressure of the enlarged uterus on the vena cava, reduces blood supply to the heart, decreases blood pressure, and reduces blood circulation to the uterus and across the placenta to the fetus. The patient may complain of being nauseated and feeling cool and clammy. The best position for the patient is on her left side since this increases fetal circulation.
k. Prevention of Infection. Handwashing is essential before and after performing any procedure. Fresh, clean scrub suits should be worn in the delivery area. Unauthorized persons should not be allowed in the area. A patient with infections should be separated from other patients.
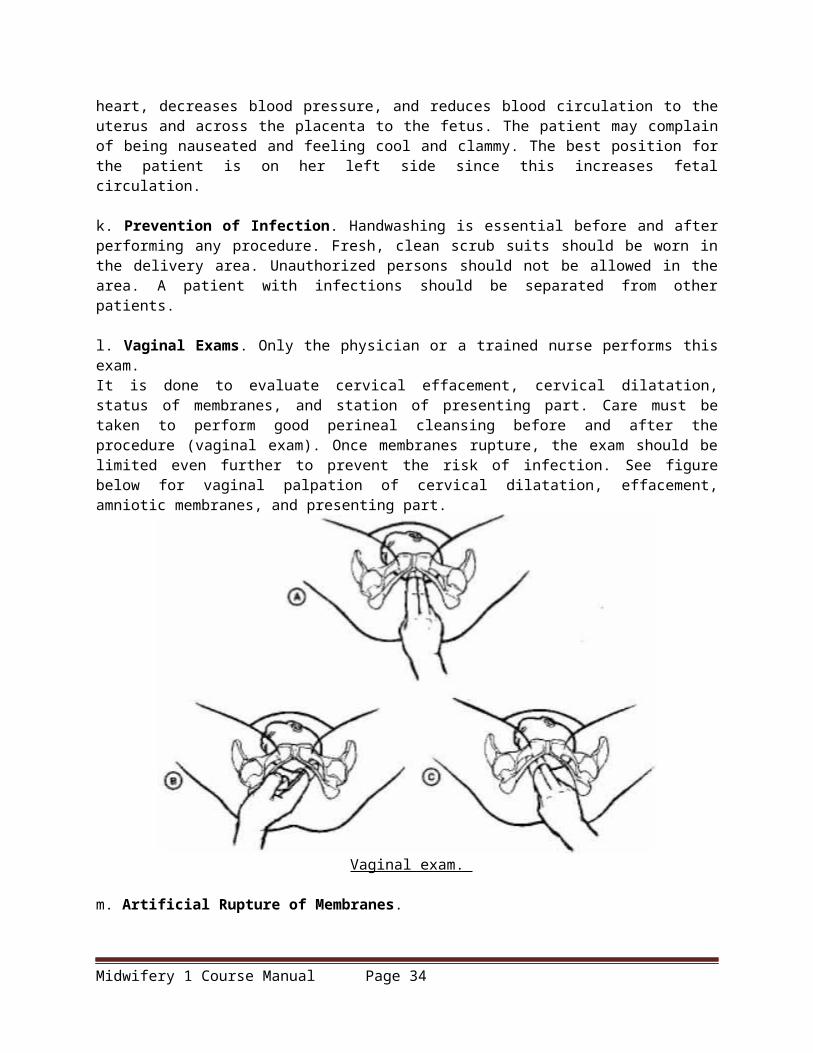
l. Vaginal Exams. Only the physician or a trained nurse performs this exam. It is done to evaluate cervical effacement, cervical dilatation, status of membranes, and station of presenting part. Care must be taken to perform good perineal cleansing before and after the procedure (vaginal exam). Once membranes rupture, the exam should be limited even further to prevent the risk of infection. See figure below for vaginal palpation of cervical dilatation, effacement, amniotic membranes, and presenting part.
Vaginal exam.
m. Artificial Rupture of Membranes.
Midwifery 1 Course Manual Page 26

(1) Rupture of the membranes is done by the physician to induce or hasten labor. Apply an internal fetal monitor lead or a uterine catheter.
(2) The FHTs should be checked immediately following rupture. Determining fetal distress is secondary to ckompression of the cord. The cord may be displaced by the sudden "gush" of waters, which may yield a prolapsed cord.
(3) Fluids should be carefully examined for meconium if the fetus is in the vertex presentation, (that is, head first). You should check for:
(a) Slight green color--called light meconium. (b) Green to dark color--called moderate meconium. (c) Dark green with chucks of meconium--called heavy meconium.
(4) Record the following information: (a) Time of the procedure (rupture of membranes). (b) Amount of fluid expelled (small, moderate, or large). (c) Color--clear or meconium stained (extent of staining--light, moderate, or heavy). (d) Fetal heart rate immediately after the procedure and five minutes after the procedure. (e) Instrument used, if other than an amnihook, to provide a slow, controlled release of fluid. Other instruments may be a fetal scalp electrode or spinal needle.
NOTE: The amnihook is used to tear a small opening in the amniotic sac.
n. Emotional Support. (1) First phase--latent. Offer support and explanations. Instruct or reinforce breathing techniques
(breathe slowly and deeply and use deep chest or abdominal breathing). Remind the patient to not push down during the first stage since it could causes cervical edema. It could also cause cervical lacerations and fetal hypoxia.
(2) Second phase--active. Continue to give support, offer encouragement, and give explanations. Include significant other in these procedures. Reinforce breathing and relaxation techniques. Accelerated shallow panting may be used, and also, effleurage (stroking movement used in massage, usually of the abdomen).
(3) Third phase--transition. Encouragement is especially important now since the patient is most likely losing control at this point. She may be nauseated or flushed and may vomit. Assist the patient to turn on her side or to sit up to prevent aspiration. Wipe her face and mouth with a cool cloth. Be aware that the patient may want to be left alone, but don't leave; stay and support her. Remind the patient that this is the shortest stage and that the baby will be born soon. Encourage her to concentrate on relaxation and breathing techniques. Use more intensive breathing techniques (high chest, pant-blow). Make sure to give instructions in short, simple phrases. Remind the patient that she still can't push even though she may have a strong urge to do so.
o. Preparation of the Delivery Room. Preparation is usually done by the paraprofessional on duty if the scrub technicians are not employed. Strict aseptic technique is maintained. The room is prepared while the patient is in the first stage of labor. The local SOP will determine how soon before anticipated delivery the room can be set up. It is usually 2 to 12 hours if the tables are covered and rooms are closed.
SECOND STAGE OF LABOR (DELIVERY STAGE)
SECOND STAGE OF LABOR
Midwifery 1 Course Manual Page 27

The second stage of labor begins when the cervix is completely effaced and dilated and ends when the infant is born.
a. These signs of the second stage of labor are considered imminent or impending signs. (1) Imminent signs.
(a) Increased bloody show. (b) Desire to bear down or have bowel movement (result of the descent of the presenting
part). (c) Bulging of the perineum. (d) Dilatation of the anal orifice.
(2) Impending signs. (a) Nausea and retching. (b) Irritability and uncooperativeness. (c) Complaints of severe discomfort. (d) Pleas for relief.
b. Once dilatation and effacement are complete, the patient is instructed to push with each contraction to bring the presenting part down into the pelvis.
TRANSFER OF THE LABOR PATIENT TO THE DELIVERY ROOM
Transfer the mother to the delivery room and prepare her for delivery when delivery seems imminent. Timing is dependent on the parity of the patient, size of the infant, effectiveness of the patient's pushes, arrival of the physician, familiarity of the staff with equipment, and need for additional preparation time. Parity refers to the condition of the woman with respect to her having borne children.
a. Primigravida patients are transferred when the cervix is completely effaced and dilated and the head or presenting part is crowning.
b. Multipara patients are transferred when the cervix is completely effaced and dilated. The patient usually pushes (i.e., bears down) in the delivery room. She may be transferred prior to complete dilatation (8 to 9 cm) if she is progressing rapidly and the presenting part is descending. These patients are normally not encouraged to push when in the labor room since delivery occurs more rapidly in the multipara patient.
NURSING CARE GIVEN WHILE IN THE DELIVERY ROOM
a. Never leave the patient alone once she has been transferred to the delivery room. In addition, never turn your back on the perineum because the baby could push through the vaginal opening while your back is turned.
b. Encourage the patient to rest between contractions and to push with contractions. Only one person should coach. Verbal encouragement and physical contact help reassure and encourage the patient.
c. Position the patient's legs in the stirrups for the lithotomy position. This is the most common position for delivery. Facilities using birthing beds have the patient in an upright position. Positioning also depends upon the type of anesthesia to be used and C-section delivery. Each case may be different.
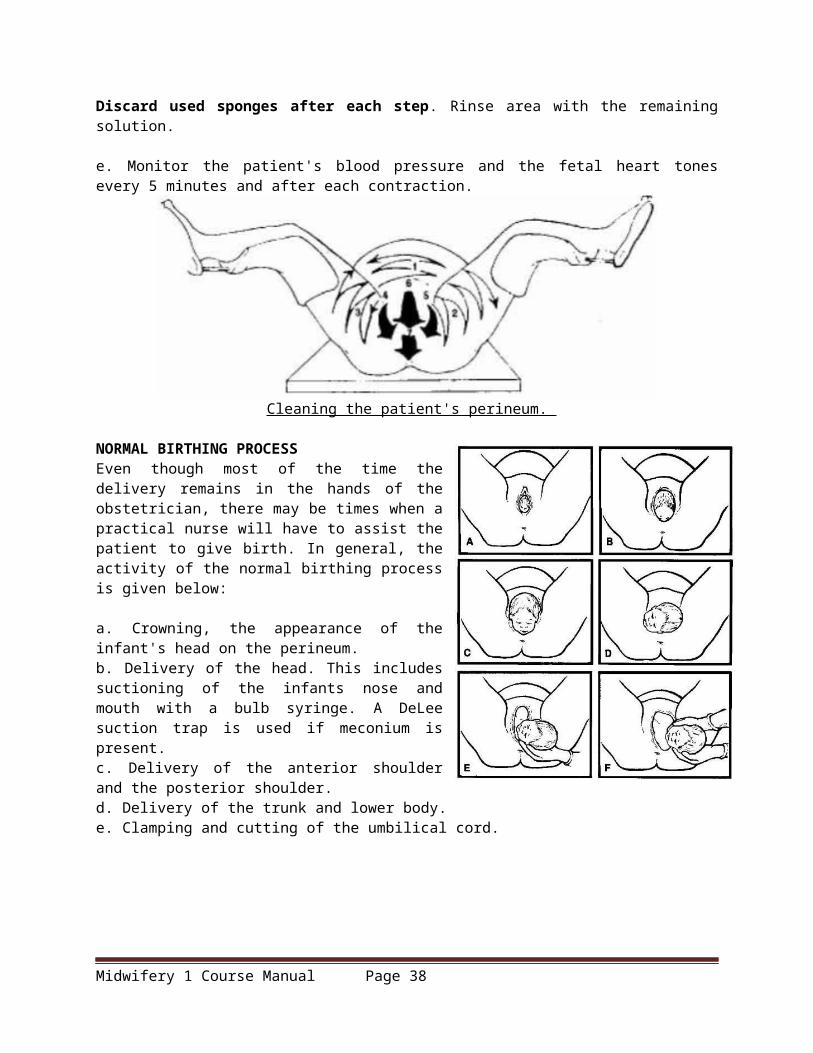
d. Prep the patient's perineum. A Betadine® scrub and water are used with 4x4's. Clean the perineum by washing the pubic area, down each thigh, down each side of the labia, down the perineum, and down the
Midwifery 1 Course Manual Page 28

rectal area. Begin cleaning at number 1 and proceed through number 7. Discard used sponges after each step. Rinse area with the remaining solution.
e. Monitor the patient's blood pressure and the fetal heart tones every 5 minutes and after each contraction.
Cleaning the patient's perineum.
NORMAL BIRTHING PROCESS Even though most of the time the delivery remains in the hands of the obstetrician, there may be times when a practical nurse will have to assist the patient to give birth. In general, the activity of the normal birthing process is given below:
a. Crowning, the appearance of the infant's head on the perineum. b. Delivery of the head. This includes suctioning of the infants nose and mouth with a bulb syringe. A DeLee suction trap is used if meconium is present. c. Delivery of the anterior shoulder and the posterior shoulder. d. Delivery of the trunk and lower body. e. Clamping and cutting of the umbilical cord.
Midwifery 1 Course Manual Page 29

Birthing process (continued).
INFORMATION TO BE RECORDED ABOUT THE DELIVERY Record the following information.
a. Exact date and time of delivery. b. Sex of the infant. c. Condition of the infant (APGAR) after birth. APGAR is the most widely used method of evaluating the condition of a newborn baby. A value of 0 to 2 is given for each observation (i.e., heart rate, respiratory effort, muscle tone, reflex irritability, and color). The values are added giving a total APGAR score. A
Midwifery 1 Course Manual Page 30

baby in excellent condition would score 9 to 10 and a dead baby would score 0. Most babies score 7 or better. The condition of the infant will be taken at one (1) minute, at five (5) minutes, and at thirty (30) minutes.
APGAR SCORE
Category 0 Points 1 Point 2 PointsHeart Rate Absent <100 >100Respiratory Effort Absent Slow, Irregular Good, crying
Muscle Tone FlaccidSome flexion of extremities
Active motion
Reflex Irritability No Response Grimace Vigorous cry
Color Blue, paleBody pink, extremities blue
Completely pink
. d. Position of the infant at delivery. e. Type of episiotomy, lacerations. f. Spontaneous or forceps delivery. g. Use of oxygen and suction on the infant. h. Number of vessels in the cord. i. Mother's name. j. Any other pertinent facts about the delivery.
THIRD STAGE OF LABOR (PLACENTAL STAGE)
2-11. THIRD STAGE OF LABOR
As previously mentioned, the third stage of labor is the period from birth of the baby through delivery of the placenta. This is considered a dangerous time because of the possibility of hemorrhaging. Signs of the placental separation are as follows:
a. The uterus becomes globular in shape and firmer. b. The uterus rises in the abdomen. c. The umbilical cord descends three (3) inches or more further out of the vagina. d. Sudden gush of blood.
Midwifery 1 Course Manual Page 31

Placental separation and delivery.
NURSING CARE DURING THE THIRD STAGE
a. Continue observation. Following delivery of the placenta, continue in your observation of the fundus. Ensure that the fundus remains contracted. Retention of the tissues in the uterus can lead to uterine atony and cause hemorrhage. Massaging the fundus gently will ensure that it remains contracted.
b. Allow the mother to bond with the infant. Show the infant to the mother and allow her to hold the infant.
INFORMATION TO RECORD Record the following information.
a. Time the placenta is delivered. b. How delivered (spontaneously or manually removed by the physician). c. Type, amount, time and route of administration of oxytocin. Oxytocin is never administered prior to delivery of the placenta because the strong uterine contractions could harm the fetus. d. If the placenta is delivered complete and intact or in fragments.
FOURTH STAGE OF LABOR (RECOVERY STAGE)
FOURTH STAGE OF LABOR The fourth stage of labor, as previously mentioned, is the period from the delivery of the placenta
until the uterus remains firm on its own. In this stabilization phase, the uterus makes its initial readjustment to the nonpregnant state. The primary goal is to prevent hemorrhage from the uterine atony and the cervical or vaginal lacerations.
NOTE: Atony is the lack of normal muscle tone. Uterine atony is failure of the uterus to contract.
NURSING CARE DURING THE FOURTH STAGE OF LABOR
Midwifery 1 Course Manual Page 32
a. Transfer the patient from the delivery table. Remove the drapes and soiled linen. Remove both legs from the stirrups at the same time and then lower both legs down at the same time to prevent cramping. Assist the patient to move from the table to the bed.
b. Provide care of the perineum. An ice pack may be applied to the perineum to reduce swelling from episiotomy especially if a fourth degree tear has occurred and to reduce swelling from manual manipulation of the perineum during labor from all the exams. Apply a clean perineal pad between the legs.
c. Transfer the patient to the recovery room. This will be done after you place a clean gown on the patient, obtained a complete set of vital signs, evaluated the fundal height and firmness, and evaluated the lochia.
d. Ensure emergency equipment is available in the recovery room for possible complications. (1) Suction and oxygen in case patient becomes eclamptic. (2) Pitocin® is available in the event of hemorrhage. (3) IV remains patent for possible use if complications develop.
e. Check the fundus. (1) Ensure the fundus remains firm. (2) Massage the fundus until it is firm if the uterus should relax.
Massaging the fundus.
(3) Massage the fundus every 15 minutes during the first hour, every 30 minutes during the next hour, and then, every hour until the patient is ready for transfer. (4) Chart fundal height. Evaluate from the umbilicus using fingerbreadths. This is recorded as two fingers below the umbilicus (U/2), one finger above the umbilicus (1/U), and so forth. The fundus should remain in the midline. If it deviates from the middle, identify this and evaluate for distended bladder.
(5) Inform the Charge Nurse or physician if the fundus remains boggy after being massaged.
NOTE: A boggy uterus many indicate uterine atony or retained placental fragments. Boggy refers to being inadequately contracted and having a spongy rather than firm feeling. This is descriptive of the postdelivery of the uterus.
f. Monitor lochia flow. Lochia is the maternal discharge of blood, mucus, and tissue from the uterus.
Midwifery 1 Course Manual Page 33
This may last for several weeks after birth.
(1) Keep a pad count. Record the number of pads soaked with lochia during recovery. (2) Identify presence of bright red bleeding or blood clots. (3) Document thick, foul-smelling lochia. (4) Observe for constant trickle of bright red lochia. This may indicate lacerations. (5) Identify lochia amounts as small, moderate, or heavy (large).(6) Document lochia flow when the fundus is massaged.
(a) Every fifteen (15) minutes times one hour. (b) Every thirty (30) minutes times one hour. (c) Every hour until ready for transfer.
g. Observe the mother for chills. The cause of the mother being chilled following birth is unknown. However, it refers primarily to the result of circulatory changes after delivery. The best means of relief is to cover the mother with a warm blanket.
Assessing lochia flow.
h. Monitor the patient's vital signs and general condition. (1) Take BP, P, and R every 15 minutes for an hour, then every 30 minutes for an hour, and then every hour as long as the patient is stable. Take the patient's temperature every hour. (2) Observe for uterine atony or hemorrhage. (3) Observe for any untoward effects from anesthesia. (4) Orient the patient to the surroundings (bathroom, call bell, lights, etc.). (5) Allow the patient time to rest. (6) Encourage the patient to drink fluids.
i. Observe patient's urinary bladder for distention. Be able to recognize the difference between a full bladder and a fundus.
(1) Characteristics of a full bladder.
(a) Bulging of the lower abdomen
Midwifery 1 Course Manual Page 34

Bulging of the lower abdomen.
(b) Spongy feeling mass between the fundus and the pubis. (c) Displaced uterus from the midline, usually to the right. (d) Increased lochia flow.
(2) Full bladders may actually cause postpartum hemorrhage because it prevents the uterus from contracting appropriately.
(3) Nerve blocks may alter the sensation of a full bladder to the patient and prevent her from urinating.
(4) If at all possible, ambulate the patient to the bathroom.
(5) Urine output less than 300cc on initial void after delivery may suggest urinary retention.
(a) Document the fundal height and bladder status before the patient urinates.
(b) Reevaluate and document the fundal height and bladder status after the patient urinates to accurately document an empty bladder.
j. Evaluate the perineal area for signs of developing edema and/or hematoma.
(1) Predisposing conditions includes prolonged second stage, delivery of a large infant, rapid delivery, forceps delivery, and fourth degree lacerations.
(2) Nursing considerations for perineal edema. (a) Apply an ice pack to the perineum as soon as possible to decrease the amount of
developing edema. (b) Stress the importance of peri-care and use of "sitz-baths" on the postpartum ward. (c) Assess for urinary distention which is due to edema of the urethra.
(3) Assessment for perineal hematoma. (a) Look for discoloration of the perineum. (b) Listen for the patient's complaints or expression of severe perineal pain. (c) Observe for edema of the area. (d) Observe/listen for patient's feeling the need to defecate if forming hematoma is creating rectal pressure. (e) Observe for patient's sensitivity of the area by touch (by sterile glove).
k. Observe for signs of hemorrhage. (1) Uterine atony. (2) Vaginal or cervical lacerations. (3) Retained placental fragments.
Midwifery 1 Course Manual Page 35

(4) Bladder distention. (5) Severe hematoma in vagina or surrounding perineum.
l. Assess for ambulatory stability.
(1) The patient is at risk of fainting on initial ambulation after delivery due to hypovolemia from blood loss at delivery and hypoglycemia from prolonged nothing by mouth (NPO) status. (2) The patient should be accompanied on the first ambulation and observed for stability. (3) Ammonia ampuls should be readily available. (4) The patient should be closely monitored while in the bathroom to prevent injury if fainting does occur. (5) The patient who received regional anesthesia at deliver (that is, pudendal block) should be
assessed for possible loss of sensation in the lower extremities.
m. Observe C-section patients. Most C-section patients are still initially recovered in the recovery room. If not, monitor the patient as you would any patient in a recovery room immediately during post delivery. Include monitoring of the fundus and lochia flow. Times are consistent with the normal vaginal delivery patient.
n. Instruct the patient in the proper perineal care. The patient should use the peribottle after each void and bowel movement, wipe from front to back to avoid contamination, and apply the perineal pad from front to back.
o. Discontinue IV on a normal patient once she is stable and the physician has ordered removal.
p. Complete notes and transfer the stable patient to the ward (on normal vaginal delivery--others require physician clearance).
STEPS IN BATHING THE NEWBORN
1. Gather your supplies. Have everything you’ll need at your fingertips before you start. Otherwise, you’ll have to gather up your naked newborn mid–sponge bath to fetch whatever you’ve forgotten. Here are the essentials:
Midwifery 1 Course Manual Page 36

One or two cotton washcloths A couple of plush towels (the bottom one can be hooded) A mild, unscented soap or body wash and shampoo (or a product that does double duty) Cotton balls Rubbing alcohol A plastic basin filled with warm water A plastic cup Baby lotion Diaper cream (if your baby is rash-prone) A clean diaper A fresh set of clothes A blanket or two (one to cover parts of him during the sponge bath and another for after the sponge
bath if your baby likes to be swaddled)
2. Set up your baby’s sponge-bath site. Layer one towel on top of the other. Arrange everything else within easy reach.
3. Prep your baby. Lay him down on the top towel and strip him down to his birthday suit. You’ll be washing the top half of his body first, so drape the blanket over his lower limbs to keep him toasty.
4. Focus on his face first. Dip a corner of a washcloth or cotton ball in the warm water, and gently wipe one eye from the inner corner outward. Using a different corner of the cloth or a clean cotton ball, clean the other eye. Wet the washcloth entirely and wash your munchkin’s mug, especially around his mouth and under his chin where milk and drool can pool, and inside and behind his ears. (Never use a cotton swab to clean inside your cutie’s ears.) It’s okay to use a little soap on your baby’s face for stubborn crud.
5. Wash his body. With the blanket still in place over his lower body, dip the washcloth in warm water and wash your little one’s neck and torso. (You usually don’t need soap when cleaning most parts of your newborn — they just don’t get that dirty). Maneuver carefully around the umbilical cord; it’s okay to gently wipe away any crustiness around it. Next clean under his arms and between his fingers, reposition the blanket so it covers the top half of his tiny body, then clean his legs and toes. Be sure to get into those little creases and skin folds.
6. Clean the diaper area. If your baby boy is uncircumcised, no need to pull back his foreskin; simply wipe his penis clean. Do the same if he’s been circumcised, and then follow whatever directions your doctor has given you. If you have a girl, gently wipe the folds of her vagina. Next up: that tiny tush. (Be sure to use a little soap for this part of the baby sponge bath.)
7. Shampoo his hair — if he has any, that is. (If he doesn’t, use a washcloth on his bald noggin.) Using water and a tiny bit of shampoo, lather your baby’s scalp. To rinse, hold your critter football-style (the back of his head cradled in one hand, his body draped along your arm) with his head over the basin. Fill the cup with water and gently pour it over your baby’s head.
8. Dry him off. Peel off the top towel (it’s probably damp anyway) and use the bottom one to pat your baby dry.
9. Lotion him up. If your baby has dry or eczema-prone skin, massage a hypoallergenic lotion into his skin (warm it first between your palms).
Midwifery 1 Course Manual Page 37
10. Diaper and dress. Finished bathing your newborn? Slip on a fresh diaper and dress your little one in some clean clothes. If he needs a little soothing after his sponge bath, swaddle him in a blanket. Then settle in for some serious snuggling with your clean, sweet-smelling sweetie.
Laboratory Exercise
INSTRUCTIONS: Answer the following exercises by marking the lettered response that best answers the exercise, by completing the incomplete statement, or by writing the answer in the space(s) provided.
Midwifery 1 Course Manual Page 38

1. What are the main factors involved in distinguishing between true and false labor? ______________________________ ________________________ ______________________________ ________________________ 2. Complete dilatation of the cervix is considered _________ cm. 3. There are forces involved when the cervix is dilating. These forces are called: _______________________________________________________________ 4. There are four stages involved in the labor process. Each stage is referred to with different events. Fill in the blanks identifying each event. First stage - _____________________________________________________ Second stage - __________________________________________________ Third stage - ____________________________________________________ Fourth stage - ___________________________________________________ 5. The first stage of labor is categorized with three phases. They are: _______________________________ _______________________________ _______________________________
Special Instructions for exercises 6 through 18. Indicate whether the following statements/phrases are true or false by circling the "T" for true and "F" for false.
6. A cleansing enema is always given to the patient when she is in labor. T F 7. Normal fetal heart rate ranges from 120 to 160 beats per minute. T F 8. Rupture of the membranes is performed by the physician to induce or hasten labor. T F 9. The primigravida patient is transferred to the delivery room when her cervix is completely effaced and dilated and the head or presenting part is crowning. T F 10. The multipara patient is transferred to the delivery room when her cervix is completely effaced and dilated. T F 11. A patient who has been transferred to the delivery room can be left alone for 2 minutes. T F 12. APGAR is a method used for evaluating the condition of a newborn baby. T F 13. Oxytocin can be administered prior to delivery of the placenta. T F 14. A boggy uterus may indicate uterine atony or retained placental fragments. T F 15. The contractions of true labor produce progressive dilation and effacement of the cervix. T F 16. Show is present in false labor. T F 17. The fetus heart may increase or decrease by 40 BPM during a contraction. T F 18. A high risk patient is a candidate for continuous fetal monitoring. T F 19. Complete the chart below to indicate what happens during each factor to identify true and false labor.
FACTOR TRUE LABOR FALSE LABOR
Contractions .
Show
Cervix
Fetal Movement
Midwifery 1 Course Manual Page 39

20. In which phase of the first stage of labor does the contractions become stronger and last longer, usually 45 to 60 seconds? ________________________________________________________________
21. In which phase of the first stage of labor does contractions become sharp, are more intensified, and last from 60 to 90 seconds? ________________________________________________________________
22. What are the reasons some physicians consider giving fleets? ________________________________________________________________ ________________________________________________________________ ________________________________________________________________
23. Where should you, the practical nurse, place your hands when you are palpating the patient's contractions? ________________________________________________________________
24. Why is fetal monitoring performed? ________________________________________________________________ ________________________________________________________________
25. The patient being nauseated and retching, irritable and uncooperative, complains of severe discomfort, and pleas for relief are all impending signs of labor during which stage of labor? ________________________________________________________________
26. What nursing care is performed in the delivery room? ________________________________________________________________ ________________________________________________________________ ________________________________________________________________ ________________________________________________________________ ________________________________________________________________
27. The activity of the normal birthing process includes: ________________________________________________________________ ________________________________________________________________ ________________________________________________________________ ________________________________________________________________ ________________________________________________________________
28. Information to be recorded about the delivery includes: ________________________________________________________________ ________________________________________________________________ ________________________________________________________________ ________________________________________________________________ ________________________________________________________________ ________________________________________________________________ 29. What are the characteristics of a full bladder after delivery? ________________________________________________________________ ________________________________________________________________ ________________________________________________________________ ________________________________________________________________ 30. What nursing care is performed to the patient after delivery? List 8 of the 16 tasks. ________________________________________________________________ ________________________________________________________________ ________________________________________________________________ ________________________________________________________________ ________________________________________________________________ ________________________________________________________________ ________________________________________________________________
Midwifery 1 Course Manual Page 40

________________________________________________________________ 31. List the five factors that may extend or influence the duration of labor. ________________________________________________________________ ________________________________________________________________ ________________________________________________________________ ________________________________________________________________ ________________________________________________________________ 32. If the patient's uterus should relax after delivery, what nursing care should be given? ________________________________________________________________ 33. ________ is the maternal discharge of blood, mucus, and tissue from the uterus. 34. What are the signs of placental separation? ________________________________________________________________ ________________________________________________________________ ________________________________________________________________ 35. The onset of rhythmic contractions, the relaxation of the uterine smooth muscles which results in
effacement or progressive thinning of the cervix, and dilation or widening of the cervix is known as:
________________________________________________________________
LABORATORY PROCEDURES FOR GRADED RETURN DEMONSTRATION
Midwifery 1 Course Manual Page 41

Laboratory Procedures for Graded Return Demonstration
I. Mechanism of LaborIs the process of adaptation or accommodation of suitable portion of the head to the various
segments of the pelvis as required in vaginal delivery.The Cardinal Movements of Labour is composed of:
The movement in upper zone of passagesEngagementFlexionDescent
The movement in lower zone of passages
Midwifery 1 Course Manual Page 42

Internal rotationExtension
The Movement which is out of the passages:RestitutionExternal RotationExpulsion
Mechanism of Normal LaborThere are five classical steps in the normal mechanism of labor. They are:
Descent Flexion Internal Rotation Extension External Rotation
Usually, labor progresses in this fashion, if the fetus is of average size, with a normally positioned head, in a normal labor pattern in a woman whose pelvis is of average size and gynecoid in shape.
There is overlap of these mechanisms. The fetal head, for example, may continue to flex or increase its flexion while it is also internally rotating and descending.
Midwifery 1 Course Manual Page 43

Descent: As the fetal head engages and descends, it assumes an occiput transverse position because that is the widest pelvic diameter available for the widest part of the fetal head.
Flexion: While descending through the pelvis, the fetal head flexes so that the fetal chin is touching the fetal chest. This functionally creates a smaller structure to pass through the maternal pelvis. When flexion occurs, the occipital (posterior) fontanel slides into the center of the birth canal and the anterior fontanel becomes more remote and difficult to feel. The fetal position remains occiput transverse.
Internal Rotation: With further descent, the occiput rotates anteriorly and the fetal head assumes an oblique orientation. In some cases, the head may rotate completely to the occiput anterior position.
II. LEOPOLD’S MANEUVER
Leopold’s Maneuver is preferably performed after 24 weeks gestation when fetal outline can be already palpated.
It is a method that determines the fetal position, fetal presentation, and engagement.
Midwifery 1 Course Manual Page 44

It has 4 different actions that help determine the position and presentation of the fetus. Proper assessment and findings can indicate whether the delivery would be normal, complicated
or if the mother would need to undergo Caesarian section.
Preparation:
Explain procedure to the patient. Ask the mother to empty the bladder. The nurse should then warm the hands and apply it to the abdomen of the mother by using firm
and gentle pressure. Use the palm for palpation not the fingers. Place in dorsal recumbent position, supine with knees flexed to relax abdominal muscles Drape properly to maintain privacy.
Leopold’s Maneuver
Maneuvers Purpose Procedure Findings
First Maneuver:
To determine fetal part lying in the
Using both hands, feel for the Head: more firm, hard and round that moves independently of the body.
Midwifery 1 Course Manual Page 45

Fundal Grip fundus.
To determine presentation.
fetal part lying in the fundus. Breech: less well defined that moves only in conjunction with the body.
Second Maneuver:Umbilical Grip
To identify location of fetal back.To determine position.
One hand is used to steady the uterus on one side of the abdomen while the other hand moves slightly on a circular motion from top to the lower segment of the uterus to feel for the fetal back and small fetal parts.Use gentle but deep pressure.
Fetal back: smooth, hard, and resistant surfaceKnees and elbows: with a number of angular nodulation upon palpation
Third Maneuver:Pawlik’s Grip
To determine engagement of presenting part.
Using thumb and finger, grasp the lower portion of the abdomen above symphisis pubis, press in slightly and make gentle movements from side to side.
The presenting part is engaged if it is not movable.
It is not yet engaged if it is still movable.
Fourth Maneuver:Pelvic Grip
To determine the degree of flexion of fetal head.
To determine attitude.
Facing foot part of the woman, palpate fetal head pressing downward about 2 inches above the inguinal ligament.Use both hands.
Good attitude: if brow corresponds to the side (2nd maneuver) that contained the elbows and knees.Poor attitude: if examining fingers will meet an obstruction on the same side as fetal back (hyperextended head)
Also palpates infant’s anteroposterior position. If brow is very easily palpated, fetus is at posterior position (occiput pointing towards woman’s back)
III. ASSISTING IN BIRTH AND DELIVERY
Responsibilities During Birth
Midwifery 1 Course Manual Page 46

Preparation of a sterile delivery table with gowns, gloves, drapes, solutions, and instruments. Perineal cleansing Initial care and assessment of the newborn. Administration of medications, usually oxytocin, to contract the uterus and control blood loss.
During the birth
Remain with the woman to assist her in giving birth. Use the call bell or ask her partner to call for help.
Stay calm to reduce the couple’s anxiety. Put on gloves, preferably sterile, to prevent contamination with blood and other secretions. Sterile
gloves reduce the transmission of environmental organisms to the mother and infant. The nurse will be “catching” the infant in this situation. No invasive procedure is to be done.
After the birth
Observe the infant’s color and respirations for distress. Suction excess secretions with a bulb syringe. Dry the infant, and place skin-to-skin with the mother or cover with warmed blankets to maintain
warmth. Put the infant to the mother’s breast, and encourage suckling to promote uterine contraction,
facilitating expulsion of the placenta and controlling bleeding.
Action RationaleI. Transfer and Positioning for Birth1. When the woman is almost ready to give birth, transfer her to the delivery room or position the birthing bed. The exact time varies with several factors (such as overall speed of labor and rate of fetal descent).
Rushed, last-moment preparations are anxiety producing for the woman, her partner, and the nurse. Remaining in the birth position for a long time can be tiring.
2. Continue observing the perineum while making final preparations for birth.
Birth may occur unexpectedly, and the nurse should be prepared to “catch” the infant if the attendant (physician or nurse-midwife) is not in the room.
3. Continue observing the fetal heart rate (FHR) with continuous monitoring or intermittent auscultation.
Detects changes in fetal condition that may require interventions by the attendant to speed birth.
4. Elevate the woman’s back, shoulders, and head with a wedge ( on a delivery table) or by raising the head of the birthing bed.
Allows more effective maternal pushing and uses gravity to aid fetal descent.
5.Stirrups or foot rests to support the woman’s legs and feet may be used on a birthing bed, Pad the surface.
Padding reduces pressure, preventing venous stasis and possible thrombus formation.
6. When placing the woman’s legs in stirrups, elevate them and remove them simultaneously. Do not separate her legs widely.
Reduces strain on muscles and ligaments.
Prepping and Draping7. After the woman is in position, cleanse the perineal area with a sterile iodophor and water preparation unless she is allergic. Use warm water to dilute iodophor scrub.
Removes secretions and feces from the perineal area.
Midwifery 1 Course Manual Page 47

8. After handwashing, apply sterile gloves for the procedure.Take fresh sponge to begin each new area, and do not return to a clean area with a used sponge. Six sponges are needed. The proper order and motions are as follows:a. Use a zig-zag motion from clitoris to lower abdomen just above the public hairline.b, c. Use a zig-zag motion on the inner thigh from the labia majora to about halfway between the hip and knee. Repeat for the other inner thigh.d, e. Apply a single stroke on one side on one side from clitoris over labia, perineum, and anus. Repeat for the other side. f. Use a single stroke in the middle from the clitoris over the vulva and perineum.
Prevents cross-contamination or recontamination of an area that is already clean,
9. The attendant may apply sterile drapes if desires.
A vaginal birth is a clean procedure rather than a sterile one because the vagina is not sterile. Sterile drapes are unnecessary, but some attendants may prefer to use them.
Birth of the Head10. If an episiotomy is needed, the attendant will perform it when the head is well crowned.
Minimizes blood loss from the episiotomy.
11.As the vaginal orifice encircles the fetal head, the attendant applies gentle pressure to the woman’s perineum with one hand while applying counterpressure to the fetal head with the other hand (Ritgen’s maneuver). The attendant may ask the mother to blow so that she avoids pushing or to push gently.
Controls the exit of the fetal head so that it is born gradually rather than popping out; this minimizes trauma to the maternal tissues.
12. The attendant wipes secretions from the infant’s face and suctions the nose and mouth with a bulb syringe,
Removes blood and secretions, preventing the infant from aspirating them with the first breaths.
13. The attendant feels for a cord around the fetal neck (nuchal cord).If it loose, it is slipped over the head. If tight it is clamped and cut between two clamps before the rest of the baby is born.
Allows the rest of the birth to occur and prevents stretching or tearing the cord.
Birth of the Shoulders 14.After external rotation, the attendant applies gentle traction on the fetal head in the direction of the mother’s perineum.
External rotation allows the shoulders to rotate internally and aligns their transverse diameter with the anteroposterior diameter of the mother’s pelvic outlet. Traction on the head in the direction of her perineum allows the anterior fetal shoulder to slip under the symphysis pubis.
15. The attendant then lifts the head toward the mother’s symphysis pubis.
Permits the posterior fetal shoulder to be eased over the perineum, minimizing trauma to the maternal tissues.
Clearing the infant’s airway and cutting the cord16. The rest of the infant’s body is born quickly after the shoulders are born. The attendant
Gravity aids spontaneous drainage of secretions and prevents aspiration of oral mucus and
Midwifery 1 Course Manual Page 48

maintains the infant in a slightly head-dependent position while suctioning excess secretions with a bulb syringe. The infant is often placed on the mother’s abdomen.
secretions.
17. The attendant clamps the cord. Either the father or the attendant cuts the cord above the clamp.
Allows parents to interact more freely with their infant. Prevents flow of blood between placenta and infant, which might result in anemia ( if infant is higher than placenta) or polycythemia ( if infant is below the placenta).
Delivery of Placenta18. After the placenta separates, it can usually be delivered of the mother bears down. The attendant may pull gently on the cord.
Excess traction on the cord may cause it to break, making the placenta harder to deliver.
19. The attendant inspects both sides of the placenta.
Ensures that no fragments remain inside the uterus that might cause hemorrhage and infection.
20. After the infant and placenta are born, the attendant inspects the birth canal for injuries. If needed, any injuries and the episiotomy (if one was done) are required.
Care of the InfantA. CrowningThe fetal head distends the labial and perineal tissues. The anus is stretched wide, and it is not unusual to see the woman’s anterior rectal wall at this time. Any feces expelled are wiped posteriorly to avoid contamination of the vulva. The attendant (physicianor nurse-midwife) is not holding the fetal head back but rather controlling its exit by using gentle pressure on the fetal occiput.
B. Ritgen ManueverPressure is applied to the fetal chin through the perineum at the same time pressure is applied to the occiput of the fetal head. This action aids the mechanism of extension as the fetal head comes under the symphysis.
C. Birth of the HeadAs the head emerges, the attendant prepares to suction the nose and mouth to avoid aspiration of secretions when the infant takes the first breath.
D. Restitution and External RotationAfter the head emerges, it realigns with the shoulders (restitution). External rotation occurs as the fetal shoulders internally rotate, aligning their transverse diameter with the anteroposterior diameter of the pelvic outlet.
E. Birth of the anterior shouldersThe attendant gently pushes the fetal head toward the woman’s perineum to allow the anterior shoulder to slip under the symphysis. The bluish skin color of the fetus is normal at this point; it becomes pink as the infant begins air breathing.
F. Birth of Posterior ShoulderThe attendant now pushes the fetal head upward toward the woman’s symphysis to allow the posterior shoulder to slip over her perineum.
Midwifery 1 Course Manual Page 49

G. Completion of the BirthThe attendant supports the fetus during expulsion. Note that the infant has excellent muscle tone, as evidenced by facial grimacing and flexion of the arms and hands.
H. Cord clampingWhile the infant is in skin-to-skin contact on the mother’s abdomen, the attendant clamps the umbilical cord. The cord is then cut between the two clamps. Samples of cord blood are collected after it is cut.
I. Birth of the placentaThe attendant applies gentle traction on the cord to aid expulsion of the placenta. This placenta is expelled in the more common Schultze mechanism, with the shiny fetal surface and membranes emerging. Note the fetal membranes that surrounded the fetus and amniotic fluid during pregnancy. The chorionic vessels that branch from the umbilical cord are readily visible on the fetal surface of the placenta.
Midwifery 1 Course Manual Page 50
Evaluation Checklists
Christian University of ThailandCollege of Nursing
Midwifery 1 Course Manual Page 51
Evaluation Checklist for Mechanism of Labor
Student number:_____________________ Name-Surname:__________________________________________________Date performed:_____________________
Rating Scale: 3-Very good 2- Good 1-Needs practice 0- Unperformed
Description 3 2 1 0 Remarks1. EngagementThe widest diameter of the presenting part (with a well-flexed head, where the largest transverse diameter of the fetal occiput is the biparietal diameter) enters the maternal pelvis to a level below the plane of the pelvic inlet. On the pelvic examination, the presenting part is at 0 station, or at the level of the maternal ischial spines. 2. DescentThe downward passage of the presenting part through the pelvis. This occurs intermittently with contractions. The rate is greatest during the second stage of labor. 3. FlexionAs the fetal vertex descents, it encounters resistance from the bony pelvis or the soft tissues of the pelvic floor, resulting in passive flexion of the fetal occiput. The chin is brought into contact with the fetal thorax, and the presenting diameter changes from occipitofrontal (11.0 cm) to suboccipitobregmatic (9.5 cm) for optimal passage through the pelvis. 4. Internal rotationAs the head descends, the presenting part, usually in the transverse position, is rotated about 45° to anteroposterior (AP) position under the symphysis. Internal rotation brings the AP diameter of the head in line with the AP diameter of the pelvic outlet. 5. ExtensionWith further descent and full flexion of the head, the base of the occiput comes in contact with the inferior margin of the pubic symphysis. Upward resistance from the pelvic floor and the downward forces from the uterine contractions cause the occiput to extend and rotate around the symphysis. This is followed by the delivery of the fetus' head. 6. Restitution and external rotationWhen the fetus' head is free of resistance, it untwists about 45° left or right, returning to its original anatomic position in relation to the body.
7. Expulsion
Midwifery 1 Course Manual Page 52
After the fetus' head is delivered, further descent brings the anterior shoulder to the level of the pubic symphysis. The anterior shoulder is then rotated under the symphysis, followed by the posterior shoulder and the rest of the fetus.
Total Score: /21
Evaluated by: ________________________________ Student’s Signature:____________________________
_____/______/_______ _____/_____/_____
Midwifery 1 Course Manual Page 53
Christian University of ThailandCollege of Nursing
Evaluation Checklist for Assisting in Birth and Delivery
Student number:_____________________ Name-Surname:__________________________________________________Date performed:_____________________
Rating Scale: 3-Very good 2- Good 1-Needs practice 0- Unperformed
Action 3 2 1 0 RemarksIdentify the patientExplain the procedure to the patientPrepare the equipments needed for the procedureTransfer and Positioning for Birth1. When the woman is almost ready to give birth, transfer her to the delivery room or position the birthing bed. 2. Continue observing the perineum while making final preparations for birth.3. Continue observing the fetal heart rate (FHR) with continuous monitoring or intermittent auscultation.4. Elevate the woman’s back, shoulders, and head with a wedge (on a delivery table) or by raising the head of the birthing bed.5. Stirrups or foot rests to support the woman’s legs and feet may be used on a birthing bed, Pad the surface.6. When placing the woman’s legs in stirrups, elevate them and remove them simultaneously. Do not separate her legs widely.Prepping and Draping7. After the woman is in position, cleanse the perineal area with a sterile iodophor and water preparation unless she is allergic. Use warm water to dilute iodophor scrub.8. After handwashing, apply sterile gloves for the procedure.Take fresh sponge to begin each new area, and do not return to a clean area with a used sponge. Six sponges are needed. The proper order and motions are as follows:a. Use a zig-zag motion from clitoris to lower abdomen just above the public hairline.b.Use a zig-zag motion on the inner thigh from the labia majora to about halfway between the hip and knee. Repeat for the other inner thigh.c. Apply a single stroke on one side on one side from clitoris over labia, perineum, and anus. Repeat for the
Midwifery 1 Course Manual Page 54

other side. d. Use a single stroke in the middle from the clitoris over the vulva and perineum. 9. Apply sterile drapes if desired.Birth of the Head10. If an episiotomy is needed, perform it when the head is well crowned.11. As the vaginal orifice encircles the fetal head, apply gentle pressure to the woman’s perineum with one hand while applying counterpressure to the fetal head with the other hand (Ritgen’s maneuver). May ask the mother to blow so that she avoids pushing or to push gently.12. Wipes secretions from the infant’s face and suctions the nose and mouth with a bulb syringe,13. Feels for a cord around the fetal neck (nuchal cord).If it loose, it is slipped over the head. If tight it is clamped and cut between two clamps before the rest of the baby is born.Birth of the Shoulders14.After external rotation, apply gentle traction on the fetal head in the direction of the mother’s perineum.15. Then lift the head toward the mother’s symphysis pubis.Clearing the infant’s airway and cutting the cord16. The rest of the infant’s body is born quickly after the shoulders are born. Maintains the infant in a slightly head-dependent position while suctioning excess secretions with a bulb syringe. The infant is often placed on the mother’s abdomen.17. Clamps the cord. Either the father or the attendant cuts the cord above the clamp.Delivery of Placenta18. After the placenta separates, it can usually be delivered of the mother bears down. May pull gently on the cord.19. Inspects both sides of the placenta.20. Assess the amount of blood loss from the delivery. Normally, blood loss is less than 500 cc. Save all evidence of blood loss.21. Gently massage the uterus if the fundus is soft or boggy.22. Assess for intactness of the placenta23.Make notations about the birth to include: (1) Fetal position and presentation. (2) Presence of nuchal cord and method of reduction. (3) Color, character, and amount of amniotic fluid. (4) Time of delivery.
Midwifery 1 Course Manual Page 55

(5) Sex of infant. (6) APGAR scores; need for stimulation or resuscitation. (7) Approximate time of placental expulsion, appearance, and completeness. (8) Maternal condition (affect, amount of bleeding, and status of uterine contraction). (9) Any unusual occurrences during the delivery. 24. Monitor BP and administer methergin drug
Total: /99
Evaluated by: ________________________________ Student’s Signature:____________________________
_____/______/_______ _____/_____/_____
Midwifery 1 Course Manual Page 56

Christian University of ThailandCollege of Nursing
Evaluation Checklist for Abdominal Examination and Leopold’s Maneuver
Student number:_____________________ Name-Surname:__________________________________________________Date performed:_____________________
Rating Scale: 3-Very good 2- Good 1-Needs practice 0- Unperformed
Description 3 2 1 0 Remarks1. Identify the patient.2. Explain the procedure to the patient.3. Ask the mother to empty the bladder.4. Warm the hands and apply it to the abdomen of the mother by using form and gentle pressure.5. Use the palm for palpation and not the fingers.6. Place the patient in dorsal recumbent position, supine with knees flexed to relax abdominal muscles.7. Drape properly to maintain privacy.8. First maneuver: Fundal GripUsing both hands, feel for the fetal part lying in the fundus.9. Second maneuver: Umbilical GripOne hand is used to steady the uterus on one side of the abdomen while the other hand moves slightly on a circular motion from top to the lower segment of the uterus to feel for the fetal back and small fetal parts.Use gentle but deep pressure.10.Third maneuver: Pawlik’s GripUsing thumb and finger, grasp the lower portion of the abdomen above symphisis pubis, press in slightly and make gentle movements from side to side.11. Fourth maneuver: Pelvic GripFacing foot part of the woman, palpate fetal head pressing downward about 2 inches above the inguinal ligament.Use both hands.12.Listen to the fetal heart sound correctly.13. Explain the results of the examination14.Document Findings
Total: /42
Midwifery 1 Course Manual Page 57
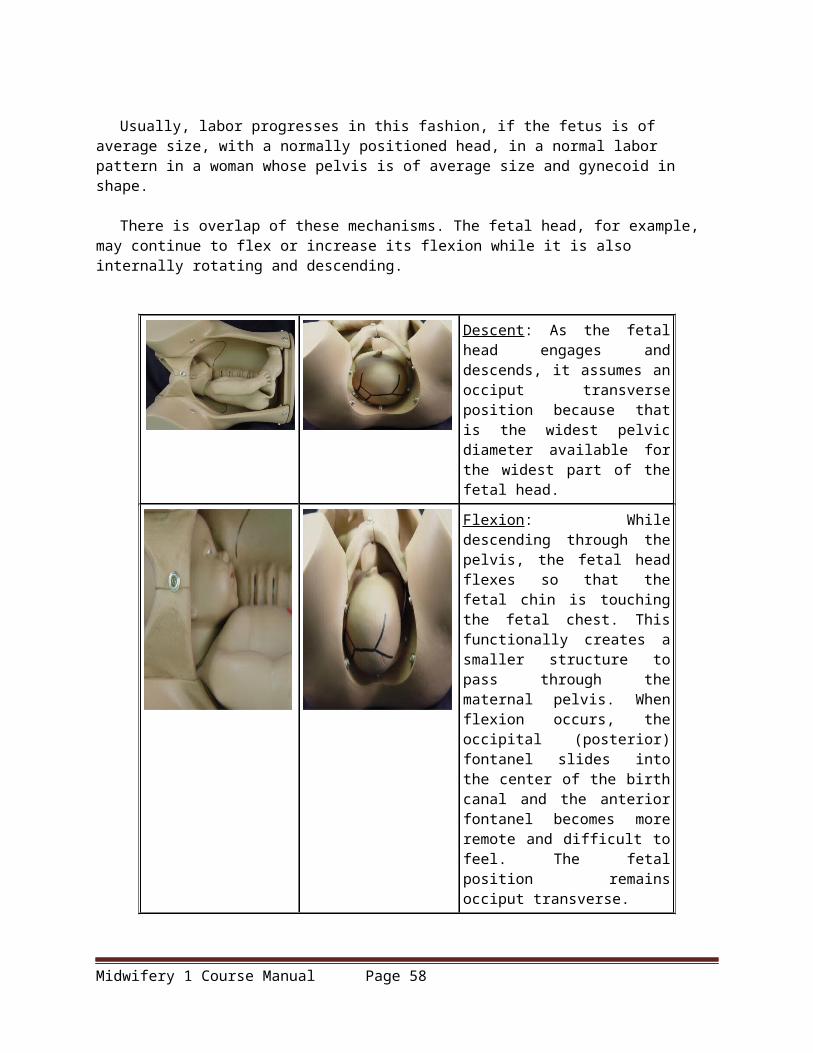
Evaluated by: ________________________________ Student’s Signature:____________________________
_____/______/_______ _____/_____/_____
Resources:
Olds. S.B. al (2008). Maternal – Newborn Nursing Women’s Health Care. 8th ed. New Jersey : Pearson.
Goorrle, T.M. McKinney, E.S. Murray, S.S. (1998) Foundation of Maternal Newborn Nursing. 2nd ed. Philadelphia : W.B. Saunders Company.
Lowdermilk, D.L. and Perry, S.E. (2004) Maternity and Women’ Health Care.8th ed. St. Louis : Mosby-Year. Book, Inc.
Lawdermilk. D.L. and Perry. S.E. (2004) Maternity and women’s Health Care. 8th ed. Missuri. Mosby.
Mattos, J.H. (1998) Obstetrics & Gynecology. St. Louis : Mosby-Year. Book, Inc.Makinney, E.S. et. al. (2000). Maternal – Child Nursing. 1st ed. Philadelphia:W.B.Saunders.
Olds. S.B. al (2004). Maternal – Newborn Nursing Women’s Health Care. 7th ed. New Jersey : Pearson.
http://medical-dictionary.thefreedictionary.com/High-risk+pregnancy
http://www.baby2see.com/laborandbirth.html
http://www.childbirth.org/articles/efm.html
http://gowingo.com/health/TEXTS/PHYSIOLOGY_LABOR.shtml
http://www.waybuilder.net/sweethaven/MedTech/ObsNewborn/default.asp?iNum=11001
http://www.brooksidepress.org/Products/Obstetric_and_Newborn_Care_II/lesson_2_Section_1.htm
http://www.brooksidepress.org/Products/Obstetric_and_Newborn_Care_II/lesson_1_Section_1A.htm
http://health.howstuffworks.com/pregnancy-and-parenting/pregnancy/issues/how-to-exercise-while-
pregnant4.htm
http://cene.nurse.cmu.ac.th/ceneweb/e-learning/Program554312eng/index.html
Midwifery 1 Course Manual Page 58