prime timetable - school scheduling software for mac, … · system requirements web ... you will...
TRANSCRIPT
Prime Timetable User Guide

Contents
Chapter 1: Get started Overview Basic timetabling terms System requirements Free sign up Premium support Log in Forgot password Log out Profile Create application shortcut Update school account Extend subscription
Chapter 2: Import Import data from Excel/Sheets Import lessons Import from Xml
Chapter 3: Timetable Create new timetable Open timetable Open from file Open example Save changes Create a copy of timetable Delete timetable Restore timetable Merge timetables
Chapter 4: Data School name and year Days Periods Custom periods Subjects Rooms Teachers Classes Groups Students Lessons Lunch
Lunch as pinned cards
1

Lunch as forbidden positions Class statistics Teacher statistics Subject statistics Room statistics Select multiple items Sort Reorder Undo and redo History
Chapter 5: Views Master view Individual view Extra views Vertical zoom Horizontal zoom Browser zoom
Chapter 6: Cards Drag and drop Select multiple cards Card details Copy/paste cards Edit cards Remove cards Delete cards Merge cards Split cards Customize cards
Chapter 7: Constraints Draw time constraints with markers Draw forbidden positions Draw unwanted positions Draw mandatory positions Copy marks and settings to other resources Erase marks Pin cards Clip cards
Chapter 8: Generate Improve timetable Generator tips & tricks Improvement priorities
1 Fatal error level 2 Difficult warning level 3 Warning level
Chapter 9: Validate Notifications
2

Resolve notifications Resolve conflict exceptions Resolve gap exceptions Resolve subject exceptions Resolve missing groups Resolve unscheduled cards Exclude resources
Chapter 10: Print Print timetable Print individual timetables
Chapter 11: Share Share with others Timetable collaboration Publish to the Web Customize published timetable Share on Social Networks Add timetable to the school website
Chapter 12: Export Export data to Excel/Sheets Save as local file Save as Html spreadsheet(s) Save as CSV file Save as PDF Save as image Save as Xml
Chapter 13: Options Application options
Skin Save reminder Default view Time format Preferred app Rotate conflicted cards Show notification number Ignore items with short name set to "" Install Prime Timetable (plugin app only)
Keyboard shortcuts Chapter 14: Troubleshooting
Resolve common issues I am not allowed to save changes My account is locked and I am not allowed to log in I have some other issue
3

Chapter 1: Get started
Overview Prime Timetable is a school scheduling software designed for both manual and automatic timetabling on any device: Mac, PC, tablet, smartphone. Prime Timetable is used for scheduling primary/elementary, junior/middle/high/secondary schools, international schools, universities and other educational organizations (art and language schools), as well as for scheduling various events: school camps and courses.
Basic timetabling terms Interpret terms as best suits your organization, e.g. use 'grade' instead of 'class' or 'course' instead of 'subject'.
SCHOOL Institution designed to allow and encourage student groups to attend school activities under the supervision of teachers.
TEACHER / EDUCATOR / PROFESSOR / TUTOR / INSTRUCTOR Person who teaches, guides, instructs, trains or helps another in the process of learning knowledge.
STUDENT Learner, or someone who attends an educational institution.
ROOM Place where teaching, learning or any other school activity can occur, e.g. biology room, history room, but also dining room, reception hall...
CLASS / GRADE Group of students attending a specific lesson.
RESOURCE Class, Teacher or Room
SUBJECT / COURSE / ACTIVITY Activity that includes at least one school resource, e.g. Math, English, Biology, but also school recess, lunch, some nonclass activities like teacher meetings, sport events, etc.
PERIOD / TIME SLOT Block of time used for lessons
LESSON / SECTION Structured period of time where a school activity is intended to occur.
4

TIMETABLE / SCHEDULE Table which displays lessons.
CARD Visual representation of a lesson.
UNSCHEDULED CARD Card waiting to be scheduled and therefore placed outside the timetable.
PINNED CARD Card locked on a specific period, meaning it won't be rescheduled during automatic timetable generation.
TIMETABLE VIEW Master or individual view that displays lessons as cards, e.g. class/teacher/room master view, Grade 8 view, etc.
TIMETABLER Person who creates a school timetable.
THE BASIC TIMETABLING RULE One school resource during one school period can be scheduled in only one lesson. Otherwise, there is a conflict!
CONFLICT Group of cards on the same position or overlapping each other.
GAP / PAUSE / WINDOW Empty period between school activities.
CONSTRAINT Requirement which should be satisfied in the generated timetable, e.g. setting that gaps are forbidden for all classes.
TIME CONSTRAINT Specifying whether a particular school resource or activity is forbidden, unwanted or mandatory in a certain period.
AUTOMATIC TIMETABLE GENERATOR Software which automatically creates a school timetable based on provided input.
MANUAL TIMETABLING Creating a timetable manually by dragging cards.
TIMETABLE VALIDATION Process of validating a timetable, e.g. showing notification that there are no conflicts and that all specified constraints are met.
SCHOOL SCHEDULING/TIMETABLING SOFTWARE Software designed to simplify and automate scheduling/timetabling process.
5
System requirements Web app is designed to work on any device (desktop, tablet, smartphone...) on any OS (Mac, Windows, Linux, iOS, Android...) and in any Html 5 capable browser (Chrome, Firefox, Edge, Safari, Internet Explorer 11...). The best automatic generator performances can be achieved using Chrome which is several times faster than other browsers. Optional plugin app uses Microsoft Silverlight which works in older browsers like Internet Explorer 6, 7 and 8, but it's not supported by latest Chrome and Edge browser. In order to install Silverlight follow the link: http://www.microsoft.com/getsilverlight.
Free sign up In order to evaluate the software and see if it meets your school needs, you first need to sign up:
Click Free sign up on the home page Choose Free plan Type your email address and desired password and optionally provide additional
school info Click Start my free month
Prime Timetable will start and a new timetable will be opened for you.
Premium support By signing up you get a 30day free trial and premium support included. Support team will contact you shortly after the sign up to provide you with the necessary guidance and answer any question you might have.
Log in To start Prime Timetable you need to log in first:
Click Log in in the header of the home page Enter your email and password Optionally, check Remember Me and the app will be automatically opened the next
time you visit the home page Click Log In button
After successful login, the last opened timetable will be displayed.
Forgot password Go to forgot password page Type your email and click Send code An email containing a code (random alphanumeric string) will be sent to you Copy and paste the code from the email and enter the new password Click Change password
6

Login window will open where you can log in using the new password.
Log out In order to leave the app:
Click profile icon in the top right corner Click Log out
Your session will end and home page will show up.
Profile Click profile icon in the top right corner Click My profile Set your email and password used for login, and your first and last name Click Edit
Create application shortcut Desktop icon enables fast and easy access to Prime Timetable. In the latest Chrome browser choose Menu > More tools > Add to desktop... > Add, and the owl icon will be added to your desktop. By clicking the owl icon, the app will be started in the full window just like a typical desktop application. For all other browsers create a desktop shortcut to a website and on any smartphone or tablet just add to the homescreen.
Update school account By signing up a new school account is created that can be shared with other colleagues and teachers. In order to update school account:
Click profile icon in the top right corner Click Purchase Click Add more info in "Step 2. School account info" Enter your school name, address, contact name, phone and other info Click Buy from 2Checkout to save changes
If there is more than one account for your school, contact us to merge them.
Extend subscription If subscription is about to expire or free evaluation period is over:
Go to home page and log in Click profile icon in the top right corner Click Purchase Select Basic or Premium plan based on the number of teachers. Basic is up to 40
teachers and Premium is up to 100 teachers If you want to take advantage of special discounts, choose billing term by dragging
year slider
7

Click Buy from 2Checkout You will be redirected to 2Checkout form where you can purchase the software online. 2Checkout supports Visa, MasterCard, Discover, American Express, Diners, JCB, PIN debit cards with the Visa or MasterCard logo, Debit cards with the Visa or MasterCard logo and PayPal. Contact us for alternative payment methods.
8
Chapter 2: Import
Import data from Excel/Sheets Subjects, rooms, teachers, classes/groups, students and lessons can be imported from other software using copy/paste:
Open Microsoft Excel/Word or Google Sheets/Docs document and make a selection Use right mouse click and choose Copy Choose Import > Import Subjects/Rooms/Teachers/Classes/Lessons Right mouse click on the text field and choose Paste Click Import
In import Sheets document each sheet shows an example of importing subjects, rooms, teachers, classes/groups, students and lessons. Imported items should be in a separate lines/rows.
Name Short Groups
Grade 11 11 Math,Eng|Art,Mus
Grade 12 12 Math,Eng|Art,Mus Columns when importing class and its groups
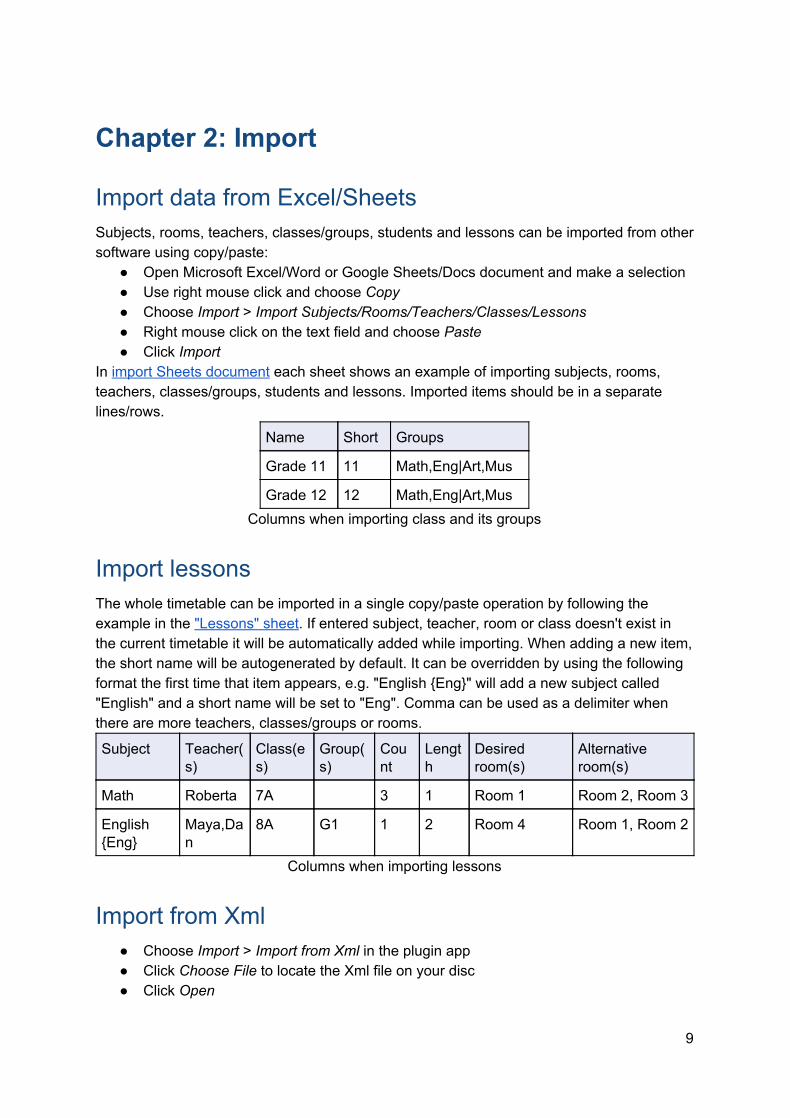
Import lessons The whole timetable can be imported in a single copy/paste operation by following the example in the "Lessons" sheet. If entered subject, teacher, room or class doesn't exist in the current timetable it will be automatically added while importing. When adding a new item, the short name will be autogenerated by default. It can be overridden by using the following format the first time that item appears, e.g. "English Eng" will add a new subject called "English" and a short name will be set to "Eng". Comma can be used as a delimiter when there are more teachers, classes/groups or rooms.
Subject Teacher(s)
Class(es)
Group(s)
Count
Length
Desired room(s)
Alternative room(s)
Math Roberta 7A 3 1 Room 1 Room 2, Room 3
English Eng
Maya,Dan
8A G1 1 2 Room 4 Room 1, Room 2
Columns when importing lessons
Import from Xml Choose Import > Import from Xml in the plugin app Click Choose File to locate the Xml file on your disc Click Open
9

Chapter 3: Timetable
Create new timetable Choose Open > New Timetable Enter the name of the timetable document and description (optional) Click Ok
Open timetable Click open icon or choose Open > Open Timetable Select a timetable from the list Click Open
Open from file In order to open timetable from previously saved file on the disc:
Choose Open > Open from File Click Choose File to locate the file on your disc Click Open
Open example Choose Open > Open Examples Select example from the list Click Open
Save changes Click save icon to save changes
All changes will be synchronized and merged across any device you or your colleagues might be using.
Create a copy of timetable Choose Save as > Copy of Timetable Enter the name of the timetable document and description (optional) Click Ok
Delete timetable Click open icon
10

Select a timetable from the list Click Delete
Restore timetable If you delete timetable by accident, it is possible to restore it. Please contact us if you need to restore a deleted timetable.
Merge timetables Merge enables working on separate timetables, e.g. separate timetable for lower and upper schools which later can be merged:
Open base timetable Choose Import > Merge timetables Select the other timetable and click Merge
If there is already a teacher, room, class or subject with the same name in the base timetable, it will be used as it is; otherwise, it will be added. Periods and days are also going to be merged based on the same name. If a period doesn't have a specified name, it will be merged based on what's displayed on the screen; e.g. period interval or period number. Furthermore, all lessons from the second timetable will be added to the base timetable.
11
Chapter 4: Data
School name and year Choose Manage > Days and Periods to set:
School name School year usually academic year, e.g. 2016/2017 Number of days for 1week timetable choose 5 and for the 2week choose 10 Periods per day number of maximum lessons per day Use prelesson? Whether the day starts with prelesson
Days Choose Manage > Days and Periods > Manage days or click day name in the view
To add a new day enter a name and short name. For 1week timetable add 5 days, for 2week timetable add 10 days and so on. If there are many days and periods use horizontal zoom to focus on specific day(s). Days can be reordered with arrows in the bottom right corner of the grid.
Periods Choose Manage > Days and Periods > Manage periods or click period name in the
view For each period set start/end time and optionally name. For start and end time use 24hour clock, e.g. instead of 01:15 set 13:15. Choose Owl > Options > Period format to control how periods will be displayed in the view. If the number of periods vary from day to day, set the maximum number of periods for all
days and then use to forbid positions that are not allowed. E.g. some lessons last 45 minutes and others 15 minutes. Add periods with 15minute intervals and while adding lessons choose triple for lessons that last 45 minutes (3 * 15 min = 45 min). If lower, middle and high schools have different period intervals consider creating a separate timetable for each school and optionally merge them later. Periods can be sorted and reordered. In order to keep period intervals and period numbers aligned:
Choose Manage > Days and Periods > Manage Periods Click Start time in the header of the grid to sort periods Click lock icon in the bottom right corner of the grid to align period numbers and
intervals
12

Custom periods In order to enter custom period intervals for specific day(s)/class(es)/subject(s)/room(s)/teacher(s):
Click on a default period you wish to modify and then click Add Change period interval: start and end time Choose class, subject, room, or teacher custom period Choose day(s)/class(es)/subject(s)/room(s)/teacher(s) where the new interval applies Click Ok
If a timetable has custom periods, the filters will appear above the periods grid where you can choose whether to show custom periods or not. If "Show custom periods" is checked, all custom periods will show up in the grid. Choose specific day and/or class/subject/room/teacher to filter custom periods. When you add new custom period(s), related cards will be resized and repositioned based on specified custom interval. Choose Owl > Options > Time format > 12hour or 24hour clock to display custom interval inside these cards. When you drag a card, the card's shadow changes its size and position according to default or custom periods below. Thus, you will know the size and the position of the dragged card before it is dropped.
Individual view with custom periods: note how Spanish, Handwriting Without Tears, Choir,
Art and Interdisciplinary Studies have different intervals
13

For more information about custom periods please refer to these blog posts or take a look at K5 example with lots of custom periods for specific grades on different days, e.g. for the same subjects, Kindergarten has different intervals compared to lower grades.
Subjects Choose Manage > Subjects
Click Add to add a new subject, or select the existing subject to edit, delete or copy using the buttons on the right. Each subject has the following properties:
Name, e.g. Math Short name Color Difficulty: Low, Medium or High Allow subject to be taught more than once per day Insert day off if subject is taught 2 times per week Insert day off if subject is taught 3 times per week
The generator will try to optimize each day so that students don't get too many difficult or too many easy subjects per day. Otherwise, notifications will show adequate warnings. If Allow subject to be taught more than once per day is checked, placing that subject more than once in a day will not be reported as an error. If Insert day off if subjects is taught 2 times per week is checked, that subject will not be scheduled on subsequent days, e.g. having that subject on Monday and Tuesday will show an error notification. In case that Insert day off if subjects is taught 3 times per week is checked, having subject on Monday, Tuesday and Wednesday will cause error notification for a specific class, whereas Monday, Tuesday, Thursday will be valid.
Rooms Choose Manage > Rooms
Click Add to add a new room, or select the existing room to edit, delete or copy using the buttons on the right. Each room has the following properties:
Name, e.g. "Computer lab", "Physics lab", "Bio lab", "Conference room", "Playground", "Meeting room", etc.
Short name Color Tags, e.g. "1st floor, lab" Capacity Building name
In order to group rooms, specify their room tag, e.g. "1st floor". That way, it will be easier to select them when adding or editing lessons. Multiple tags should be separated with comma. Room capacity represents maximum student seat number and can be used for optimizing room usage for students. Building name can be used to optimize daily moves between buildings.
14
Teachers Choose Manage > Teachers
Click Add to add a new teacher, or select the existing teacher to edit, delete or copy using the buttons on the right. Each teacher has the following properties:
Name, e.g. John Smith Short name Color Maximum number of lessons in a row Maximum gaps per week Maximum gaps per day Minimum lessons to allow gaps Allowed lesson number deviation Minimum lessons per day Maximum lessons per day Allowed daily number of moves between buildings
Maximum number of lessons in a row assures that teacher doesn't have more than specified number of lessons in a row. Maximum gaps per week/day can minimize teacher gaps per week/day. Minimum lessons to allow gaps assures the teacher has a specified number of lessons in a row before gaps are allowed. Allowed daily lesson number deviation is useful to minimize the difference between the numbers of lessons per day for a specific teacher. For instance, if allowed lesson number deviation is set to 1 and if a teacher has 4 lessons on Monday and Tuesday and 6 lessons on Wednesday, the notification will show a warning for Wednesday. Minimum and maximum lessons per day will make sure the teacher doesn't have too few or too many lessons per day. Allowed daily number of moves between buildings reduces unnecessary teacher moves. If required, teacher moves after the gap can be ignored.
Classes Choose Manage > Classes
Click Add to add a new class, or select the existing class to edit, delete or copy using the buttons on the right. Each class has the following properties:
Name, e.g. 7A or Grade 8 or Year 9 Short name Color Lessons start on first period Whether gaps are forbidden Whether groups have to finish lessons at the same time Allowed difference between maximum and minimum daily lesson number
When forbid gaps option is checked, the class will have no gaps. Otherwise, error notification will be shown.
15

Allowed difference between maximum and minimum daily lesson number assures that class has nearly the same or equal number of lessons per day. For instance, if the value is set to 1 and class has 4 lessons on Monday and 6 lessons on Tuesday, error notification will be shown. When adding a new class, the following set of groups will be created: Boys and Girls and Group 1 and Group 2.
Groups You can divide a class into one or more sets of groups, e.g. French, German and Italian and Science, Math and Chemistry. In order to manage groups:
Choose Manage > Classes Select a class on the list Click Groups
A set of groups for the selected class will be displayed. The first row represents the entire class.
Grade divided into two sets of groups: English, French and Art, Chemistry, Music, Spanish
groups
In order to add a new set of groups, click Add and a new row with two groups will be created. To delete a set of groups, select a row and click Delete. In order to add another group in a row:
Select desired row Click Add group Enter group's name and short name Click Add
16

In Example 3 5A class is divided into French and German groups, and related cards are clipped so they will always be scheduled on the same position. In Egypt example 11A class is divided into Art, Cooking and Music groups.
Students Students can be managed in two ways:
As classes As groups
In English College Example students are managed as classes. The other option is to manage students as groups, e.g. here is direct link to demo student called Clark of published schedule for 7th grade. Click the class icon in the top left corner to filter lessons by other groups/students.
Lessons Choose Manage > Lessons to manage lessons and view statistics. Adding lessons to classes on the same grade level or same subject teachers can be cumbersome. Instead copy and edit cards or import lessons via Excel/Sheets. For instance, add lessons for only one class and then copy/edit cards for other related classes or leave desired room empty and assign teachers to their homeroom later to speed up the process. When adding or editing lessons the following information can be specified:
Teacher(s) Subject Class(es) and/or group(s) Lessons per cycle count Lesson length: single, double, triple, etc. Desired room(s) Alternative room(s)
If there is more than one teacher holding the lesson click More... to add more teachers, e.g. two teachers might be needed for Physical education. Subject or course is an activity including at least one school resource, e.g. Math, English, Biology, etc. One lesson can have any number of classes/grades and/or groups. Choose Manage > Classes > Groups to manage class groups. In Example 3, French and German groups are clipped so that they will always be scheduled on the same position, and 2 classes have Physical education (PE) at the same time. Right mouse click these cards and choose Edit lesson to better understand the example. Lessons per cycle represents the total number of recurring lessons in one cycle (5 days for 1week, 10 days for 2week schedule, etc.). E.g. a class can have 5 English lessons in a cycle. Lesson length can be single, double, triple and so on depending on default period interval. E.g. if default period interval is 30 minutes and lesson lasts 1 hour, lesson length should be set to double. The majority of lessons require only one desired room. If more than one room is required click More... to add more rooms, e.g. Physical education might require Sports Hall and Gym.
17

If desired room is unavailable, the generator will try to allocate the lesson in alternative rooms.
Lunch In order to manage lunch a new period should be added which might be called "Lunch". There are two common ways to manage lunch: lunch as pinned cards and lunch as forbidden positions.
Lunch as pinned cards Add lunch as a subject Add lessons for lunch and select related resources Drag lunch cards to the lunch periods Pin lunch cards so they won't be moved by automatic generator
Kindergarten through 5th grade example shows lunch as pinned cards
Lunch as forbidden positions
Use to forbid lunch periods for all days and automatic generator will try to avoid lunch periods while rearranging cards
18

United States International example shows lunch as forbidden periods
Class statistics Choose Manage > Lessons Total lesson and total class count is displayed above the lesson grid Open class combo to filter lessons by specific class and group
Clicking the class icon above the lesson grid will switch to class, teacher, room and subject statistics.
Teacher statistics Choose Manage > Lessons Click the class icon in the top left corner to switch to filtering lessons by teacher Select a teacher from the combo to filter his/her lessons and see the total lesson
count and total hours Teacher's lessons can be filtered by specific subject in case he/she teaches two or more subjects. If the teacher is not already scheduled his/her total hours will be approximated based on average period length.
Subject statistics Choose Manage > Lessons Click the class icon in the top left corner to switch to filtering lessons by subjects Select a subject from the combo to see the total lesson count
Room statistics Choose Manage > Lessons Click the class icon in the top left corner to switch to filtering lessons by rooms Select a room from the combo to see the total lesson count
19

Select multiple items Hold down the Ctrl or Cmd key and click the items Click the first item, hold down the Shift key, and then click the last item to select a
consecutive group of items Hold down the Ctrl or Cmd key and press A to select all items in the grid
Sort Sort days, periods, subjects, rooms, teachers, classes, lessons and other items by clicking desired column name. For instance, in order to sort teachers by their names:
Choose Manage > Teachers Click Name column Click it once again to sort in the reverse order
Use lock icon in the grid's bottom right corner to make current order permanent, which will also change the order in the master timetable view. Use cancel icon to cancel and revert to previous order.
Reorder Select item(s) in the grid Use up and down arrows in the bottom right corner
Undo and redo Click undo icon to undo the latest change or click redo icon to redo the latest undo.
History Click history icon to see the list of previous changes, e.g. 2 cards dragged, 4 marks erased, 143 cards changed by generator, 2 cards cleared, 2 positions marked as mandatory. Click item on the list to undo more actions at once.
20

Undo 5 actions at once using history
21
Chapter 5: Views
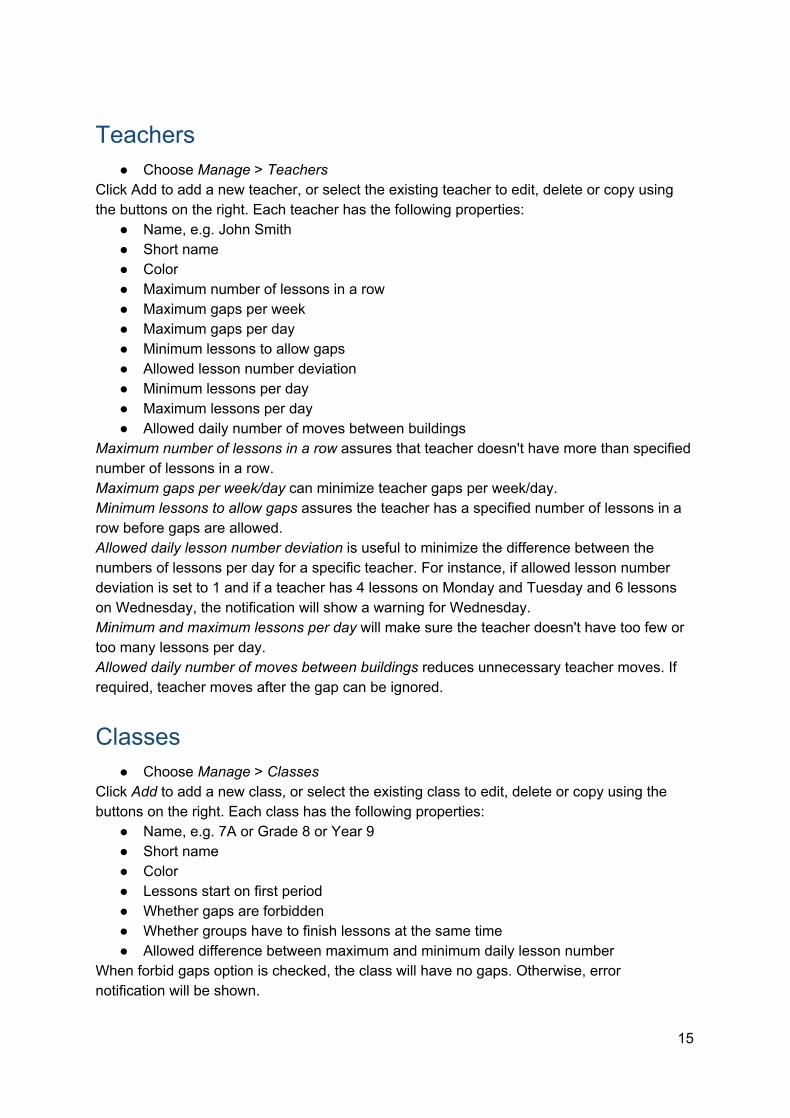
Master view In order to change the view click the view indicator (icon below the owl) and:
Click class icon to switch to the class master view Click teacher icon to switch to the teacher master view Click room icon to switch to the room master view Click subject icon to switch to the subject master view
Switching master view
The width of master, individual and extra views can be adjusted by dragging the vertical splitter which divides scheduled from unscheduled cards.
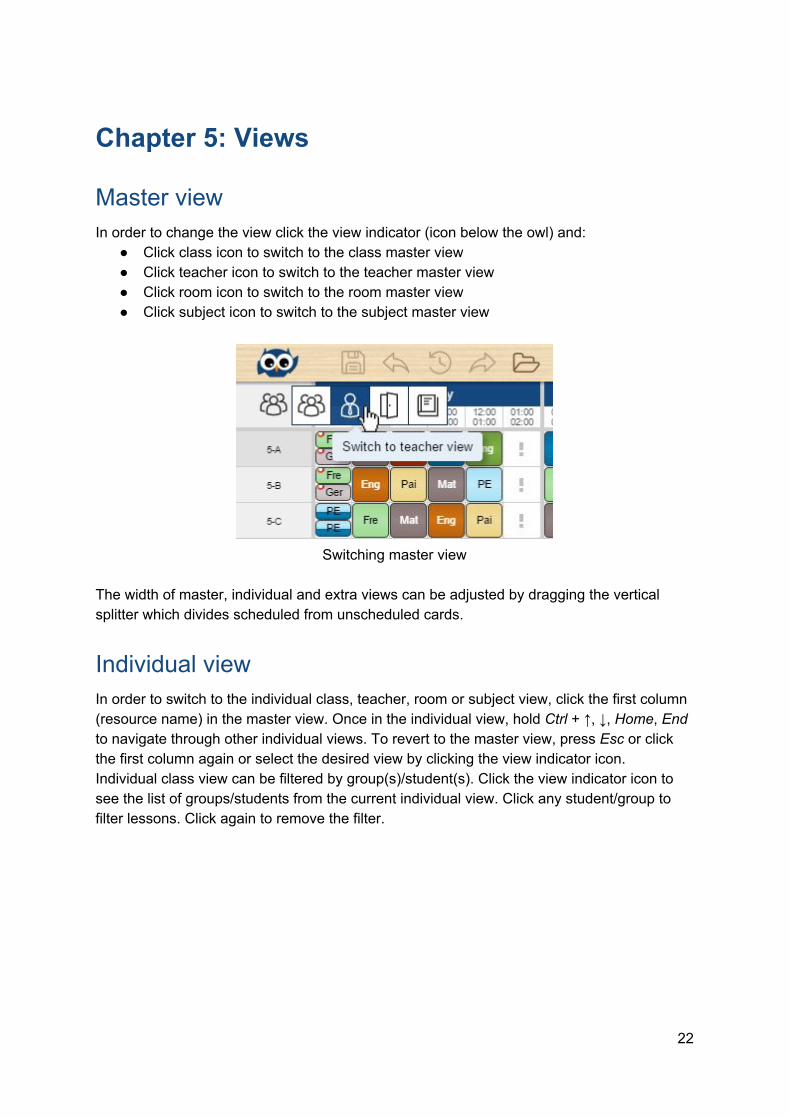
Individual view In order to switch to the individual class, teacher, room or subject view, click the first column (resource name) in the master view. Once in the individual view, hold Ctrl + ↑, ↓, Home, End to navigate through other individual views. To revert to the master view, press Esc or click the first column again or select the desired view by clicking the view indicator icon. Individual class view can be filtered by group(s)/student(s). Click the view indicator icon to see the list of groups/students from the current individual view. Click any student/group to filter lessons. Click again to remove the filter.
22
Filtering individual view by specific group (7X) and student (Diggs)
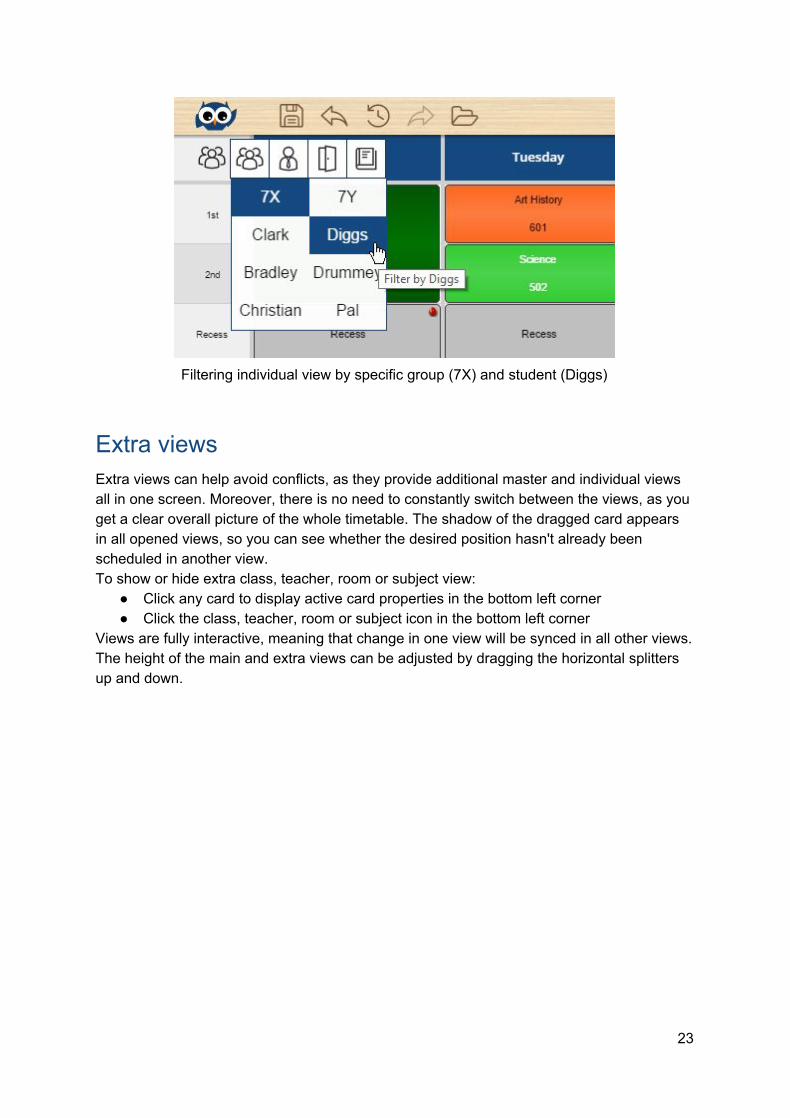
Extra views Extra views can help avoid conflicts, as they provide additional master and individual views all in one screen. Moreover, there is no need to constantly switch between the views, as you get a clear overall picture of the whole timetable. The shadow of the dragged card appears in all opened views, so you can see whether the desired position hasn't already been scheduled in another view. To show or hide extra class, teacher, room or subject view:
Click any card to display active card properties in the bottom left corner Click the class, teacher, room or subject icon in the bottom left corner
Views are fully interactive, meaning that change in one view will be synced in all other views. The height of the main and extra views can be adjusted by dragging the horizontal splitters up and down.
23
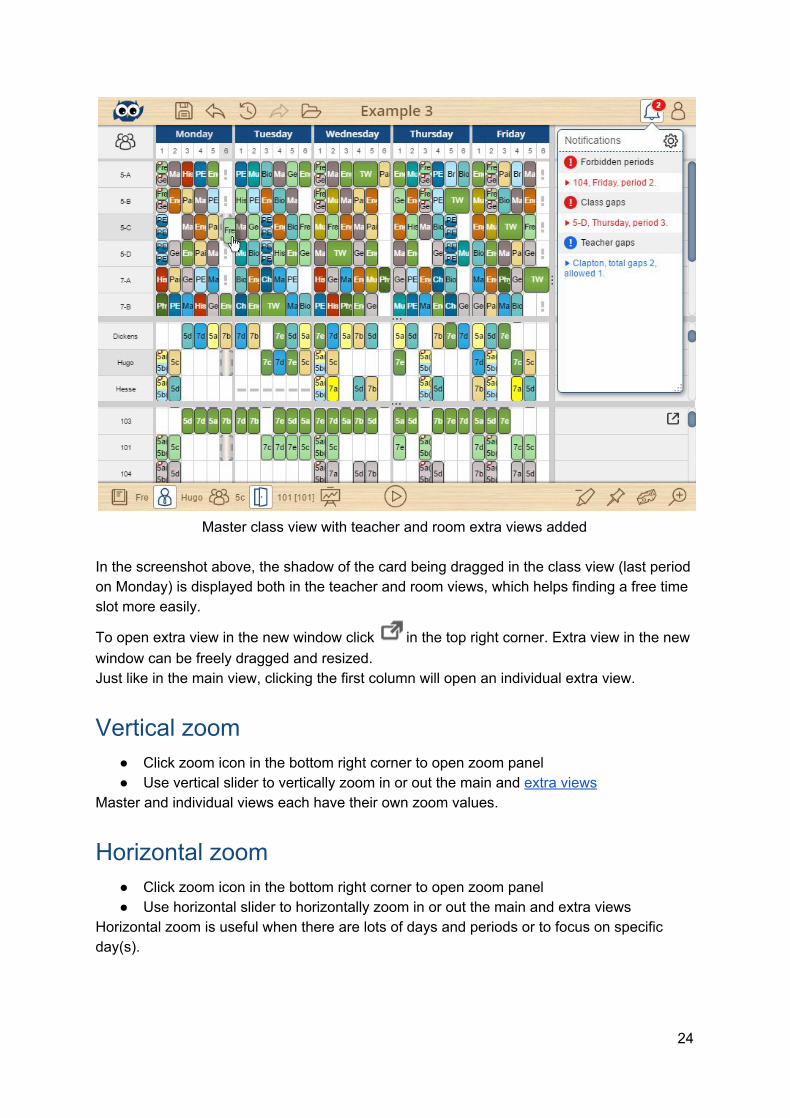
Master class view with teacher and room extra views added
In the screenshot above, the shadow of the card being dragged in the class view (last period on Monday) is displayed both in the teacher and room views, which helps finding a free time slot more easily.
To open extra view in the new window click in the top right corner. Extra view in the new window can be freely dragged and resized. Just like in the main view, clicking the first column will open an individual extra view.
Vertical zoom Click zoom icon in the bottom right corner to open zoom panel Use vertical slider to vertically zoom in or out the main and extra views
Master and individual views each have their own zoom values.
Horizontal zoom Click zoom icon in the bottom right corner to open zoom panel Use horizontal slider to horizontally zoom in or out the main and extra views
Horizontal zoom is useful when there are lots of days and periods or to focus on specific day(s).
24
Browser zoom Zooming in and out can also be done using the browser's zoom:
Hold Ctrl or Cmd key and press + to zoom in Hold Ctrl or Cmd key and press to zoom out Hold Ctrl or Cmd key and press 0 to reset zoom to default value Add Shift key for vertical or Alt key for horizontal zoom in the above keyboard
shortcuts
25

Chapter 6: Cards
Drag and drop Select card by clicking it with the left mouse button While keeping the left mouse button pressed, drag card to a new position Drop card by releasing the left mouse button
On touch devices use finger to drag cards. If there is already a card on the drop position, those conflicted cards will be slightly rotated. Clicking the bottom card in conflicted group will bring it to the front.
Select multiple cards Select multiple cards in order to perform bulk actions on more than one card, like multiple drag and drop, edit cards, clip, copy, pin/unpin, merge/split etc. using context menu. There are many ways to select multiple cards:
Click and drag the cursor across timetable. A rectangular marquee will appear, with one corner where you started dragging and the opposite corner where you stopped and all cards inside the marquee will be selected.
Hold Ctrl or Cmd key while clicking cards to add or remove cards from the selection Hold Ctrl or Cmd key while clicking day, period or resource name to (de)select the
whole day, period or resource cards Hold Shift while you click the last card that you want to include in the new selection.
The rectangular range between the active card and the card that you click becomes the new selection.
On touch device, hold card with one finger while tapping other cards, day, period or resource name with other fingers
Selecting multiple cards using rectangular marquee
26
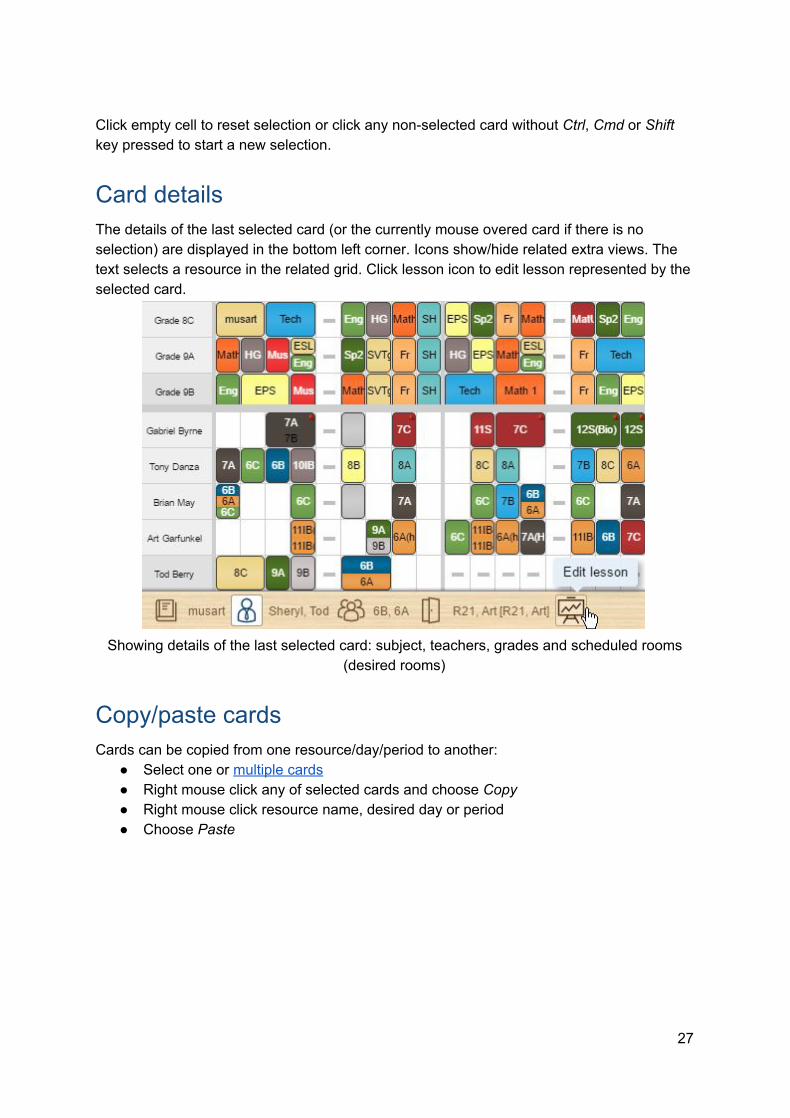
Click empty cell to reset selection or click any nonselected card without Ctrl, Cmd or Shift key pressed to start a new selection.
Card details The details of the last selected card (or the currently mouse overed card if there is no selection) are displayed in the bottom left corner. Icons show/hide related extra views. The text selects a resource in the related grid. Click lesson icon to edit lesson represented by the selected card.
Showing details of the last selected card: subject, teachers, grades and scheduled rooms
(desired rooms)
Copy/paste cards Cards can be copied from one resource/day/period to another:
Select one or multiple cards Right mouse click any of selected cards and choose Copy Right mouse click resource name, desired day or period Choose Paste
27

Right mouse click day (Tuesday in the screenshot) and choose Paste from the context menu
to copy the selected cards into the specific day
Edit cards Select multiple cards Right mouse click any of selected cards and choose Edit cards Change subject, teacher(s), class(es)/group(s), length, desired or alternative rooms Click Edit
Substitute teacher: Switch to teacher master view and hold Ctrl or Cmd key while clicking teacher name
to select all teacher's cards Right mouse click any of selected cards and choose Edit cards Choose different teacher Click Edit
Assign a homeroom to a teacher: Switch to teacher master view and hold Ctrl or Cmd key while clicking teacher name
to select all teacher's cards Right mouse click any of selected cards and choose Edit cards Choose desired room Click Edit
Add teacher assistant(s): Select multiple cards where teacher assistant(s) are needed Right mouse click any of selected cards and choose Edit cards Click "More..." button next to selected teacher. Note that current selected teachers
are displayed as "Current" Select teacher assistant(s), click Ok and then Edit
Remove cards
Click the and then click card(s)/day(s)/period(s)/resource(s) you want to remove from the timetable, or use right mouse click on any card/day/period/resource to choose Remove from the context menu. Removed card(s) will be placed outside the timetable, along with
28

other unscheduled cards. Click the top right corner with sponge selected to remove all cards from the timetable.
Delete cards Right mouse click unscheduled card(s) Choose Delete from the context menu
Another way to delete cards/lessons is via Manage > Lessons > Delete.
Merge cards Merge allows combining two or more cards into one, thus avoiding conflicts:
Right mouse click any conflicted/rotated card to open the context menu Choose Merge
Two or more cards can be merged into one if they are on the same position, have the same subject, length and rooms, but different teacher(s) and/or class(es)/group(s). In the class master view select multiple cards, right mouse click any selected card and choose Merge to merge two or more class cards into one.
Resolving the conflict on the first period for the room Sports Hall by right mouse clicking
"5d(girls) card" and choosing Merge. The merged card will be similar to "5c(girls)+5c(boys)" card on the right.
29

Split cards Split is the opposite of merge as it creates more cards out of the one when there is more than one group or teacher. For instance, if card has 2 teachers and 3 groups, 6 new cards will be created after split all with only one teacher and one group. In order to split card:
Select card(s) which have more than one teacher or group Use right mouse click on selected card(s) to open context menu Choose Split
Customize cards Right mouse click the card and choose Customize from the context menu or choose Print > Customize Cards to change background color, text and border for any master or individual timetable view. Background card color can be from the current class, teacher, room or subject or no background color at all. The text inside the cards can be any combination of class, teacher, room or subject names or their related short names. Selecting the card text from the list will add text to the card, while clicking the text in the enlarged card removes it. Card border can be set to: round, square, round (no border) and square (no border). All style changes are preserved and saved into the current timetable document as a timetable template.
30

Choosing text, background color and border for cards in the individual class view
When you create a new timetable document all style settings will be copied from previously opened so you don't have to tweak styles again.
31

Chapter 7: Constraints
Draw time constraints with markers Marker draws or erases forbidden, unwanted or mandatory card positions for classes, teachers, rooms and subjects. When a marker is selected, previously drawn marks will color (red, yellow and blue) while the cards fade away. To draw or erase marks click on any position in the timetable view or any day/period/resource with a selected marker. To drop the marker press Esc or click outside of the timetable. Markers can be used in any master, individual or extra view and notifications will be updated upon any change.
Forbidden (red minus), unwanted (yellow exclamation mark) and mandatory (blue plus)
marks in the master teacher view
Draw forbidden positions
Pick the red marker to draw/erase forbidden positions (displayed as red minus signs)
32

Clicking Lunch period with the red marker will forbid Lunch period for all classes
Draw unwanted positions
Pick the yellow marker to draw/erase unwanted positions (displayed as yellow exclamation marks)
Mouse over the first column (resource name) to open unwanted settings Set allowed number of unwanted lessons per week/day
If allowed number of unwanted lessons per week/day is set to Arbitrary which is a default value, unwanted positions will be completely ignored by the generator.
Draw mandatory positions
Pick the blue marker to draw/erase mandatory positions (displayed as blue plus signs)
Mouse over the first column (resource name) to open mandatory settings Set allowed number of missed mandatory lessons per week and per day
If allowed number of missed mandatory lessons is set to Arbitrary which is a default value, mandatory positions will be completely ignored by the generator.
33
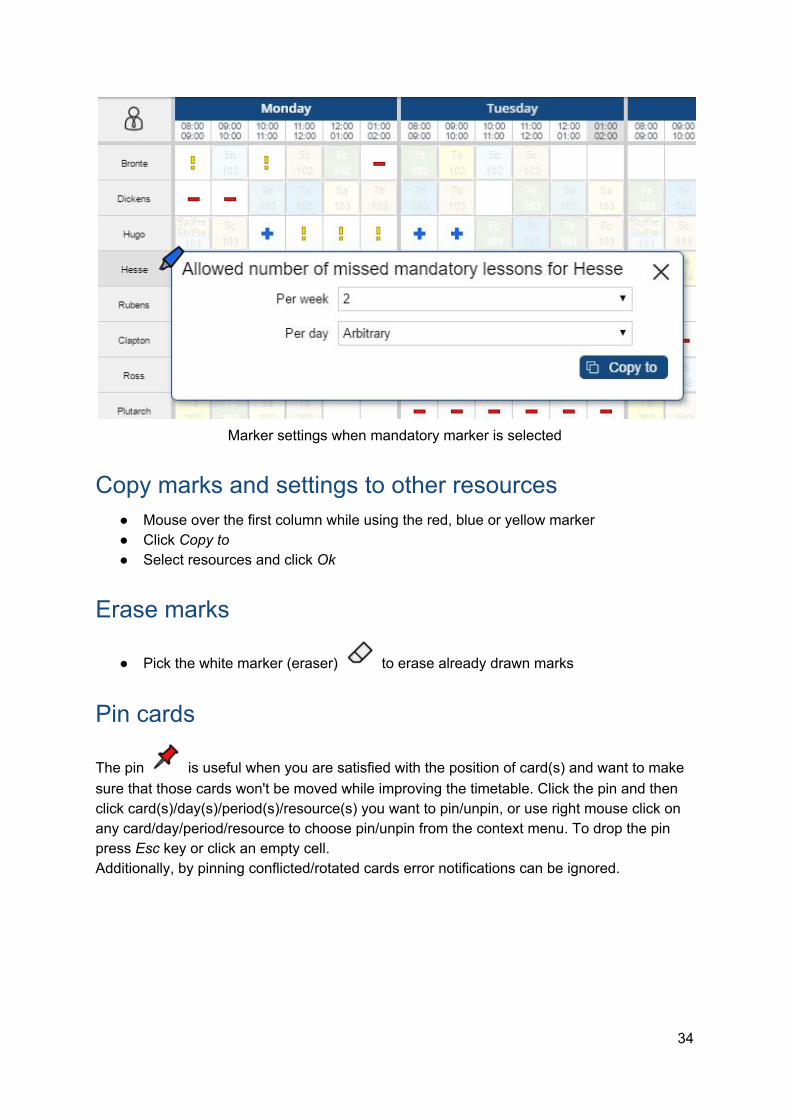
Marker settings when mandatory marker is selected
Copy marks and settings to other resources Mouse over the first column while using the red, blue or yellow marker Click Copy to Select resources and click Ok
Erase marks
Pick the white marker (eraser) to erase already drawn marks
Pin cards
The pin is useful when you are satisfied with the position of card(s) and want to make sure that those cards won't be moved while improving the timetable. Click the pin and then click card(s)/day(s)/period(s)/resource(s) you want to pin/unpin, or use right mouse click on any card/day/period/resource to choose pin/unpin from the context menu. To drop the pin press Esc key or click an empty cell. Additionally, by pinning conflicted/rotated cards error notifications can be ignored.
34
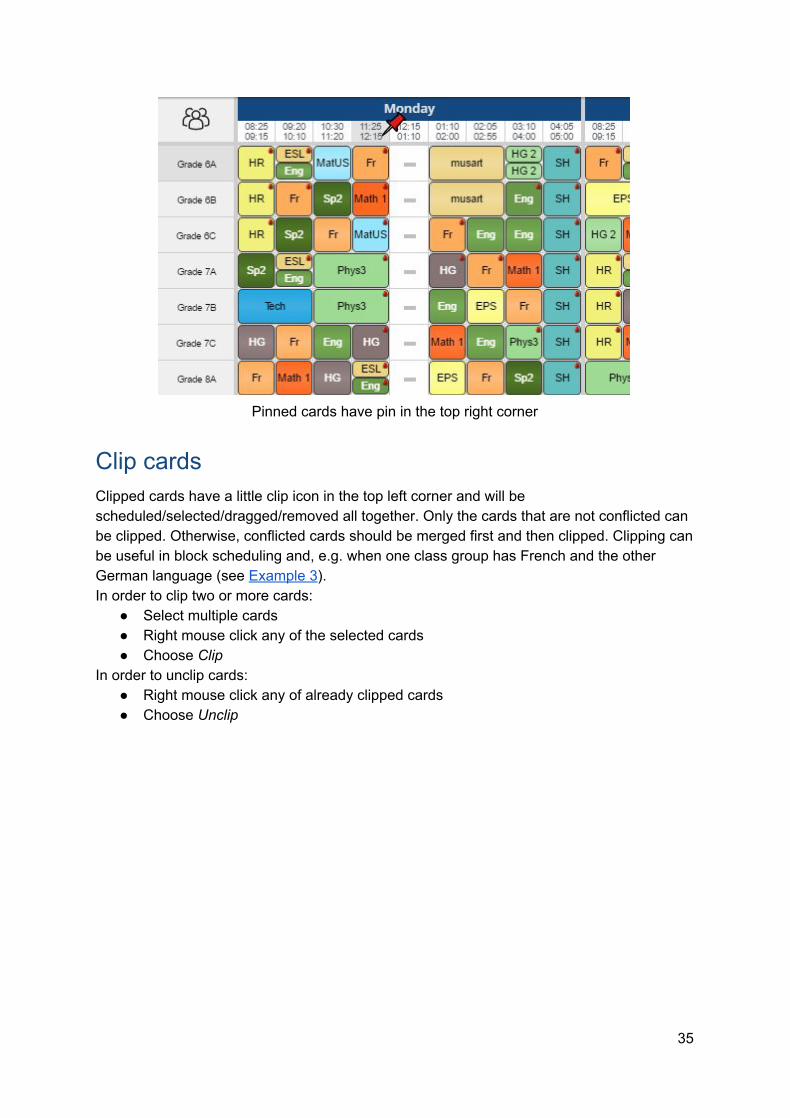
Pinned cards have pin in the top right corner
Clip cards Clipped cards have a little clip icon in the top left corner and will be scheduled/selected/dragged/removed all together. Only the cards that are not conflicted can be clipped. Otherwise, conflicted cards should be merged first and then clipped. Clipping can be useful in block scheduling and, e.g. when one class group has French and the other German language (see Example 3). In order to clip two or more cards:
Select multiple cards Right mouse click any of the selected cards Choose Clip
In order to unclip cards: Right mouse click any of already clipped cards Choose Unclip
35

Unclipping already clipped French and German groups
In order to add cards to existing clip relation:
Click any of already clipped cards which will select all other clipped cards Hold Ctrl or Cmd key to add additional cards to selection Right mouse click any of selected cards Choose Clip
In order to remove cards from existing clip relation unclip and then clip again or: Click any of already clipped cards which will select all other clipped cards Hold Ctrl or Cmd key to remove card from existing clip relation
36

Chapter 8: Generate
Improve timetable Click play icon to start improving the current timetable. The automatic generator will try to find the best solution by rearranging cards in order to solve all constraints and avoid any conflicts. Total generation progress is displayed in the window title as well as progress for specific categories: card conflicts, forbidden periods, class gaps, same day subjects, unwanted or mandatory periods, class and teacher warnings. During the generation process,pinned cards won't be moved.
Automatic timetable generation with teacher extra view and realtime notifications
Generator tips & tricks First generate a timetable with no constraints at all and then gradually add them. If
the timetable can't be generated even without constraints revise your entered data. The generator will always try to find a better solution no matter how hard the
constraints are. If there is no progress for a couple of seconds or so, stop the generator and revise constraints or data.
Always follow basic timetabling rule: One school resource during one period can be scheduled in only one lesson, otherwise, there is a conflict. If you need more
37

resources click "More..." button to add lessons with more than one group/class/teacher/room.
As long as there are cards scheduled on forbidden positions, card conflicts or class gaps, the generator will not be working on improving the rest of the timetable because of priorities.
Click bell icon to open notifications. Conflicts and other errors and warnings can be
ignored if needed. For example, if you pin conflicted/rotated cards with or mark
gap position as forbidden with , related notifications will disappear. Instead of pinning, a more convenient way to resolve conflicts is to merge cards: right
mouse click the rotated card and choose Merge from the card's context menu. When you clip two or more cards, they will always be scheduled on the same position.
All changes can be reverted by using undo and redo icons and there is also a history icon which lets you see all previous changes and undo one or more actions.
Improvement priorities Automatic generator is supposed to solve about thirty highly complex requirements. Since these are commonly conflicted and it is usually impossible to solve them all, priority levels have been introduced, which the generator manages in the following way: lower priority requirements will not be solved as long as there are unsolved higher priority requirements. The problem is that the generator is not always capable of detecting that some requirements cannot be satisfied and will keep trying to solve them at all costs, perpetually working without progress, leaving the rest of the timetable in poor state. That's why it is necessary to prepare quality data in order to help the generator do its best. Notifications are an irreplaceable tool for this task. However, some of the oversights made while entering data cannot be seen even in the notifications. The problem can be solved only if you abide by the following rules:
Do not expect an instantly perfect timetable, because it is impossible to know beforehand whether such timetable is even possible
At first, set moderate requirements and let the generator automatically create the timetable
Only when you manage to get a valid timetable should you gradually increase the requirements and start the automatic improvement again.
The generator recognizes three levels of priority, each consisting of a number of individual requirements:
1 Fatal error level This group includes:
cards scheduled on forbidden positions card conflicts class gaps
As long as any of these errors exist, the generator will not be working on improving the rest of the timetable. Here are some typical beginner mistakes that should be avoided at all costs:
38

A teacher/class has so many forbidden periods that some cards must be placed on a forbidden position
There are more lessons you want to put in a room or assign to a teacher than the total number of periods in the timetable
Too many forbidden positions for a specific lesson and related resources
2 Difficult warning level Difficult warning level includes only one item: a subject appears in some class timetables more than once a day. You should make sure to enter as many subjects as really taught in the school and choose the right subject for each lesson.
3 Warning level There are over twenty different warnings that will often appear in notifications. The generator will solve them only when all other errors and warnings have been solved.
39

Chapter 9: Validate
Notifications Notification number in the bell icon shows the total number of errors or warnings. The number is instantly updated along with all notifications upon any change. The bell icon shows or hides the notification list. The notification list can be dragged and resized to best suite your device screen.
Bell icon shows current errors and warnings.
A flashing red cell on Friday, period 8 for the Grade 6B indicates the gap problem.
The timetable is valid if there are no notifications, which means that all entered requirements and constraints have been resolved. The red notification indicates that the timetable has a fatal error which needs to be fixed, whereas the blue one represents a warning. When red or blue notifications are clicked, related flashing cells will appear in the view, making it easy to spot the problem.
Resolve notifications In some cases there might be exceptions to the rules, e.g. two or more cards might be purposely scheduled at the same position causing a conflict, or a class gap should be allowed only for lunch (otherwise gaps are forbidden), or unscheduled card(s) should be ignored, etc. These exceptions will appear on notification list and must be resolved first at all
40

costs, before the automatic generator can move towards solving other constraints and conflicts.
Resolve conflict exceptions Conflicts should be resolved by merging cards. If merging is not possible or desired (e.g. conflicted cards have different subject, room(s) or length), pin conflicted/rotated cards using
the and related notifications will be removed.
Resolve gap exceptions
Mark a gap as forbidden using the and related notifications will be removed.
Resolve subject exceptions The notification "subject appears more than once in a day" can be resolved by checking Manage > Subjects > Select specific subject > Edit > Allow subject to be taught more than once per day.
Resolve missing groups The notification "missing groups in the class" can be resolved by unchecking Manage > Classes > Select specific class > Edit > Forbid gaps.
Resolve unscheduled cards The notification "unscheduled cards" can be resolved by pinning unscheduled cards. The generator will ignore pinned unscheduled cards.
Exclude resources To exclude specific subject, room, teacher or class from notifications and improvement process:
Set "" (minus without quotes) as a short name for the item you want to exclude Check Owl > Options > Exclude items with short name set to ""
For instance, set short name to "" for Lunch (subject) and Gym (room) and all errors and warnings related to Lunch and Gym will be completely ignored and won't be automatically improved.
41
Chapter 10: Print
Print timetable In order to print the current master or individual timetable:
Choose Print > Print Timetable Click title or year to edit Choose paper size, orientation, color and margins Click Print
Paper size, orientation, color and margins should match adequate printer settings. Timetable will be stretched to fit paper width. If the master timetable doesn't fit paper height it will be automatically split into several pages. Chrome browser have builtin print preview so you can make sure that everything is fine before printing. Use vertical zoom in/out to increase or decrease row height. Color printers don't print card's background color by default. Here is how to set printing web page background colors and images. The recommended approach is to choose landscape paper orientation while printing master timetable. For more info read how to set landscape orientation on Mac OS or set landscape orientation on Windows. In order to set landscape paper orientation as a default on Mac OS:
Open Page Setup Change page orientation to landscape Choose "Save As Default" from the "Settings: Page Attributes" menu selection
Print individual timetables In order to print all individual timetables:
Switch to desired class, teacher, room or subject master view Choose Print > Print Individuals Click title or year to edit Choose paper size, orientation, color and margins Click Print
Software will go through all individual timetables in the current master view and print them on separate pages. Paper size, orientation, color and margins should match adequate printer settings. The recommended approach is to choose portrait paper orientation while printing. If there are many periods use zoom out to decrease row height in order to fit the printed page. Otherwise, if there are too few periods, use zoom in to increase row height.
42
Chapter 11: Share
Share with others Choose Share > Share with others to manage people who have access to school timetables. The following roles are available:
Owner Creator Viewer
The owner is a person who created the school account and has the highest privileges. The owner can add or delete other owners, creators or viewers. The creator can create and change timetables but can't manage, add or delete other people who have access. The viewer can only view timetables and is not allowed to move cards or save changes.
Timetable collaboration Timetablers can collaborate on the same timetable and at the same time. All saved changes will be synchronized and merged across any device you or your colleagues might be using. In the edge case when merging is not possible, e.g. timetablers have made different changes to the same resource at the same time and saved changes, the software uses "last save wins" concurrency model.
Publish to the Web A teacher, class/group or student can have direct access to their timetable simply by bookmarking the web page which shows it. The published web page is accessible from any device, including phones and tablets, and is automatically updated when the timetable is saved. Furthermore, the page will automatically refresh within minutes to make sure the latest timetable changes have been delivered to all. In order to publish a timetable and share it with others:
Choose Share > Publish to the Web Click Publish to the Web
To stop publishing: Choose Share > Publish to the Web Click Unpublish
Customize published timetable Choose Share > Publish to the Web to customize the published timetable:
Choose initially displayed master view Choose a desired timetable skin Choose time format: name or period number, 12hour and 24hour clock Check whether switching view is allowed
43

When done, copy and share the provided link or visit the published web page. The size of cards in the published page can be adjusted based on parameters in the link. For instance, this is the published page for Example 3 where cards are vertically zoomed in by 150% in both master and individual views. Rotation of conflicts in the published page can be disabled by adding rotate=0 to the url.
Share on Social Networks Choose Share > Social Networks If timetable is not published, click Publish to the Web and customize it by choosing
skin, period format, etc. Click Facebook, Twitter or Google+ icon to share timetable on Facebook, Twitter or
Google+
Add timetable to the school website Choose Share > Embed Timetable If timetable is not published, click Publish to the Web and customize it by choosing
skin, period format, etc. Copy generated Html code and paste it into your website. Optionally, adjust Html code to suite your website, e.g. change background color,
size and similar.
44
Chapter 12: Export
Export data to Excel/Sheets In the plugin app open desired data grid Make a selection Press Ctrl or Cmd+C (copy keyboard shortcut) Click on Microsoft Word/Excel or Google Docs/Sheets document and press Ctrl or
Cmd+V (paste keyboard shortcut)
Save as local file Choose Save as > Local File
Timetable will be downloaded to your disc as an JSON file which can be opened later.
Save as Html spreadsheet(s) In order to export timetable(s) to the spreadsheet app:
Choose Save as > Html Spreadsheet(s) Choose current timetable view or all related individual timetables and click Download Open downloaded html document and select the desired timetable(s) with the mouse Right mouse click selection and choose Copy Switch to Microsoft Excel or Google Sheets and right mouse click cell and choose
Paste
Save as CSV file Choose Save as > CSV file Choose folder where you want to save CSV file Click Save
The columns in the exported CSV file are: lesson number, class short name, teacher short name, subject short name, room(s) short name, day of the week and hour of the day. CSV file follows Smartschool specification.
Save as PDF Any master or individual view can be saved as PDF. Export to PDF is builtin on Mac while printing. On Windows you need to install a PDF printer. There is also an option to export the published web page to PDF using various free online tools. For instance, if your url to published timetable is this one: http://www.primetimetable.com/publish/?id=69e5bf8d74a54984b9a003d59c806a7d you can copy published url and paste it on this web site http://pdfcrowd.com and it will convert the web page to PDF for free.
45

Save as image To export current timetable view as an image:
In the plugin app choose Save as > Jpeg Document Browse to local folder where image will be saved Enter the name of image file Click Save
Save as Xml In the plugin app choose Save as > Xml Document Browse to your local folder where file will be saved Enter the name of Xml file Click Save
46

Chapter 13: Options
Application options Choose Owl > Options to customize the following application options:
Skin Choose blue (default), green, red, violet, orange, pink, cyan, brown, gray or dark skin.
Save reminder Set save reminder interval. Default value is 20 minutes.
Default view Selected master view will be displayed when application starts.
Time format Choose name or period number, 12hour and 24hour clock for displaying period intervals.
Preferred app Choose between web and plugin app. The web app is recommended choice since it works everywhere and has more features. The plugin app can be used for older browsers and as desktop application on Mac and PC.
Rotate conflicted cards Set whether or not conflicted cards should be rotated. This option is checked by default.
Show notification number Set whether notification number in the top right corner should be shown or hidden.
Ignore items with short name set to "" Any subject, room, teacher or class with short name set to "" will be completely excluded from notifications and timetable improvement process if this option is checked. For instance, set short name to "" (minus without quotes) to Lunch subject or Gym room and all related notifications will be instantly removed.
Install Prime Timetable (plugin app only) Click install Prime Timetable button to install software on your computer. You will get the newly installed program in Program Files and a new desktop icon. Starting Prime Timetable
47

from your desktop allows you to access your timetables whenever you want with or without Internet connection.
Keyboard shortcuts Key combination Action Key combination Action
Ctrl+O Open timetable Ctrl+S Save changes
Ctrl+Z Undo Ctrl+Y Redo
Esc Close window, drop marker/pin/sponge, revert from individual/print view
F11 Toggle browser between fullscreen and regular view
Ctrl+1,2,3,4 Switch to class, teacher, room or subject master view
Ctrl+Alt+1,2,3,4 Show/hide class, teacher, room or subject extra view
Ctrl+↑,↓,Home,End Navigate through other individual views
Ctrl+D Opens data window
← → Switch to left/right tab ↑ ↓ Select previous/next item
Home End Go to first/last item Type first letters Find and select item in the grid
+ Add new item Enter Edit selected item
Backspace or Delete
Delete selected items Ctrl + click Multi selection of cards/items
Shift + click Range selection of cards/items
Ctrl+A Select all items
Ctrl+C Copy selected cards to clipboard
Ctrl+V Paste items from clipboard into grid
Ctrl+M Pick/drop marker Ctrl+. Pick/drop pin
Ctrl+Backspace Remove/delete selected cards
Ctrl+N Show/hide notifications
Ctrl+Space Improve timetable Ctrl+Shift+Space Generate timetable from scratch
48

Ctrl+P Print timetable Ctrl+Shift+P Print individual timetables
Ctrl+Alt+P Publish to the Web Ctrl+U My profile
Ctrl+Alt+O Application options F1 User guide
49
Chapter 14: Troubleshooting
Resolve common issues
I am not allowed to save changes Make sure that you are logged in first. Your account might have expired and you need to update it. Check your license by
choosing Owl > Help > About.
My account is locked and I am not allowed to log in You have entered a wrong email while signing up. Provide us your valid email so you
can continue working. Your account might have been locked due to expiration and you need to update it. You are abusing our terms of service, e.g. creating more than one free account.
I have some other issue Save changes first. Save your schedule as a local file to create a backup on your device. Force refresh in your browser, e.g. Ctrl + F5 so that app can load properly. If your issue is not resolved, contact us and we will get back to you as soon as
possible.
50