process guide | version 7 | january 2008ims.uthscsa.edu/technology_support/guides/admin... ·...
TRANSCRIPT
DCATS 210-567-0180
Information Management Client Support Services
Process Guide | Version 7 | January 2008
PeopleSoft Process Guide HRMS Administrative Mailbox
Page 2 of 34
Administrative Mailboxes
Introduction & Objectives
UTHSCSA is utilizing a portion of the PeopleSoft system known as workflow. Workflow is a PeopleSoft tool that allows us to enhance our business processes. An important part of our approach involves the sending of an “FYI confirmation email” following the review of a personnel transaction by Human Resources.
These “FYI confirmation emails” serve to notify departments and their Executive Committee level offices that the Human Resources and Payroll offices have completed their respective duties with regard to a personnel action. These emails will be sent to an administrative mailbox in each department. The departmental ACE will function as the owner of the mailbox and will need to use MicroSoft Outlook to administer these administrative mailboxes.
The objective of this material is to discuss how the ACE might configure the department's administrative mailbox and also to suggest an approach for how to use it. The ACE is the intended audience for this document; however, the ACE may need to enlist the support of his/her departmental Technical Support Representative (TSR) to complete the setup and configuration steps discussed in this document.
Key Points Upon completion of this topic you will be able to administer your administrative mailbox by configuring it to support your department's processes for review of personnel transactions.
PeopleSoft Process Guide HRMS Administrative Mailbox
Page 3 of 34
Table of Contents
Administrative Mailboxes..................................................................................................... 2 A Suggested Approach for Utilizing the Administrative Mailbox .......................................... 4 Separation of Duties ......................................................................................... 5 Overview of the Administrative Mailbox Setup.................................................. 5
How to Add the Administrative Mailbox Using Outlook........................................................ 6 How to Add the Administrative Mailbox Using Office XP or Office 2003.............................. 9 How to Add the Administrative Mailbox Using Office 2007................................................ 14 How to Add the Administrative Mailbox Using a Macintosh Computer .............................. 19 How to Remove an Email Account................................................................................... 24 How to Create Folders....................................................................................................... 25 How to Grant Access to the Mailbox and its Folders ......................................................... 28 How Others Add the Administrative Mailbox ..................................................................... 34
PeopleSoft Process Guide HRMS Administrative Mailbox
Page 4 of 34
A Suggested Approach for Utilizing the Administrative Mailbox
Most of the PeopleSoft workflows generate email at the conclusion of the workflow. This email is sent to Backoffice departments, such as Human Resources and Payroll, informing them of the department's personnel transaction. The Backoffice departments then review the transaction and complete their actions with regard to it. At this point, an "FYI confirmation email" is generated and sent to the department which originated the personnel transaction. Email is also sent to the department which is one level higher in the organizational reporting structure. Generally, this will be an Executive Committee level department.
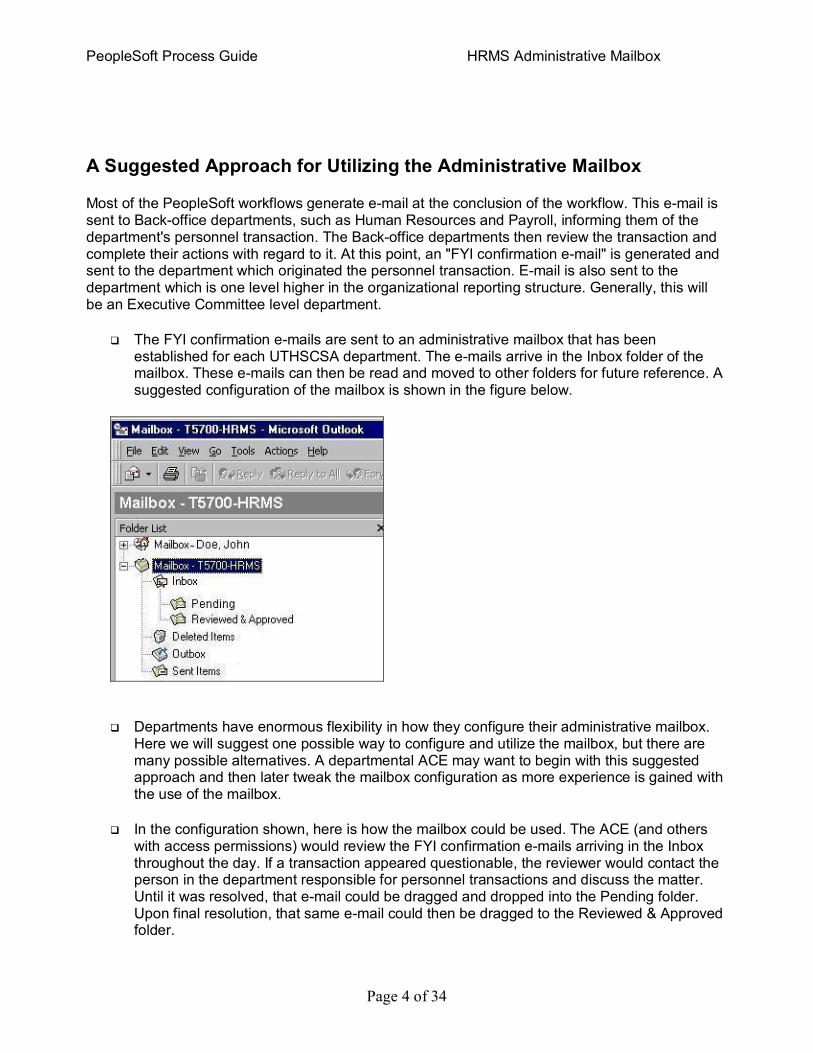
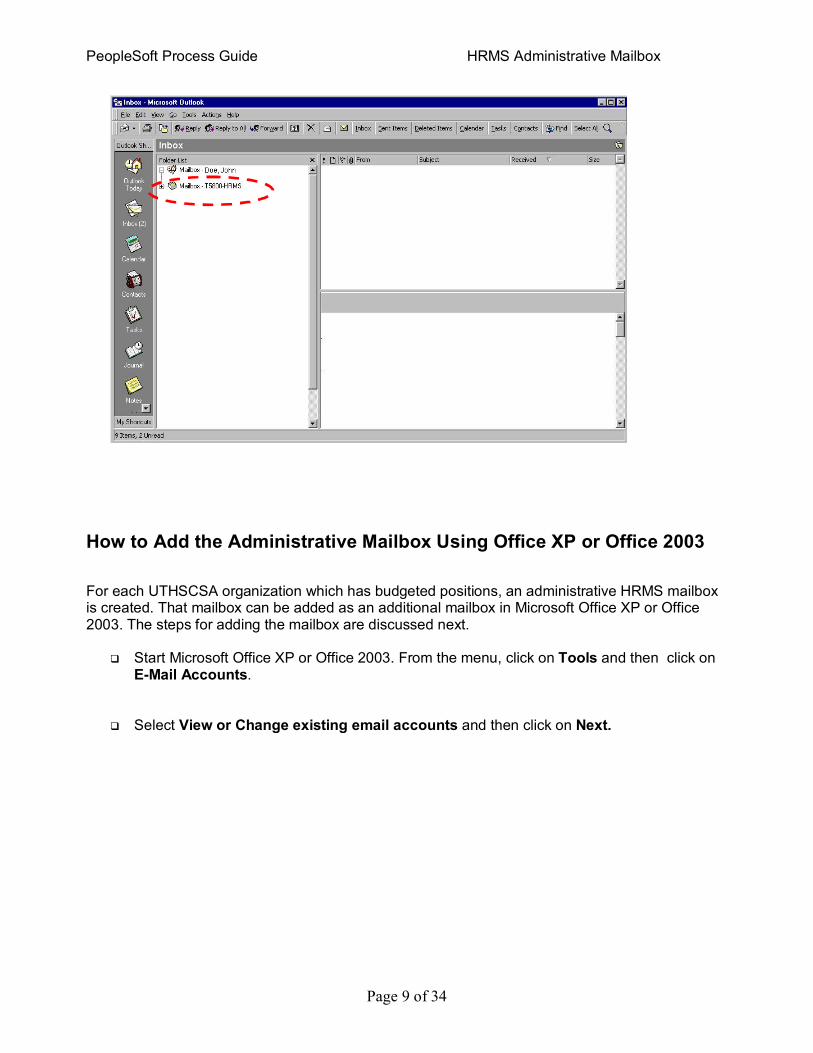
q The FYI confirmation emails are sent to an administrative mailbox that has been established for each UTHSCSA department. The emails arrive in the Inbox folder of the mailbox. These emails can then be read and moved to other folders for future reference. A suggested configuration of the mailbox is shown in the figure below.
q Departments have enormous flexibility in how they configure their administrative mailbox. Here we will suggest one possible way to configure and utilize the mailbox, but there are many possible alternatives. A departmental ACE may want to begin with this suggested approach and then later tweak the mailbox configuration as more experience is gained with the use of the mailbox.
q In the configuration shown, here is how the mailbox could be used. The ACE (and others with access permissions) would review the FYI confirmation emails arriving in the Inbox throughout the day. If a transaction appeared questionable, the reviewer would contact the person in the department responsible for personnel transactions and discuss the matter. Until it was resolved, that email could be dragged and dropped into the Pending folder. Upon final resolution, that same email could then be dragged to the Reviewed & Approved folder.
PeopleSoft Process Guide HRMS Administrative Mailbox
Page 5 of 34
q From time to time, emails occupying the Reviewed & Approved folder can be deleted. Since these email messages are text only, and therefore occupy very little disk space, a department might choose to delete only those email messages more than one year old.
q From this example, an ACE might see other possibilities. For example, the Reviewed & Approved folder might contain subfolders by month, or by employee type (classified, A&P, faculty). As mentioned earlier, the possibilities for configuring the administrative mailbox are considerable.
Note: The administrative mailbox is a shared mailbox. All persons who have access to the mailbox see the exact same set of messages. Therefore, if one person with access to the mailbox deletes a message—for example from the Inbox—then that message is no longer viewable from the Inbox by any users. At that point, the deleted message is moved to the Deleted Items folder where only the ACE and those persons with access to the Deleted Items folder may retrieve the message.
Separation of Duties
It is recommended that the person who reviews the FYI confirmation emails be someone other than the person who enters the personnel transactions in PeopleSoft. This separation of duties is advisable not only to minimize the chance of fraud, but also to increase the chance of discovering errors and unintentional mistakes.
q Even though Human Resources will review the personnel transaction, certain aspects of it will not be called into question by their review. For example, the project id the department uses to pay someone is not part of Human Resources' review.
Overview of the Administrative Mailbox Setup
Before you can begin using the administrative mailbox, you must have Microsoft Outlook. Different versions of Outlook can be used. If you do not know how to install Outlook or if you need Outlook installed, contact your TSR or call Triage at (210) 5672069.
q Please note, to use Outlook, you will need to request that Computing Resources create an Exchange Server account first before you can begin using Outlook. Once your Exchange Server account is created, all of your email will be routed to your Exchange Server account.
PeopleSoft Process Guide HRMS Administrative Mailbox
Page 6 of 34
Once Microsoft Outlook is installed, you will complete the following basic steps to create and configure your administrative mailbox. Each of these steps is explained in more detail in this guide.
1. Add the administrative mailbox. 2. Create optional folders. 3. Grant permissions to others to access the mailbox and its folders. 4. Those granted access must add the administrative mailbox to their Outlook installation.
How to Add the Administrative Mailbox Using Outlook
For each UTHSCSA organization which has budgeted positions, an administrative HRMS mailbox is created. That mailbox can be added as an additional mailbox in Microsoft Outlook. The steps for adding the mailbox are discussed next.
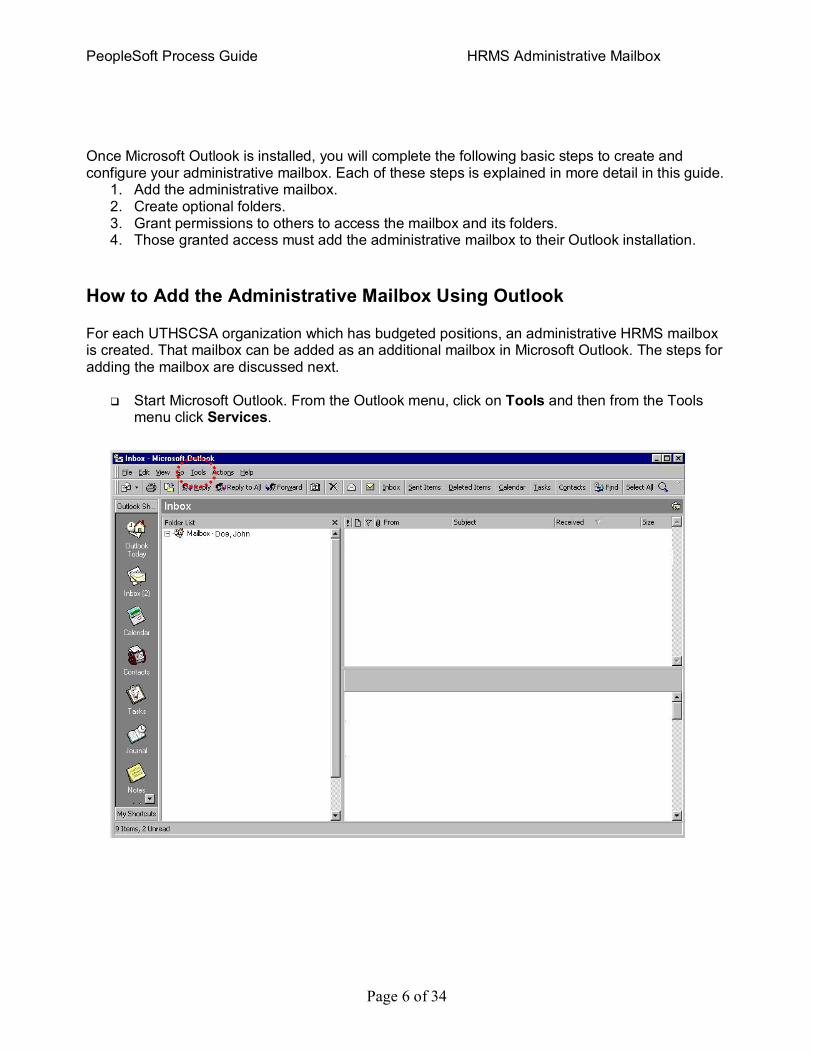
q Start Microsoft Outlook. From the Outlook menu, click on Tools and then from the Tools menu click Services.
PeopleSoft Process Guide HRMS Administrative Mailbox
Page 7 of 34
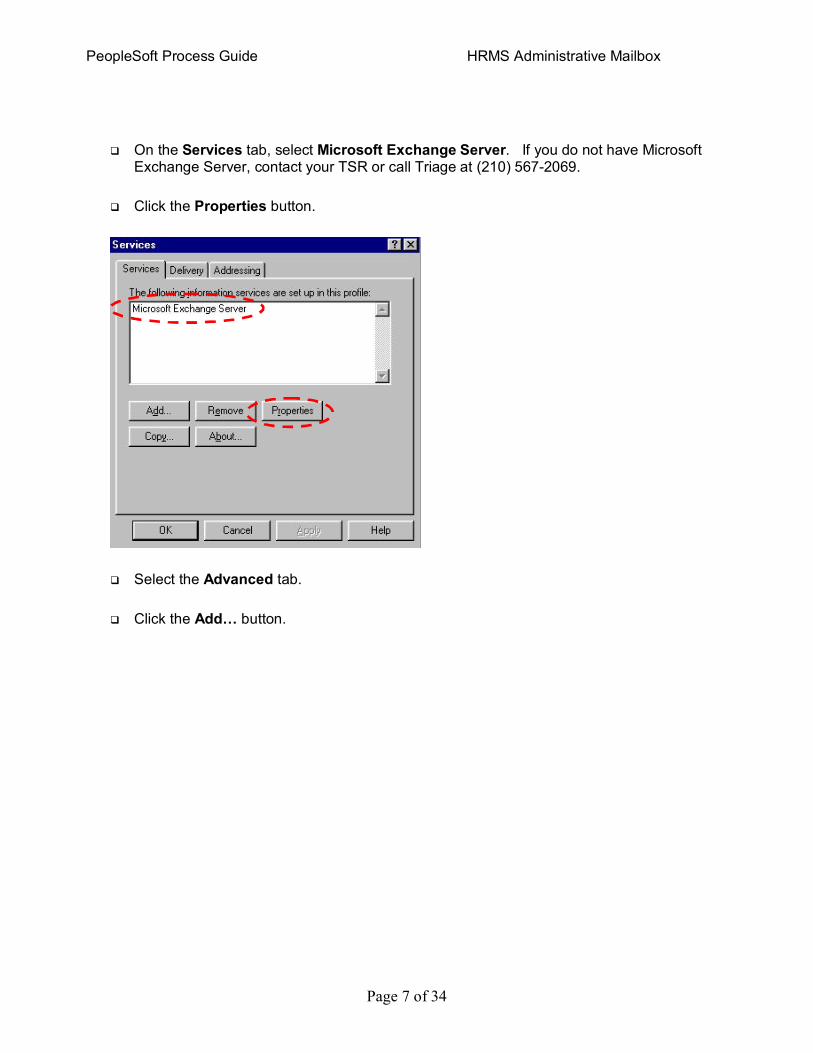
q On the Services tab, select Microsoft Exchange Server. If you do not have Microsoft Exchange Server, contact your TSR or call Triage at (210) 5672069.
q Click the Properties button.
q Select the Advanced tab.
q Click the Add… button.
PeopleSoft Process Guide HRMS Administrative Mailbox
Page 8 of 34
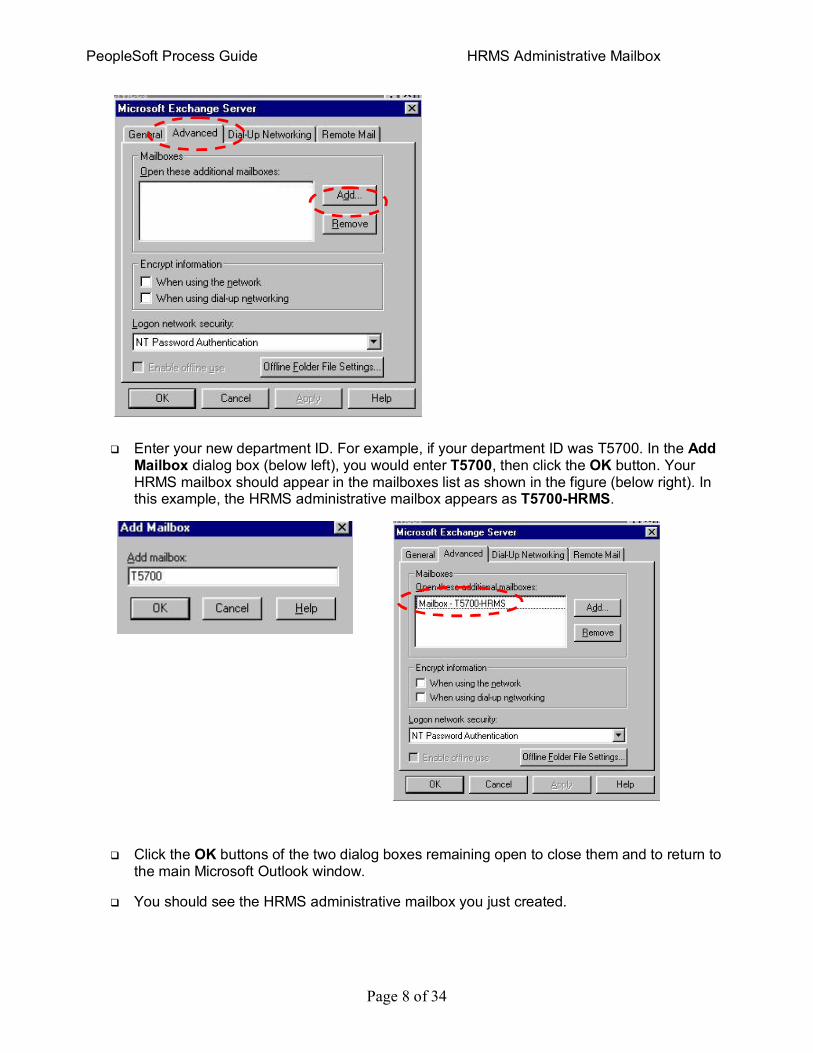
q Enter your new department ID. For example, if your department ID was T5700. In the Add Mailbox dialog box (below left), you would enter T5700, then click the OK button. Your HRMS mailbox should appear in the mailboxes list as shown in the figure (below right). In this example, the HRMS administrative mailbox appears as T5700HRMS.
q Click the OK buttons of the two dialog boxes remaining open to close them and to return to the main Microsoft Outlook window.
q You should see the HRMS administrative mailbox you just created.
PeopleSoft Process Guide HRMS Administrative Mailbox
Page 9 of 34
How to Add the Administrative Mailbox Using Office XP or Office 2003
For each UTHSCSA organization which has budgeted positions, an administrative HRMS mailbox is created. That mailbox can be added as an additional mailbox in Microsoft Office XP or Office 2003. The steps for adding the mailbox are discussed next.
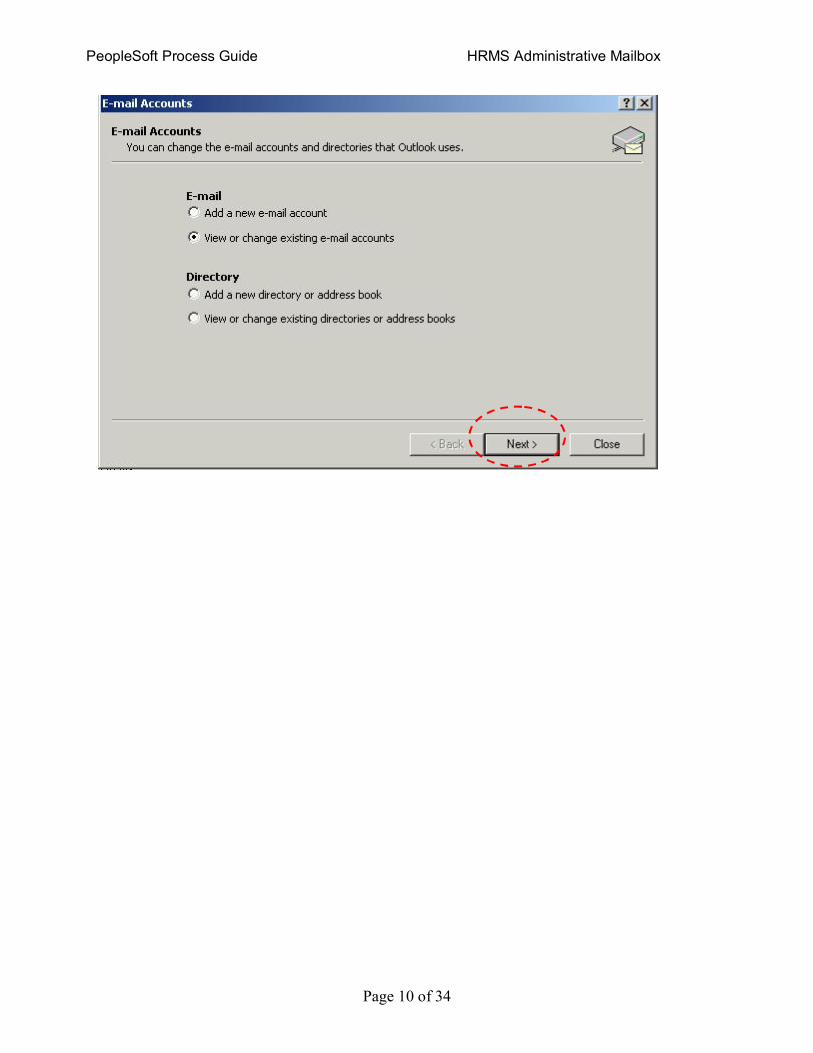
q Start Microsoft Office XP or Office 2003. From the menu, click on Tools and then click on EMail Accounts.
q Select View or Change existing email accounts and then click on Next.
PeopleSoft Process Guide HRMS Administrative Mailbox
Page 10 of 34
q
PeopleSoft Process Guide HRMS Administrative Mailbox
Page 11 of 34
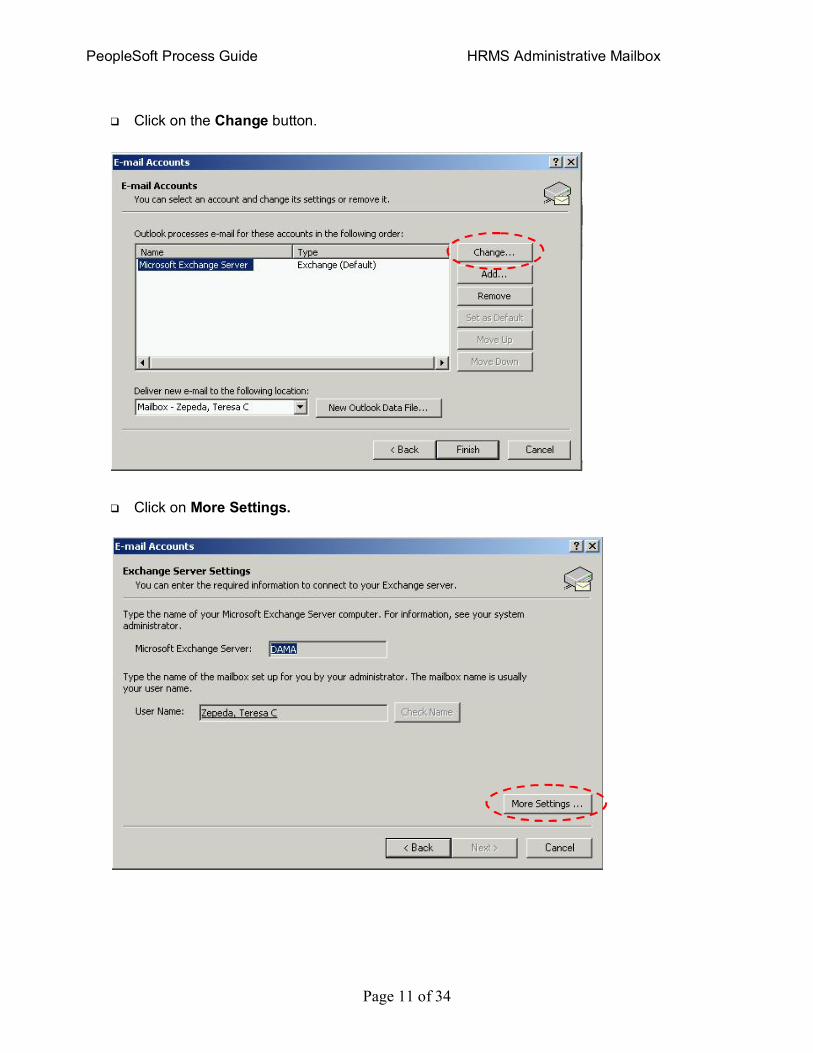
q Click on the Change button.
q Click on More Settings.
PeopleSoft Process Guide HRMS Administrative Mailbox
Page 12 of 34
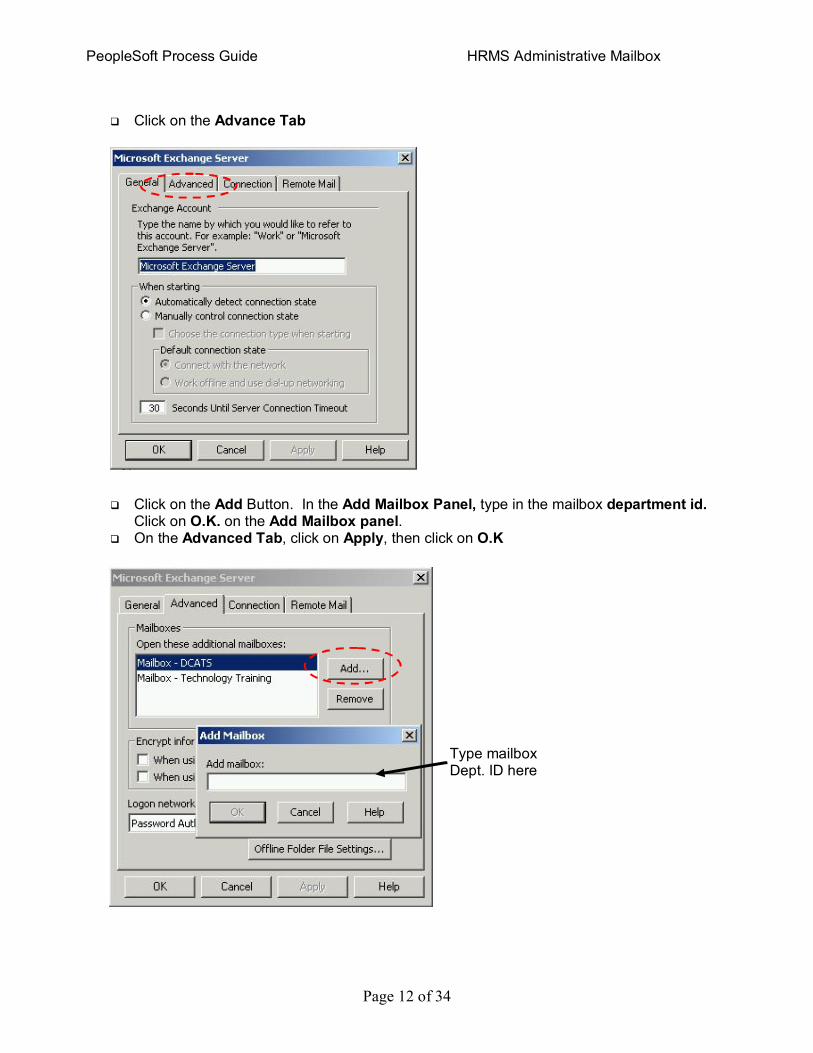
q Click on the Advance Tab
q Click on the Add Button. In the Add Mailbox Panel, type in the mailbox department id. Click on O.K. on the Add Mailbox panel.
q On the Advanced Tab, click on Apply, then click on O.K
Type mailbox Dept. ID here
PeopleSoft Process Guide HRMS Administrative Mailbox
Page 13 of 34
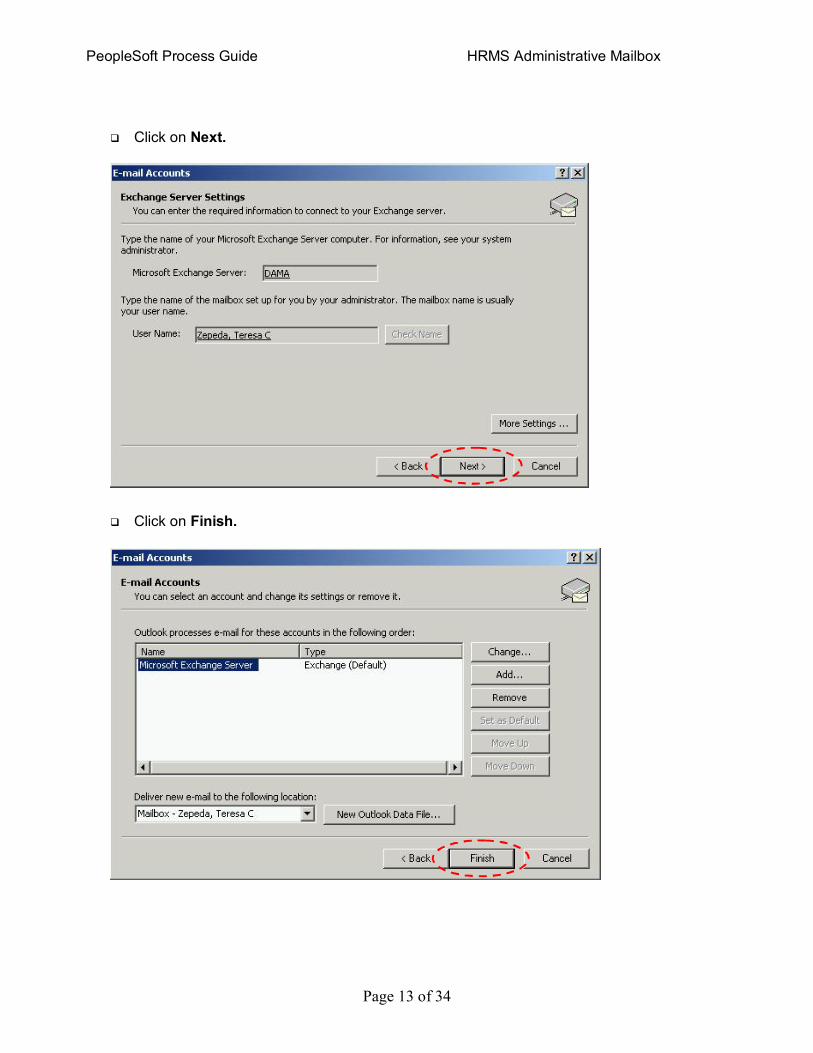
q Click on Next.
q Click on Finish.
PeopleSoft Process Guide HRMS Administrative Mailbox
Page 14 of 34
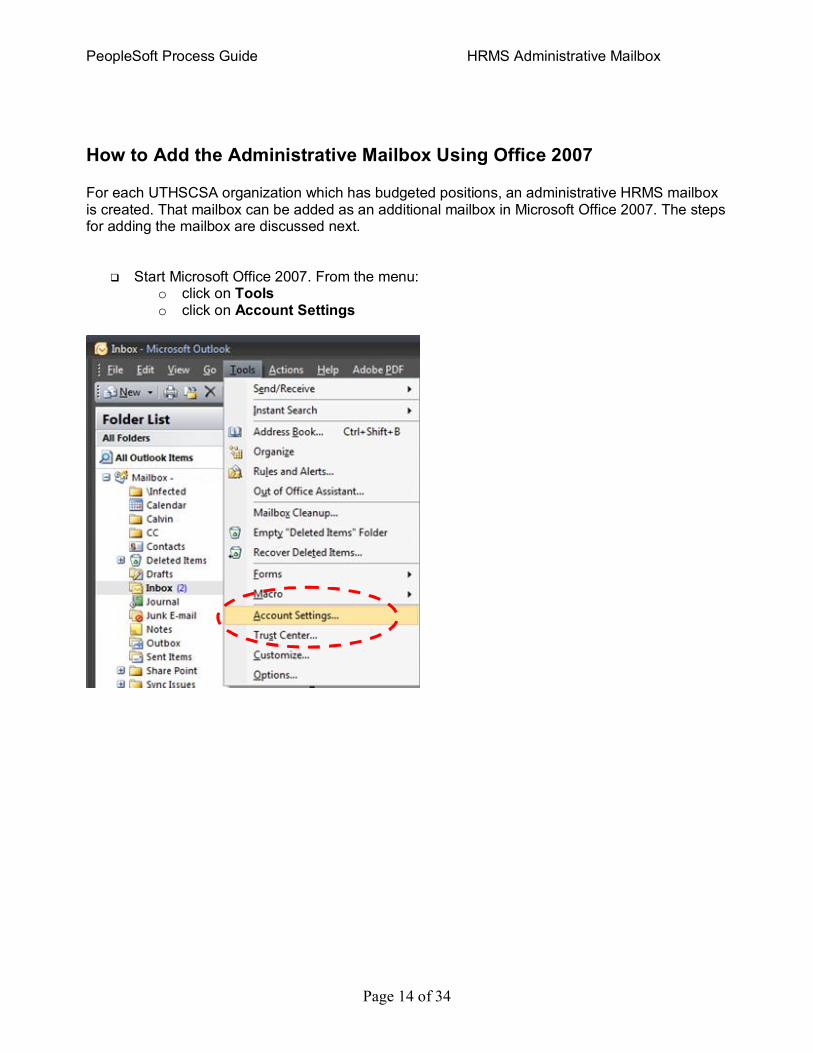
How to Add the Administrative Mailbox Using Office 2007
For each UTHSCSA organization which has budgeted positions, an administrative HRMS mailbox is created. That mailbox can be added as an additional mailbox in Microsoft Office 2007. The steps for adding the mailbox are discussed next.
q Start Microsoft Office 2007. From the menu: o click on Tools o click on Account Settings
PeopleSoft Process Guide HRMS Administrative Mailbox
Page 15 of 34
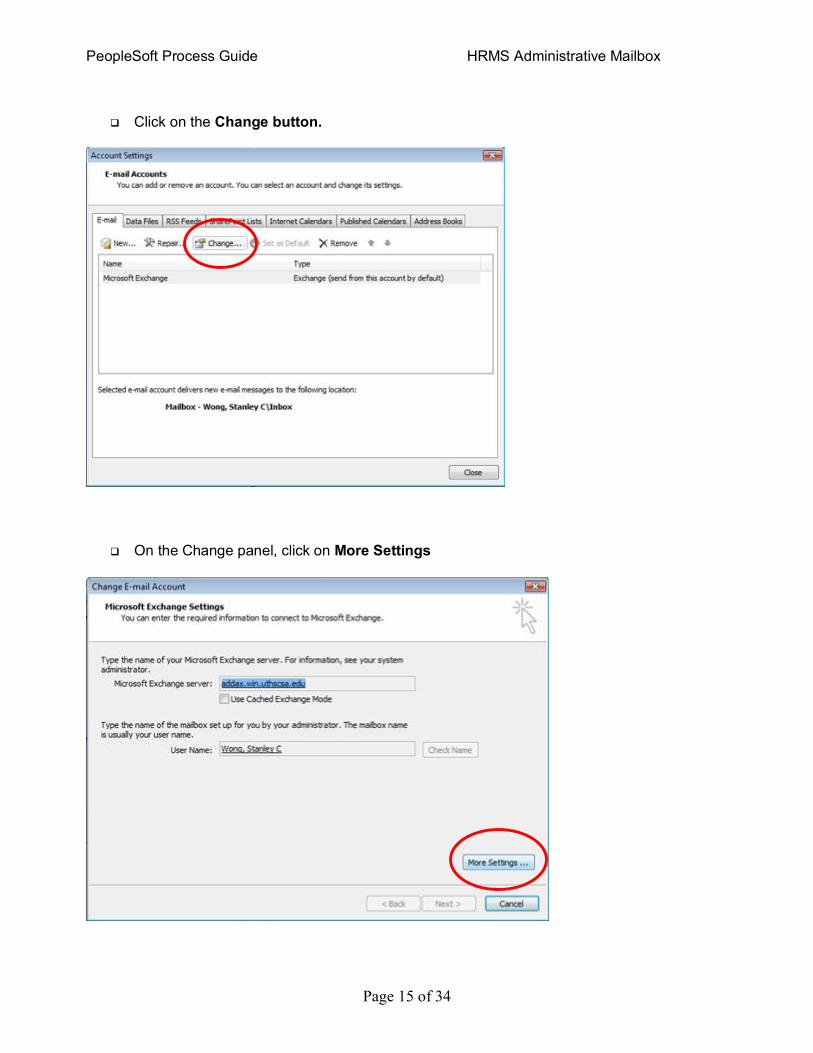
q Click on the Change button.
q On the Change panel, click on More Settings
PeopleSoft Process Guide HRMS Administrative Mailbox
Page 16 of 34
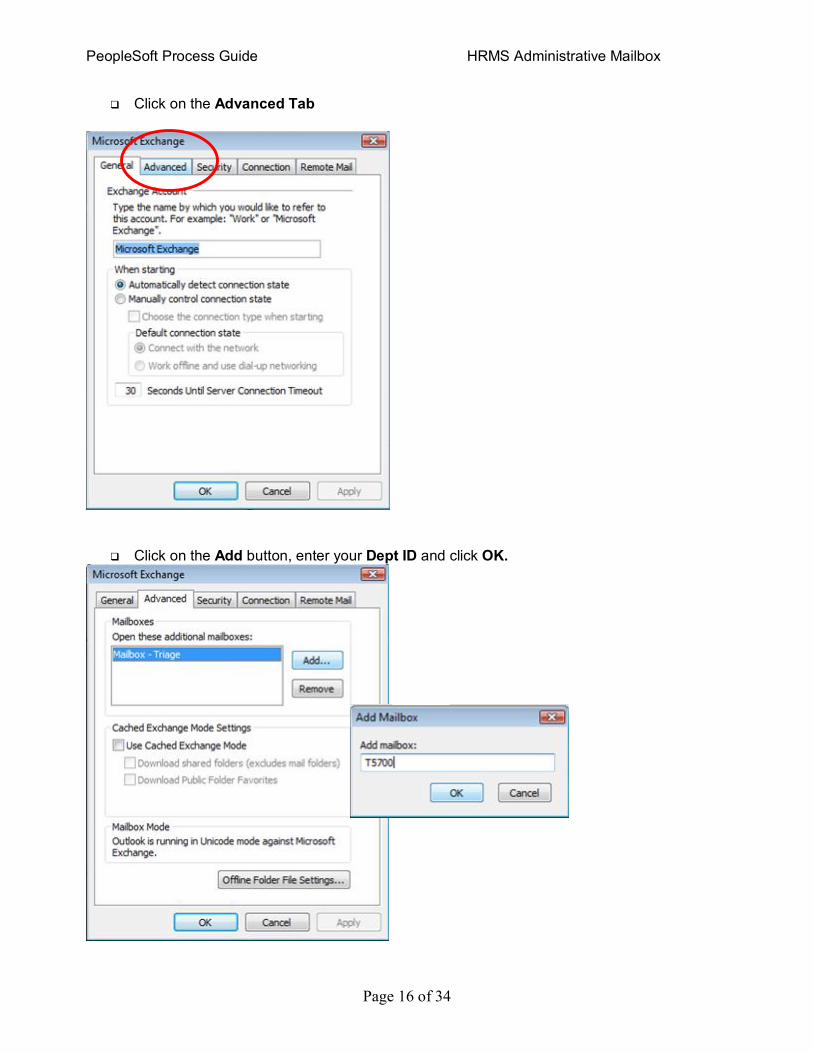
q Click on the Advanced Tab
q Click on the Add button, enter your Dept ID and click OK.
PeopleSoft Process Guide HRMS Administrative Mailbox
Page 17 of 34
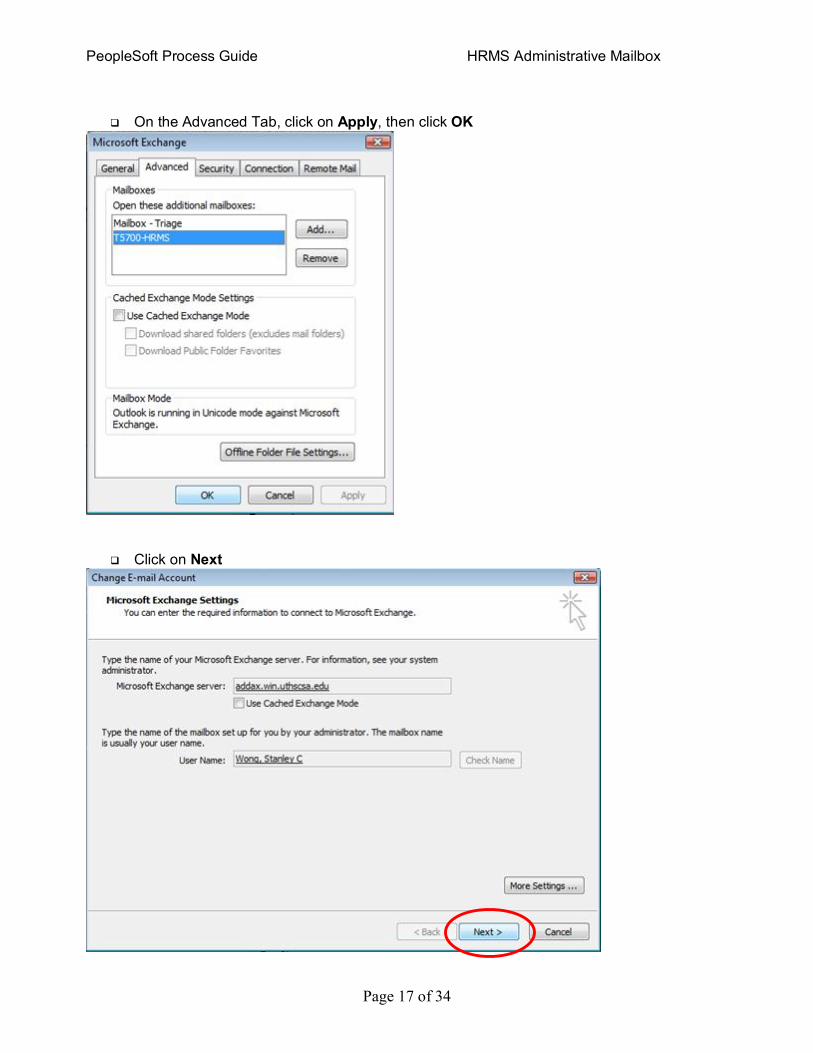
q On the Advanced Tab, click on Apply, then click OK
q Click on Next
PeopleSoft Process Guide HRMS Administrative Mailbox
Page 18 of 34
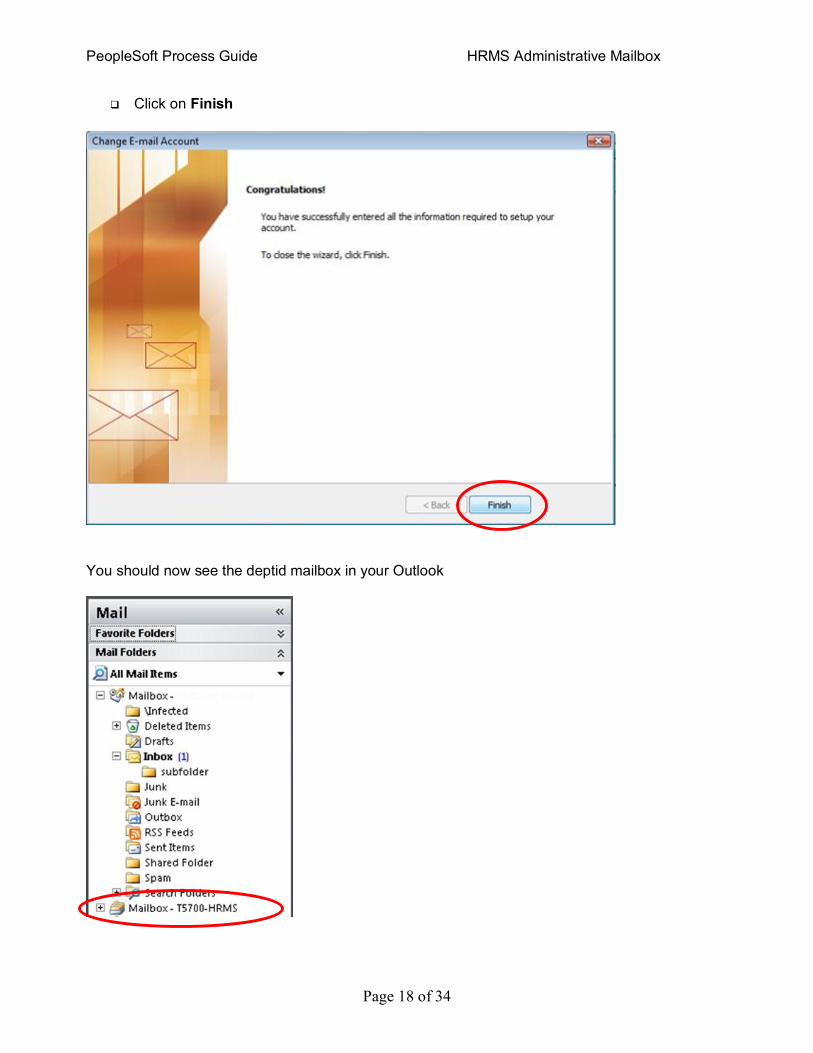
q Click on Finish
You should now see the deptid mailbox in your Outlook
PeopleSoft Process Guide HRMS Administrative Mailbox
Page 19 of 34
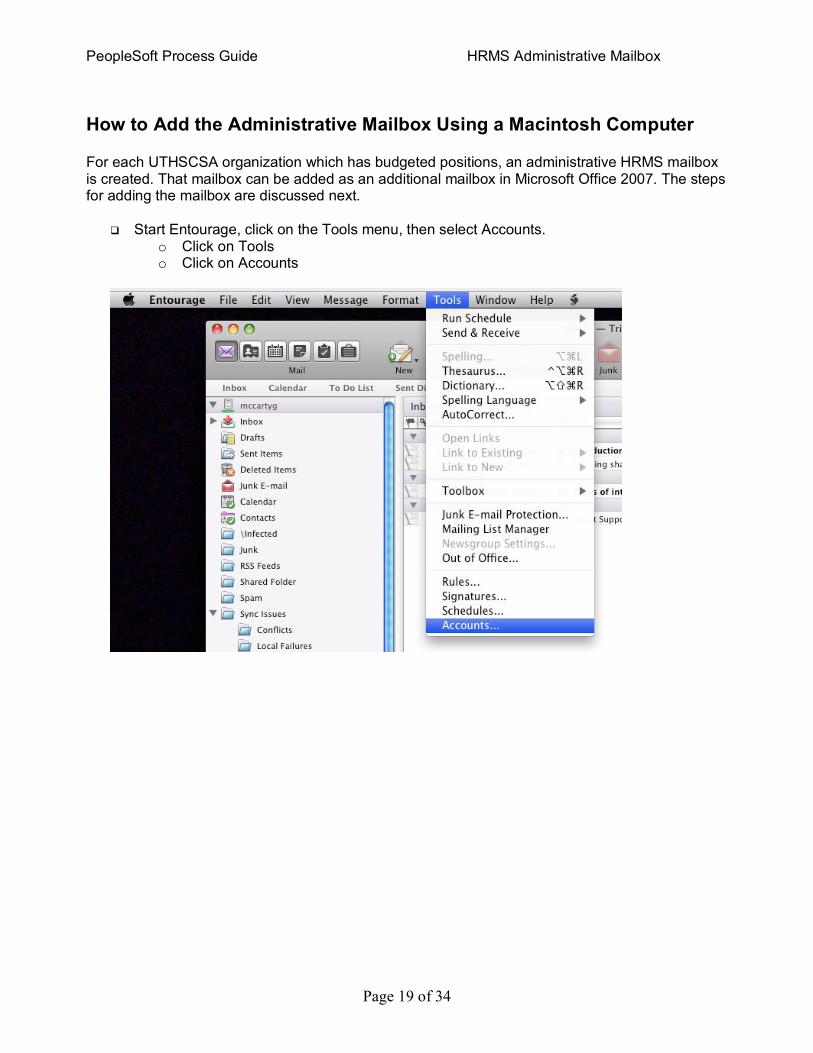
How to Add the Administrative Mailbox Using a Macintosh Computer
For each UTHSCSA organization which has budgeted positions, an administrative HRMS mailbox is created. That mailbox can be added as an additional mailbox in Microsoft Office 2007. The steps for adding the mailbox are discussed next.
q Start Entourage, click on the Tools menu, then select Accounts. o Click on Tools o Click on Accounts
PeopleSoft Process Guide HRMS Administrative Mailbox
Page 20 of 34
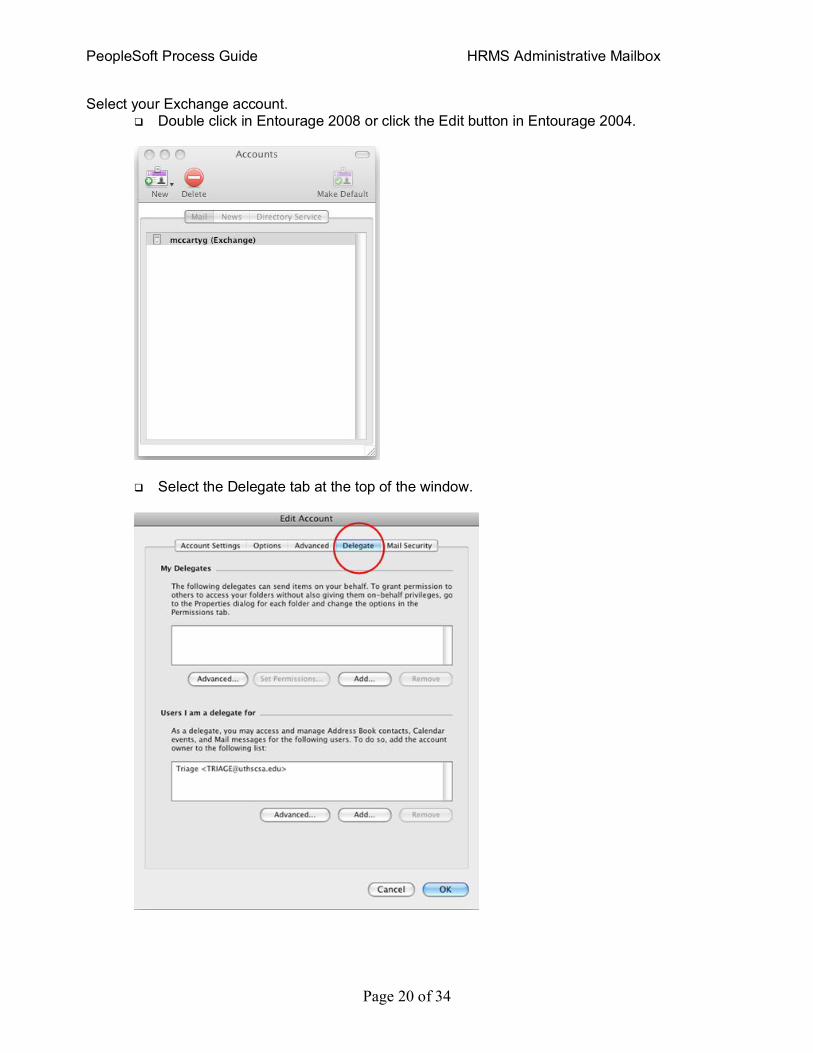
Select your Exchange account. q Double click in Entourage 2008 or click the Edit button in Entourage 2004.
q Select the Delegate tab at the top of the window.
PeopleSoft Process Guide HRMS Administrative Mailbox
Page 21 of 34
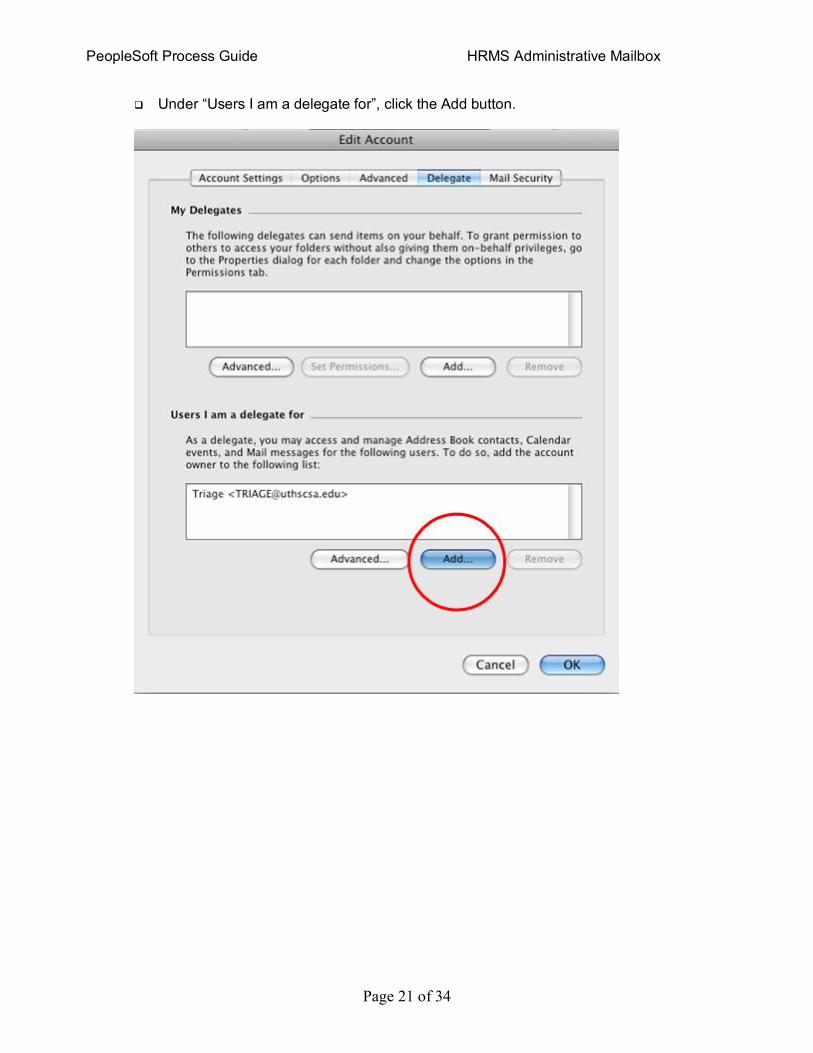
q Under “Users I am a delegate for”, click the Add button.
PeopleSoft Process Guide HRMS Administrative Mailbox
Page 22 of 34
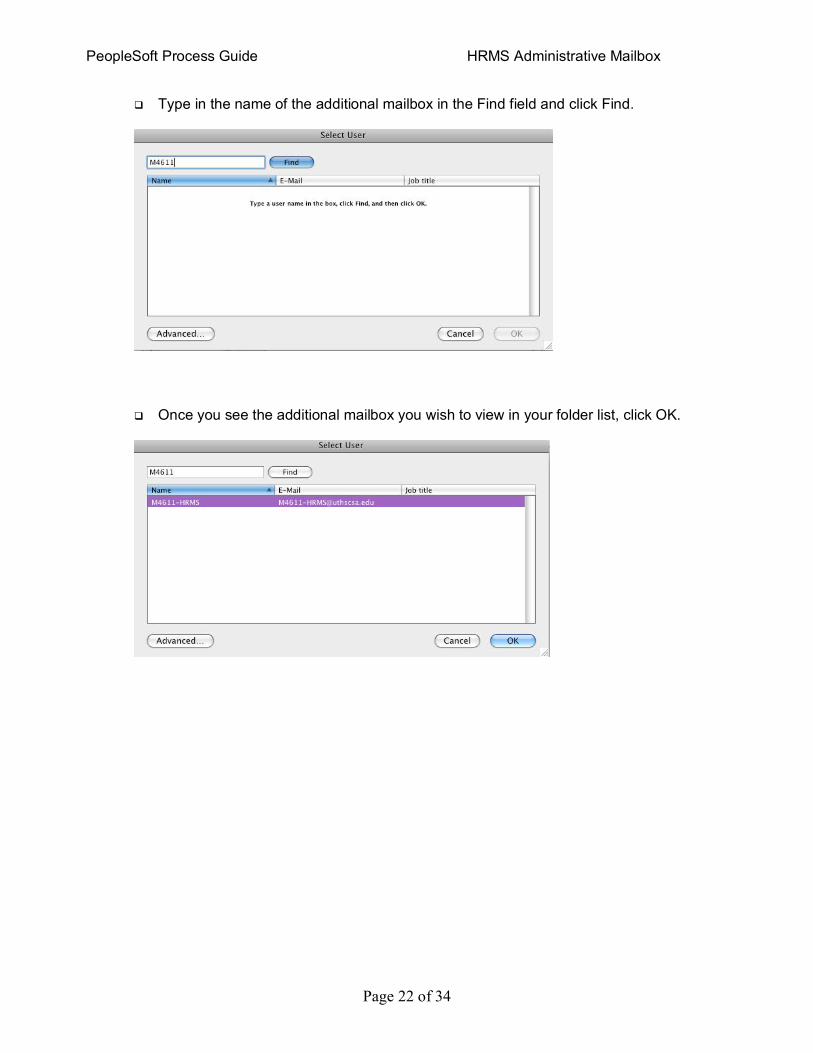
q Type in the name of the additional mailbox in the Find field and click Find.
q Once you see the additional mailbox you wish to view in your folder list, click OK.
PeopleSoft Process Guide HRMS Administrative Mailbox
Page 23 of 34
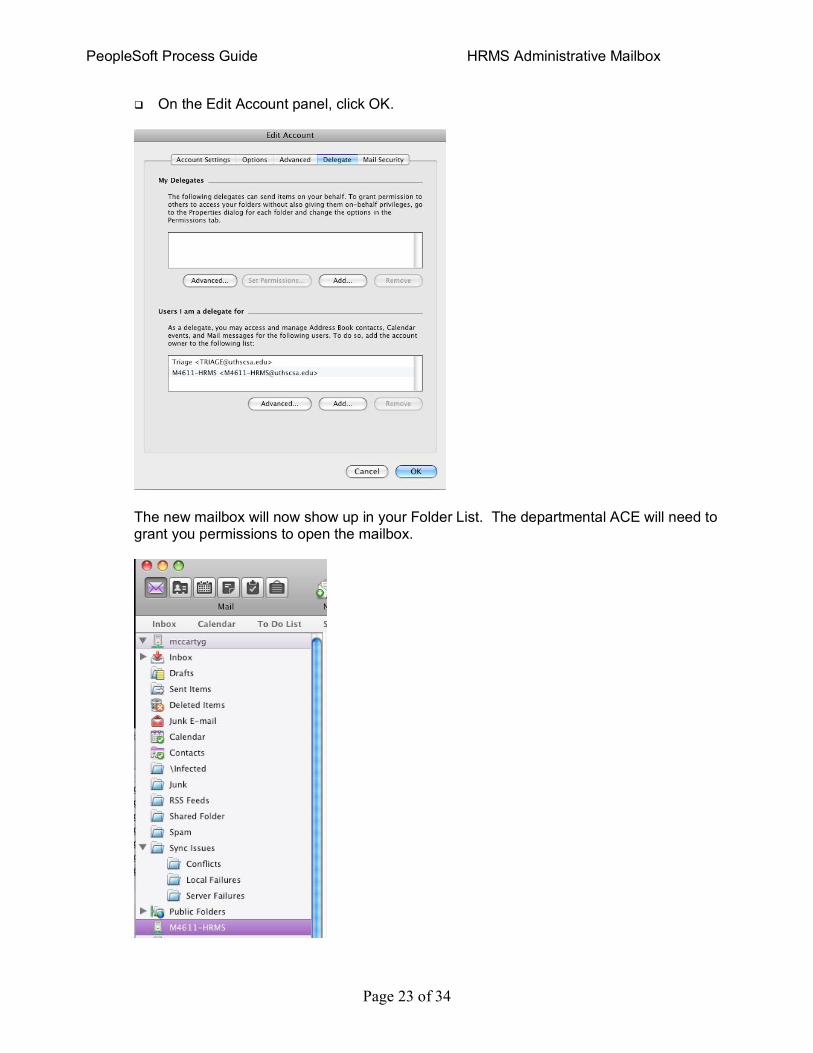
q On the Edit Account panel, click OK.
The new mailbox will now show up in your Folder List. The departmental ACE will need to grant you permissions to open the mailbox.

PeopleSoft Process Guide HRMS Administrative Mailbox
Page 24 of 34
How to Remove an Email Account
q Find the instructions in the Table of Contents for the system you have (Outlook, Office XP, Office 2003, Office 2007). Follow steps in the beginning and on the Advanced tab, highlight the selected mailbox deptid and click on “Remove” instead of “Add”.
q Are you sure you want to remove this mailbox, Click on “Yes”.
q On the Advanced Tab, Click on Apply then click on O.K.
q Click on Next then click on Finish.
PeopleSoft Process Guide HRMS Administrative Mailbox
Page 25 of 34
How to Create Folders
Once you have added the HRMS administrative mailbox, by default Microsoft Outlook will create several folders. They include the Inbox, Outbox, Sent Items, and Deleted Items folders. You may create additional folders as needed. These folders can be created at the same level as the default folders Outlook creates, or you can create subfolders for the default Outlook folders. For example, on the Inbox folder, you can create subfolders called Reviewed & Approved, Pending, etc.
Where you create these folders and what you name them is a matter of personal preference, but it is suggested that you create your folders off of the Inbox folder. In the example that follows, we will use the T5700HRMS mailbox created earlier and create a subfolder for the Inbox called Reviewed & Approved.
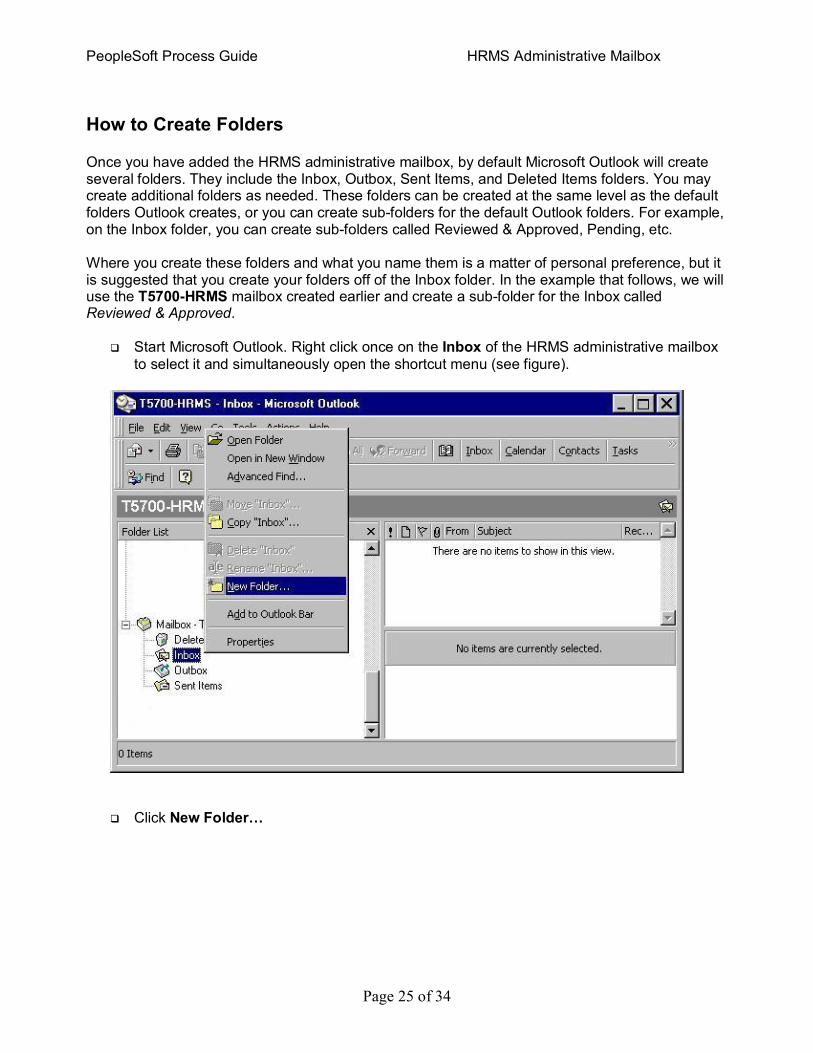
q Start Microsoft Outlook. Right click once on the Inbox of the HRMS administrative mailbox to select it and simultaneously open the shortcut menu (see figure).
q Click New Folder…
PeopleSoft Process Guide HRMS Administrative Mailbox
Page 26 of 34
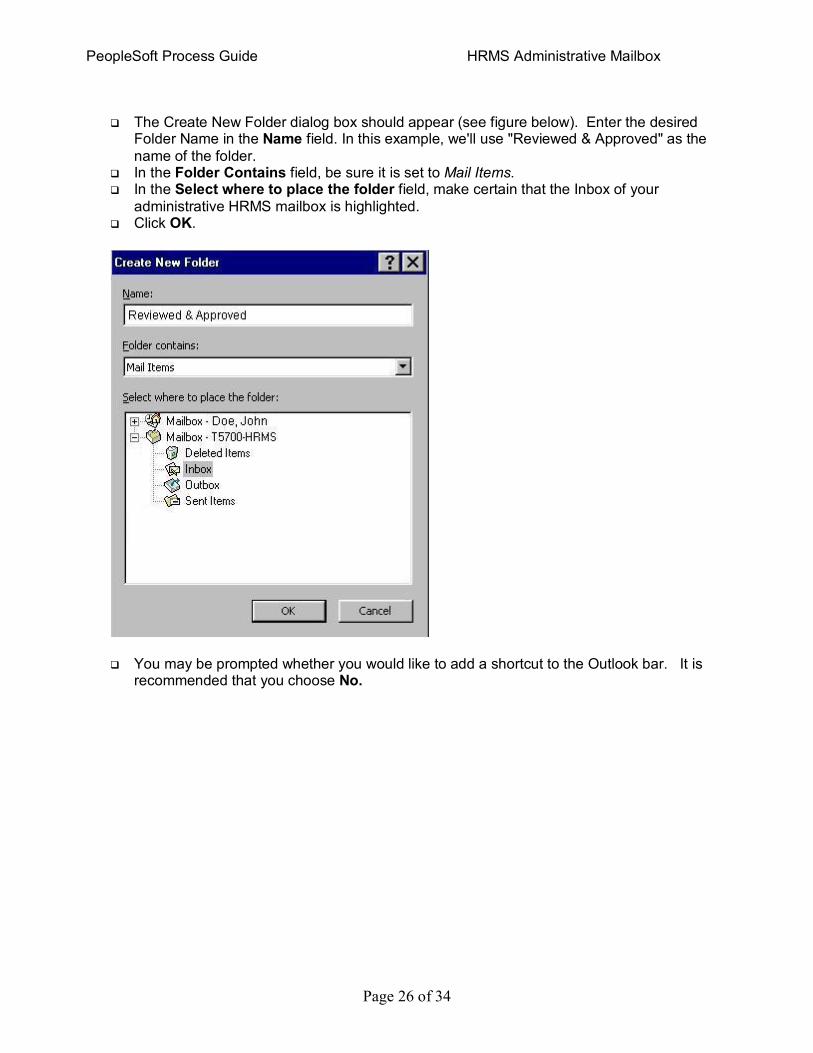
q The Create New Folder dialog box should appear (see figure below). Enter the desired Folder Name in the Name field. In this example, we'll use "Reviewed & Approved" as the name of the folder.
q In the Folder Contains field, be sure it is set to Mail Items. q In the Select where to place the folder field, make certain that the Inbox of your
administrative HRMS mailbox is highlighted. q Click OK.
q You may be prompted whether you would like to add a shortcut to the Outlook bar. It is recommended that you choose No.
PeopleSoft Process Guide HRMS Administrative Mailbox
Page 27 of 34
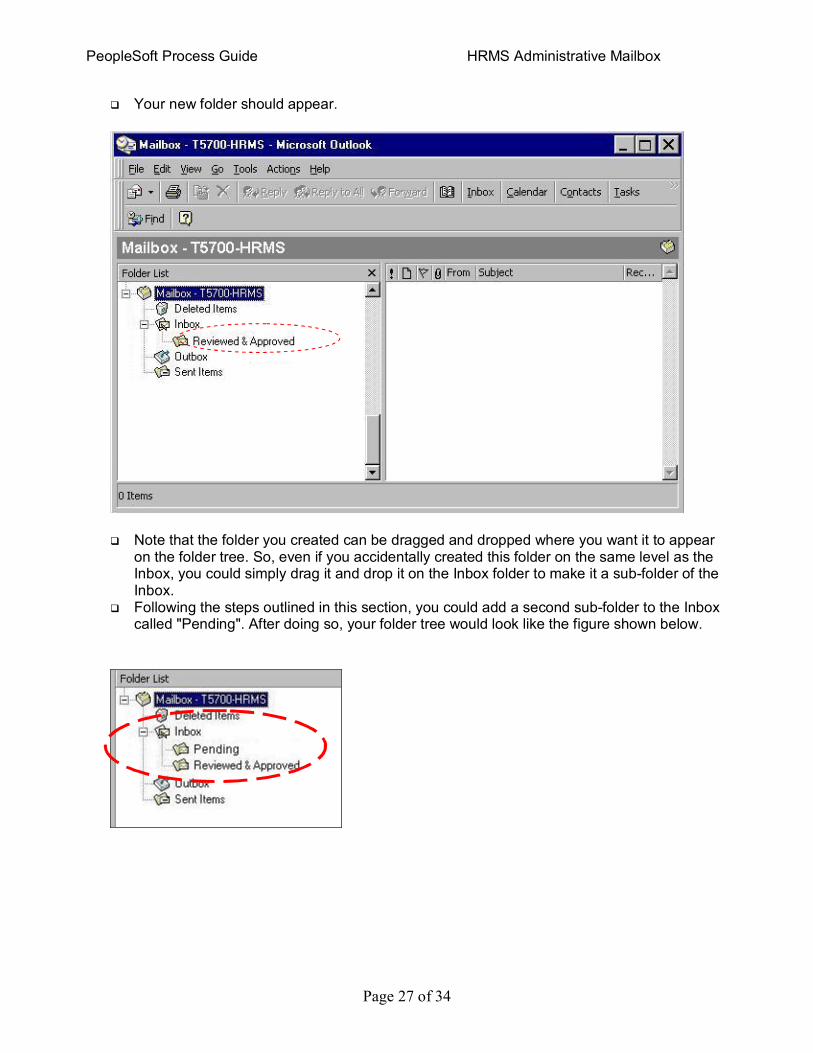
q Your new folder should appear.
q Note that the folder you created can be dragged and dropped where you want it to appear on the folder tree. So, even if you accidentally created this folder on the same level as the Inbox, you could simply drag it and drop it on the Inbox folder to make it a subfolder of the Inbox.
q Following the steps outlined in this section, you could add a second subfolder to the Inbox called "Pending". After doing so, your folder tree would look like the figure shown below.
PeopleSoft Process Guide HRMS Administrative Mailbox
Page 28 of 34
How to Grant Access to the Mailbox and its Folders
Once you have created the mailbox and any folders, you must grant access permissions. The ACE is the owner of the administrative mailbox and is responsible for providing others with access. Granting someone access permissions generally involves two steps. First, the ACE must grant access to the Mailbox itself and second, the ACE must then grant access to specific folders within the mailbox.
When you create mailboxes and grant access permissions, you must grant access to each folder you want others to access. For example, granting permission to access the Inbox folder does not also permit access to the Deleted Items folder. You must separately grant access to the Deleted Items folder. If you grant access to top level folders of the HRMS mailbox, any subfolders you create "inherit" the permissions you grant for the top level folders. For example, by granting others access to the Inbox, they automatically have access to the Reviewed & Approved and Pending subfolders of the Inbox.
The steps for granting access are outlined next.
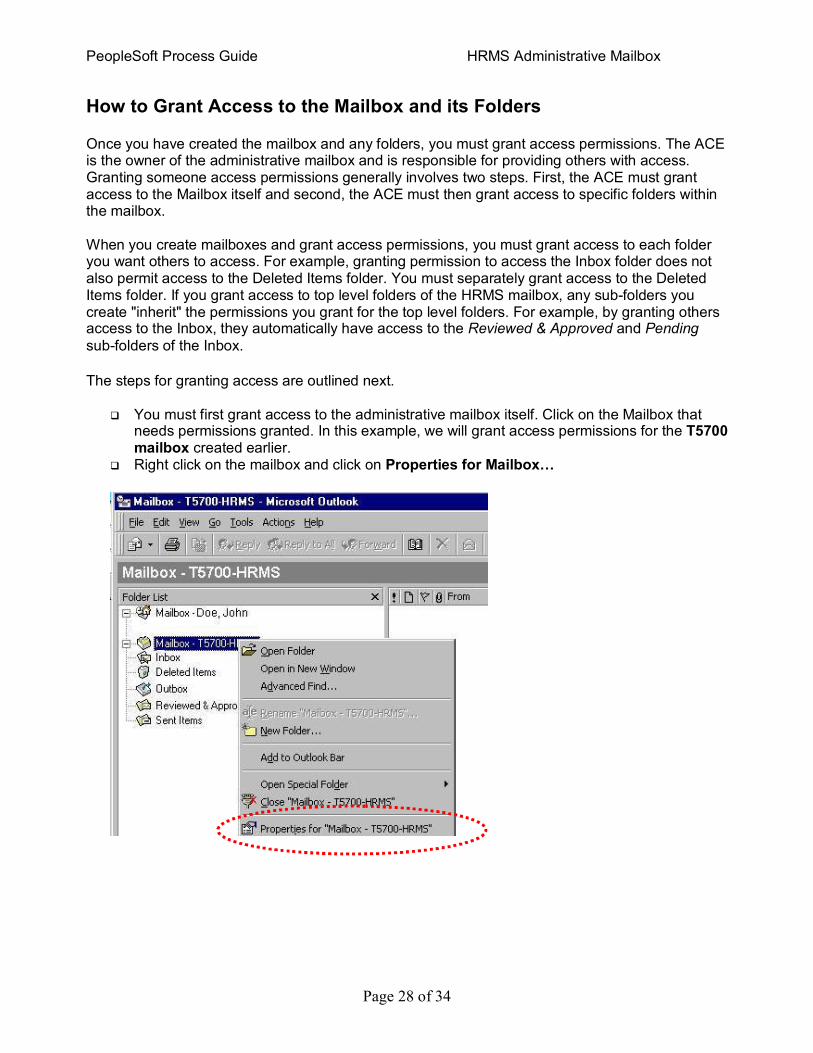
q You must first grant access to the administrative mailbox itself. Click on the Mailbox that needs permissions granted. In this example, we will grant access permissions for the T5700 mailbox created earlier.
q Right click on the mailbox and click on Properties for Mailbox…
PeopleSoft Process Guide HRMS Administrative Mailbox
Page 29 of 34
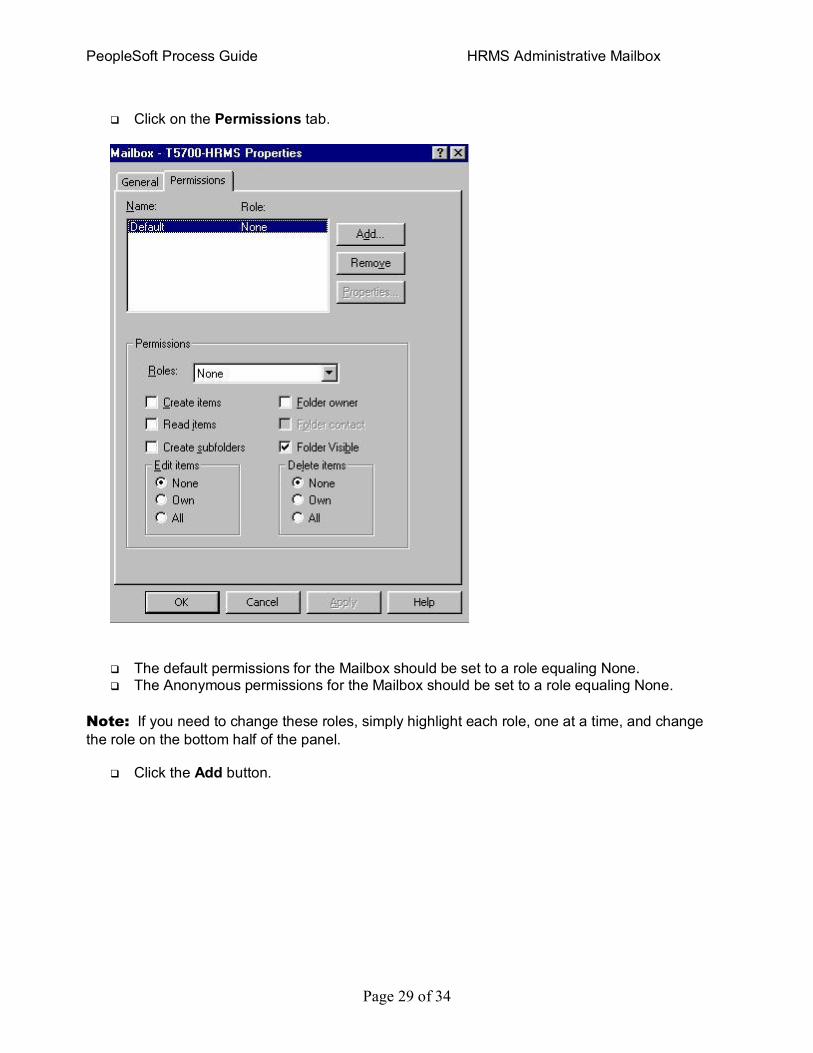
q Click on the Permissions tab.
q The default permissions for the Mailbox should be set to a role equaling None. q The Anonymous permissions for the Mailbox should be set to a role equaling None.
Note: If you need to change these roles, simply highlight each role, one at a time, and change the role on the bottom half of the panel.
q Click the Add button.
PeopleSoft Process Guide HRMS Administrative Mailbox
Page 30 of 34
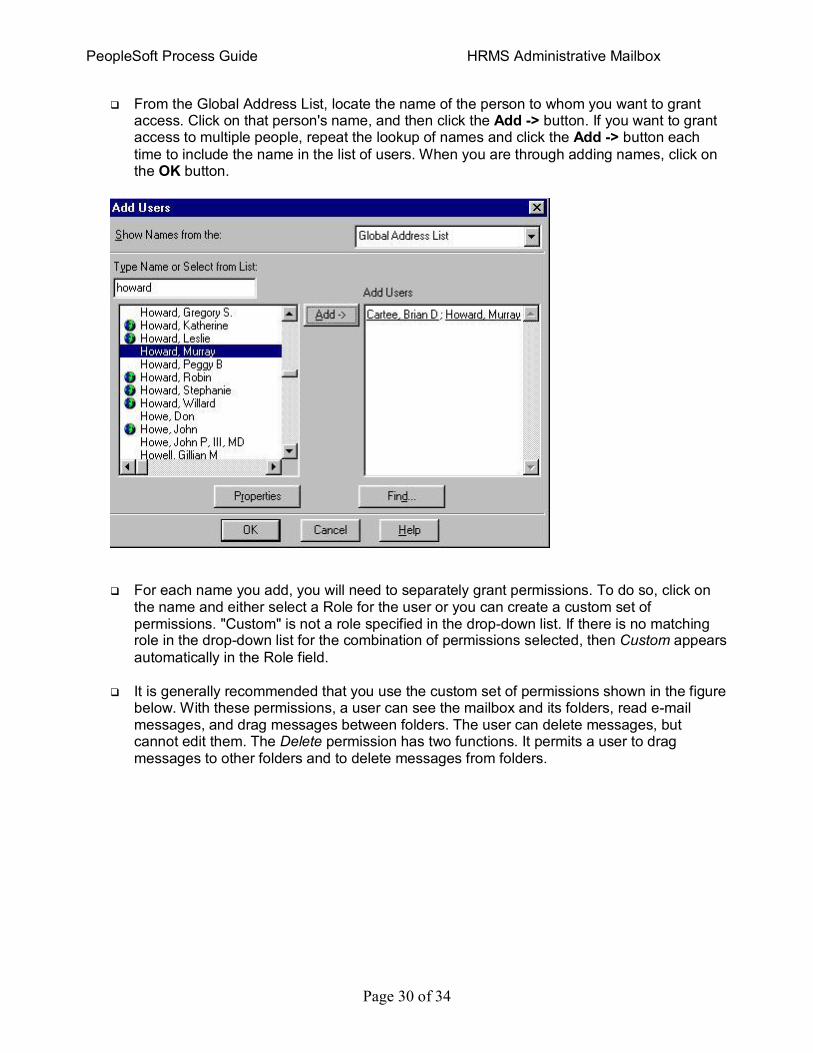
q From the Global Address List, locate the name of the person to whom you want to grant access. Click on that person's name, and then click the Add > button. If you want to grant access to multiple people, repeat the lookup of names and click the Add > button each time to include the name in the list of users. When you are through adding names, click on the OK button.
q For each name you add, you will need to separately grant permissions. To do so, click on the name and either select a Role for the user or you can create a custom set of permissions. "Custom" is not a role specified in the dropdown list. If there is no matching role in the dropdown list for the combination of permissions selected, then Custom appears automatically in the Role field.
q It is generally recommended that you use the custom set of permissions shown in the figure below. With these permissions, a user can see the mailbox and its folders, read email messages, and drag messages between folders. The user can delete messages, but cannot edit them. The Delete permission has two functions. It permits a user to drag messages to other folders and to delete messages from folders.
PeopleSoft Process Guide HRMS Administrative Mailbox
Page 31 of 34
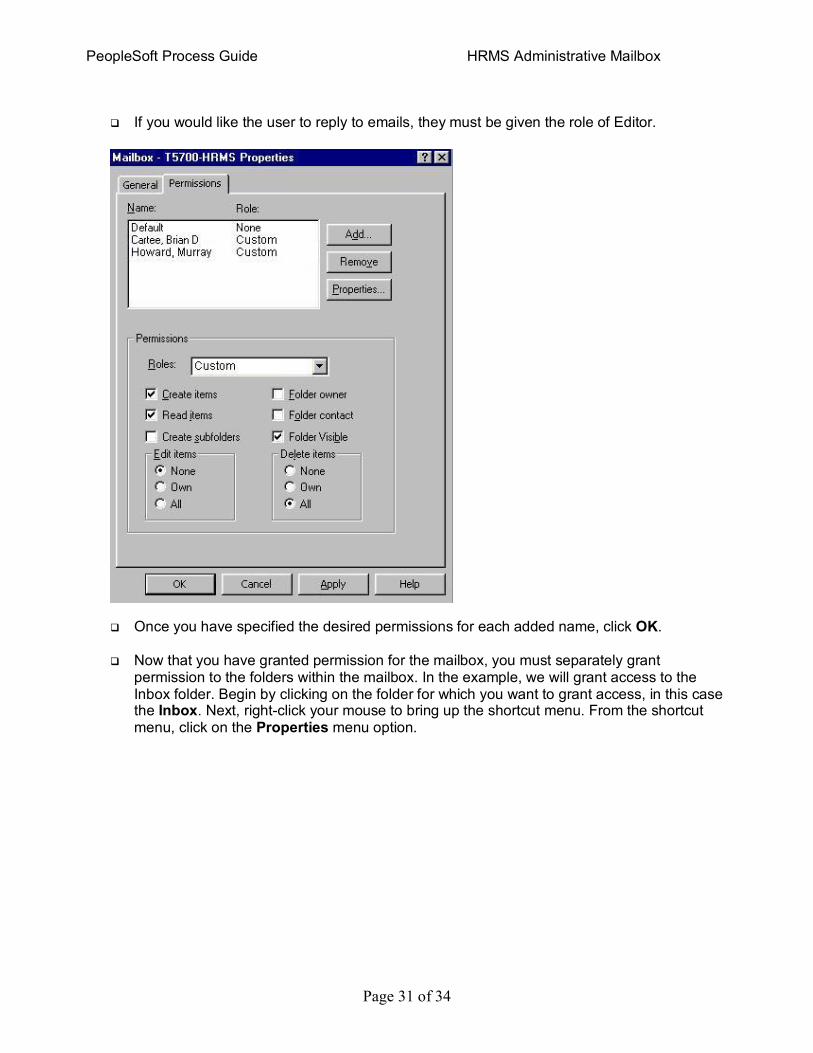
q If you would like the user to reply to emails, they must be given the role of Editor.
q Once you have specified the desired permissions for each added name, click OK.
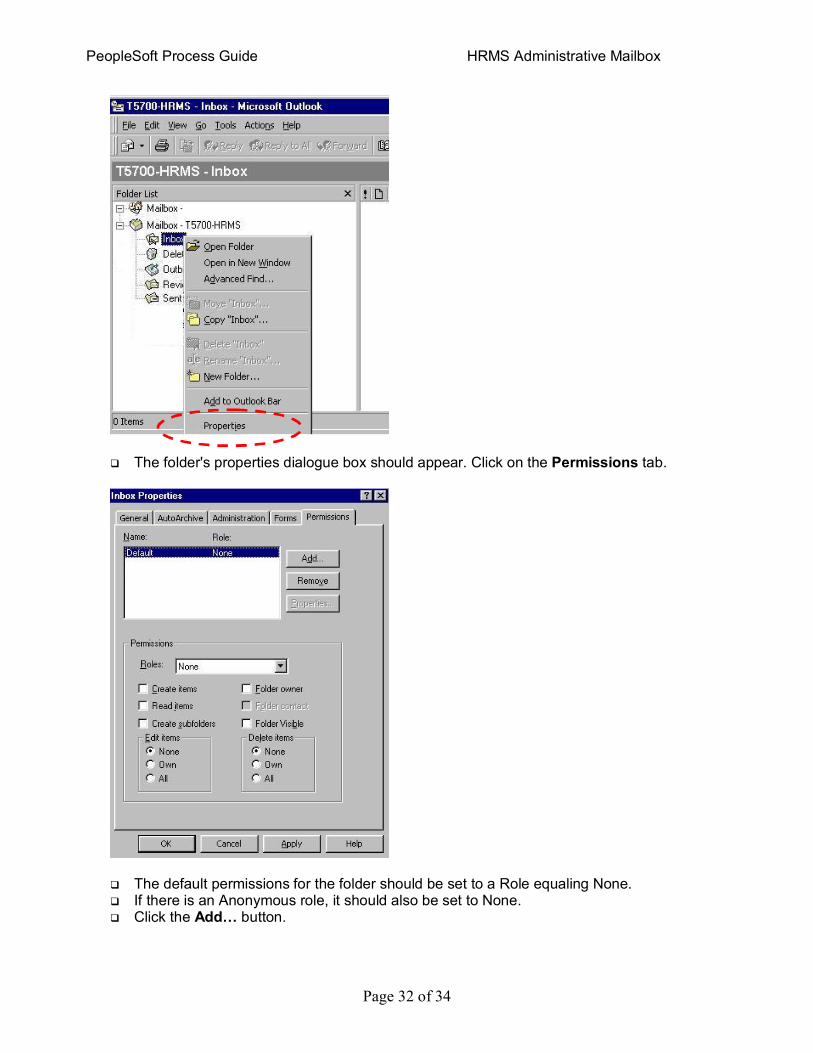
q Now that you have granted permission for the mailbox, you must separately grant permission to the folders within the mailbox. In the example, we will grant access to the Inbox folder. Begin by clicking on the folder for which you want to grant access, in this case the Inbox. Next, rightclick your mouse to bring up the shortcut menu. From the shortcut menu, click on the Properties menu option.
PeopleSoft Process Guide HRMS Administrative Mailbox
Page 32 of 34
q The folder's properties dialogue box should appear. Click on the Permissions tab.
q The default permissions for the folder should be set to a Role equaling None. q If there is an Anonymous role, it should also be set to None. q Click the Add… button.
PeopleSoft Process Guide HRMS Administrative Mailbox
Page 33 of 34
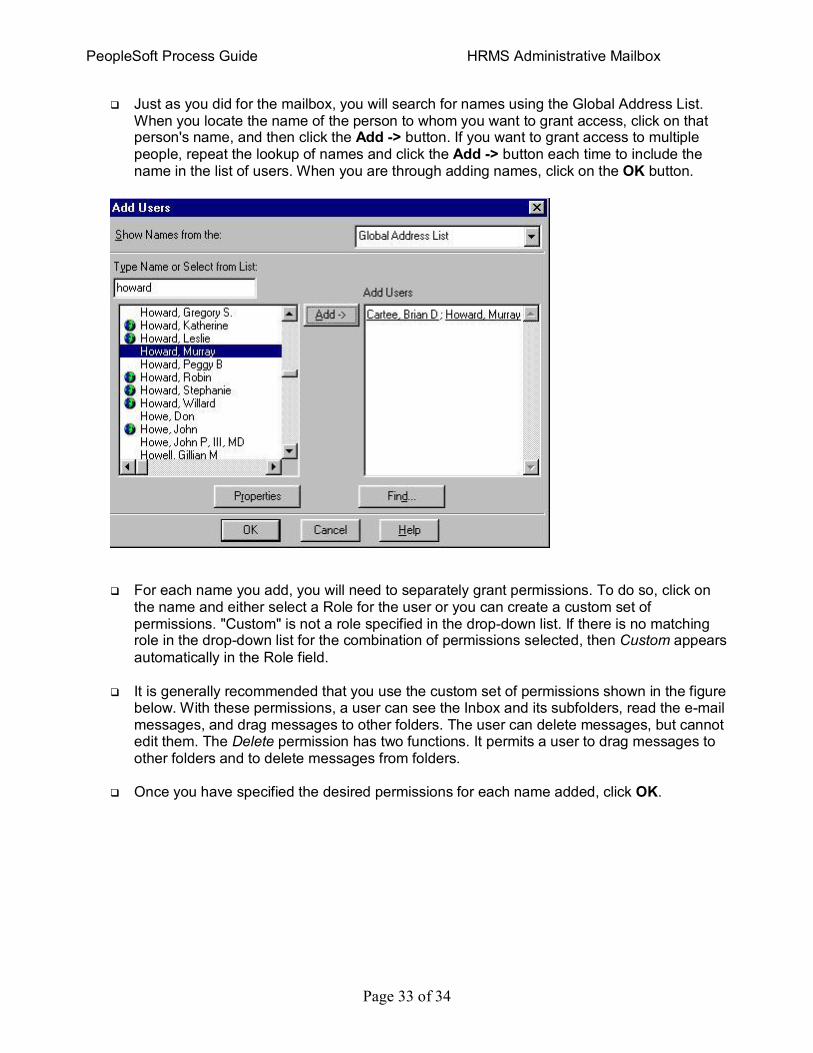
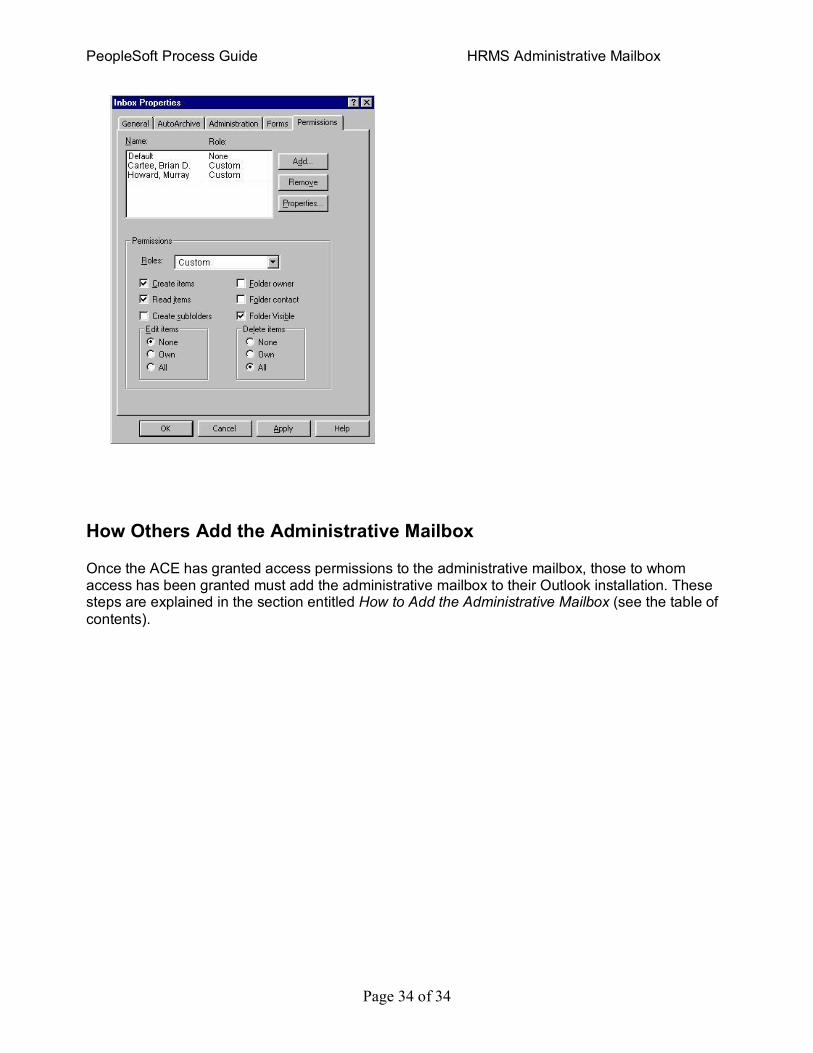
q Just as you did for the mailbox, you will search for names using the Global Address List. When you locate the name of the person to whom you want to grant access, click on that person's name, and then click the Add > button. If you want to grant access to multiple people, repeat the lookup of names and click the Add > button each time to include the name in the list of users. When you are through adding names, click on the OK button.
q For each name you add, you will need to separately grant permissions. To do so, click on the name and either select a Role for the user or you can create a custom set of permissions. "Custom" is not a role specified in the dropdown list. If there is no matching role in the dropdown list for the combination of permissions selected, then Custom appears automatically in the Role field.
q It is generally recommended that you use the custom set of permissions shown in the figure below. With these permissions, a user can see the Inbox and its subfolders, read the email messages, and drag messages to other folders. The user can delete messages, but cannot edit them. The Delete permission has two functions. It permits a user to drag messages to other folders and to delete messages from folders.
q Once you have specified the desired permissions for each name added, click OK.
PeopleSoft Process Guide HRMS Administrative Mailbox
Page 34 of 34
How Others Add the Administrative Mailbox
Once the ACE has granted access permissions to the administrative mailbox, those to whom access has been granted must add the administrative mailbox to their Outlook installation. These steps are explained in the section entitled How to Add the Administrative Mailbox (see the table of contents).