version 09.02.01 user’s guide - ahit · word 2000 through 2003—screen description ... using...
TRANSCRIPT

Home Inspection Software Version 09.02.01
User’s Guide
InspectIt
N19 W24075 Riverwood Drive, Suite 200 Waukesha WI 53188
© COPYRIGHT 1994-2009 AHIT, LTD. ALL RIGHTS RESERVED

InspectIt ReportPlus User’s Guide 2
Table of Contents SECTION ONE: USING THE PROGRAM................................................................................ 5
OVERVIEW........................................................................................................................... 5 Easy startup...............................................................................................................................................5 Report editing and saving......................................................................................................................5 Field checklists ...........................................................................................................................................5 On-the-fly reporting ................................................................................................................................5 New features.............................................................................................................................................5
GETTING STARTED .............................................................................................................. 6 Installation procedure..............................................................................................................................6 System requirements ................................................................................................................................6 Microsoft Word prerequisite .................................................................................................................6 Start ReportPlus ........................................................................................................................................7 Main menu buttons ...................................................................................................................................7
THE REPORTPLUS TOOLBAR ............................................................................................... 9 Shortcut icon descriptions ........................................................................................................................9
CREATING REPORTS.......................................................................................................... 11 Create a narrative or checklist report .............................................................................................. 11 Enter client information......................................................................................................................... 12 Use OfficePro Data .............................................................................................................................. 12 Save as…............................................................................................................................................... 13
CHECKLIST VERSUS NARRARTIVE REPORT....................................................................... 14 Checklist style report ............................................................................................................................ 14 Narrative style report .......................................................................................................................... 15
MISCELLANEOUS REPORTING CAPABILITIES .................................................................... 17 Work with report sub-sections ............................................................................................................ 17 Insert text ................................................................................................................................................ 17
Observations, recommendations, etc. ............................................................................................. 17 Insert buttons........................................................................................................................................ 18
Insert a picture ....................................................................................................................................... 19 Navigate report sections ..................................................................................................................... 19 Use check box controls ......................................................................................................................... 19 Type and edit within Word................................................................................................................. 19 Use Info buttons ..................................................................................................................................... 20
Add text to Summary categories .................................................................................................... 20

InspectIt ReportPlus User’s Guide 3
Add items to the INFO button list .................................................................................................... 21 Edit items in the INFO button list...................................................................................................... 21
Insert a Table of Contents (optional)................................................................................................. 22
CREATING INSPECTION DOCUMENTS .............................................................................. 24 Run an inspection document................................................................................................................. 24 Enter inspection information ................................................................................................................ 25
Provide basic property data ........................................................................................................... 25 Provide client details ......................................................................................................................... 26 Provide buyer’s realtor details ........................................................................................................ 26 Provide seller’s realtor details ......................................................................................................... 27 Provide other referral source details ............................................................................................. 28
SECTION TWO: CUSTOMIZING THE PROGRAM................................................................ 29
SETTING USER PREFERENCES ............................................................................................ 29 Specify your settings ............................................................................................................................ 29 Modify the template............................................................................................................................. 31
Insert a new page .............................................................................................................................. 32 Insert fields (Inspection Documents Only) ....................................................................................... 32 Delete pages....................................................................................................................................... 33 Re-arrange report sections............................................................................................................... 33 Re-name section titles, add default text, and change formats ................................................. 33 Save template changes..................................................................................................................... 33 Create numerous report layouts ...................................................................................................... 33
Back up the InspectIt Software program.......................................................................................... 33
CUSTOMIZING THE REPORT SECTIONS SCREEN............................................................... 35 Modify the Report Sections screen .................................................................................................... 35
THE CUSTOMIZATION TOOLS TOOLBAR.......................................................................... 37 Add to option screens........................................................................................................................... 37 Edit option screen text files ................................................................................................................. 38 Edit AutoText .......................................................................................................................................... 40
Re-define AutoText ............................................................................................................................ 40 Bookmarks............................................................................................................................................... 42
View bookmarks ................................................................................................................................. 42 Bookmark reference list..................................................................................................................... 42 Bookmark insertion (automated)...................................................................................................... 43 Find a bookmark name ..................................................................................................................... 43 Re-insert a bookmark ........................................................................................................................ 44
Add INFO button................................................................................................................................... 44
CUSTOMIZING TOOLBAR BUTTONS (WORD 97 – WORD 2003 ONLY) ............................ 46 Rearrange order of buttons ................................................................................................................ 46 Delete or re-name buttons................................................................................................................... 46
CUSTOMIZING INSPECTION REPORTS .............................................................................. 48

InspectIt ReportPlus User’s Guide 4
Define report sections........................................................................................................................... 48 Add new comments ............................................................................................................................... 48 Edit comments......................................................................................................................................... 48
FORMATTING NOTES........................................................................................................ 50 Define description items....................................................................................................................... 50 Define observation items ..................................................................................................................... 51 Define comment items........................................................................................................................... 51 Define limitation items .......................................................................................................................... 52
APPENDIX A: NAVIGATING THE WORD SCREEN ............................................................. 53 Word 2000 through 2003—Screen description ............................................................................ 53 Word 2007—Screen description ...................................................................................................... 54 Using Shortcuts within Word ............................................................................................................... 55
Perform common tasks with keyboard shortcuts........................................................................... 55 Highlight text with mouse click/drag.............................................................................................. 55 Highlight text with keyboard shortcuts........................................................................................... 56
Using the “Undo” feature .................................................................................................................... 57 Deleting sections or pages from a Word document ...................................................................... 57 Saving a Word document ................................................................................................................... 57 Printing a Word document .................................................................................................................. 57 Printing to PDF file format ................................................................................................................... 57
APPENDIX B: USING THE INSPECTIT HANDHELD SOFTWARE........................................... 59 Introduction ............................................................................................................................................. 59 Create a report file for the handheld .............................................................................................. 59
Option 1 — Connected to PC.......................................................................................................... 59 Option 2 — Not connected to PC................................................................................................... 59
Import data from a handheld............................................................................................................. 60 How to use ReportPlus for Pocket PC................................................................................................ 61
Send ReportPlus changes to the Pocket PC ................................................................................... 62 How to use ReportPlus for Palm OS .................................................................................................. 62
Send ReportPlus changes to the Palm OS handheld ................................................................... 63
APPENDIX C: END USER LICENSE AGREEMENT ................................................................ 64
SOFTWARE TECHNICAL SUPPORT..................................................................................... 66 Contact us ............................................................................................................................................... 66

InspectIt ReportPlus User’s Guide 5
SECTION ONE: USING THE PROGRAM
OVERVIEW The InspectIt family of software is the most comprehensive automated reporting software available for home inspectors on the market today. The program allows you to generate a custom narrative or checklist style report with the ease of filling out hardcopy forms. The ReportPlus™ program generates the report inside Microsoft Word for Windows. This allows the inspector to quickly compile, edit, and print the report.
Easy startup When you start the program, you simply choose which section of the report you want to begin filling out. Next, a toolbar appears for the chosen section enabling you to activate any of the four Option screens for that section. Once the selected Option screen appears, you can select your pre-defined parameters and have them inserted into the report document — you can even insert the text in both the report section and summary section of the document at the same time.
Report editing and saving After you have made your text selections, you can edit your report document using any of the powerful tools within ReportPlus — as well as those available in Microsoft Word. You can add additional text, send selected items to the summary, insert digital photos or drawings, create a table of contents, etc. When finished, you can save the document in the location of your choice, send a fax, or conveniently email the report document directly to your client!
Field checklists Useful field checklists can be used at the inspection site to collect the necessary information with which to generate a report. These checklists are identical in content to the program and can also be edited by you as you customize the software. This allows you or your office staff to compile the report with ease following the inspection. A master copy of the checklists has been included with the program. You can use these masters to make copies of the field checklists for use during your inspections.
On-the-fly reporting If you prefer, you can create your inspection report on the fly at the inspection site for the customer’s immediate use.
New features In this release, a Settings screen has been introduced with new report set-up capabilities based strictly on user preferences. This powerful customization tool offers true flexibility by enabling you to actually change the way the software, itself, works to suit your inspection needs. For example, you can add new sections, rename existing ones, re-sequence items, and modify categories. You can also change the way that photos are inserted, change checkbox and info buttons to single or double-click, and change the way your toolbars show or hide.
InspectIt ReportPlus User’s Guide 6
GETTING STARTED
Installation procedure You can install the ReportPlus program using CDs or an online installation procedure at www.ahit.com\install. Please note that you must have a current password to log into our install site. This password changes periodically and can only be obtained if your technical support is current. Easy, step-by-step instructions will guide you through either install method. If you have any problems, or require assistance during installation, contact the InspectIt Technical Support team.
The installation process consists of copying files from the ReportPlus CD to a C:\InspectIt folder. The installation program automatically moves the User Templates folder to: C:\InspectIt\ReportPlus.
The ReportPlus template will be active the next time Word is run. If you have existing templates created within Word and still wish to use them, simply copy those files to the new User Templates location of C:\InspectIt\ReportPlus.
System requirements The following minimum requirements are needed to operate ReportPlus:
• Microsoft® Windows™ 98se or later, including Vista • Microsoft® Word™ 2000 with Service Pack 3 or later • Microsoft .NET 2.0 • Pentium or higher processor • 128 MB RAM (512 MB recommended) • 25 MB of free space on hard drive • Internet connection (for report purchasing/authenticating only)
Microsoft Word prerequisite Being able to navigate through Microsoft Word is a prerequisite to using ReportPlus. We have also provided tips throughout this user guide to help you understand how the two programs work together. Additional information can be found in Word from the Help option.
IMPORTANT: If you are using Word 2007, be sure to note the following:
• Saved templates are NOT downward compatible. • “Auto text” has been renamed to “building blocks.” • The ReportPlus toolbar is displayed under Add-Ins, with a ribbon look and feel. • Turn off “Auto Recovery” to avoid computer lockup due to background saving, which may take up
to 10 minutes. Do NOT shut down…just wait for the saving process to end.
IMPORTANT: Since Microsoft Word is required to use and install our software, all Microsoft office products should be closed during the installation process.

InspectIt ReportPlus User’s Guide 7
Start ReportPlus To startup ReportPlus, double-click the InspectIt Reporting Software shortcut icon on your desktop.
Microsoft Word opens and displays the Main ReportPlus screen with several menu options.
Main menu buttons The available menu buttons on the Main screen are described in the table below.
Button Function
Create Narrative Report Allows you to start a new system-by-system summary style report that covers only the inspection information that is needed for that inspection.
Create Checklist Report Allows you to start a room-by-room checklist style report that covers all of the inspection information (including good, marginal, and bad).
Run Inspection Documents Allows you to generate work orders, invoices, and letters to real estate agents using any format you want.
Open Existing Document Allows you to open a pre-defined folder to find reports that have already been created and stored on your computer.
NOTE: The default opening folder is My Documents, but you can reset your preference via the Settings screen (see the Setting User Preferences section).
NOTE: The checklist style report is based on the AHIT standard home inspection report.

InspectIt ReportPlus User’s Guide 8
View User’s Guide Allows you to access a copy of this user guide for viewing or printing purposes.
Report Authentication Allows you to download additional reports, as needed.
• If you are on the Pay-Per-Use plan, you can download reports in blocks of 10, 25, or 50 at a time. (The system prompts you when it is time to pay for more reports.)
• If you have purchased the software outright (Monthly or Purchase Plan), you can download unlimited reports. However, you will need to enter your username and password once every 50 inspection reports to verify that you are the registered user for the software.
Settings Opens the Settings screen where you can customize inspection reports and modify templates according to your preferences.
USER TIP: A Help button is available from some ReportPlus screens to provide online instructions as you work in the program.

InspectIt ReportPlus User’s Guide 9
THE REPORTPLUS TOOLBAR The ReportPlus toolbar automatically appears on the left side of the Word window (or in the Add-Ins Tab on the Ribbon above the document in Word 2007) when you start the program.
Shortcut icon descriptions These shortcut icon buttons enable you to work more efficiently, as described below.
Icon/Button Name Function
Report Sections Allows you to access to the Report Sections screen, where you can choose which section of the report you would like to create or edit.
Customer Information Allows you to make corrections to the customer information, if necessary. When you have finished entering data on this screen, click the OK button. The information will be inserted onto the first page of the report. Also, the inspection address will appear in the header and the client name will appear in the footer of each page of the report document.
Search for Additional Information Searches the document (similar to the Find function in Word), from the current cursor position to the end of the document, for groups of 3 question marks (???) or INFO buttons.
Copy to Report Summary Copies text you have highlighted to the summary section of your choice.
Add Photo Opens the “Insert Picture” window and displays the contents of Digital Images folder (as defined in the Default Folders screen — see the Customizing section of this guide). You can preview each of the images in this window and then choose to insert an image into your report at the current cursor location; however, the cursor must be blinking on a blank line with no other text.
Illustrated Home Clip Art Opens the “Insert Picture” window and displays the contents of The Illustrated Home CD-ROM (sold separately). You can preview each of the images in this window and then choose to insert an image into your report at the current cursor location. A screen containing sample images from The Illustrated Home can also be opened.
Photo Frame (3 buttons) Add an empty frame at your current cursor position in the report document; however, the cursor must be blinking on a blank line with no other text. You can then insert a photo or digital image into the frame and it will be automatically sized to fit the frame. Also, you can use frames 2 and 3 together to create two images side-by-side.
Photo Summary Adds a new page to the end of the report with 6 photo frames on the page.
InspectIt ReportPlus User’s Guide 10
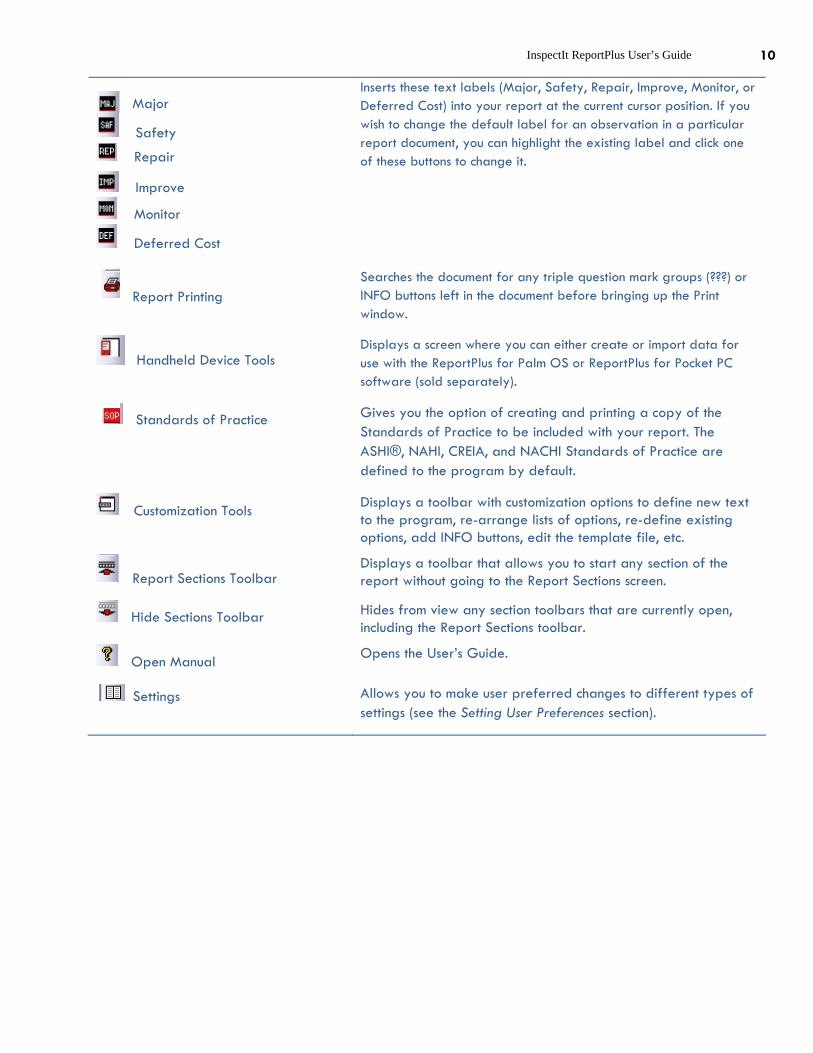
Major
Safety
Repair
Inserts these text labels (Major, Safety, Repair, Improve, Monitor, or Deferred Cost) into your report at the current cursor position. If you wish to change the default label for an observation in a particular report document, you can highlight the existing label and click one of these buttons to change it.
Improve
Monitor
Deferred Cost
Report Printing
Searches the document for any triple question mark groups (???) or INFO buttons left in the document before bringing up the Print window.
Handheld Device Tools Displays a screen where you can either create or import data for use with the ReportPlus for Palm OS or ReportPlus for Pocket PC software (sold separately).
Standards of Practice Gives you the option of creating and printing a copy of the Standards of Practice to be included with your report. The ASHI®, NAHI, CREIA, and NACHI Standards of Practice are defined to the program by default.
Customization Tools Displays a toolbar with customization options to define new text to the program, re-arrange lists of options, re-define existing options, add INFO buttons, edit the template file, etc.
Report Sections Toolbar Displays a toolbar that allows you to start any section of the report without going to the Report Sections screen.
Hide Sections Toolbar Hides from view any section toolbars that are currently open, including the Report Sections toolbar.
Open Manual Opens the User’s Guide.
Settings Allows you to make user preferred changes to different types of settings (see the Setting User Preferences section).

InspectIt ReportPlus User’s Guide 11
CREATING REPORTS
Create a narrative or checklist report Go to the Main ReportPlus screen, and select the type of report template you want by clicking the appropriate menu button. Your options are: Create Narrative Report or Create Checklist Report.
The Client Info screen is displayed.
InspectIt ReportPlus User’s Guide 12
Enter client information The basic client information that is entered on the Client Info screen enables the system to auto-populate the first page of the inspection report, as well as the header and footer.
1. Type in the following fields what you want to appear in this report.
• Client Name • Inspection Address • Inspector (defaults to your name) • Inspection Date (defaults to today’s date) • Report Number
2. Click the OK button.
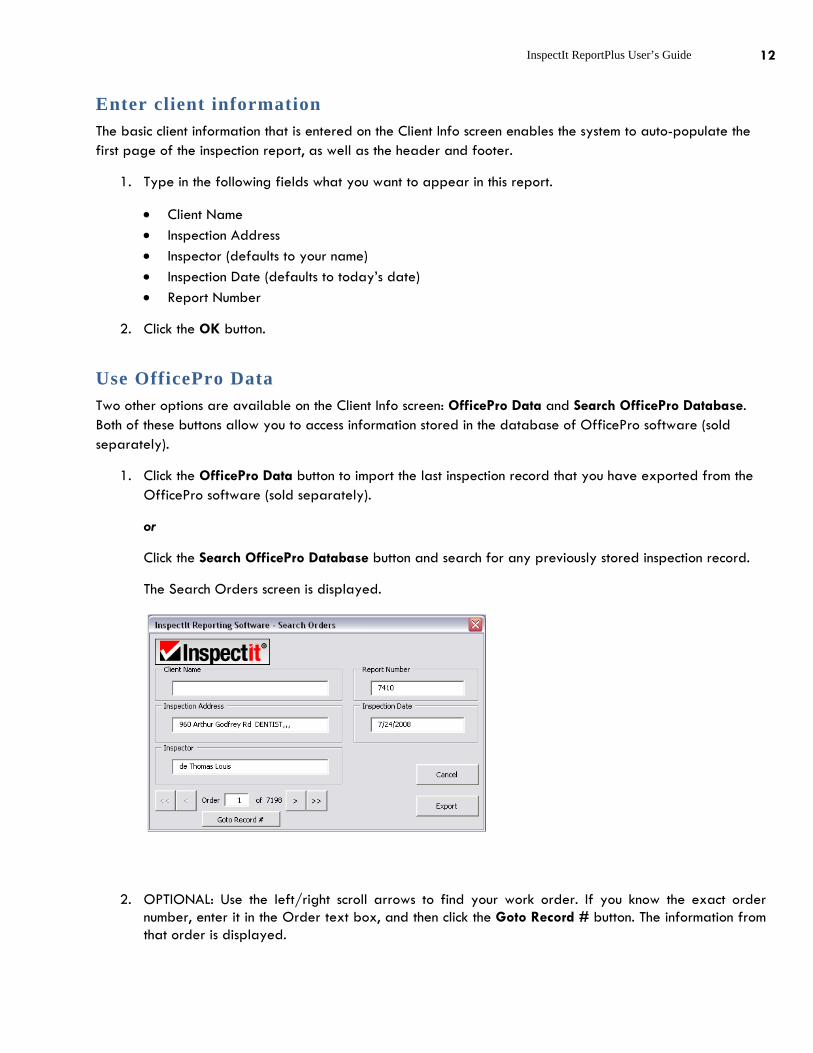
Use OfficePro Data Two other options are available on the Client Info screen: OfficePro Data and Search OfficePro Database. Both of these buttons allow you to access information stored in the database of OfficePro software (sold separately).
1. Click the OfficePro Data button to import the last inspection record that you have exported from the OfficePro software (sold separately).
or
Click the Search OfficePro Database button and search for any previously stored inspection record.
The Search Orders screen is displayed.
2. OPTIONAL: Use the left/right scroll arrows to find your work order. If you know the exact order number, enter it in the Order text box, and then click the Goto Record # button. The information from that order is displayed.
InspectIt ReportPlus User’s Guide 13
Save as… Be sure to save the report. When the basic inspection report information has been inserted into this report, you will be prompted to type a file name and save it as a new document.
We recommend you use file names that correspond to the street address of the property you are inspecting. Alternatively you can use a date-coded format for your file names, or the report number. You can also create folders on your hard drive in which to store your documents.
IMPORTANT: Remember that each time you create and save a new report, it counts as one of your uses of the software.
InspectIt ReportPlus User’s Guide 14
CHECKLIST VERSUS NARRARTIVE REPORT
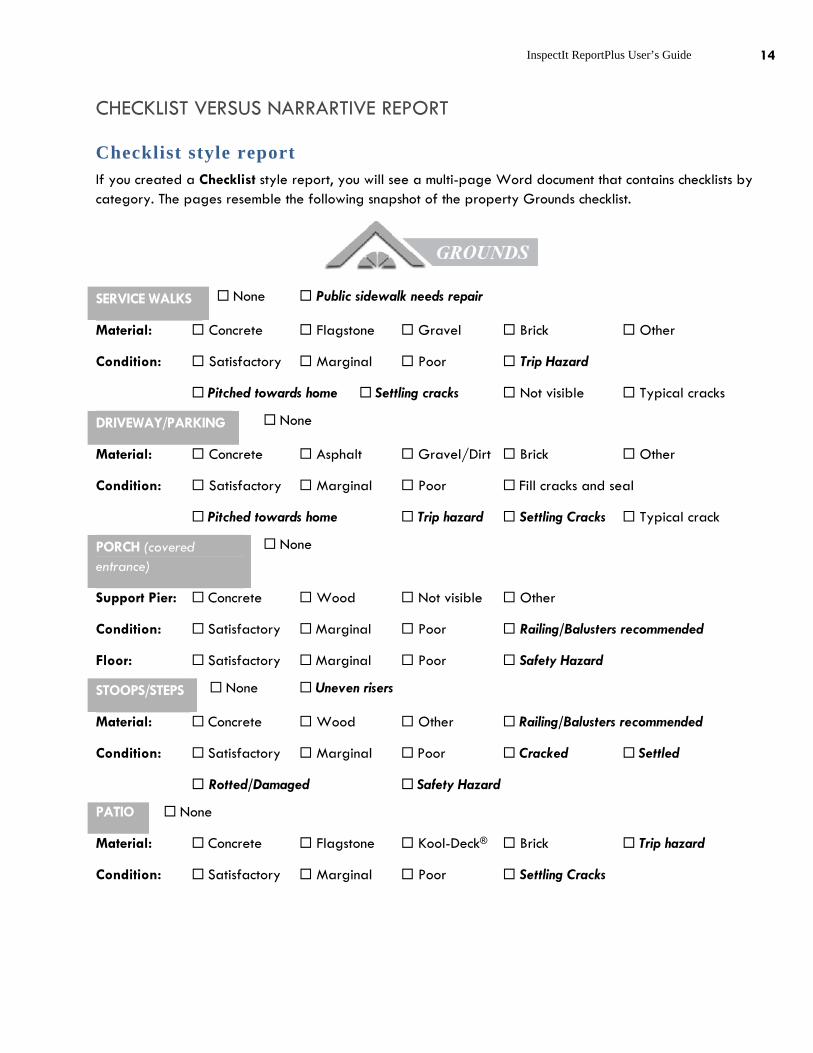
Checklist style report If you created a Checklist style report, you will see a multi-page Word document that contains checklists by category. The pages resemble the following snapshot of the property Grounds checklist.
SERVICE WALKS None Public sidewalk needs repair
Material: Concrete Flagstone Gravel Brick Other
Condition: Satisfactory Marginal Poor Trip Hazard
Pitched towards home Settling cracks Not visible Typical cracks
DRIVEWAY/PARKING None
Material: Concrete Asphalt Gravel/Dirt Brick Other
Condition: Satisfactory Marginal Poor Fill cracks and seal
Pitched towards home Trip hazard Settling Cracks Typical crack
PORCH (covered entrance)
None
Support Pier: Concrete Wood Not visible Other
Condition: Satisfactory Marginal Poor Railing/Balusters recommended
Floor: Satisfactory Marginal Poor Safety Hazard
STOOPS/STEPS None one Uneven risers Uneven risers
Material: Concrete Wood Other Railing/Balusters recommended
Condition: Satisfactory Marginal Poor Cracked Settled
Rotted/Damaged Safety Hazard
PATIO None
Material: Concrete Flagstone Kool-Deck® Brick Trip hazard
Condition: Satisfactory Marginal Poor Settling Cracks

InspectIt ReportPlus User’s Guide 15
Narrative style report If you created a Narrative style report, there are two ways that the software will work depending on your settings on the Settings screen.
• The first way is that you will be brought to the Main ReportPlus screen. From here, you can select your section, and then insert your comments.
• The second way, you will go to the Report Sections screen.

InspectIt ReportPlus User’s Guide 16
The Report Sections screen is the first window that appears after the Main ReportPlus screen. You can also
access this screen by clicking the Report Sections icon button on the ReportPlus toolbar.
This screen is where you choose a section of your report to work on from a list of 11 default section titles. Simply click on the section you want (for example, Structure) and you will go directly to that section of the selected Building Inspection Report.
The screen has additional features that allow you to insert a Cost Summary, generate a Table of Contents, and go to other useful ReportPlus screens, such as Additional Sections/General Information (explained later in this user guide).
Finally, a Customize function allows you to re-define or create your own report sections (see Customizing the Program). Once there, any section of the program can be accessed by pressing the key corresponding to an underlined letter on a push button (i.e., Table of Contents can be started by pressing the “T” key).
USER TIP: Online help is available from this screen by clicking the Help button.

InspectIt ReportPlus User’s Guide 17
MISCELLANEOUS REPORTING CAPABILITIES
Work with report sub-sections ReportPlus sections have sub-sections that help organize your inspection details into a standard format. Each sub-section is designed to be contained on a single page (this can be altered by eliminating the page breaks between sections in the template file (see Editing the ReportPlus Document Template). If you have numerous observations, the text will automatically move to a second page, and the page numbers will be automatically updated.
When you select an option from the Report Sections screen, the toolbar for that section appears over the report document (Word 97-2003) or on the Word Ribbon (Word 2007).
By default, the pre-defined sub-sections are: Description, Comments, Observations, and Limitations. Click the desired button to activate a screen that allows you to insert items into that part of your report.
Insert text
Observations, recommendations, etc.
There are text comments built into the ReportPlus software for your convenience. This library of pre-defined (auto text) comments can be used to insert standard recommendations, observations, etc.
The system also lets you add any non-standard observations, recommendations, additional text, etc., that you may need to document but which are not pre-programmed by default. This might include observations specific to your geographic location, for instance.
To insert text into the report:
1. Choose a section (example: Structure) on the Report Sections screen and click one of the sub-section buttons (example: Description) on the new toolbar that appears. The following screen Main Screen (example: Structure Description) is displayed.
USER TIP: There is no limitation to the length or formatting of the text that you add to the report. You can even add a combination of photo, drawing, and paragraph of text as a single entry!
USER TIP: Each of these buttons can be re-named to create your own sub-sections (see Customizing Toolbar Buttons). For example, you may want the buttons to be: Description, Observations, Time Frame, and Cost Estimates.

InspectIt ReportPlus User’s Guide 18
Checklist View Insert View
2. Choose a view option from the left-hand list on the screen. Items that appear in ALL CAPS are sub-headings that can be used.
3. As you highlight items in the list, a preview of the text will show at the bottom of the screen.
a. In the “Checklist View,” when you select the descriptor, the sub-heading will select itself and be inserted along with the descriptor. (Both the “Insert View” and the “CheckList View” are shown to the right.)
Locations / Comments
You can also choose an option from the Locations/Comments list. Many of the options allow you to add items from this list into the text as it is printed on the report.
If none of the list items apply to your report, you can type up to 250 characters in the upper portion of the list. This list can be modified by you to include your own options (see Modifying the Location/Comments Lists).
Insert buttons
USER TIP: If you select Location, the location will remain on the screen and be inserted into any additional options unless you clear the Location text box. You can accomplish this by clicking on a blank line in the list of location options.
USER TIP: The name of the location within the house can also be inserted into each comment, by selecting from a drop-down list or adding on-the-fly in the Location field.
USER TIP: On Description screens, in the “Insert View,” you would usually want to insert a sub-heading before choosing any of the description options.

InspectIt ReportPlus User’s Guide 19
There are various Insert buttons that provide:
• Insert in Section button — places your text in the section of the report you are working on.
• Summary button — inserts your choice in both the current section (example: Electrical) and the Report Overview page [Summary] of the report).
• Insert At Cursor button — inserts your choice at the current cursor location within the document.
After you have finished inserting your text, click the Close button to shut the option screen.
Insert a picture Pictures add value to your inspection report, and are easy to insert using the section toolbar.
1. Click your cursor on a “blank” line in your report (be sure it is blinking).
2. Click the Picture button on that section’s toolbar. The Insert Picture window appears.
3. Select an image to insert at your cursor position.
Navigate report sections After completing a given section of the report, you can switch sections and areas by clicking on any of the section buttons or section area tabs. You can also access all of the areas that are found on the report sections screen, such as Additional Sections, General Information, Table of Contents, and Cost Summary.
Use check box controls If you are using one of the ReportPlus layouts that have check boxes present on the report document, you
can “check” one of the boxes by simply clicking it. Clicking it again will “un-check” the box.
Type and edit within Word To type directly into the inspection report, click on the actual report screen. Then, proceed to type and make edits as you wish.
USER TIP: The report window can remain open while you are working inside the ReportPlus program.
USER TIP: You can also define a specific folder or drive for your program to look within before it displays the Insert Picture window (see Defining Default Folders).
USER TIP: This option is especially helpful when you are editing the report and realize that you need to insert additional text. After inserting text you can move the option screen out of the way and edit the text of your report. You can then easily move back the option screen and continue to insert auto text into the report.

InspectIt ReportPlus User’s Guide 20
Use Info buttons INFO buttons are designed to help fill out your reports with commonly used text in certain categories. These buttons allow you to choose from a list of auto text items that you can define yourself.
1. To embed Info buttons within the ReportPlus template, double-click one of these buttons. A screen similar to this Additional Information screen is displayed.
2. Select an item from the existing list.
or
Type in the text box to Add a new item to the list (follow instructions below).
3. Click the appropriate button to insert a selected item in your report.
• Insert-Close — inserts your selected item and then closes the screen. • Insert-Repeat — inserts your selected item and keeps the screen displayed, so that you may
select another item. • Insert-Line Break — acts as if you hit the Enter key and starts a new paragraph with your next
selection. • Insert AT Close — inserts your selected item if it is a defined auto text and then closes the screen. • Insert AT Repeat — inserts your selected item if it is a defined auto text and keeps the screen
displayed so that you may select another item. • Insert AT Line Break — inserts your selected item if it is a defined auto text and acts as if you hit
the Enter key, starting a new paragraph with your next selection.
Add text to Summary categories
USER TIP: If you selected the Run Next INFO Button option from the Search toolbar (see Search for Additional Information), the Insert-Edit button inserts your selection, closes the screen, and stops the program from searching for the next INFO button.

InspectIt ReportPlus User’s Guide 21
You can also use INFO buttons to add pre-defined items to both the current cursor position and the Summary section at the same time.
1. Follow the INFO button steps above.
2. After selecting the item you want to insert, click one of the Summary Category buttons at the bottom of the Additional Information screen.
The selected text is inserted in both locations of the report document. The screen stays active in the same way as the Insert-Repeat button.
3. Continue to add the text to as many of the Summary categories as you want.
Add items to the INFO button list
You can add new text items to the INFO button list, as needed.
1. Type new INFO button text in the Add a new item to the list box.
2. Click the Add New Item button. All new items are added to the end of the list.
Edit items in the INFO button list
You might also want to edit the INFO button list, for example, to sequence the listed items.
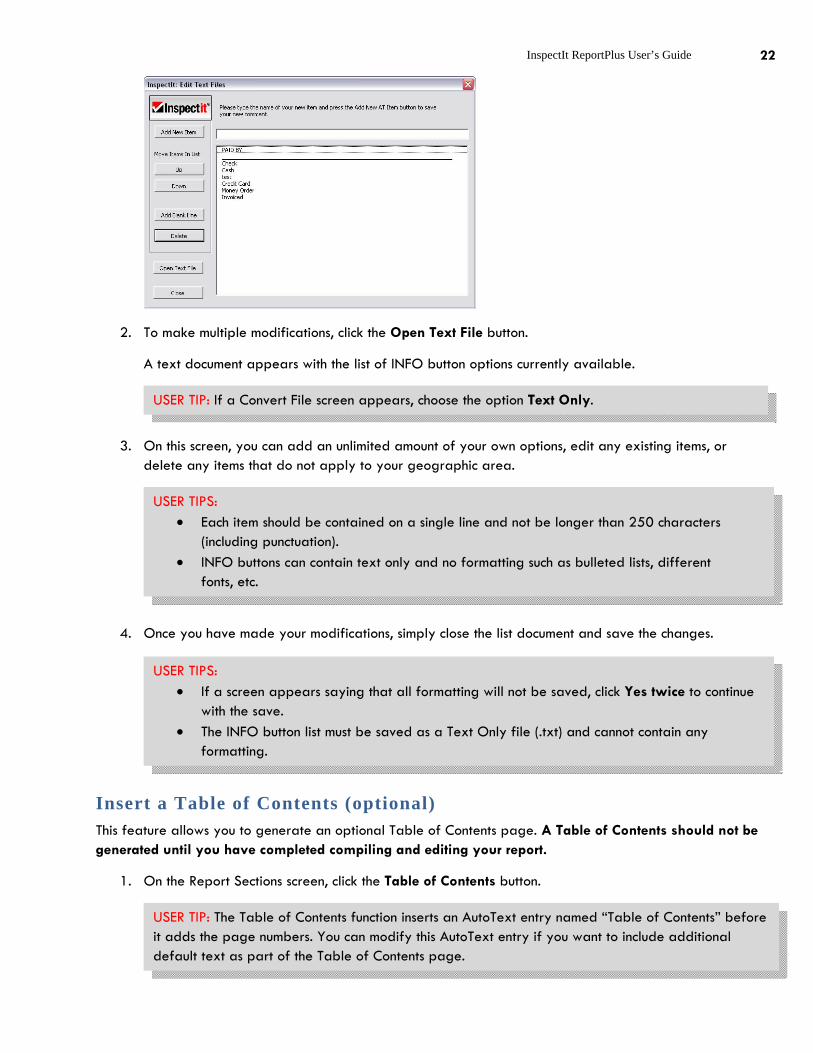
1. To simply edit a single item, click the Edit Text File button. The Edit Text Files screen is displayed. This enables you to move an item up and down in the list, add a blank line, or delete an item using the appropriate buttons.
USER TIP: These buttons correspond to the six default Summary categories that come with the program. You can modify the categories to your liking (see Customize the Summary Categories).
InspectIt ReportPlus User’s Guide 22
2. To make multiple modifications, click the Open Text File button.
A text document appears with the list of INFO button options currently available.
3. On this screen, you can add an unlimited amount of your own options, edit any existing items, or delete any items that do not apply to your geographic area.
4. Once you have made your modifications, simply close the list document and save the changes.
Insert a Table of Contents (optional) This feature allows you to generate an optional Table of Contents page. A Table of Contents should not be generated until you have completed compiling and editing your report.
1. On the Report Sections screen, click the Table of Contents button.
USER TIP: The Table of Contents function inserts an AutoText entry named “Table of Contents” before it adds the page numbers. You can modify this AutoText entry if you want to include additional default text as part of the Table of Contents page.
USER TIPS: • If a screen appears saying that all formatting will not be saved, click Yes twice to continue
with the save. • The INFO button list must be saved as a Text Only file (.txt) and cannot contain any
formatting.
USER TIPS: • Each item should be contained on a single line and not be longer than 250 characters
(including punctuation). • INFO buttons can contain text only and no formatting such as bulleted lists, different
fonts, etc.
USER TIP: If a Convert File screen appears, choose the option Text Only.
InspectIt ReportPlus User’s Guide 23
2. Simply press the Table of Contents button on the Report Sections screen.
3. To refresh the Table of Contents after adding or deleting a report section, highlight the Table of Contents and press F9 on your keyboard.
4. Select Update entire table, and then click OK.
5. Remember to Save the entire report when done.

InspectIt ReportPlus User’s Guide 24
CREATING INSPECTION DOCUMENTS Within ReportPlus, you can create additional documents needed for the inspection. These documents include an Order Form, Inspection Agreement, Invoice, Report Cover Letter, Letter to the Buyer’s Agent, and a Letter to the Seller’s Agent. All of the documents can be modified to include your own verbiage, logos, etc. You can also add an unlimited amount of additional documents.
Run an inspection document 1. Go to the Main ReportPlus screen, and click the Run Inspection Documents menu button.
The Inspection Documents main screen is displayed, with menu buttons that allow you to create documents, print order forms, and import or search data stored in OfficePro software (sold separately).
2. Click the Create Documents button to display the Inspection Information screen. From here, you can fill in the information that will be used to create your inspection document.

InspectIt ReportPlus User’s Guide 25
or
Click the OfficePro Data button, and the program will:
o search for information to export from the OfficePro software, o start a new document, and o show the Inspection Information screen with the exported information displayed (OfficePro is
sold separately). The main Inspection Information screen is displayed for entering basic property data. From here, you can also access screens for entering additional details related to the client, buyer’s realtor, seller’s realtor, and other referral information. (These names will be automatically shown on the main screen.)
Enter inspection information The basic property information that is entered on the Inspection Information screen enables the system to auto-populate the first page of the inspection document, as well as the header and footer.
Provide basic property data
1. Complete the required fields.
• Client Name • Inspection Address
USER TIP: This inspection data is retained while you are using the program, so if you made a mistake in the spelling of the Client Name, for instance, you can run the program again without having to re-enter all the information. Just make the correction and click the OK button for automatic updating of documents.
USER TIP: If you want to start with a completely blank screen, click the Clear Screen button.

InspectIt ReportPlus User’s Guide 26
• Inspection Date (defaults to today’s date) • Time • Report Number • Structure Style • Structure Type • Fee • Square Footage • Age • Purchase Price • Directions • Inspector (defaults to your name) • Report Delivery (E-mail, etc.) • Inspection Notes
2. If done, click the OK button, or click the appropriate button to enter further details about the property.
Provide client details
1. On the Inspection Information screen, click the Client(s) Information button. The Client Information screen is displayed.
2. Complete the required fields.
• Client Name • Company Name • Address • Phone & Fax Numbers
3. Click the OK button.
Provide buyer’s realtor details

InspectIt ReportPlus User’s Guide 27
1. On the Inspection Information screen, click the Buyer’s Realtor Information button. The Buyer’s Realtor Information screen is displayed.
2. Complete the required fields.
• Name • Company Name • Address • Phone & Fax Numbers
3. Click the OK button.
Provide seller’s realtor details
1. On the Inspection Information screen, click the Seller’s Realtor Information button. The Seller’s Realtor Information screen is displayed.
2. Complete the required fields.
InspectIt ReportPlus User’s Guide 28
• Name • Company Name • Address • Phone & Fax Numbers
3. Click the OK button.
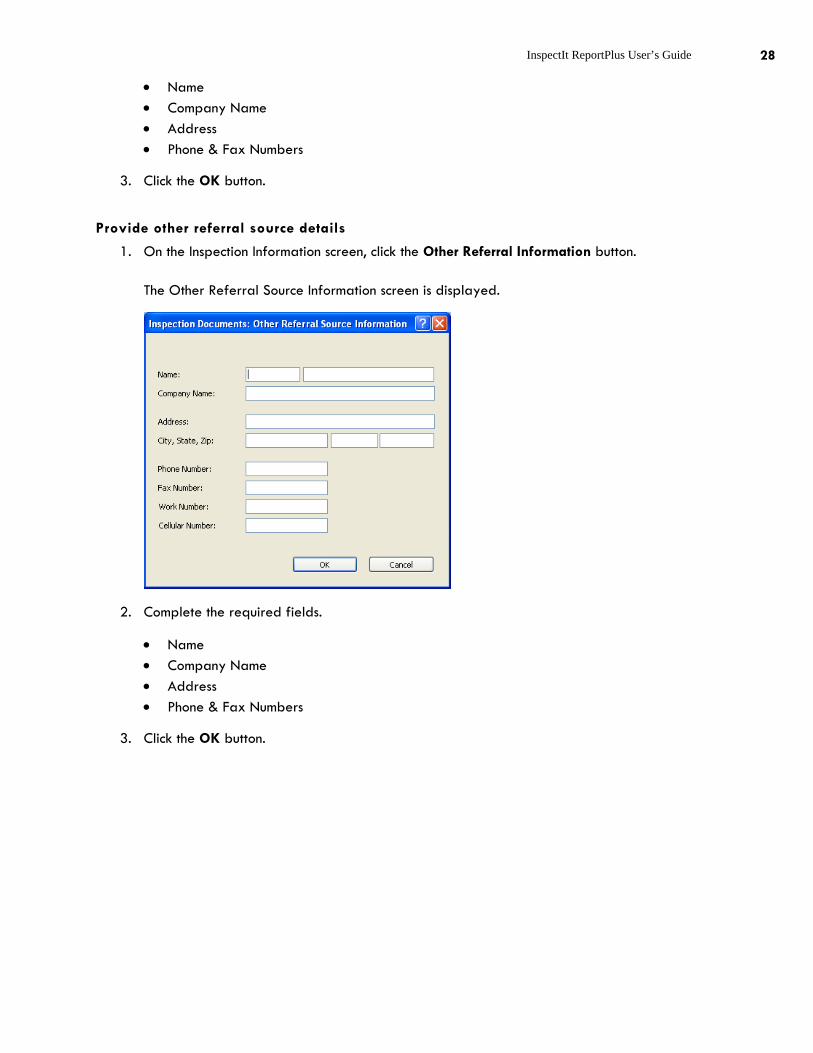
Provide other referral source details
1. On the Inspection Information screen, click the Other Referral Information button. The Other Referral Source Information screen is displayed.
2. Complete the required fields.
• Name • Company Name • Address • Phone & Fax Numbers
3. Click the OK button.

InspectIt ReportPlus User’s Guide 29
SECTION TWO: CUSTOMIZING THE PROGRAM
SETTING USER PREFERENCES A Settings screen allows you to set certain preferences for using the program exactly the way you want. Note that these settings can be changed at anytime. However, some settings are not applicable to the Checklist version.
Specify your settings 1. On the Main ReportPlus screen, click the Settings button.
The Settings screen is displayed.
2. Click the desired option button to set the following preferences:
a. Section Toolbar — Show Toolbar or Hide Toolbar (most useful for Word 2007 users who want to clean up their window by hiding the ribbon)

InspectIt ReportPlus User’s Guide 30
b. Bookmarks — Show Bookmarks or Hide Bookmarks
c. Click — Single Click or Double Click
d. Photo Insert — Automatic Insert or Manual Insert (manual mode allows you to insert a picture frame without the picture.)
e. Paragraph Markers — Show or Hide
f. Individual Section Toolbars — Show Toolbars or Hide Toolbars
Add your company information One of the first things you will want to customize in the program is your company information. This information will be used on all the documents that are in the Inspection Documents program by default. It can also be inserted into any document that you may add to the program.
To add your information:
1. Click the InspectIt button on the toolbar at the top of your screen (or click the Inspection menu option on the Word menu bar). Then, select the Company Information option.
or
Simply click the Company Info button on the Settings screen.
2. Enter your company information on the screen that appears.
3. When finished, click the OK button. This information will now be used in all future reports and inspection documents.
Define default folders You can define the default folders on your hard drive for Inspection Reports, Inspection Documents, and the location of your digital images (such as digital photos, line drawings, etc.).
1. On the Main ReportPlus screen, click the Settings button.
2. Highlight the option you want to re-define (example: MyDocuments).
3. Manually type the directory path in the Setting field, or Browse to locate the folder of your choice.

InspectIt ReportPlus User’s Guide 31
4. Click the Save Location button.
5. Click the Save Settings button to close the screen. The new file location is saved to the program.
Modify the template A “template” file is similar to pre-printed letterhead. The template contains the body text and formatting that appears by default when you begin a new inspection report. Template files can be edited in the same way as any Word document. You can change the look and feel of the ReportPlus templates to match your company colors, add your logo, and so forth.
1. On the Settings screen, click the Modify Template button. The template file (InspectIt ReportPlus.dot) opens.
2. Proceed to edit it exactly as you would a document file.
The sections of the report can be re-arranged in any order you wish (example: moving the Roofing section in front of the Structure section). If you re-arrange the sections, make sure that the bookmarks are moved along with the text of the section (see Bookmarks).
You can also re-name the titles of each section, add text to the template that will appear every time you run the report, add your company logo (see Adding Photos and Graphics to the Report), change the default fonts, add color, etc.
4. Once you have completed your editing of the template file, be sure to save your changes. The documents generated from the ReportPlus program will now include your changes.
IMPORTANT: Anything added to the template becomes a permanent change.
IMPORTANT: When you are editing the template, do not run any of the program functions used to fill out a report.
USER TIP: It is recommended that changes be made before you start using the program to create reports.
USER TIP: Next time you save your Inspection Report, it will be stored in the new default folder.
IMPORTANT: The folders that you define must exist on your hard drive — typing in a folder path on this screen will not create the folder. You must create the folders (using Windows Explorer, for example) prior to using this option.

InspectIt ReportPlus User’s Guide 32
Insert a new page
New pages or documents can be added by inserting page breaks once the template file for the program is open.
To insert a page break:
1. Click your mouse where you want the page break (usually at the end of the template document),
2. From the Insert menu, choose Break, and then select Page Break.
3. You can now begin typing on your new page.
Insert fields (Inspection Documents Only)
You can also insert fields from the Field toolbars within the program to “merge” the inspection information into your documents.
To insert a field into your document:
1. Choose View Document Field Toolbars from the Documents menu.
or
Click the Document Field Toolbar button on the left side of the screen. The Field Categories toolbar appears.
2. Select a category, such as Client (shown above).
3. Click your cursor where you want to insert the client’s first name, for example, in your document.
4. Click the First Name button on the toolbar and you will see it inserted at the cursor position.
USER TIP: The keyboard shortcut for inserting a page break is Ctrl + Enter.
USER TIP: You can also the AutoText function of the program to create numerous report layouts with their own unique text, formatting, etc. Examples would include a commercial report, condominium report, or others that you may come up with — such as a layout for a specific subdivision. To accomplish this, you would create the layout within a report document, highlight all of the text in the document, and add the layout as a new entry to an Option Screen (example: the General Information screen).

InspectIt ReportPlus User’s Guide 33
When you run the Inspection Documents program, the client’s first name will be inserted at this point in your document.
Delete pages
If you wish to delete any pages from the template, simply delete the text and the page break.
Re-arrange report sections
The sections of your report can be re-arranged in any order you wish (example: moving the Roofing section in front of the Structure section). If you re-arrange the sections, make sure that the bookmarks are moved along with the text of the section (see Bookmarks).
Re-name section titles, add default text, and change formats
You can also re-name the titles of each section, add text to the template that will appear every time you run the report, add your company logo (see Adding Photos and Graphics to the Report), change the default fonts, add color, etc.
Save template changes
When all template changes are made, they must be saved. After saving, any documents generated from the ReportPlus program will now include your changes.
Create numerous report layouts
Using the AutoText function, you can create numerous report layouts with their own unique text, formatting, etc. Examples would include a commercial report, condominium report, or others that you may come up with — such as a layout for a specific subdivision.
To accomplish this, simply create the layout within a report document, highlight all of the text in the document, and add the layout as a new entry to an Option Screen (example: the General Information screen).
Back up the InspectIt Software program
IMPORTANT: The template changes are permanent. Be sure you want to make modifications before you actually save them.
IMPORTANT: When editing document templates or AutoText entries, you will view the Bookmarks that are present within the text (see Bookmarks). Bookmarks appear as large capital I’s or the end section of an I-beam. Be very careful not to delete the Bookmarks while editing — deleting them will cause errors within the program.
USER TIP: You can use the same fields as many times as you like within your documents; it makes no difference to the program. Once you’ve inserted a field, you can change the font, size, etc.

InspectIt ReportPlus User’s Guide 34
Make a back up copy of the c:\InspectIt folder whenever you make a change to the software. To do this, simply copy the c:\InspectIt folder to a floppy disk, or other backup media, and keep it in a safe place where you’ll be able to retrieve it. If you do not do this and experience a hard disk problem, all of your template changes will be lost. While we can send you another copy of the program, we will not be able to recover your customizations.

InspectIt ReportPlus User’s Guide 35
CUSTOMIZING THE REPORT SECTIONS SCREEN With ReportPlus, you have the ability to customize the report sections to your liking by re-naming existing sections or adding completely new ones to your report.
Modify the Report Sections screen 1. Click the Report Sections button on the ReportPlus toolbar.
2. On the Report Sections screen shown below, click the Customize button.
The Customize Report Sections screen is displayed.
Change the name of the section by clicking the check box to the left of the textbox and then editing the text. In our example shown above, we’ve changed Section 12 to “Detached Garage.”
3. Once you have edited the options on this screen to your liking, click the OK button.
The next time you bring up the Report Sections screen, it will appear with your edited section on the button faces and the titles of the page for that section within the report document.

InspectIt ReportPlus User’s Guide 36
USER TIP: To make the changes to the Report Sections screen permanent, you must save the changes to the InspectIt ReportPlus.dot template when you close the document in which you are currently working.
InspectIt ReportPlus User’s Guide 37
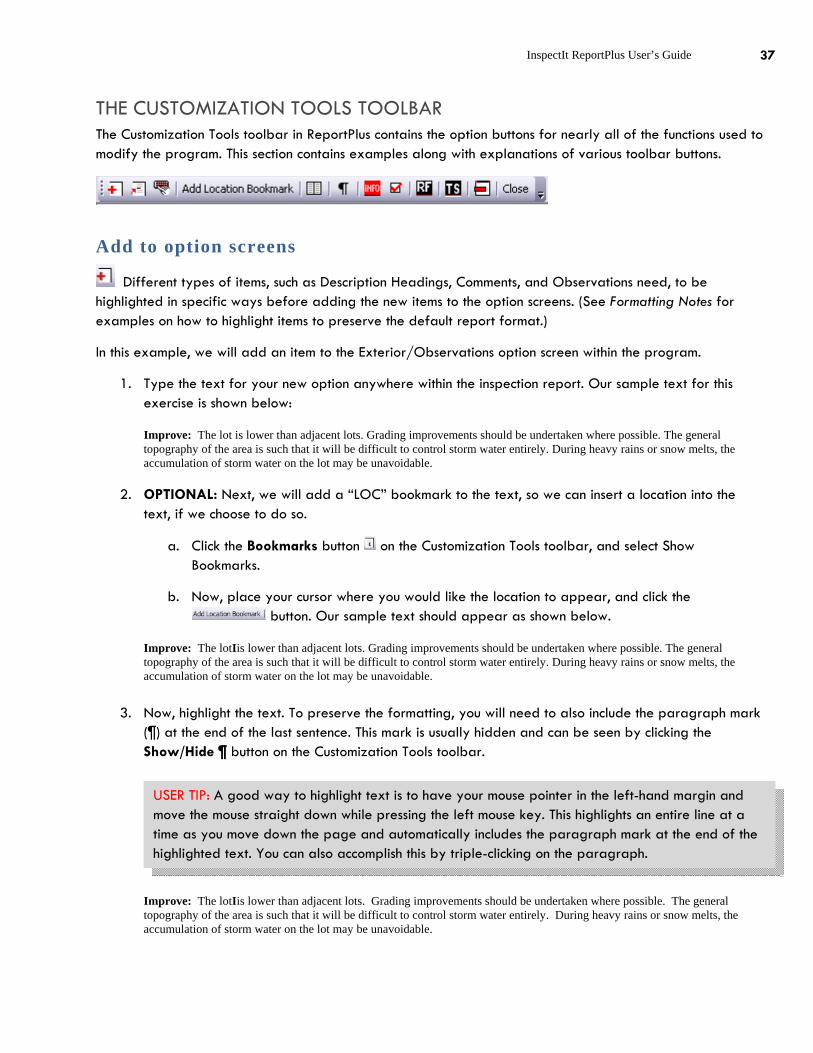
THE CUSTOMIZATION TOOLS TOOLBAR The Customization Tools toolbar in ReportPlus contains the option buttons for nearly all of the functions used to modify the program. This section contains examples along with explanations of various toolbar buttons.
Add to option screens
Different types of items, such as Description Headings, Comments, and Observations need, to be highlighted in specific ways before adding the new items to the option screens. (See Formatting Notes for examples on how to highlight items to preserve the default report format.)
In this example, we will add an item to the Exterior/Observations option screen within the program.
1. Type the text for your new option anywhere within the inspection report. Our sample text for this exercise is shown below:
Improve: The lot is lower than adjacent lots. Grading improvements should be undertaken where possible. The general topography of the area is such that it will be difficult to control storm water entirely. During heavy rains or snow melts, the accumulation of storm water on the lot may be unavoidable.
2. OPTIONAL: Next, we will add a “LOC” bookmark to the text, so we can insert a location into the
text, if we choose to do so.
a. Click the Bookmarks button on the Customization Tools toolbar, and select Show Bookmarks.
b. Now, place your cursor where you would like the location to appear, and click the button. Our sample text should appear as shown below.
Improve: The lotIis lower than adjacent lots. Grading improvements should be undertaken where possible. The general topography of the area is such that it will be difficult to control storm water entirely. During heavy rains or snow melts, the accumulation of storm water on the lot may be unavoidable.
3. Now, highlight the text. To preserve the formatting, you will need to also include the paragraph mark (¶) at the end of the last sentence. This mark is usually hidden and can be seen by clicking the Show/Hide ¶ button on the Customization Tools toolbar.
Improve: The lotIis lower than adjacent lots. Grading improvements should be undertaken where possible. The general topography of the area is such that it will be difficult to control storm water entirely. During heavy rains or snow melts, the accumulation of storm water on the lot may be unavoidable.
USER TIP: A good way to highlight text is to have your mouse pointer in the left-hand margin and move the mouse straight down while pressing the left mouse key. This highlights an entire line at a time as you move down the page and automatically includes the paragraph mark at the end of the highlighted text. You can also accomplish this by triple-clicking on the paragraph.

InspectIt ReportPlus User’s Guide 38
4. Once the text is highlighted, click the Add To Option Screens button on the Customization Tools toolbar. The program prompts you to modify an option screen in a particular section (choose Exterior).
5. From the next screen that appears, you will be able to choose a specific option screen for the section (choose Option Screen 3 for Observations).
6. In the Enter a name for the new item text box on the screen shown below, type the name of the new Option Screen entry — we will call our observation “Low Lot” – and then click the OK button.
7. Once your new entry has been added, you will be prompted to edit the text file (.txt) for the option screen. The option you just added now appears at the end of the list, and you can edit the text file to group similar items together (see Edit Option Screen Text Files).
The next time you run the option screen that you modified (in this example, the Exterior Observations option screen), your new entry will appear.
8. To delete items, you would not highlight any text and then bring up the option screen of your choice. Using the list box shown above, click the option you wish to delete and then click the Delete button.
Edit option screen text files
USER TIP: To make the change permanent, you must save it to the InspectIt ReportPlus.dot template when you close the document in which you are currently working.

InspectIt ReportPlus User’s Guide 39
In the previous example, we added an item to the Exterior/Observations option screen and will now change the position on the screen where our option can be found. You can also use the Cut and Paste
commands to transfer options from the text file of one screen to another if you wish to re-organize your report sections.
1. Click the Edit Option Screen Text Files button on the Customization Tools toolbar.
2. You will be prompted to modify the text file list for a particular section (choose Exterior) and then which particular screen (choose Option Screen 3 for Observations). You can also use this method to edit the list of locations shown on a particular screen by clicking the Location/Comments buttons.
3. Word opens the text file (in this example: S033~~~~.txt) and the paragraph marks (¶) automatically turn on. To turn them back off after you’ve edited this file, click the Show/Hide ¶ button.
4. Scroll down to the end of the document, where you can now see the item “Low Lot.”
5. Highlight this line and click the Cut button on the Word toolbar, or use the keyboard shortcut Ctrl+X. If your cursor is on a blank line after you cut the text, press the Backspace key.
6. In this example, we decide that we want this item to appear above the option Low Lot Relative To Neighbor with the Lot Drainage observations. Scroll up the list until these items appear.
7. Place your cursor at the beginning of Low Lot Relative To Neighbor and select Paste from the Word toolbar, or press Ctrl+V. When you paste in the option, Word often adds an extra space at the end of the line. The spaces are

InspectIt ReportPlus User’s Guide 40
represented by dots, as shown on the screen below. If an extra space has been inserted, be sure to delete it or the program will not recognize it as an AutoText entry.
8. Close and save the “S033~~~~.txt” file, making sure that the file is saved as a text only (.txt) file by Word (choose to lose any formatting changes, if asked). The next time you view the Exterior/Observations screen, the Low Lot option will appear with the Surface Drainage options.
Edit AutoText
The text defined to the ReportPlus program is saved as AutoText entries within Microsoft Word. Changes made to the AutoText entries will be permanent. If you just want to change a word or phrase in a particular report, do so in the report document, itself. To make a permanent change to the pre-defined text, change the AutoText entry as shown in the following example.
Re-define AutoText
In this example, we will edit and re-define the Low Lot observation from the Exterior/Observations screen. Before beginning, we recommend activating the Show Bookmarks feature.
1. Insert the text into a report document by selecting Low Lot from the Exterior/Observations screen. or If you know the AutoText name, type it and press the F3 key. The text will be inserted into your document, as shown below.
USER TIP: If you want to leave a blank line between groups of options, be sure to press the Spacebar once — the line cannot be totally blank.

InspectIt ReportPlus User’s Guide 41
Improve: The lotI is lower than adjacent lots. Grading improvements should be undertaken where possible. The general topography of the area is such that it will be difficult to control storm water entirely. During heavy rains or snow melts, the accumulation of storm water on the lot may be unavoidable
2. Next, edit the text to your liking. In this case, we will remove phrase “or snow melts.”
Improve: The lotI is lower than adjacent lots. Grading improvements should be undertaken where possible. The general topography of the area is such that it will be difficult to control storm water entirely. During heavy rains, the accumulation of storm water on the lot may be unavoidable
3. Now, highlight the text. To preserve the formatting, you need to also include the paragraph mark (¶) at the end of the last sentence. This mark is usually hidden and can be seen by clicking the Show/Hide ¶ button on the Customization Tools toolbar.
Improve: The lotIis lower than adjacent lots. Grading improvements should be undertaken where possible. The general topography of the area is such that it will be difficult to control storm water entirely. During heavy rains, the accumulation of storm water on the lot may be unavoidable
4. Once the text is highlighted, click the Edit AutoText button on the Customization Tools toolbar. The following screen appears.
5. In the All AutoText Entries text box, type the AutoText entry name (“Low Lot”), or select it from either list. The History list displays the last 10 items that you inserted on the screen to make it easier to remember exactly what you are redefining.
USER TIP: A good way to highlight text is to have your mouse pointer in the left-hand margin and move the mouse straight down while pressing the left mouse key. This highlights an entire line at a time as you move down the page and automatically includes the paragraph mark at the end of the highlighted text. (See Formatting Notes for examples on how to highlight items to preserve the default report format.)

InspectIt ReportPlus User’s Guide 42
6. Click the Save AutoText button, or double-click the name of the item from either list. The entry has now been re-defined and will appear in the edited version the next time that you insert it from the option screen.
There is no limitation to the length or formatting of the text that you define to the screen. For example, the ASHI® Standards of Practice have been defined as a single entry to the program — seven pages of text using multiple fonts and font sizes. You can also define digital photographs or line drawings as AutoText entries. In fact, you can even define a combination of a photo, a drawing, and a paragraph of text as a single entry! As long as you can highlight it on the page, you can add it to the ReportPlus program.
(Refer to your Microsoft Word documentation and Help file for additional information on creating and editing AutoText entries.)
Bookmarks
The “bookmark” feature of Microsoft Word is used extensively within ReportPlus. The program uses bookmarks as placeholders, so that it knows where in the report document to insert your option screen selections as well as the Inspection/Client information. If the bookmarks are not present within the inspection report, ReportPlus will not know where to place text within the document and will generate an error message — therefore, it is very important that the bookmarks are not deleted.
View bookmarks
You can view the bookmarks while you are working on the document to help you from inadvertently deleting them. To do this, we will:
1. Click the Bookmarks button on the Customization Tools toolbar.
2. Select the Show Bookmarks option. The bookmarks will appear similar to a capital I or an end section of an I-beam. In the example below, the bookmark is between the words “lot” and “is.”
Improve: The lotIis lower than adjacent lots. Grading improvements should be undertaken where possible. The general topography of the area is such that it will be difficult to control storm water entirely. During heavy rains or snow melts, the accumulation of storm water on the lot may be unavoidable.
Bookmark reference list
The following list of bookmarks shows ones that are present within the document template by default. This list indicates on which page each bookmark appears and the purpose of each bookmark. Use this as a reference in case you delete a bookmark or wish to move a bookmark to a different location.
IMPORTANT NOTE: To make the change permanent, you must save it to the InspectIt ReportPlus.dot template when you close the document in which you are currently working.

InspectIt ReportPlus User’s Guide 43
Name Purpose
Summary Page: Toc Used to generate a Table of Contents
Summary Used when copying items to Summary section 1
Summary2 Used when copying items to Summary section 2
Summary3 Used when copying items to Summary section 3
Summary4 Used when copying items to Summary section 4
Summary5 Used when copying items to Summary section 5
Summary6 Used when copying items to Summary section 6
Report Sections: Note: Each section has 4 bookmarks that correspond to each of the 4 Option Screens within the section. The naming convention is as follows:
The first 3 characters indicate the section number – from section 01 to 21
The fourth character indicates which Option Screen it corresponds to – 1 to 4
Therefore, for Section 1, the bookmarks would be as follows
S011 Location for items chosen from Option Screen 1
S012 Location for items chosen from Option Screen 2
S013 Location for items chosen from Option Screen 3
S014 Location for items chosen from Option Screen 4
In another example, the bookmarks for Section 16 would be:
S161 Location for items chosen from Option Screen 1
S162 Location for items chosen from Option Screen 2
S163 Location for items chosen from Option Screen 3
S164 Location for items chosen from Option Screen 4
Bookmark insertion (automated)
The bookmarks on the cover page insert text at the location of the bookmark, itself. On the report section pages, the program moves to the bookmark location, moves left one space, and then inserts the text into the report. If there is no space immediately to the left of a bookmark on one of the section pages, the program moves to the next line above and then inserts the text.
Find a bookmark name
You can find the name of an existing bookmark by clicking your cursor on the bookmark and then selecting Bookmark from the Insert menu (or Insert tab on the Word 2007 Ribbon). The name that appears in the Bookmark name text box is the name of the bookmark.

InspectIt ReportPlus User’s Guide 44
Re-insert a bookmark
Should you delete a bookmark, you can re-insert it into the document or template file. First, make sure you are viewing the bookmarks.
1. Place your cursor where you want the bookmark to appear.
2. Click on the Insert menu (or Insert tab on the Word 2007 Ribbon) and select Bookmark.
3. Type the name of the bookmark, and then click the Add button The bookmark now re-appears in the document. You can also use this same process to move a bookmark from one location to another.
Add INFO button
You can use each INFO button with the same list of options an unlimited amount of times, and up to 500 different INFO buttons can be created — each with its own unique list of options. The INFO buttons can be present on the ReportPlus template file or defined within AutoText entries.
To place an INFO button on the document or template:
1. Click the Add INFO Button option on the Customization Tools toolbar. A new button appears in your report at the current cursor position.
2. Once an INFO button is present on the document, you can simply highlight an existing INFO button, then copy and paste it into a new location. If you wish to use the same list, there is nothing further you need to do.
3. To use a different list of items or to create a new list, right-click the INFO button and select Toggle Field Codes. Instead of only the button graphic being displayed, the example shown below will appear on the document:
{ MACROBUTTON InformationPopUp1 INFO }
USER TIP: There is also a keyboard shortcut, Ctrl+Shift+F5, which brings up the Bookmark screen.

InspectIt ReportPlus User’s Guide 45
4. To change the list of options that will be displayed, change the number following the text “InformationPopUp.” Since the program can accommodate up to 500 different lists, the text can read from “InformationPopUp1” to “InformationPopUp500.”
5. Once the number has been changed, you can switch back to displaying only the button by right-clicking over the text and selecting Toggle Field Codes.
You can use INFO buttons in conjunction with pre-existing text on the template file. To view this in use:
1. Click the Report Sections button, select Additional Sections, and then insert the “Swimming Pool” section. The example would be on the Swimming Pool Description sub-section, where you can have the “Pool Type” sub-heading already on the document.
2. You can then place an INFO button to the right that would give you options to complete the description ( “above ground,” “below ground”, etc.).

InspectIt ReportPlus User’s Guide 46
CUSTOMIZING TOOLBAR BUTTONS (WORD 97 – WORD 2003 ONLY) The Report Sections toolbar and individual Section toolbars can be easily modified by following the steps below. For more detailed instructions on customizing your toolbars, consult your Word documentation and Help file.
Rearrange order of buttons To re-arrange the order of the buttons:
1. Hold the ALT key down on your keyboard, and hold the left mouse button down over the button you wish to move. A border will appear around the selected button (for example, Observations).
2. Drag the button to your desired location. A vertical black bar, as shown on the toolbar above, indicates the new location.
3. Let go of the mouse, and the button will be in its new position.
Delete or re-name buttons To delete or re-name one of the toolbar buttons:
1. Right-click your mouse over any button on any toolbar, and then select Customize from the bottom of the pop-up menu. (You can also select Customize from the Tools menu.) The Customize screen is displayed.
2. Click the Commands tab, and select the template InspectIt ReportPlus.dot from the “Save in:” drop-down list.
3. To delete a button, simply hold down with your left mouse button over the button you wish to delete, drag your mouse so it is on top of the document (an “X” appears in the lower right corner of your cursor icon) and let go of the mouse. The button will no longer be present on your toolbar.

InspectIt ReportPlus User’s Guide 47
4. To re-name an existing button, make sure that the Customize window is open and then click with your right mouse button over the button whose title you wish to change. The following pop-up menu is displayed.
5. Click your cursor in the Name textbox on the pop-up menu to edit the text of the button face.
6. Once you have edited the button title to your liking, click anywhere on the report document to close the pop-up menu.
7. To re-name another button, click with your right mouse button on the button you wish to edit and repeat the process.
8. When you have finished editing toolbar buttons, click on Close button on the Customize window.
IMPORTANT: If you make changes to the toolbars, you must save the changes to the template file InspectIt ReportPlus.dot when you close the document in which you are currently working.
IMPORTANT: Once a button is removed, you must call our Technical Support office to replace it.

InspectIt ReportPlus User’s Guide 48
CUSTOMIZING INSPECTION REPORTS ReportPlus allows you to customize inspection reports to suit your company’s needs. You can change any or all of the features described in this section to gain efficiency and speed in reporting.
Define report sections Each report section is designed to be contained on a single page. This can be altered by eliminating the page breaks between sections in the template file (see Editing the ReportPlus Document Template). If you have numerous observations, the text will automatically move to a second page and the page numbers will be automatically updated.
When you select a menu option from the Report Sections screen, the toolbar for that section will now appear over the report document (Word 97-2003) or on the Word Ribbon (Word 2007).
By default, the pre-defined sections of the software contain buttons for Description, Comments, Observations, and Limitations (also known as Option Screens 1 through 4) for each section. Clicking on one of these buttons will activate the appropriate Option Screen that you can use to insert items into your report document.
Each of these buttons can be re-named, if you wish, to create your own sub-sections (see Customizing Toolbar Buttons). For example, you may want the buttons to read Description, Observations, Time Frame, and Cost Estimates.
Clicking on the Picture button will bring up the Insert Picture window and allow you to choose an image to insert at your cursor position; however, the cursor must be blinking on a blank line with no other text. You can also define a specific folder or drive for your program to look within before it displays the Insert Picture window.
Add new comments The Add New button allows you to add a new comment to your library of comments.
Simply type in text and click the Add New button to create a new comment that will be defined with the same formatting as out-of-the-box ReportPlus comments. For example, if you are in the Description area and add a descriptor, the output would look exactly as the other description items (i.e., Times New Roman, 10Pt, with a bullet in front, and two spaces after the item).
Edit comments The Option Screen feature can be used to edit or add any observations, recommendations, additional text, etc., that you may need in the program that are not present by default; observations that are specific to your geographic location, for instance. You can edit the font and formatting from the AutoText tools window.
The Redefine button lets you modify existing comments. First, select an item from the list, make your changes, and then press the Redefine button. The name of the AutoText will be taken from the last item you selected in

InspectIt ReportPlus User’s Guide 49
the list and apply your changes after confirming you want the item to be changed. Again, the standard program formatting is automatically applied to any changes you make.
USER TIP: You can also use the buttons above the Preview screen to change font, color, and other formatting changes. If you use any of these buttons, the text will be defined as you see in the screen rather than our out-of-box formatting options.

InspectIt ReportPlus User’s Guide 50
FORMATTING NOTES The ReportPlus software is able to produce a nearly infinite number of different report styles, layouts, formatting, etc. The examples below show how the default program text was formatted and defined. Please check your Word documentation on formatting and experiment to create a style of your own. If you choose to continue with the default layout of the report, you will need to define your text to the program using the following procedures.
The easiest way to define new items in the default format of ReportPlus is to insert an existing option into a report, modify the text, and define the new option to the program. To better illustrate these examples, you can view the paragraph marks. Clicking the Show/Hide ¶ button on the ReportPlus Customization Toolbar will display these symbols.
Define description items Description items in the report fall into two categories — Description Headings and Description Options. In the default text, we’ve decided to have the headings in Arial Bold 10 point and the options in Times New Roman Regular 10 point, with a bullet symbol before each option. We’ve also decided to have a hanging indent for the Description Options. See example below.
• To define a description heading, highlight the heading text as shown below, and then define the item to the program. This example shows the paragraph mark on the line above the heading text.
• To define a description option, highlight the heading text as shown below, and then define the item to the program.

InspectIt ReportPlus User’s Guide 51
The recommended way to add new Description Headings and Options is to insert a working heading and option into your document. The entries will already be formatted correctly so you can modify the text, highlight as shown above, and define new entries to the program.
An example of this would be to add the Roof Structure sub-heading shown above, change the text to Number Of Layers, highlight the Number Of Layers heading, and then add the new description heading to the program.
Define observation items Observation items in the report fall into two categories — Observation Headings and Observation Options. In the default text, we’ve decided to have the headings in Arial Bold 10 point and the options in Times New Roman Regular 10 point, with a symbol before each option. We’ve also decided to have a hanging indent for the Observation Options. See example below.
• To define an observation heading, highlight the heading text as shown below, and then define the item to the program.
• To define an observation option, highlight the heading text as shown below, and then define the item to the program.
Define comment items These items (Positive Attributes/General Comments) have the same sub-headings as the Observations and only a slight variation on the options — you do not include the paragraph mark (¶) as you highlight the text for a new option.

InspectIt ReportPlus User’s Guide 52
Define limitation items The limitation items in the report fall into a single category. In the default text, we’ve decided to have the options in Times New Roman Regular 10 point as bulleted text.

InspectIt ReportPlus User’s Guide 53
APPENDIX A: NAVIGATING THE WORD SCREEN
Word 2000 through 2003—Screen description The screen callouts below identify the basic components of Word 2000—2003 that you will use to navigate through the ReportPlus program. In addition to the standard Word menu bar and toolbar, the ReportPlus toolbar appears fixed on the left side of the screen (by default), and each of the section toolbars float over the top of the document.
Title Bar
Menu Bar
Standard Toolbar
Format Toolbar
Vertical Scroll Bar
Status Bar
ReportPlus Toolbar
ReportPlus Section Toolbar

InspectIt ReportPlus User’s Guide 54
Word 2007—Screen description In Word 2007, the ReportPlus toolbar and each of the section toolbars appear on the Add-Ins tab at the top of the screen. The floating toolbars are not an option in this version of Word.
Title Bar
ReportPlus Toolbar
ReportPlus Section Toolbar
Ribbon
Scroll Bar
Status Bar

InspectIt ReportPlus User’s Guide 55
Using Shortcuts within Word While Microsoft Windows has a “point-and-click” interface, the keyboard can also be used to effectively navigate many Windows applications. Microsoft Word is no different. In addition to using the mouse for text highlighting, etc., Word also allows you to use keyboard shortcuts. These are key strokes in which you press two or more keys simultaneously to accomplish many functions. In the keyboard combinations shown below, keys pressed at the same time are separated by a plus (+) sign.
You may find that, with practice, a combination of keyboard and mouse functions can substantially speed up your work in ReportPlus.
Perform common tasks with keyboard shortcuts
Task Key command
Bold letters Ctrl+B
Italic letters Ctrl+I
Underlining Ctrl+U
Copy Ctrl+C
Cut Ctrl+X
Paste Ctrl+V
Undo Ctrl+Z
Select all Ctrl+A
Highlight text with mouse click/drag
Text Mouse action
Any amount of text Drag over the text.
A single word Double-click the word.
A line of text Move the pointer to the left of the line until it changes to a right-pointing arrow, and then click.
A sentence Hold down CTRL, and then click anywhere in the sentence.
A paragraph Move the pointer to the left of the paragraph until it changes to a right-pointing arrow, and then double-click. Or triple-click anywhere in the paragraph.
A graphic Click the graphic.

InspectIt ReportPlus User’s Guide 56
A text box or frame Move the pointer over the border of the frame or text box until the pointer becomes a four-headed arrow, and then click to see the sizing handles. (Sizing handle: One of the small circles or squares that appear at the corners and sides of a selected object. You drag these handles to change the size of the object.)
Highlight text with keyboard shortcuts
Text Key command
One character to the right SHIFT+RIGHT ARROW
One character to the left SHIFT+LEFT ARROW
To the end of a word CTRL+SHIFT+RIGHT ARROW
To the end of a line SHIFT+END
To the beginning of a line SHIFT+HOME
One line down SHIFT+DOWN ARROW
One line up SHIFT+UP ARROW
To the end of a paragraph CTRL+SHIFT+DOWN ARROW
To the beginning of a paragraph
CTRL+SHIFT+UP ARROW
Once screen down SHIFT+PAGE DOWN
One screen up SHIFT+PAGE UP
To the beginning of a document CTRL+SHIFT+HOME
To the end of a document CTRL+SHIFT+END
To the end of a window ALT+CTRL+SHIFT+PAGE DOWN
To include the entire document CTRL+A
USER TIP: Many more keyboard shortcuts can be found in the Help menu within Microsoft Word.

InspectIt ReportPlus User’s Guide 57
Using the “Undo” feature One of the features of Microsoft Word is the Undo command. This command can be accessed by:
• selecting Undo from the Edit menu (or the Title Bar in Word 2007),
• pressing the Ctrl+Z key command, or
• clicking the Undo icon button.
Deleting sections or pages from a Word document To delete a specific section or page from your report, simply highlight the entire page and press either the Backspace key or Delete key on your keyboard. Be sure to include the page break at the bottom of the page as you are highlighting, if it includes one.
Saving a Word document In Word, you can save your report by:
• selecting Save from the File menu (or the Office Logo in Word 2007), • pressing the Ctrl+S key command, or • clicking the Save button on the toolbar.
Printing a Word document When you are ready to print your report in Word, you can do so by:
• clicking the Report Printing icon button on the ReportPlus toolbar, • selecting Print from the File menu (or the Office Logo in Word 2007), • pressing the Ctrl+P key command, or • clicking the Print button on the toolbar.
Printing to PDF file format
USER TIP: You can undo up to the last 100 actions performed on the document. For example, if you inserted the wrong text into your report, keep clicking the Undo button until the unwanted text is cleared.

InspectIt ReportPlus User’s Guide 58
If your report contains photographs, we suggest converting the Word document to an Adobe Acrobat PDF file.
USER TIP: You can install free PDF print drivers, such as those found at http://www.primopdf.com or http://www.pdf995.com.

InspectIt ReportPlus User’s Guide 59
APPENDIX B: USING THE INSPECTIT HANDHELD SOFTWARE
Introduction The ReportPlus for Palm OS and ReportPlus for Pocket PC programs (both sold separately) are add-on products for the ReportPlus software that allow you to use a handheld device to collect data during the inspection.
These programs work like an “electronic checklist” with compatible functions that enable selection from pre-defined options set up in your PC version of ReportPlus using the handheld device. You can then create a report based on the items selected on the handheld.
Create a report file for the handheld There are two options available for creating a report file on your Palm or Pocket PC handheld.
Option 1 — Connected to PC
1. From within the ReportPlus software, click the Handheld Device Tools button located on the left side of the screen.
2. Select the Create Handheld Report File option The Create Report for Handheld screen is displayed.
3. Enter a Report File Name in the text box, limited to 16 characters. The next time you synchronize the handheld and PC, a report file will be created on the handheld. You can then open the InspectIt application on the handheld and find your file on the list.
Option 2 — Not connected to PC
1. Start the InspectIt application on your handheld, and then click on the Add Report button.
2. At the prompt, enter an identification name.

InspectIt ReportPlus User’s Guide 60
3. Click the OK button. The new report name will be listed within the InspectIt application on the handheld.
4. To delete a report file name on your PC once it has been created on your handheld, click the report name on the screen shown above and click the Delete button.
Import data from a handheld After completing a report on your handheld, synchronize the device with your PC. During the synching process, the files from your handheld are uploaded to the PC hard drive.
Once the synchronization is done, create a new inspection report or open one that was previously saved on your hard drive.
1. Click the Handheld Device Tools button located on the left side of the screen, and then select Import Data From Handheld Device.
The Handheld Inspection Data screen is displayed.
2. Select the report file name from the list, and then click the OK button.
The system automatically inserts all the AutoText entries that you selected from the handheld into the report document.
3. To delete report data on your PC once you have finished the report, select the report name on the screen shown above and click the Delete button.
USER TIP: If you added Notes on your handheld, they will appear: • at the bottom of the Report Overview page when using the Palm OS software, or • in the Observations area for each section when using the Pocket PC software.
USER TIP: It can take up to 5 minutes per report when uploading data to your PC.
IMPORTANT: A maximum of five (5) reports can be created on the handheld device at any point in time.

InspectIt ReportPlus User’s Guide 61
How to use ReportPlus for Pocket PC The ReportPlus for Pocket PC program runs on handheld devices via the Pocket PC operating system, such as the Dell Axim™ and HP iPAQ. Below you will find an overview of the features used to navigate through the program and collect data during the inspection.
USER TIP: The names of the Report Sections in the drop-down list are generated from the first word in the Description text file for each section. Example: The first word on the Structure/Description text file (S011~~~~.txt) is “Structure.” Therefore, the name in the section drop-down list on the handheld device will be “Structure.”
Use this list to navigate through the Report Sections
Sub-headings within a section can be expanded or contracted by clicking here
Clicking on an individual item will also select the sub-heading
Use this toolbar to view Descriptions, Comments, Observations, Limitations, or make notes for each report section
The scroll bar is used to move down the list of items

InspectIt ReportPlus User’s Guide 62
Send ReportPlus changes to the Pocket PC
When you make changes to the ReportPlus software on your PC — such as adding new items to the list of Foundation types shown above — you can send these changes to your handheld device. First make sure that your Pocket PC handheld device is plugged into your computer or in its cradle.
1. Click the Handheld Device Tools button located on the left side of the screen
2. Click the Update Options on Pocket PC button on the screen shown below. Any changes will then be sent to the handheld device.
How to use ReportPlus for Palm OS The ReportPlus for Palm OS software works on devices running Palm OS (or the Palm Operating System), such as those manufactured by Palm and Sony CLIÉ handhelds. Below you will find an overview of the features used to navigate through the program and collect data during the inspection.
Use this list to navigate through the Report Use this toolbar
to view Descriptions, Comments, Observations, and Limitations
Click on sub-headings and items observed during the inspection
Use these + / − buttons to move up and down the list of items

InspectIt ReportPlus User’s Guide 63
Send ReportPlus changes to the Palm OS handheld
When you make changes to the ReportPlus software on your PC — such as adding new items to the list of Foundation types shown above — you can send these changes to your handheld device.
Sending changes to your Palm OS handheld is automatic. During the HotSync process between the handheld and your PC, any changes that you have made to your desktop software will be sent to your handheld device.
IMPORTANT: (For ReportPlus with Palm OS only) When creating a new report file name from either the PC or the Palm handheld, the first character of the name cannot be a number. The first character must be a letter.
USER TIP: The names of the Report Sections in the drop-down list are generated from the first word in the Description text file for each section. Example: The first word on the Structure/Description text file (S011~~~~.txt) is “Structure.” Therefore, the name in the section drop-down list on the handheld device will be “Structure.”

InspectIt ReportPlus User’s Guide 64
APPENDIX C: END USER LICENSE AGREEMENT This Software, including any documentation and media that accompanies this license, (the "Software") is the property of the American Home Inspectors Training Institute, Ltd. (AHIT) and is protected by copyright law. While AHIT continues to own the Software, you will have certain rights to use the Software after you accept this license. Your rights and obligations to use the Software are as follows:
You may:
1) use one copy of the Software on a single computer at a single site at a single time;*
2) use the Software on a network, provided that you have a licensed copy of the Software for each computer that can access the Software over that network. You can acquire LAN or network packs for this purpose;*
3) after written notice to AHIT, transfer the Software on a permanent basis to another person or entity within your company, provided that you retain no copies of the Software and the transferee agrees to the terms of this agreement;
4) modify the text or data that accompanies the Software, in the manner that is described in the User's Guide also accompanying the Software; and
5) print the text or data in conjunction with running the Software and supply this print out to other parties in a manner for which the Software is intended.
*PAY-PER-USE PLAN SOFTWARE
If you have purchased this software on a Pay-Per-Use plan, you may install this software on as many computers as you wish provided that you purchase Report Packs (uses of the software) for each computer that the software is installed. Packs are not transferable between computers.
*PURCHASE PLAN SOFTWARE
If you have purchased this software on a purchase plan, you may install this software on as many computers as you wish provided that only the licensed user (whose name appears on documents created by the software) operates the software on each computer that the software is installed. Use of the software by anyone other than the licensed user will require the purchase of an additional license. Violations of this license agreement can lead to suspension and/or cancellation of your license benefits.
You may not:
1) print out or copy databases, documents, text, or any other data that accompany the Software, or a substantial portion thereof, and supply it to any person or corporation;
2) copy any of the documentation that accompanies the Software;
3) re-sale, rent, lease, or sub-license any portion of the Software;
4) reverse engineer, de-compile, disassemble, modify, translate, make any attempt to discover the source code of the Software, or create derivative works from the Software; or
5) use the previous version of the Software in addition to an upgraded version received as a replacement of the prior version. Upon upgrading the Software, all copies of the prior version must be destroyed except for copies retained for archival purposes.
Limited Warranty
AHIT warrants that the media on which the Software is distributed will be free from defects for a period of thirty (30) days from the shipping date. Your sole remedy in the event of a breach of this warranty will be that AHIT will, at its option, replace any defective media returned to AHIT within the warranty period or refund the money paid for the Software. AHIT does not warrant that the Software will meet your requirements or that operation of the Software will be uninterrupted or that the Software will be error-free.

InspectIt ReportPlus User’s Guide 65
THE ABOVE WARRANTY IS EXCLUSIVE AND IN LIEU OF ALL OTHER WARRANTIES, WHETHER EXPRESS OR IMPLIED, INCLUDING THE IMPLIED WARRANTIES OF MERCHANTABILITY, FITNESS FOR A PARTICULAR PURPOSE AND NONINFRINGEMENT. THIS WARRANTY GIVES YOU SPECIFIC LEGAL RIGHTS. YOU MAY HAVE OTHER RIGHTS, WHICH VARY FROM STATE TO STATE.
Disclaimer of Damages
REGARDLESS OF WHETHER ANY REMEDY SET FORTH HEREIN FAILS OF ITS ESSENTIAL PURPOSE, IN NO EVENT WILL AHIT BE LIABLE TO YOU FOR ANY SPECIAL, CONSEQUENTIAL, INDIRECT OR SIMILAR DAMAGES, INCLUDING ANY LOST PROFITS OR LOST DATA ARISING OUT OF THE USE OR INABILITY TO USE THE SOFTWARE EVEN IF AHIT HAS BEEN ADVISED OF THE POSSIBILITY OF SUCH DAMAGES. SOME STATES DO NOT ALLOW THE LIMITATION OR EXCLUSION OF LIABILITY OR INCIDENTAL OR CONSEQUENTIAL DAMAGES SO THE ABOVE LIMITATION OR EXCLUSION MAY NOT APPLY TO YOU.
IN NO CASE SHALL AHIT’S LIABILITY EXCEED THE PURCHASE PRICE OF THE SOFTWARE. The disclaimers and limitations set forth above will apply regardless of whether you accept the Software.
General
This Agreement will be governed by the laws of the State of Wisconsin. This Agreement may only be modified by a license addendum which accompanies this license or by a written document which has been signed by both you and AHIT. If you have any questions regarding this Agreement, please write AHIT at the address below:
AHIT, Ltd.
N19W24075 Riverwood Drive, Suite 200, Waukesha, WI 53188

InspectIt ReportPlus User’s Guide 66
SOFTWARE TECHNICAL SUPPORT InspectIt is committed to supporting our products and helping you with your reporting solutions. We offer a variety of ways to receive information or assistance from our company in an effort to provide you with the best possible customer service.
Contact us • For software technical support, call our Technical Support line at
(877) 443-4921, 9 AM to 5 PM Central Time, Monday through Friday • Expanded information can also be obtained from our Website at
http://www.InspectIt.com/support.html • Our online Bulletin Board system can be accessed from our Website at
http://www.InspectIt.com • Software Technical Support staff can also be reached via Email at