setting open cv for vs2012, and use image watch tool
TRANSCRIPT

Visual studio 2012 에서 openCV 설정하기And install Image Watch tool for Debug
Jongho [email protected]
Windows 8.1 (64bit 기준 )
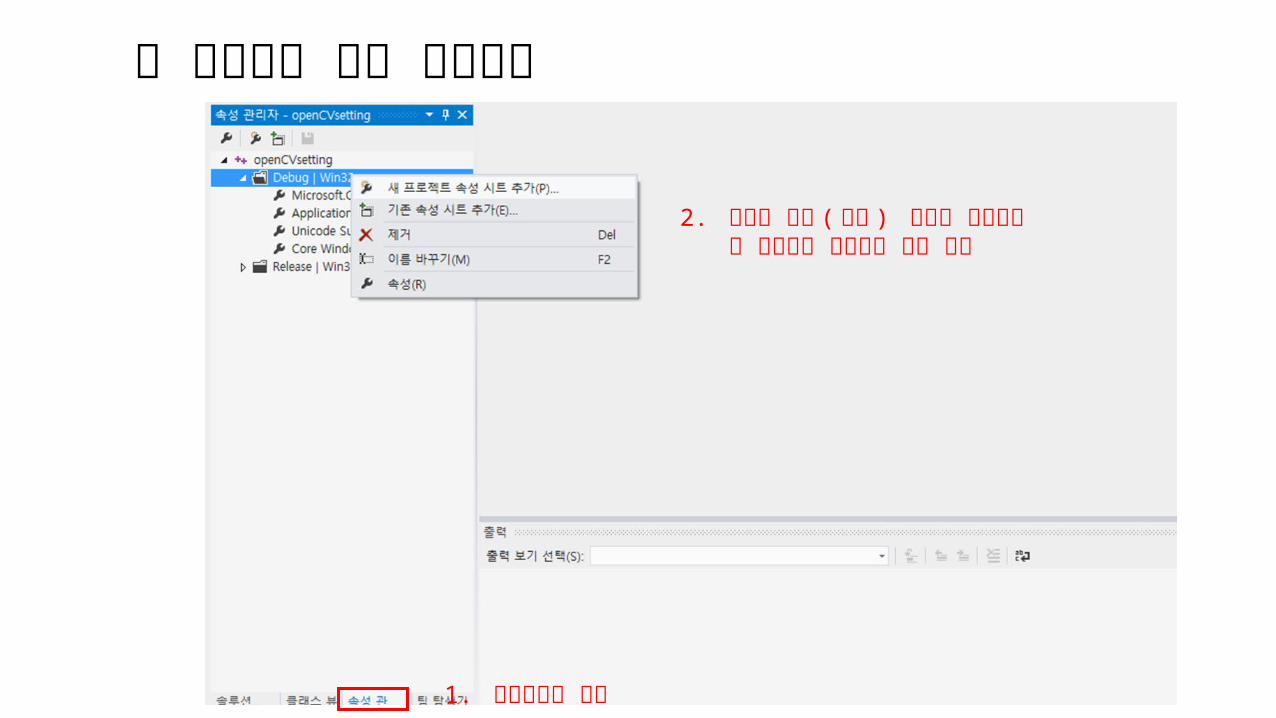
1. 속성관리자 클릭
2. 디버그 폴더 ( 속성 ) 오른쪽 클릭하고 새 프로젝트 속성시트 추가 클릭
새 프로젝트 속성 추가하기

새 프로젝트 속성 추가하기 ( 계속 )
1. 이름 입력2. 속성 시트를 만들 위치 지정 ( 선택 )
3. 추가 클릭

새 프로젝트 속성 편집하기 ( 설정하기 )
새로 생김
OPENCV_DEBUG 를 오른쪽 클릭 후 속성 클릭 .또는 OPENCV_DEBUG 더블 클릭

새 프로젝트 속성 편집하기 ( 사용자 매크로 설정 )
12
3. 매크로 이름 입력4. 다운 받은 openCV 폴더의 build 경로를 입력
5
생성됨 .

새 프로젝트 속성 편집하기 (include source file of opencv)
1
2. 편집 클릭
3. include 경로 입력 . OPENCV_BUILD 는 이전에 사용자 매크로로 build 의 경로를 지정했기 때문에 위처럼 입력하면 됨
4

새 프로젝트 속성 편집하기 (library 설정 )
1
2. 편집 클릭
3. lib 경로 입력 . 32bit 환경의 경우는 x86, 64bit 환경은 x64 를 입력 vs 2010 인 경우는 vc 10, vs 2012 인 경우는 vc 11, vs 2013 인 경우는 vc 12 입력
4

새 프로젝트 속성 편집하기 (library 설정 )
1
2. 편집 클릭
3. opencv lib 파일명 입력 . opencv 버전에 따라 2410 부분을 수정해서 입력 (ex. opencv 2.4.11 인 경우 opencv_calib3d2411d.lib 로 입력
4
opencv_calib3d2410d.libopencv_contrib2410d.libopencv_core2410d.libopencv_features2d2410d.libopencv_flann2410d.libopencv_gpu2410d.libopencv_highgui2410d.libopencv_imgproc2410d.libopencv_legacy2410d.libopencv_ml2410d.libopencv_nonfree2410d.libopencv_objdetect2410d.libopencv_ocl2410d.libopencv_photo2410d.libopencv_stitching2410d.libopencv_superres2410d.libopencv_ts2410d.libopencv_video2410d.libopencv_videostab2410d.lib
opencv lib 파일들 (ver.2.4.10 기준 )
5

새 프로젝트 속성 편집하기 (library 설정 )
1
2. 오른쪽 클릭
3. 속성 클릭
4
5
6
7
8

환경변수 설정 (bin 경로 지정 )
1. Alt 키 옆에 있는 “ window key + s” 를 눌러서 검색창을 연다 .2. “ 시스템 환경 변수 편집” 을 검색해서 실행
3. 환경 변수 클릭
4. Path 변수를 찾는다 .
5. 편집을 누른다 .
6. 앞의 패스와 ‘ ;’ 으로 구분하고 bin 의 경로를 지정한다 .
7. 확인을 누른다 .
※ 참고사항 : 환경변수 설정 후에도 dll 을 찾지 못해서 빌드가 안되면 컴퓨터를 재부팅 시키고 다시 빌드 시도를 해본다 .

Image Watch Test (download)This test is debug tool test for image in memory
https://visualstudiogallery.msdn.microsoft.com/e682d542-7ef3-402c-b857-bbf-ba714f78d
다운로드 후 설치
Image Watch Tool 설치

1. Visual Studio 2012 에서 빈 프로젝트를 생성하고 cpp 파일을 생성한다 .
2. 소스코드 입력// Test application for the Visual Studio Image Watch Debugger extension
#include <iostream> // std::cout#include <opencv2/core/core.hpp> // cv::Mat#include <opencv2/highgui/highgui.hpp> // cv::imread()#include <opencv2/imgproc/imgproc.hpp> // cv::Canny()
using namespace std;using namespace cv;
/* print infomation */void help(){ cout << "----------------------------------------------------" << endl << "This is a test program for the Image Watch Debugger " << endl << "plug-in for Visual Studio. The program loads an " << endl << "image from a file and runs the Canny edge detector. " << endl << "No output is displayed or written to disk." << endl << "Usage:" << endl << "image-watch-demo inputimage" << endl << "----------------------------------------------------" << endl << endl;}
/* main function. 실행시 한개의 매개변수 (argument) 를 입력받는다 . */int main(int argc, char *argv[]){ help(); // print infomation
/* 실행시 매개변수 (argument, open 할 파일 이름 ) 가 주어지지 않으면 종료 */ if (argc != 2) { cout << "Wrong number of parameters" << endl; return -1; }
cout << "Loading input image: " << argv[1] << endl; // 매개변수 파일의 이름 출력 Mat input; input = imread(argv[1], CV_LOAD_IMAGE_COLOR); // 파일 읽기
/* Canny Edge Detector 적용 */ cout << "Detecting edges in input image" << endl; Mat edges; Canny(input, edges, 10, 100);
return 0;}
※ Canny Edge Detector 참고자료 : http://carstart.tistory.com/188
Image Watch Test (create source code)

1. 중단점 생성
Mat edges 왼쪽을 클릭하여 중단점 생성하고
F5 를 눌러 디버그 실행 .
또는OR
Mat edges 라인에서 오른쪽 클릭하여 커서까지 실행 클릭
Image Watch Test (create break point of debug)

1. Image Watch 창 열기 ( 보기 -> 다른 창 -> Image Watch)
1
2
3
Image Watch Test (open window of Image Watch)

1. 드래그 앤 드롭으로 Image Watch 창을 code view 옆에 넣을 수 있다 .
Image Watch Test (Image Watch 창 소스코드 옆에 넣기 )

1. 이미지를 클릭하면 이미지를 볼 수 있음 .
Image Watch Test (Test Image Watch Tool)

1. F10 으로 run line of Canny()
Canny Edge Detector 결과가 edges 에 assignment 되어 보여짐
따로 창을 만들어 확인하지 않아도 디버그 창에서 이미지 변화 확인 가능
Image Watch Test (Test Image Watch Tool)
