home energy management zigbee card installation · pdf fileappendix a: technical...
TRANSCRIPT

Europe & APACVersion 1.2
SolarEdgeHome Energy Management ZigBee Card
Installation Guide
Revision Historyl Version 1.2 (Nov. 2017)w
o Terminology change: n Home Energy Management n AC Switch with Metering
o Up to 6 devices inter-connected in a master-slave configuration
o Addition of step: make sure the inverter/ CCG is turnedOFF before card installation
o Addition of LCD menu item - RS485-2
o Updated images o Updated Contact information
l Version 1.1 (Apr. 2017) - language editing; no content change
l Version 1.0 (Jul. 2016) - First release
Home Energy Management ZigBee Card Installation MAN-01-00287-1.2

Disclaimers
DisclaimersImportant NoticeCopyright © SolarEdge Inc. All rights reserved.No part of this document may be reproduced, stored in a retrieval system or transmitted, in any form or by any means, electronic, mechanical, photographic, magnetic or otherwise, without the prior written permission of SolarEdge Inc.The material furnished in this document is believed to be accurate and reliable. However, SolarEdge assumes no responsibility for the use of this material. SolarEdge reserves the right to make changes to the material at any time and without notice. You may refer to the SolarEdge web site (www.solaredge.comhttp://www.solaredge.us) for the most updated version.All company and brand products and service names are trademarks or registered trademarks of their respective holders.Patent marking notice: see http://www.solaredge.com/patent The general terms and conditions of delivery of SolarEdge shall apply.The content of these documents is continually reviewed and amended, where necessary. However, discrepancies cannot be excluded. No guarantee is made for the completeness of these documents.The images contained in this document are for illustrative purposes only and may vary depending on product models.
Emission ComplianceThis equipment has been tested and found to comply with the limits applied by the local regulations. These limits are designed to provide reasonable protection against harmful interference in a residential installation. This equipment generates, uses and can radiate radio frequency energy and, if not installed and used in accordance with the instructions, may cause harmful interference to radio communications. However, there is no
Home Energy Management ZigBee Card Installation MAN-01-00287-1.21

guarantee that interference will not occur in a particular installation. If this equipment does cause harmful interference to radio or television reception, which can be determined by turning the equipment off and on, you are encouraged to try to correct the interference by one or more of the following measures:l Reorient or relocate the receiving antenna.l Increase the separation between the equipment and the receiver.l Connect the equipment into an outlet on a circuit different from that to
which the receiver is connected.l Consult the dealer or an experienced radio/TV technician for help.Changes or modifications not expressly approved by the party responsible for compliance may void the user’s authority to operate the equipment.
Disclaimers
Home Energy Management ZigBee Card Installation MAN-01-00287-1.22

Contents
Contents
Disclaimers 1Important Notice 1Emission Compliance 1
Contents 3Support and Contact Information 4About This Guide 6Chapter 1: Overview 7
Package Contents 7Chapter 2: Installing the ZigBee Card and Antenna 8
Installing the Antenna and Cable 8Mounting the ZigBee Card in the Inverter 11
Chapter 3: Configuring ZigBee Communication 13Appendix A: Technical Specifications 19
Home Energy Management ZigBee Card Installation MAN-01-00287-1.23

Support and Contact InformationIf you have technical problems concerning SolarEdge products, please contact us:
Country Phone E-MailAustralia (+61) 1800 465 567 [email protected]
APAC (Asia Pacific)(+972) 073 240 3118 [email protected]
BeneluxNL: 0800-7105
BE: 0800-76633
China (+86) 21 6212 5536 [email protected]
DACH & Rest of Europe (+49) 089 454 59730 [email protected]
France (+33) 0800 917410 [email protected]
Italy (+39) 0422 053700 [email protected]
Japan (+81) 03 6262 1223 [email protected]
Netherlands (+31) 0800 0221 089 [email protected]
New Zealand (+64) 0800 144 875 [email protected]
US & Canada (+1) 510 498 3200 [email protected]
United Kingdom (+44) 0800 028 1183 [email protected]
Greece (+49) 89 454 59730
Israel (+972) 073 240 3122
Middle East & Africa (+972) 073 240 3118
South Africa (+27) 0800 982 659
Turkey (+90) 216 706 1929
Worldwide (+972) 073 240 3118
Support and Contact Information
Home Energy Management ZigBee Card Installation MAN-01-00287-1.24

Support and Contact Information
Before contact, make sure to have the following information at hand: l Model and serial number of the product in question. l The error indicated on the Application screen or on the SolarEdge
monitoring platform or by the LED, if there is such an indication. l System configuration information, including the type and number of
modules connected and the number and length of strings. l The communication method to the SolarEdge server, if the site is
connected. l The software version as appears in the ID status screen.
Home Energy Management ZigBee Card Installation MAN-01-00287-1.25
About This GuideThis user guide is intended for Photovoltaic (PV) system owners, installers, technicians, maintainers, and integrators who use the SolarEdge power harvesting system.This manual describes how to install and set up the Device Control ZigBee™ card for Device Control network management.This guide assumes that the SolarEdge power harvesting system is already installed and commissioned. For additional information about how to install and commission the SolarEdge power harvesting system, refer to the relevant installation guide.This guide includes the following chapters:l Overview on page 7, describes the SolarEdge Wi-Fi card functionality and
connection.l Installing the ZigBee Card and Antenna on page 8 describes how to mount,
connect and verify the connection of the Wi-Fi card.l Configuring ZigBee Communication on page 13 describes how to set up the
Device Control network manager.l Technical Specifications on page 19 provides the electrical and mechanical
specifications of the Device Control ZigBee card.
For further information, datasheets and the most up-to-date certifications for various products in different countries, please visit the SolarEdge website: www.solaredge.com.
About This Guide
Home Energy Management ZigBee Card Installation MAN-01-00287-1.26

Chapter 1: Overview
Chapter 1: OverviewZigBee is an open global standard for wireless technology designed to use low-power digital radio signals for personal area networks. ZigBee is used for connection between several SolarEdge devices. Home Energy Management uses the ZigBee Home Automation protocol with up to 6 devices inter-connected in a master-slave configuration where the Home Energy Management ZigBee card is the master. Home Energy Management products include:l Immersion Heater Controllerl Plug-In Socket with Meteringl AC Switch with Meteringl Dry Contact Switch
Package Contentsl Home Energy Management ZigBee Card l Antennal Mounting clip with RF cablel Activation cardl This installation guide
NOTEThis ZigBee card is for Home Energy Management only and cannot be used for communications to the monitoring platform.
Home Energy Management ZigBee Card Installation MAN-01-00287-1.27
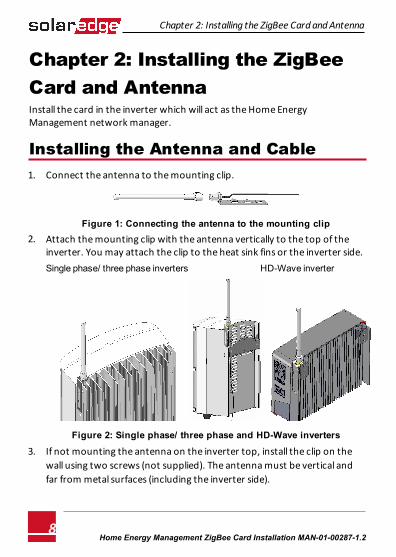
Chapter 2: Installing the ZigBee Card and AntennaInstall the card in the inverter which will act as the Home Energy Management network manager.
Installing the Antenna and Cable 1. Connect the antenna to the mounting clip.
Figure 1: Connecting the antenna to the mounting clip 2. Attach the mounting clip with the antenna vertically to the top of the
inverter. You may attach the clip to the heat sink fins or the inverter side.Single phase/ three phase inverters HD-Wave inverter
Figure 2: Single phase/ three phase and HD-Wave inverters
3. If not mounting the antenna on the inverter top, install the clip on the wall using two screws (not supplied). The antenna must be vertical andfar from metal surfaces (including the inverter side).
Chapter 2: Installing the ZigBee Card and Antenna
Home Energy Management ZigBee Card Installation MAN-01-00287-1.28

Chapter 2: Installing the ZigBee Card and Antenna
4. Route the antenna cable along the inner fins or the inverter side, in the bracket. Make sure the cable is not hanging loose outside the inverterenclosure.
Figure 3: Routing the antenna cable (Three phase inverter)
5. Disconnect the AC power to the inverter and wait 5 minutes.
6. Open the inverter cover as described in the appropriate manual.
Home Energy Management ZigBee Card Installation MAN-01-00287-1.29

7. Open the communication gland numbered 1 at the bottom of the inverter.
Figure 4: Single phase/ three phase inverter sealing glands
Figure 5: HD-Wave inverter communication gland
8. Remove the plastic seal from the small opening .
9. Remove the rubber fitting from the gland and insert the RF cable throughthe gland cover and the opened connection of the inverter.
10. Push the cable into the cut opening of the rubber fitting.
Figure 6: Rubber fitting
11. Insert the rubber seal with the cable into to the gland body andreconnect the gland to the inverter. Tighten the sealing gland.
Chapter 2: Installing the ZigBee Card and Antenna
Home Energy Management ZigBee Card Installation MAN-01-00287-1.210

Chapter 2: Installing the ZigBee Card and Antenna
12. Insert the excess of cable length into the inverter until the cable can be tightly attached to the inverter side.
Mounting the ZigBee Card in the Inverter 1. Check the card part number and verify you are using the Home Energy
Management ZigBee Card (and not the Home Gateway ZigBee Card).
2. Turn OFF the inverter ON/OFF switch, the safety switch (if applicable) andthe AC circuit breaker on the main AC distribution panel.
3. Connect the ZigBee card in its place on the communication board, as shown in Figure 8.
4. Follow these guidelines:l Use the marking on the communication board to plug in the ZigBee
card with the correct orientation.l Insert the ZigBee card such that all pins are correctly positioned in the
communication board socket, and no pins are left out of their socket.l Make sure that the card is firmly in place.
5. Install the two cable holders on the communication board.
6. Route the cable towards the ZigBee card while snapping it into the twocable holders at the side of the communication board.
Home Energy Management ZigBee Card Installation MAN-01-00287-1.211

7. Connect the RF cable to the ZigBee card and tighten manually.
Figure 7: ZigBee and RF cable on the single/three phase inverter communication board
Figure 8: ZigBee on HD-Wave inverter communication board
8. Close the SolarEdge inverter cover as described in the inverter installationguide. Check for proper cover fastening to ensure sealing.
9. Turn ON AC power to the inverter.
10. Turn the inverter ON/OFF switch to ON.
Chapter 2: Installing the ZigBee Card and Antenna
Home Energy Management ZigBee Card Installation MAN-01-00287-1.212

Chapter 3: Configuring ZigBee Communication
Chapter 3: Configuring ZigBee CommunicationThis section describes, how to upgrade the inverter software in 1Ph/3Ph inverters and in HD-Wave inverters, ZigBee communication configuration in 1Ph/3Ph inverters and in HD-Wave inverters.
To upgrade the inverter software:
1. Disconnect the AC power to the inverter and wait 5 minutes.
2. Open the inverter cover as described in its manual. 3. Insert the firmware upgrade card supplied with the kit into the card slot
on the communication board.SolarEdge 1Ph/3Ph inverters SolarEdge 1Ph inverter (HD-Wave)
Figure 9: Communication board and activation card 4. Turn the AC ON.
WARNING!ELECTRICAL SHOCK HAZARD. Do not touch uninsulated wires when the cover is removed.
Home Energy Management ZigBee Card Installation MAN-01-00287-1.213

5. If upgrade is required, it starts automatically. Wait for the message "Done" to be displayed on the LCD.
6. Verify the correct version as described above.
7. Remove the card from the inverter.
To configure ZigBee in 1Ph/3Ph inverters using theLCD light button:
Use the LCD button to toggle through the informative status screens, and for communication setup.
Figure 10: Inverter connector panel
1. Verify that the inverter ON/OFF switch is OFF. 2. Press the LCD Light button once to turn ON the back light. If the inverter
worked properly before this action, the following message is displayed:
D C V O L T A G E N O T S A F E
D O N O T D I S C O N N E C T
V D C : 7 2 . 0
This message is displayed until the DC is below the safety voltage threshold. The default safety voltage is 50 V.
Chapter 3: Configuring ZigBee Communication
Home Energy Management ZigBee Card Installation MAN-01-00287-1.214

Chapter 3: Configuring ZigBee Communication
3. Access the Setup mode: Press and hold down the LCD button until the following message is displayed:
K e e p h o l d i n g b u t t o n
f o r p a i r i n g , r e l e a s e
t o e n t e r m e n u . . .
R e m a i n i n g : 3 s e c
4. Release the button within 3 seconds to access the Setup Mode. 5. When using setup menus, short press to scroll down to the next menu
option and long press to select the item. You can use the Exit option inthese menus to move up one menu level.
O p t i m i z e r p a i r i n g
L a n g u a g e < e n g >
C o m m u n i c a t i o n
M a i n t e n a n c e
I n f o r m a t i o n
E x i t
6. Scroll down to the Communication sub-menu and select it. (Some of the menu items may vary depending on device and configuration).
S e r v e r < L A N >
L A N C o n f
R S 4 8 5 – 1 C o n f < S >
R S 4 8 5 – 2 C o n f < S >
Z i g B e e C o n f < S >
W i - F i C o n f < N / A >
C e l l u l a r C o n f
R S 2 3 2 C o n f
7. Scroll down and select the ZigBee Conf sub-menu. If Zigbee Conf <N/A> appears, and the ZigBee Conf sub-menu is not accessible, the ZigBee card is not installed correctly.
Home Energy Management ZigBee Card Installation MAN-01-00287-1.215

8. Select:l Device Type è HA (Home Automation)l Protocol è HAM (Home Automation)
D e v i c e T y p e < H A >
P r o t o c o l < H A M >
P A N I D
S c a n C h a n n e l
L o a d Z B D e f a u l t s
9. Exit the Setup mode by selecting the Exit option in each sub-menu screenor wait for the device to automatically exit Setup mode. This concludes the card configuration using the LCD button. When the HA Device Type is selected, a Device Manager menu item will appear in the main configuration menu.
C o u n t r y < I t a l y >
L a n g u a g e < E n g >
C o m m u n i c a t i o n
P o w e r C o n t r o l
D i s p l a y
M a i n t e n a n c e
I n f o r m a t i o n
To configure the ZigBee card in HD-wave inverters:
Use the LCD buttons to toggle through the informative status screens, and for communication setup. These buttons are at the front, under the LCD screen.
Chapter 3: Configuring ZigBee Communication
Home Energy Management ZigBee Card Installation MAN-01-00287-1.216

Chapter 3: Configuring ZigBee Communication
Figure 11: Inverter connector panel
1. Verify that the inverter ON/OFF switch is OFF.
2. Enter the inverter Setup mode:
l SolarEdge 1Ph/3Ph inverters - Press the Enter button for 5-10 seconds and release. Enter the password 12312312.
l SolarEdge HD-Wave inverter - Press the OK button for 5-10 seconds and release. Enter the password 12312312 (Up=1, Down=2, OK=3: Up è Down è OK è Up è Down è OK è Up è Down).
3. Scroll down to the Communication sub-menu and press Enter to selectit. The Communication menu is displayed (Some of the menu items mayvary depending on configuration).
4. Scroll down and select the ZigBee Conf sub-menu. If ZigBee Conf <N/A> appears, and the ZigBee Conf sub-menu is not accessible, the ZigBee cardis not installed correctly.
5. Select:l Device Type è HA (Home Automation)
l Protocol è HAM (Home Automation)
D e v i c e T y p e < H A >
P r o t o c o l < H A M >
P A N I D
S c a n C h a n n e l
L o a d Z B D e f a u l t s
Home Energy Management ZigBee Card Installation MAN-01-00287-1.217

6. Exit the Setup mode by selecting the Exit option in each submenu screenor wait for the device to automatically exit Setup mode. This concludes the card configuration using the LCD button.When the HA Device Type is selected, a Device Manager menu item will appear in the main configuration menu
C o u n t r y < I t a l y >
L a n g u a g e < E n g >
C o m m u n i c a t i o n
P o w e r C o n t r o l
D i s p l a y
M a i n t e n a n c e
I n f o r m a t i o n
To add devices to the ZigBee Network:
Add Device Control products to the network as described in the Device Control installation guides. For further details, see:l Immersion Heater Controller Installation Guide l Plug-In Socket with Metering Installation Guidel AC Switch with Meter Installation Guidel Dry-Contact Switch Installation Guide
When selecting "Add devices" a rotating star and a message "Adding Devices" will appear.If the message "ZigBee Card Not Ready. Try again." appears, this means that the card is still initializing and you should wait and then try to add devices again.
Z i g B e e M o d u l e
N o t R e a d y .
T r y A g a i n
Chapter 3: Configuring ZigBee Communication
Home Energy Management ZigBee Card Installation MAN-01-00287-1.218

Appendix A: Technical Specifications
Appendix A: Technical SpecificationsFunctional
Number of devices in a Device Control network
Up to 10
Communications with monitoring portalSingle inverter installation - Ethernet / GSM1; Multiple inverter installation - RS485 and Ethernet / ZigBee / Wi-Fi / GSM1
RF Performance Unit
Transmit power 11.8 dBm
Receiver sensitivity -102 dBm
Antenna gain 5 dBi
Operating frequency range 2.4-2.5 GHz
Outdoor (LOS) range 400 / 1300 m/ft
Indoor range2 50 /160 m/ft
Standard Compliance
Safety IEC60950, UL60950
EMC approvals ETSI (Europe), ACMA (Australia), Telec (Japan)
Installation Specifications
Antenna, mounting bracket and RF cable Included
Dimensions (H x W x D) 22.0 x 32.9 x 4.1 / 0.9 x 1.3 x 0.2 mm/in
Protection ratingIP65 (IP20 / indoor rated when installed inside Control and Communication Gateway)
1Not to be used with SolarEdge data plan
2Approximate values, may differ depending on specific installation conditions
Home Energy Management ZigBee Card Installation MAN-01-00287-1.219

