rover lithium - companion
TRANSCRIPT

ROVERLiTHIUM
70AH POWER STATION
OWNERS MANUALPart No. 10000072

2
IMPORTANT: PLEASE READ, UNDERSTAND AND FOLLOW THIS INSTRUCTION MANUAL CAREFULLY BEFORE FIRST USE, AND STORE IT IN A SAFE PLACE FOR FUTURE REFERENCE.
SAFETY INFORMATION
• Follow the instructions within this manual carefully as to not cause harm to yourself or others
• To be repaired by qualified persons only – contact Customer Service on 1300 555 197
• This appliance is not a toy, when used by or near children, close attention is necessary, and store this appliance in a safe place, out of the reach of children
• Children should be supervised to ensure that they do not play with the appliance
• Don’t use the appliance if it has fallen or appears to be damaged
• If the supply cord is damaged, it must be replaced by the manufacturer, its service agent or similarly qualified persons in order to avoid a hazard
• This product must not be used by persons (including children) with reduced physical or mental capabilities. Also, this product is not to be used by a person who has a lack of knowledge or experience with this type of product, unless they are being supervised by a person who is competent in the safe use of this type of product
• The manufacturer accepts no liability for damage in the following cases:
- Damage to the product resulting from mechanical influences and incorrect connection voltage
- Alterations to the product without express permission from the manufacturer
- Used for purposes other than those described in the operating manual
• Never expose the power station to rain, water, snow or excessive moisture
• When charging the power station, DO NOT expose to open flame or cigarettes
• If rust, peculiar odours, overheating or other abnormal circumstances are observed, stop using the unit immediately and contact the dealer
3
70AH POWER STATION
GENERAL SAFETY
• Only use the device as intended
• DO NOT insert foreign objects into the input/output ports
• DO NOT attempt to open, repair or replace the internal battery or any parts
• DO NOT pull on the cords to unplug input/output power from the device
• Disconnect the device from all power when cleaning
• Store the device in a dry cool place
• Make sure the unit is properly secured when transporting in a motor vehicle
• Only charge, use and store the unit within an ambient temperature of 0 to 40 degrees
• Make sure the device you are connecting is switched off before you connect it
• Switch the unit off immediately if it has accidentally fallen, been dropped or was exposed to vibrations
• DO NOT move the unit if it is being charged or in use
• DO NOT operate the power station above the specified input voltage
• DO NOT use the power station if it is not functioning correctly
• Before using for the first time, charge your power station using one of the methods described in this manual
• The best thing for any battery is to use it. Don’t leave the battery sitting without being charged for extended periods of time. If you will be storing the unit without a charger, make sure it’s fully charged before storing

4
UNDERSTANDING YOUR APPLIANCE
1. ON/OFF POWER BUTTON
2. INDICATOR LIGHTS
3. 4X USB OUTPUT, 1X USB C OUTPUT
4. USB ON/OFF BUTTON
5. DC, AC OR SOLAR INPUT
6. 12V 2 PIN OUTPUT
7. 12V CIGARETTE OUTPUT
8. LED LIGHT
9. LED LIGHT POWER BUTTON
10. 12V 2 PIN POWER BUTTON
11. 12V CIGARETTE POWER BUTTON
2
14
3
4
10
5
6
11
9
8
7

5
70AH POWER STATION
UNDERSTANDING THE LCD DISPLAY
There are 3 LED lights that will advise you on the status of the power station
UNDERSTANDING THE LCD DISPLAY
The LCD display will show the total input/output in watts along with battery percentage.
If you want to calculate the Amp you can divide the watts by the volts which give you the amps.
The screen will turn off after 30 seconds to save power
USB Power Button
AC, DC, or Solar Input
Type C Output
Power Button
LED LightPower Button
USB Outputs LCD Screen
12V 2-Pin Output 12V Cigarette Output
2-Pin Power Button 12V Power Button
USB Power Button
AC, DC, or Solar Input
Type C Output
Power Button
LED LightPower Button
USB Outputs LCD Screen
12V 2-Pin Output 12V Cigarette Output
2-Pin Power Button 12V Power Button
Input LED will illuminate green when charging
Power LED will illuminate when the power station is turned on
Alarm LED will illuminate when the USB/2-Pin/12V Power buttons are turned on, the LED will flash then the power station has experienced a fault.
6
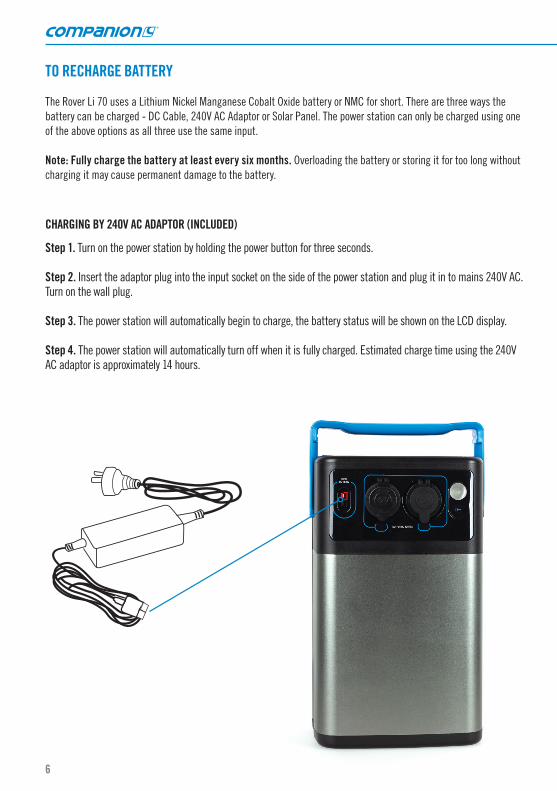
TO RECHARGE BATTERY
The Rover Li 70 uses a Lithium Nickel Manganese Cobalt Oxide battery or NMC for short. There are three ways the battery can be charged - DC Cable, 240V AC Adaptor or Solar Panel. The power station can only be charged using one of the above options as all three use the same input.
Note: Fully charge the battery at least every six months. Overloading the battery or storing it for too long without charging it may cause permanent damage to the battery.
CHARGING BY 240V AC ADAPTOR (INCLUDED)
Step 1. Turn on the power station by holding the power button for three seconds.
Step 2. Insert the adaptor plug into the input socket on the side of the power station and plug it in to mains 240V AC. Turn on the wall plug.
Step 3. The power station will automatically begin to charge, the battery status will be shown on the LCD display.
Step 4. The power station will automatically turn off when it is fully charged. Estimated charge time using the 240V AC adaptor is approximately 14 hours.

7
70AH POWER STATION
CHARGING BY DC CABLE (INCLUDED)
Step 1. Turn on the power station by holding the power button for three seconds.
Step 2. Insert the adaptor plug into the input socket on the side of the power station and the DC charger to your power source.
Step 3. The power station will automatically begin to charge. The battery status will be shown on the LCD display.
Step 4. The power station will automatically turn off when it is fully charged.
Note: Charge time will vary based on the DC power source or vehicle wiring and/or vehicle alternator, the DC capable is cable of charging at 9amps MAX.

8
Charging by Solar Panel (not included)
The power station has a built in MPPT controller so you do not need to use a solar controller. The solar panel MUST be connected directly to the power station with unregulated solar.
Step 1. Turn on the power station by holding the power button for three seconds.
Step 2. Insert the adaptor plug into the input socket on the side of the power station and other lead to your solar panel Anderson connector.
Step 3. The power station will automatically begin to charge. The battery status will be shown on the LCD display.
Step 4. The power station will automatically turn off when it is fully charged.
Note: The charging input is 12 Amp max, so a 200W panel could charge the battery in approx. 9-12 hours depending on weather.

9
70AH POWER STATION
POWERING APPLIANCES
The power station consists of multiple outputs that can be used at the same time.
Step 1. Turn on the power station by holding the power button for three seconds.
Step 2. Each power outlet have there own individual on/off buttons. Press the power button and it will allow power to that socket.
There are 3 different individual power buttons USB/USB C, 12V, 12V 2-Pin.
USB Outputs
There are 4 USB outlets with 2.4 Amp output per port and one USB Type C with 3 Amp (60W) maximum output (This will charge USB C laptops up to 60W). To use this output you need to turn on the power station and then press the USB power button to activate the power outputs.
DC Outputs
There are 2 different DC Outputs - 12V Cigarette socket 10A & 12V 2-Pin socket 10A. If using both sockets at the same time, the maximum output is 16 Amp combined. These outputs you need to turn on the power station and then press the 2-Pin/12V power button to activate the power outlets (Please note there are 2 separate button).
10
Note: The power station has the following protective functions - over temperature protection, under temperature protection, overvoltage protection, undervoltage protection, overcurrent protection, short circuit protection and incorrect polarity protection. If these are activated the alarm LED will flash on the front of the power station.
Remove all Inputs and Outputs and turn the power station off and back on.
LED Light
The power station has a useful LED light.
To power on the LED light, press light power button until light comes on. The light power button is located below the light on the back of the power station.

11
70AH POWER STATION
CLEANING INSTRUCTIONS
Step 1. Ensure the device is disconnected from the mains before performing any cleaning or device maintenance.
Step 2. DO NOT use sharp or hard objects, or cleaning agents to clean as these may damage the product.
Step 3. DO NOT use alcohol-based cleaning materials to clean the power station.
Step 4. Occasionally clean the product with a damp cloth.
MAINTENANCE
Fully charge the battery at least every six months. Overloading the battery or storing it for too long without charging it may cause permanent damage to the battery.
For further information or assistance please contact Customer Service on 1300 555 197 or email: [email protected]
DISPOSAL
Place the packaging material in the appropriate recycling waste bins wherever possible.
If you wish to finally dispose of the product, ask your local recycling centre or specialist dealer for details about how to do this in accordance with the applicable disposal regulations.
Do not dispose of any batteries with general household waste.
Return defective or used batteries to your retailer or dispose of them at collection points.

12
Situation Probable Cause Solution
Power outlets are not workingCheck power station is turned on and relevant outlet power is turned on
Turn on the power outputs by pressing theindividual power button after the power station is on.
Fridge connected but not running
Check power station is turned on Turn power station on
Check power station has sufficient charge
If low charge, charge the power station as per the user manual instructions
Check the battery monitor on the fridge is set to Low or Medium battery monitor setting
Set fridge battery monitor to the Low or Medium setting
Solar not charging the power station
Check solar is connected correctly Check all connections from the solar panel to the power station are secure
Check solar panel is set up correctly Point solar panels towards the sun. Make sure there is no inline controller/regulator before the power station
DC charger not working Check the inline fuse If fuse is broken replace with a 10A blade fuse
Alarm LED is flashing
This will be caused by either over temperature, under temperature protection, overvoltage protection, undervoltage protection, overcurrent protection, short circuit protection or incorrect polarity protection
Remove all Inputs and Outputs and turn the power station off and back on. If the warning is still there - check the current temperature. The operating temperature should be between -10 and 40°. Depending on the temperature try moving to a cooler or warmer spot
TROUBLE SHOOTING

13
70AH POWER STATION
SPECIFICATIONS
Part no. 10000072
Cell Chemistry LiNiMnCoO2 (NMC)
Capacity 70Ah
Wh (Watt hours) 850Wh
Lifecycles 800 cycles (80% Capacity Afterwards) Shelf Life 1 year
Management System MPPT
Solar Input 13-30V 12A
DC Charger 14V 9A (Max 126W)
AC Charger 16.8V 5A (Max 84W)
USB Output 4 x 5V 2.4A / 9V 2A (2.4A Max)
Type C Output
DC Output
5V/9V/12V/15V/20V 3A
1 x Cigarette Socket 12V 10A (16A Max Combined)
LED Light Output 2W
DC Output 1 x 2-Pin 12V 10A (16A Max Combined)
Charge Time 9-14 Hours
Battery Protection Yes
Ideal Operating Temp -10°C ~ 40°C
Dimensions 128 x 190 x 310mm
Weight 6.8KG
Pack Contents
Rover Li 70DC Charge CableAC Charge Cable50A Anderson to 30A Anderson Powerpole Cable

14
NOTES

15
70AH POWER STATION
WARRANTY POLICY
1. Products distributed by Adventure Operations Australia Pty Ltd and any of our subsidiaries come with guarantees that cannot be excluded under the Australian Consumer Law. You are entitled to a replacement or refund for a major failure and compensation for any other reasonably foreseeable loss or damage. You are also entitled to have the goods repaired or replaced if products fail to be of acceptable quality and the failure does not amount to a major failure.2. In addition, we warrant that this product will be free from defects in materials and workmanship under normal use as described in the published product documentation for 2 years from the date of original purchase (Limited Warranty). This Limited Warranty is only valid and enforceable in Australia and will apply only if you have purchased the product from us or our authorised resellers.3. To the extent permitted by the Australian Consumer Law and any applicable local law: (a) our obligations under this Limited Warranty are limited to the repair, replacement or refund of covered parts that prove defective under normal use during the Limited Warranty and does not extend to any claim for damages that you or any other person may have for any loss (including without limitation consequential damages or loss of profit, freight/shipping or travel costs), or damage howsoever caused whether or not such loss or damage arises as a result of any defect in the product or from the failure or omission on our part to comply with any obligation at law; (b) in replacing a defective product under the Limited Warranty, we may, at its discretion, substitute a model of equivalent nature where the exact model is unavailable; (c) this Limited Warranty does not apply to damage caused by failure and damage caused by improper use and abuse, fair wear and tear, accidents, misuse (including failure to follow instructions regarding care and maintenance of the product), neglect, disassembly, alterations or external causes such as, but not limited to, water damage, exposure to sharp objects, exposure to excessive force, anomalies in the electrical current supplied to the product (if applicable), and extreme thermal or environmental conditions; (d) we may elect, at our discretion and as an alternative to repairing or replacing a defective part to refund the cost of the relevant product upon it being returned to us; and (e) this Limited Warranty does not extend to any products acquired for the purposes of re-supply, or for use in a manufacturing, or repair processes. 4. This warranty may be claimed by: returning the product to its place of purchase, with a detailed proof-of-purchase clearly showing the date and detail of the purchase;5. If you have any questions concerning this warranty policy, you may contact us in writing: Adventure Operations, 71 Charles Ulm Place, Eagle Farm, 4009 QLD, or by email: [email protected] or visit our website: www.adventureoperations.com
TO THE EXTENT PERMITTED BY LAW, ADVENTURE OPERATIONS AUSTRALIA PTY LTD, ITS SUBSIDIARIES AND ITS VENDORS DISCLAIM ANY IMPLIED WARRANTIES OF MERCHANTABILITY OR FITNESS FOR A PARTICULAR PURPOSE OR ANY SIMILAR STANDARD IMPOSED BY APPLICABLE LEGISLATION AND ADVENTURE OPERATIONS AUSTRALIA PTY LTD AND ITS SUBSIDIARIES’ RESPONSIBILITY TO REPAIR, REPLACE, OR OFFER A REFUND FOR DEFECTIVE PRODUCTS IS THE SOLE AND EXCLUSIVE REMEDY PROVIDED TO ITS CUSTOMERS UNDER THIS DOCUMENT.

16
y
Companion® is a registered trademark ofPrimus Australia Pty Ltd
Designed & Imported by:Adventure Trading Australia Pty Ltd71 Charles Ulm Place,Eagle Farm, QLD 4009AUSTRALIA
Made in China
WARRANTY - For details see www.companionleisure.com.au/warrant